


 Jun 16, 2015, 01:28 PM
Last edit by: IB Advertising
See related guides and technical advice from our community experts:
Browse all: Air Intake and Exhaust Guides
- Mercedes-Benz C-Class: How to Replace Air Filters
Step by step instructions for do-it-yourself repairs
Browse all: Air Intake and Exhaust Guides

DIY: M271 MAF replacement

Junior Member
Joined: Feb 2011
Posts: 42
Likes: 1
From: Honolulu, HI
2005 C230
Hose clamp size
Thank you very much for this write up. I was just wondering, what size screw type hose clamp did you use as a replacement.
getting all my parts and tools ready for this weekend.")
Thanks again!
getting all my parts and tools ready for this weekend.
Thanks again!

Junior Member
Joined: Mar 2008
Posts: 19
Likes: 0
'05 c-230k,(scrapped at 97000 miles, MB unable to effect mechanical repairs) '97 c-230
Got this link from the other MB site, don't much care for rum, but have a good supply of EKU 28 on hand. For those of you who don't know what I'm talking about, EKU28 is 11.5% bier from Kulmbach Germany. And I'd love to get the ^%##$&* engineer that designed this *^%$@$%%^ to actually work on his/her own design!! Will let you know how it went. Good post w/ photos, makes things much clearer. Thought for a while that I'd have to pull the durn motor....but Germans aren't that cruel.....unlike some of their American counterparts....anyone ever change plugs on a '64 Chrysler New Yorker w/ a 383???

Super Member
Joined: May 2008
Posts: 573
Likes: 1
W203

I have a set of 3 pliers that are 12" long.
Junior Member
Joined: Mar 2008
Posts: 19
Likes: 0
'05 c-230k,(scrapped at 97000 miles, MB unable to effect mechanical repairs) '97 c-230
Ok, anyone have a tip on how to remove the vacuum line at rear of air box? Squeezed ring, got the tabs disengaged, but no joy. It will not budge. Clamp came off easy w/ long pliers. This is the only thing holding me up....Thx all!!!
P.S. Haven't even had to get into EKU 28 yet....but vacuum line might change that!
P.S. Haven't even had to get into EKU 28 yet....but vacuum line might change that!
MBWorld Fanatic!
Joined: Dec 2005
Posts: 1,055
Likes: 50
From: SoCal. Desert
'16 E350, gone: '03 c230k
Can you twist/turn it in place? That might free it up... Other than that if you're squeezing the ring in the proper places (sounds like you are) it should pop right off (keep squeezing while you pop it off).
Senior Member
Joined: Mar 2008
Posts: 426
Likes: 1
05 c230k 6spd
Ok, anyone have a tip on how to remove the vacuum line at rear of air box? Squeezed ring, got the tabs disengaged, but no joy. It will not budge. Clamp came off easy w/ long pliers. This is the only thing holding me up....Thx all!!!
P.S. Haven't even had to get into EKU 28 yet....but vacuum line might change that!
P.S. Haven't even had to get into EKU 28 yet....but vacuum line might change that!
MB World Stories
The Best of Mercedes & AMG

New Electric Mercedes-AMG GT 4-Door Coupe Unveiled: 10 Things You Need to Know
Verdad Gallardo
6 Mercedes Models That Did NOT Age Well (But Are Somehow Still Cool)
Verdad Gallardo
Manual Mercedes? 6 Times Sindelfingen Let Drivers Have All The Fun
Verdad Gallardo
Mercedes SLR McLaren 722 S Is Extremely Rare Example Modified by McLaren
Verdad Gallardo
8 Classic Boxy Mercedes Designs That Have Aged Like Fine Wine
Verdad Gallardo
Flawlessly Restored Mercedes 190E Evo II Heads to Auction
Verdad Gallardo
Electric Mercedes C-Class Unveiled: 11 Things You Need to Know
Verdad Gallardo
Mercedes EQS Gets A Major Update: Everything You Need to Know
Verdad Gallardo
5 Underrated Mercedes-Benz Models That Don't Get the Love They Deserve
Verdad Gallardo
Junior Member
Joined: Mar 2008
Posts: 19
Likes: 0
'05 c-230k,(scrapped at 97000 miles, MB unable to effect mechanical repairs) '97 c-230
 Hot damn....got the sob off!!!!
 Will probably replace the 90 degree vacuum fitting, it's kinda chewed up, old and brittle. Will post progress on reassembly when that happens...80-90 hr workweek doesn't leave much time for fun -n- games. Thx all for the support!!!
Junior Member
Joined: Mar 2008
Posts: 19
Likes: 0
'05 c-230k,(scrapped at 97000 miles, MB unable to effect mechanical repairs) '97 c-230
BTW, decided to keep original clamp, went on a hunt for hose clamp tool. Don't mess w/ autozone or similar junk, not even NAPA knew what I was looking for....go directly to Sears and tell them you want part number 9 47390 Cable operated hose clamp pliers. Now to order the MAF...
Junior Member
Joined: Mar 2008
Posts: 19
Likes: 0
'05 c-230k,(scrapped at 97000 miles, MB unable to effect mechanical repairs) '97 c-230
no joy
 Ok, installed new MAF, put it all back together, got 30mpg!! Noticed intake downtube was not properly inserted into hose, loosened up everything, got intake properly inserted into hose, reassembled everything, and now the MPG is worse....19mpg. What gives????
 I am ready to send this car to the scrap heap and make video of it being crushed in the crusher, and send video to CEO of Benz.....
Any ideas out there???/ Help!!!
PS Sears cable operated hose clamp pliar works like a charm....

Newbie
Joined: Jul 2011
Posts: 7
Likes: 0
C230K
Still too lean!
I just cleaned my MAF using your directions here. Excellent directions. it only took me about 1hr and 15min not including the time to drive to the store to get the regular hose clamp. there was no way that freaking german crazy spring clamp was going back on there.
crossed my fingers and cranked the car and it worked, but the stinking check engine light is still on.
i haven't gotten the code off yet since NAPA is closed right now... but assuming the code is still PL0171 Too Lean then what should i check next.
MAF is now cleaned, but it already looked really clean before i cleaned it. what's the next thing to check?
i already listened for vacuum leaks and dont hear any but i am no expert at listening for vacuum leaks.
please help. thanks!
Newbie
Joined: Jul 2011
Posts: 7
Likes: 0
C230K
Also, i now have another reason to not like this car.
all of the plastic parts under the hood are so brittle now and they all crack and break if you arent gentle with them. what a ridiculous joke. how can a car be made of plastic brittle parts. my car only has 70K miles on it but its plastic parts under the hood are as fragile as a 20yr old car. too much heat in there is a sure cause of this.
all of the plastic parts under the hood are so brittle now and they all crack and break if you arent gentle with them. what a ridiculous joke. how can a car be made of plastic brittle parts. my car only has 70K miles on it but its plastic parts under the hood are as fragile as a 20yr old car. too much heat in there is a sure cause of this.
Junior Member
Joined: Mar 2008
Posts: 19
Likes: 0
'05 c-230k,(scrapped at 97000 miles, MB unable to effect mechanical repairs) '97 c-230
Couple of items to address here....you should not have any problems with the spring clamp if you use the proper tool...9 47390 Cable operated hose clamp pliers from Sears, and a magnetic tool retriever to help guide it....takes approx 45 mins from start to finish to swap one of these things (MAF) out. Stealers will charge you 3-4 hrs labor....go figger. 2nd item....as per last post (5/08/2011) MPG is still crappy, and no codes are showing, even on STARS system... 2 diagnostics from stealers, 'course diagnostic from stealers don't mean nuttin'... and 1 from indy shop. I'm thinking I might have a faulty MAF from the vendor, failed enough to mess up MPG, but not enough to throw a code. Indy shop says this is possible, stealers looked at me like I was a piece of dirt....and had no answer...Still under warranty, so back it goes, and when I get the replacement MAF installed, I will post the results, probably within 5-7 days. Konaka...is your fuel mileage real crappy....18-24 mpg? If so, R+R MAF(make sure you don't forget the rubber "O" ring on the MAF), air filter, and plugs.I haven't had any luck cleaning these things (MAF), so just replace it.
DIY: Air induction assembly from grille to air box
Spark Plugs
Air filter ( Save yerself a headache.....don't use K+N oil bath filters)
Coil ignition unit
MAF
Front brakes + rotors
DIY: Air induction assembly from grille to air box
Spark Plugs
Air filter ( Save yerself a headache.....don't use K+N oil bath filters)
Coil ignition unit
MAF
Front brakes + rotors
Last edited by ulmapache; Nov 14, 2011 at 01:55 AM. Reason: More info

Newbie
Joined: Jun 2012
Posts: 1
Likes: 0
Mercedes C230 2003
I just wanted to add a couple of other tips.
Getting getting the spring loaded hose fastener off is a pain and getting it on even worse.
To remove it use this tool
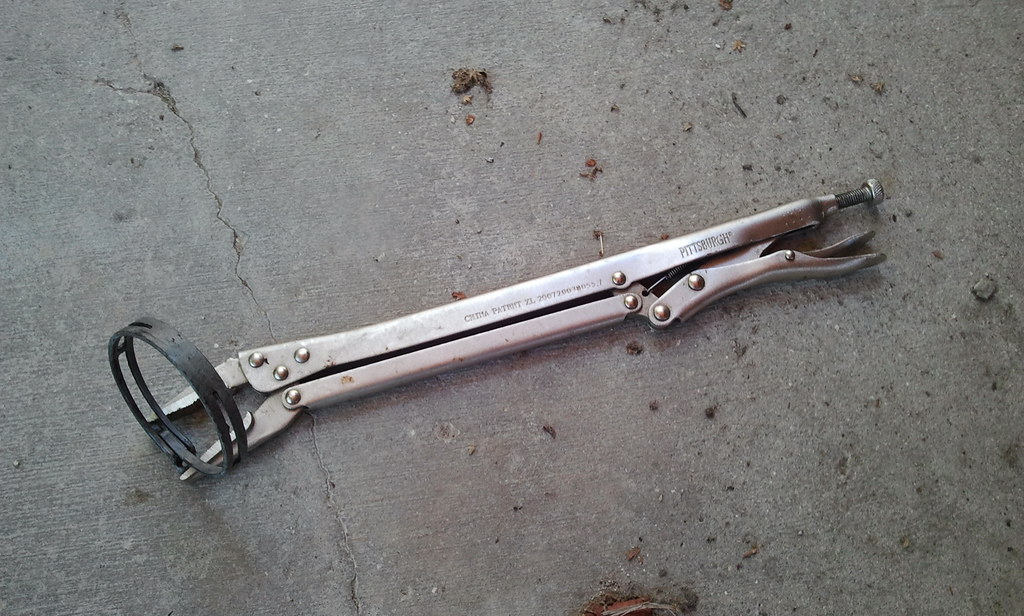
Use protective goggles as this damn spring loaded fastener can shoot off the tool.
You can use the same tool to put it back on, but be sure to fit the tool between the wiring and the body of the engine bay so
you will have room to work.

Also run a thin string through the spring loaded fastener so you can pull it up into place
one the airbox is in.

Using the spring loaded hose clap is a pain in the @#$ because when opened up it is not nice an round so it deforms the hose
and the pipe on the air box does not fit in nicely...... not to mention that it's like doing endoscopic surgery down in there....
The best thing is to get a hose fastener that you screw tight.
Be sure to pick out a nice and round one or shape it nicely before using it.
I checked mine on a drink bottle that was the right size.
One nice and round it keeps the rubber hose just the right shape for the airbox pipe to fit in smoothly.
I put a few drops of oil on the airbox pipe so it would slip in nicely.
Also to help fitting in the airbox use a bit of putty or as I did some vacuum bagging tape (sticky putty that comes in long strips).
Stick some on the two air box screws to keep them up and out of the way. Otherwise they will slip down and get caught between things and make
it really hard to fit the airbox in.
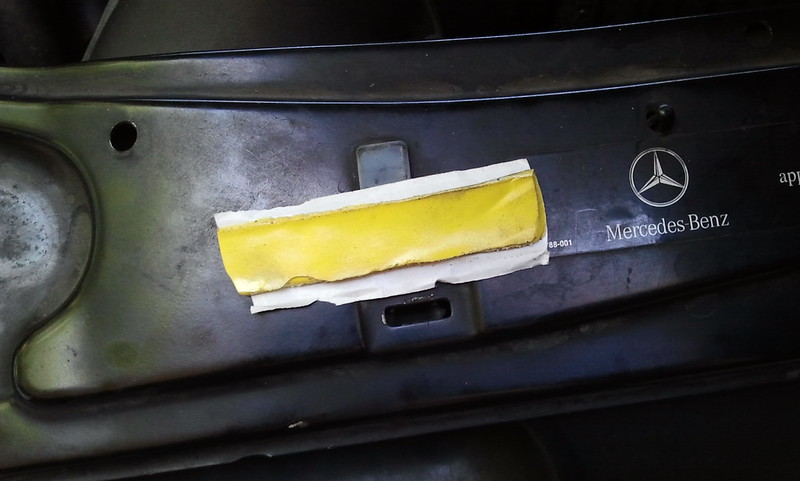
A couple of inches of vacuum bagging tape.
And here is where you put it. Leave a nice little pig tail so that you can get it off when you are ready.
It's a good idea to use this trick to make removing the box easier to.
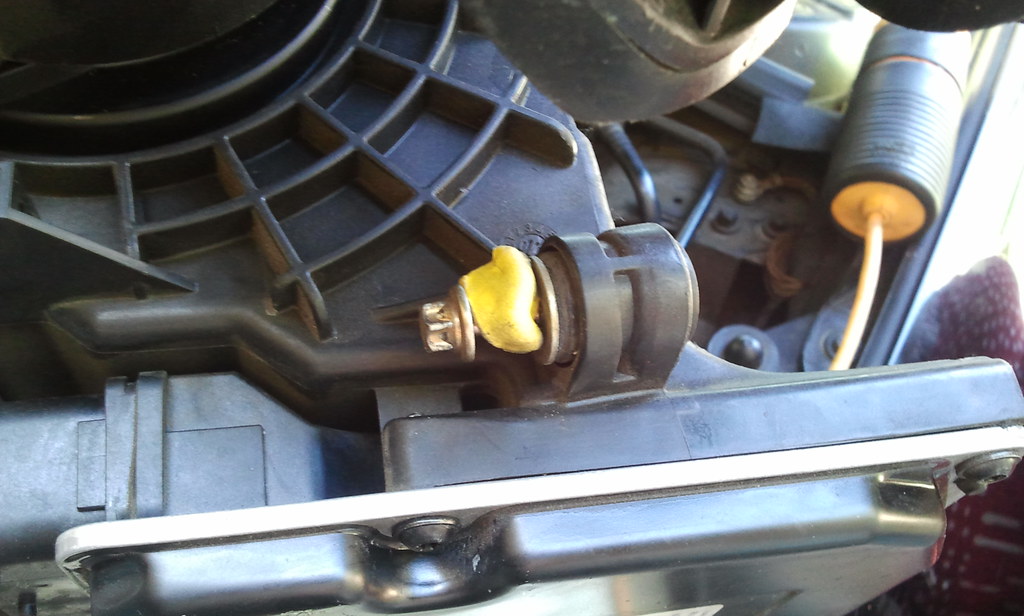
Use a magnet to raise the screws and stick some of this in there to hold the screws up.
You will need a flexible drive and a good ratchet screw driver as well as a LED light probe and an inspection mirror.
The flexible drive is so you can tighten the screw tightening hose fastener
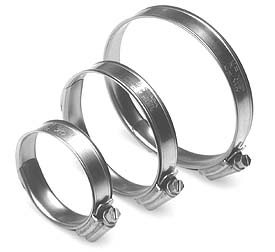
This type of fastener.
Position the fastener so that the nut/screw is pointing towards the cars computer on the side of the air box.
You will then run the flexible drive under the computer to tighten the hose fastener.
Before and half way through tightening the hose clamp inspect the fastener and hose with the LED probe light and inspection mirror.
You want everything to line up nice and snug.
Don't over tighten.
Here are the special tools I mentioned:

You can get them pretty cheap at Harbor Freight.
Hope this helps.
You can email me through my profile if you have any questions or need some extra profanity to add too
your vocab to curse the engineer that designed this car!
Getting getting the spring loaded hose fastener off is a pain and getting it on even worse.
To remove it use this tool
Use protective goggles as this damn spring loaded fastener can shoot off the tool.
You can use the same tool to put it back on, but be sure to fit the tool between the wiring and the body of the engine bay so
you will have room to work.
Also run a thin string through the spring loaded fastener so you can pull it up into place
one the airbox is in.
Using the spring loaded hose clap is a pain in the @#$ because when opened up it is not nice an round so it deforms the hose
and the pipe on the air box does not fit in nicely...... not to mention that it's like doing endoscopic surgery down in there....
The best thing is to get a hose fastener that you screw tight.
Be sure to pick out a nice and round one or shape it nicely before using it.
I checked mine on a drink bottle that was the right size.
One nice and round it keeps the rubber hose just the right shape for the airbox pipe to fit in smoothly.
I put a few drops of oil on the airbox pipe so it would slip in nicely.
Also to help fitting in the airbox use a bit of putty or as I did some vacuum bagging tape (sticky putty that comes in long strips).
Stick some on the two air box screws to keep them up and out of the way. Otherwise they will slip down and get caught between things and make
it really hard to fit the airbox in.
A couple of inches of vacuum bagging tape.
And here is where you put it. Leave a nice little pig tail so that you can get it off when you are ready.
It's a good idea to use this trick to make removing the box easier to.
Use a magnet to raise the screws and stick some of this in there to hold the screws up.
You will need a flexible drive and a good ratchet screw driver as well as a LED light probe and an inspection mirror.
The flexible drive is so you can tighten the screw tightening hose fastener
This type of fastener.
Position the fastener so that the nut/screw is pointing towards the cars computer on the side of the air box.
You will then run the flexible drive under the computer to tighten the hose fastener.
Before and half way through tightening the hose clamp inspect the fastener and hose with the LED probe light and inspection mirror.
You want everything to line up nice and snug.
Don't over tighten.
Here are the special tools I mentioned:
You can get them pretty cheap at Harbor Freight.
Hope this helps.
You can email me through my profile if you have any questions or need some extra profanity to add too
your vocab to curse the engineer that designed this car!
Last edited by FredBGG; Jun 30, 2012 at 07:29 PM.
Member
Joined: Nov 2011
Posts: 195
Likes: 1
From: Manchester, ME
10' C300 Sport and 07 Ducati S2R
Where were you about an hour ago??! LOL... I just used my dremel tool and cut it off, and replaced with a stainless steel hose clamp... Great pictures and GREAT advice... btw, that is a mean looking set of pliers!

Super Member
Joined: May 2009
Posts: 904
Likes: 22
From: Toronto, Ontario, Canada, eh!
2003 C230 Sports Coupe, Paprika Metallic Red, Auto, Pano, Leather
Unfortunately, the Sears in Canada does not carry the #9-47390 Cable operated hose clamp pliers that ulmapache recommends:
Craftsman Cable Operated Hose Clamp Pliers - SearsItem# 00947390000 | Model# 28650-998
http://www.sears.com/craftsman-cable...1&blockType=G1
After some research, I found another good cable operated hose clamp plier that is more readily available internationally and I would recommend it. It's the Astro Pneumatic model# 9409A Cable Operated Hose Clamp Pliers by Astro Pneumatic,.... available in automotive tool stores, ebay and amazon,... make sure to get the model# 9409A with the "A",... it's the latest and greatest updated stronger version.
Last edited by SunnyRayToronto; Oct 9, 2012 at 01:41 AM.

Junior Member
Joined: Sep 2011
Posts: 27
Likes: 0
w203 2005
Can you not just remove the airbox forward and leave that back hose part in place? It seems insane to ahve to remove the entire assembly. Guys, I know this is an old thread but I thought I'd add to the discussion as that pressure clamp has me sh#tting myself at the thought. My mechanic suggested that he took out the MAF and "cleaned it 3 times" Seems a little far fetched to me. Can you spray that stuff straight down the gurgler or is that asking for engine trouble?
Super Member
Joined: May 2009
Posts: 904
Likes: 22
From: Toronto, Ontario, Canada, eh!
2003 C230 Sports Coupe, Paprika Metallic Red, Auto, Pano, Leather
If you look at post# 25 from Casper_C230, there's a good photo of the MAF with the metal plate and probes that need to be sprayed,... those are behind a thick plastic mesh on the air filter housing side of the MAF sensor. Spraying through that mesh,... you'll need a lot of spray,... and you need to make sure its dry before you start the car.
Its best to take out the MAF sensor and then spray it with specialized CRC SensorKleen,...
I don't think its a good idea to take the short cut your suggesting,.... just get the cable operated hose clamp I recommended or a long bent needle nose plier,.... and a lot of patience,.... Its not worth risking engine/MAF sensor/supercharger/throttle body problems just to save yourself a few minutes and a few bucks.
Junior Member
Joined: Sep 2011
Posts: 27
Likes: 0
w203 2005
What are your thoughts on this response?
Hi Adam,
They are a bit tricky to take out. There's a thin black pipe behind the air flow pipe that needs to be loosened. Once that's done after taking out the two top screws you can get access to the one at the bottom. With a little patience you should be able to pop it out and pop the new one back in. You can take the air filter out of its box to see what your doing might make things a little easier.
Regards
Jay
Does that suggest the air bog can slide forward on it's grommets and be removed without having to remove the entire rear unit? How far does it have to slide back before it coems off the grommets? Is it only a CM or so?
Junior Member
Joined: Sep 2011
Posts: 27
Likes: 0
w203 2005
Success! I've followed the logic I was saying and pushed the airbox back toward the firewall after 'removing' the two torx bolts from it's rear. The only tricky thing was getting the underneath screw out of the MAF itself. The unit just popped out the front without the nightmare of removing the lower pipe.
Unfortunately the thing is clean as a whistle so it looks like I'll be replacing it.
I'll test it once it's back in the car, see what it's doing.
Unfortunately the thing is clean as a whistle so it looks like I'll be replacing it.
I'll test it once it's back in the car, see what it's doing.

Member
Joined: Jul 2012
Posts: 82
Likes: 0
C180 Kompressor Wagon
What exact tool did you use to access the lower, 3:rd screw of the MAF? Its very tight back there.
The scary hose clamp can be removed with a medium sized polygrip (but either remove the engine bay underpan or attach the polygrip to a string so you can retrieve it when you drop it.)
The scary hose clamp can be removed with a medium sized polygrip (but either remove the engine bay underpan or attach the polygrip to a string so you can retrieve it when you drop it.)
Junior Member
Joined: Sep 2011
Posts: 27
Likes: 0
w203 2005
I managed to get a torx driver in there and could lift the airbox up enough to get my hand in and locate the screw from the other direction. Kind of a vulcan death grip, but it wasn't really that bad.


