


C63 diffuser on w203

Junior Member
Joined: Jul 2008
Posts: 33
Likes: 4
From: Hong Kong
W212
MBWorld Fanatic!


Joined: Jan 2008
Posts: 3,597
Likes: 18
From: So Cal... In between LA and OC
2005 CLK320 Vert & 2005 CLK55 AMG
Has anyone done their diffuser in Carbon Fiber yet?? i really want to see how that looks.... i might have to get one just to try it out...
MBWorld Fanatic!
Joined: Jan 2008
Posts: 3,597
Likes: 18
From: So Cal... In between LA and OC
2005 CLK320 Vert & 2005 CLK55 AMG
MB World Stories
The Best of Mercedes & AMG

8 Oddball Mercedes Ideas That Actually Made it to Production
Verdad Gallardo
Dubai Tuner Gives the Mercedes G-Class An Entirely New Look
Verdad Gallardo
Six Gift Ideas Your AMG Loving Dad or Grad Will Cherish

7 Craziest Things AMG Gas Ever Built
Verdad Gallardo
New Electric Mercedes-AMG GT 4-Door Coupe Unveiled: 10 Things You Need to Know
Verdad Gallardo
6 Mercedes Models That Did NOT Age Well (But Are Somehow Still Cool)
Verdad Gallardo
Manual Mercedes? 6 Times Sindelfingen Let Drivers Have All The Fun
Verdad Gallardo
Mercedes SLR McLaren 722 S Is Extremely Rare Example Modified by McLaren
Verdad Gallardo
8 Classic Boxy Mercedes Designs That Have Aged Like Fine Wine
Verdad GallardoSuper Member
Joined: Jul 2006
Posts: 691
Likes: 0
From: FT POLK LOUISIANA
1992 Toyota Corolla, 1994 Chevy C1500, 2002 C32, 2012 Prius, 2013 Toyota Sienna
+1 and agree.
Well, is look great on black color car, if u wants to get this, get the C55 rear diffuser not the C32 one, coz will save u lot for time to install..and I need to let Teo to know this, on the left side is fix perfect but the right side is not at all couse is too hard, u need to cut out the exhaust part then u can fix in to the bumper. But i love this so much, Thank Teo.

MBWorld Fanatic!
Joined: Jan 2008
Posts: 3,597
Likes: 18
From: So Cal... In between LA and OC
2005 CLK320 Vert & 2005 CLK55 AMG
MBWorld Fanatic!
Joined: Jan 2008
Posts: 3,597
Likes: 18
From: So Cal... In between LA and OC
2005 CLK320 Vert & 2005 CLK55 AMG
Super Member
Joined: May 2006
Posts: 546
Likes: 10
From: Cumberland, RI U.S.A.
2005 C230WZ SS Capri Blue/Ash
Finally Installed Mine
Guys,
Finally installed my diffuser. I replaced the 3M tape Teo put on the back of the diffuser with similar 3M tape, only it's wider and felt stickier. Install went smoothly, and by the looks of it, I didn't have to use any silicone. I was originally just test fitting it, then figured I'd remove the tape backing and fully install it. Looked great, but it was lifting a little bit, and that when I decided to remove Teo's tape and use the wider stuff.
As other people mentioned in the thread, the diffuser matches up really well. My only issues are with the right side where it curves. The diffuser is a little bit short and doesn't follow the bumper cut line exactly. It's barely noticeable and no one will ever see it unless they're on their knees looking at it.
I also decided against cutting my bumper to match the diffuser's cut out on the left side (I have the single exhaust cut out). Unlike Chad's white car, which made it super noticeable, mine is Capri Blue, and I was surprised at how you can't really notice it's not cut to match the opening. The other positive is that my exhaust came OEM from the factory a little bit off center from the OEM bumper cut out. It's a bit over to the right. This ended up working out perfectly because now, the exhaust is perfectly centered with Teo's diffuser cut out.
Pics to come in a day or so, as I'm still clamping a few minor spots.
Cintoman

Senior Member
Joined: Feb 2004
Posts: 252
Likes: 0
From: CT


 I am interested in the C32 version...is there a difference in price? What is the price?
Super Member
Joined: May 2006
Posts: 546
Likes: 10
From: Cumberland, RI U.S.A.
2005 C230WZ SS Capri Blue/Ash
Cintomans' Single Side Diffuser Pics
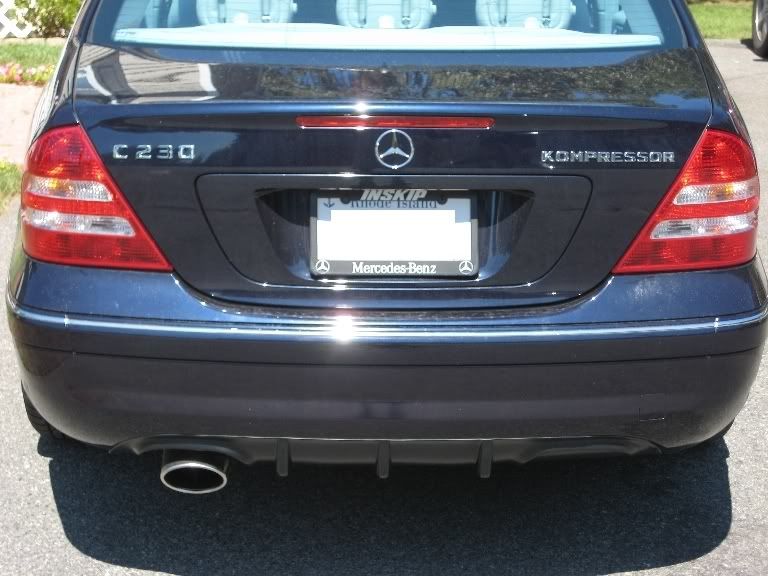
Well, I was finally able to take some quick pics of the diffuser on my car. Please pardon the major dirtiness of my car. I spent most of the day detailing a friend's car while mine is all dirty.
I'd like to mention that I'm going to be removing the diffuser and re-installing it. The wider 3M tape I used still doesn't hold it in some places, so I'm going with this other 3M tape that's supposed to be much stronger. It's called 3M Acrylic Plus Tape 06384. The cool thing about this tape is that it's black versus the standard light gray 3M tape. Plus I'm also using 3M Automotive Adhesion Promoter 06396 which you apply to both surfaces prior to attaching the tape. We'll see how it goes. Should be fun trying to remove the diffuser, since it's pretty well stuck in 95% of the bumper.
Anyways, here are the pics. Like I mentioned before, I decided against cutting the rear bumper, and it's really difficult to see the mismatch unless you're on your knees looking straight into the exhaust. Thanks to my Capri Blue color. But what do you guys/gals think? Is it THAT noticeable?

The exhaust is now very close to centered within the diffuser's cutout. Plus I don't think it's hanging low.
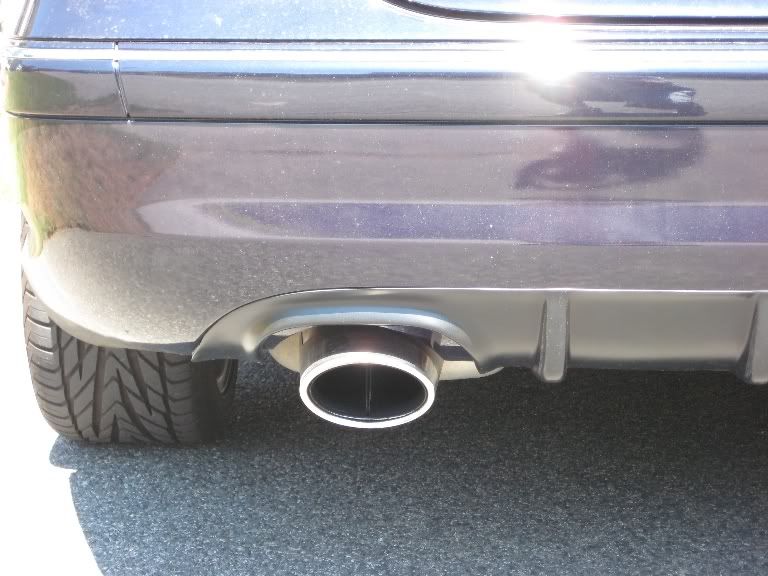
While the diffuser is out, I'm also going to fix some of the small fitting issues. Each end of the diffuser tends to overhang (or is it underhang) past the end of the bumper on the very bottom, which is a bit noticeable from the sides (see last pic). Plus the same thing on the rest of the diffuser. I want to remove some of it so it's flush with the bottom cutout/end of the OEM bumper.
What do you all think? Suggestions. Comments. Again please pardon the appearance of the diffuser unsticking on the left side above the exhaust.
Thanks,
Cintoman


Senior Member
Joined: Jan 2008
Posts: 292
Likes: 2
From: Plymouth, Devon, England
Mercedes Benz C200K Sport Edition and 04 C55 AMG
[QUOTE=Cintoman;3027353]Hey Frank and everyone else,
Well, I was finally able to take some quick pics of the diffuser on my car. Please pardon the major dirtiness of my car. I spent most of the day detailing a friend's car while mine is all dirty.
I'd like to mention that I'm going to be removing the diffuser and re-installing it. The wider 3M tape I used still doesn't hold it in some places, so I'm going with this other 3M tape that's supposed to be much stronger. It's called 3M Acrylic Plus Tape 06384. The cool thing about this tape is that it's black versus the standard light gray 3M tape. Plus I'm also using 3M Automotive Adhesion Promoter 06396 which you apply to both surfaces prior to attaching the tape. We'll see how it goes. Should be fun trying to remove the diffuser, since it's pretty well stuck in 95% of the bumper.
Anyways, here are the pics. Like I mentioned before, I decided against cutting the rear bumper, and it's really difficult to see the mismatch unless you're on your knees looking straight into the exhaust. Thanks to my Capri Blue color. But what do you guys/gals think? Is it THAT noticeable?
The exhaust is now very close to centered within the diffuser's cutout. Plus I don't think it's hanging low.
While the diffuser is out, I'm also going to fix some of the small fitting issues. Each end of the diffuser tends to overhang (or is it underhang) past the end of the bumper on the very bottom, which is a bit noticeable from the sides (see last pic). Plus the same thing on the rest of the diffuser. I want to remove some of it so it's flush with the bottom cutout/end of the OEM bumper.
What do you all think? Suggestions. Comments. Again please pardon the appearance of the diffuser unsticking on the left side above the exhaust.
Thanks,
Cintoman
Bet you are glad you didn't use black sealant first time round as would be difficult to remove. When you are done with the minor jobs and happy with the fit, as i suggested in previous thread i would just use black sealant. Don't know why you want to mess around with tape as it wont stick at 100% due to the moulding not being a correct fit.
Super Member
Joined: May 2006
Posts: 546
Likes: 10
From: Cumberland, RI U.S.A.
2005 C230WZ SS Capri Blue/Ash
Bet you are glad you didn't use black sealant first time round as would be difficult to remove. When you are done with the minor jobs and happy with the fit, as i suggested in previous thread i would just use black sealant. Don't know why you want to mess around with tape as it wont stick at 100% due to the moulding not being a correct fit.
To be honest tudu, I'm a bit nervous about using the black sealant, when you mentioned in your thread to make sure I have a bunch of turpentine and mineral spirits. But maybe you (and anyone else that used the sealant) can help me out with some concerns I have using the sealant. Ideally, I think the sealent would work out the best, but again, I don't want to slop the stuff, get it all over my bumper, and make a total mess out of it, while still not achieving my goal of it matching the bumper cutout perfectly.
Here's my concerns:
Now that I have the black tape and adhesive promoter is coming soon, I'll probably use both the tape and the sealant. Since the tape is black, I was thinking about putting it on the leading edges of the diffuser, and then using the sealant along the inside of the diffuser. Suggestions? Should I do it this way, or install the tape more towards the inside of the diffuser and use the sealant along the outer edges. Basically, I want the top edge of the diffuser to match up exactly and tightly with the cutout line along the bumper. Right now, the diffuser is on and matches the cut line nicely. But there are some areas that the diffuser is more tightly stuck to the bumper. As such, the grey tape is not noticeable, but other areas it's not as tightly stuck, and you can see the grey tape. It's not unsticking, but just not as tight. Basically, on these areas, if I pressed my fingers to the diffuser, it would push in and fit more tightly. But when I let go, eventually, it won't be as tight. BTW, I put my expert ms paint skills to good use and threw together a quick pic showing both methods. Any suggestions on what's better/cleaner looking?
If I use the sealant on the outside edges and the tape on the inside, should I make a bead line with the sealant on the diffuser first, then press it to the bumper, or should I stick the diffuser on the bumper with the tape, then use the sealant along the edge next and press it on? Doing it either way makes me think that the sealant will be squirting out onto the bumper once the diffuser is pressed in place, which might be a bit messy to clean up. How thick of a bead line should I make?
How do you keep the diffuser pressed firmly to the bumper? My fear is that I'll put the sealant on press the diffuser in place, hold it firmly as best I can with my 2 hands, but then come back only to see that part of the diffuser moved away from the bumper, and now it's impossible to press it back in place because the sealant hardened? Suggestions? Or do I need 5 guys (10 hands) to hold this in place while the sealant hardens? About how long does it take to harden?
Sorry so many questions....
Looking at it now, I can see where you can say the exhaust is a bit lower. Raising it up won't really work without cutting the OEM cutout a bit. But I see what you mean. I'm thinking it's acceptable to me for now.
Thanks guys !!
Cintoman


