
DIY - Fuel Filter Replacement

 10-08-2011, 06:32 PM
#126
Senior Member
Join Date: Jul 2010
Location: Charleston, SC
Posts: 250
Likes: 0
Received 0 Likes
on
0 Posts
2005 C230K
Successfully relieved the pressure but can't seem to get those hose clamps off. I've tried cutting, prying, and pulling with pliers, a flat-head screwdriver, aviator snips, and snub-nose cutters. Can't seem to do anything with them. Any suggestions?
Going to get out there and try again tomorrow.
Going to get out there and try again tomorrow.
 10-08-2011, 10:48 PM
#127
MBWorld Fanatic!

The hoses can be stuck on the bibs of the filter pretty good. Don't try to cut the hoses. You shouldn't need to do that. Just keep trying to pry them off. Grab the hose with a pair of pliers and try to turn the filter back and forth till it gets unstuck. You can pry the hose off the barb. Mine were pretty soft and I was afraid of tearing the hose. Try to be a little careful so you don't tear the hose. They can be a real pain. The pressures on some of the lines are pretty substantial so the hose clamps tend to be tight and the hoses end up getting stuck. Keep working at it. They'll come off.
Remember to get the "fancy" hose clamps. At AdvanceAuto where I go, they have clamps for fuel injection hoses. I think they're much better than the standard worm gear type (which are fine for almost any other application). Just get a pack of the two smallest sizes. IIRC, you'll need two of the smallest and two of the next size up.
You should also get ready to clamp the hose to the gas tank so it doesn't pour out while you're changing everything! Make sure you tighten the clamps well and test it before you put the under panels back on. You don't want to find out that you have a leak after you've taken the time to put all those panels back up.
Good luck and let us know how it went!
10-09-2011, 01:36 PM
#128
Senior Member
Join Date: Jul 2010
Location: Charleston, SC
Posts: 250
Likes: 0
Received 0 Likes
on
0 Posts
2005 C230K
Thanks for the advice. Got ready to go out there and start working about an hour ago and it started raining right when I walked outside, so I may have to wait 'til next weekend.
11-07-2011, 01:32 PM
#129
Newbie

Join Date: Dec 2010
Location: Toronto, ON
Posts: 10
Likes: 0
Received 0 Likes
on
0 Posts
2004 C230 Kompressor SS 6MT
Just a FYI...
Went to the dealer to return my fuel filter today...got there at 12:35pm to find out that parts takes lunch from 12-1 so I had to wait half an hour. Told the parts guy that I wanted to return the filter and he said since I didn't have the original packaging that he could not do anything until the parts manager got in on Mon. I told him that I live 40 miles away, he said there was nothing he could do. I asked for the service manager (he said he wasn't there), then the general manager. The GM came and said that they would have to test the fuel filter first (how he was going to do that I'm not sure). He came back after talking to a technician and asked exactly what the symptoms I was having. I told him that I was getting a high pitched humming noise, he said that the tech had only seen one other defective filter and it was making that exact sound. The GM said they will reimburse me via the mail.
Went to the dealer to return my fuel filter today...got there at 12:35pm to find out that parts takes lunch from 12-1 so I had to wait half an hour. Told the parts guy that I wanted to return the filter and he said since I didn't have the original packaging that he could not do anything until the parts manager got in on Mon. I told him that I live 40 miles away, he said there was nothing he could do. I asked for the service manager (he said he wasn't there), then the general manager. The GM came and said that they would have to test the fuel filter first (how he was going to do that I'm not sure). He came back after talking to a technician and asked exactly what the symptoms I was having. I told him that I was getting a high pitched humming noise, he said that the tech had only seen one other defective filter and it was making that exact sound. The GM said they will reimburse me via the mail.
11-08-2011, 10:26 AM
#130
Newbie
Join Date: Dec 2010
Location: Toronto, ON
Posts: 10
Likes: 0
Received 0 Likes
on
0 Posts
2004 C230 Kompressor SS 6MT
Hints and Tips
Alright, having just done this job twice, here are some hints for making it go alot easier:
- If you buy the filter from the dealer, they will also sell you all the appropriate hose clamps for a few bucks (ones you can attach yourself, not the weird ones that come from the factory), just ask.
- If you can, let your car sit for a few hours before starting the job. Back it onto some ramps then go do other stuff for a while. The pressure in the fuel system will just go down on its own, no need to bleed anything or have fuel spray in your face when you pull the hoses off.
- If your car still has the original filter installed, remove the factory clips by wedging a thin blade flathead screwdriver under the point where they fasten and lifting/pushing. Don't be afraid to really give it hell, they will pop, then just bend them apart, they aren't reusable.
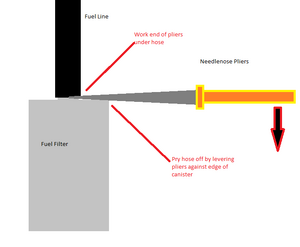
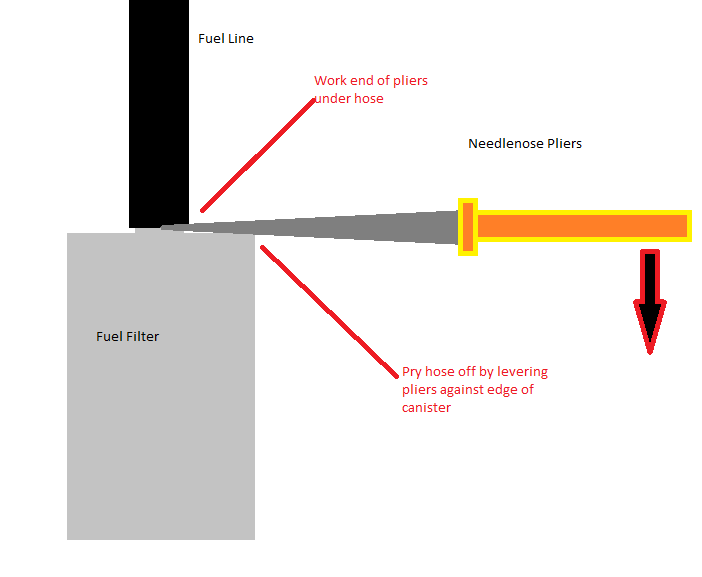
- Remove the hoses from the old filter by using a pair of needlenose pliers (see attached diagram).
- Remove the old clamps from the hoses and slide the new ones on. Hey, some people may forget.
- Spray some silicone lube or equivalent on the new filter where the hoses attach, it will make sliding them on very easy. Like anything involving a coupling, lubrication is critical.
- Tighten down the new clamps. Don't be afraid to tighten all the way, you won't damage the hoses.
- Put everything back together and go. Turn the key to position 2 for a few seconds for the fuel pump to build pressure, the engine should start with no more than a few turns extra.
Last edited by potmat; 11-08-2011 at 10:30 AM.

 03-14-2012, 01:03 AM
#133
Junior Member

I recently did this job on my '05 M271 after checking out this post. I just wanted to add a few things.
I waited about 36 hours from the last time I had driven the car to do this and there was no pressure built up in any of the lines I removed, so I didn't need to mess with the schroeder valve under the hood, nor did I remove the tank cap.
On mine, two of the four hoses needed two be clamped, the one to the tank and the one to the engine. I only had one decent clamp, so I clamped the one leading to the engine and just quickly switched the canister from the old to the new when it came to the one leading to the tank. I would say to leave the filter canister strapped to the chassis until all 4 hoses have been unclamped and broken loose, but not yet removed. The OEM clamps were pretty easy to remove after inserting small needle nose pliers into the little clamp mechanism and prying and twisting. It took me a long time to get the hoses broken loose from the canister as they were stuck on pretty well, though. I used a very large screwdriver to pry against the filter housing, similar to the graphic in the above post. I got pretty rough with them but once all 4 were unstuck the project was pretty easy from there.
I would second the idea of spraying the filter nipples with silicone or similar as the tank hose especially was very difficult to put on all the way. I got my filter from autohausaz and I didn't get any noise or anything after the replacement. I had a variety pack of fuel injector hose clamps that I used as the replacements.
Last edited by Z71Man; 03-14-2012 at 01:18 AM.
03-22-2012, 03:58 PM
#135
Super Member

Something no one has brought up but I have seen in DIY for fuel filter changes for other vehicles; would pencils work to plug the fuel lines to keep gas from spilling out while working on the install? I have read this is an effective alternative to using clamps until you can get all of the fuel lines plugged in appropriately to the new filter.
03-22-2012, 04:59 PM
#136
MBWorld Fanatic!
Something no one has brought up but I have seen in DIY for fuel filter changes for other vehicles; would pencils work to plug the fuel lines to keep gas from spilling out while working on the install? I have read this is an effective alternative to using clamps until you can get all of the fuel lines plugged in appropriately to the new filter.
Ha...
Curious though, when bleeding from the shrader valve, you still get fuel spewing everywhere, and now it spewing into the engine, which seems worse than the other alternatives.
I did wait a while, and I still had some pressure in the lines, I did clamp them as it says to do via the WIS, you can buy special fuel line clamps, but I did have some concerns about damaging the hoses.
http://www.walmart.com/ip/OTC-4506-F...p-Set/16481296
Putting pencils in, is a kinda after the fact approach.
Hard to beleive replacing a filter has resulted in a 6 page
thread.
I remember when I 1st posted, how the hell do you get those clamps off, I got NO response for such a long time. I guess I must've been one of the 1st to do it.
 05-05-2012, 09:26 PM
#138
Newbie

Join Date: Apr 2006
Posts: 13
Likes: 0
Received 0 Likes
on
0 Posts
suggestions?
I recently replaced my fuel filter with a Mahle one. On my first try, I used these to clamp (http://shop.advanceautoparts.com/web...A|GRP2014_____) but they leak badly on the input side (spraying everywhere) and when I wiggle one of the output lines, they leak too..
I replaced them with these (http://shop.advanceautoparts.com/web...A|GRP2014_____) and they are fine now I think. Are these the right clamp? How much do I need to tighten usually for these clamps? One of the bigger hose on the output side is still clamped with the 14-16mm clamp, but it is not leaking.. Should I replace it with the OEM Mercedes ones? I was going to go with that, but I started the job too late and the parts department was closed..
Also, with the car idling and me staying underneath the car (without the belly pan), I can hear a slight hissing coming from the fuel filter. Is this normal? The car currently doesn't have any CEL, but I haven't driven it around yet.. It was getting dark so I thought I will continue tomorrow morning..
Thanks beforehand guys..
05-06-2012, 01:11 AM
#139
MBWorld Fanatic!
Thread Starter
Most likely the 3/8" clamps were too large diameter and couldn't clamp the hose well enough while the 1/4" are able to keep things tight.
I seem to remember the filter making a slght noise when the car was running, but maybe more like a humming?
I seem to remember the filter making a slght noise when the car was running, but maybe more like a humming?
 09-15-2012, 06:23 PM
#142
Super Member

MB part# - size - clic-R clamps & plier - how to
These are some really funky hose clamps,.. Clic-R is the brand name.
Mercedes-part#: quant/price/size/inch/mm-diametre
A005-997-19-90 x1 $2.94 3/8" 0.375" 9.83mm
A006-997-18-90 x2 $2.36 1/2" 0.5" 12.70mm
A003-997-57-90 x1 $3.77 5/8" 0.625" 15.88mm
NOTE: price in Canadian dollar from Mercedes-Benz Stealerships in Canada,... likely cheaper in USA,... as usual!
NOTE: For size, I'm referring to outer diameter of tube for which the Clic-R hose clamp would lock onto. Prices are Mercedes-Benz Stealership prices in Canada,... likely lower in USA.
Yes, not only do these Clic-R hose clamps tighten but they also lock so they can not become loose over time. These are stainless steel hose clamps,... and should be reusable. Personally, I would recommend using or reusing the Clic-R hose clamp over the fuel injection hose clamps. You can buy a Clic-R plier for about $15-60; they're simple to use to lock and unlock these Clic-R hose clamps.
See diagram to understand how Clic-R hose clamps work. At 12 o`clock position is a triangular hook, at 3 o`clock position is the catch for the hook. The Clic-R plier (in lock position) pinches at the base of the hook and catch together until they lock. To unlock, the Clic-R plier (in unlock position - just flip it over) pinches at the base of the hook and catch and shift the hook over the catch to unlock it. Lock and unlock position of the Clic-R plier is simply done by flipping the plier around.
A lot of posters seem to be having difficulties trying to get the Clic-R hose clamps off. You do NOT need a Clic-R plier,... use something like a wire-nail cutter plier, end cutter plier, even a pruning shear should work. You just needs to pinch the base of the hook and catch together to lock it,... you will hear it click. To unlock it, do the same thing but you will need something like a small precision flathead screwdriver to jimmy the hook up, over and away from the catch.
NOTE: Top 2 clic-r clamps in first photo are actually the same 1/2" size, just that top-left one is In open-unlocked position while top-right one is in closed-locked position.
NOTE: little arrow on Clic-R plier in photo shows if its in locking or unlocking mode
Last edited by SunnyRayToronto; 09-15-2012 at 09:27 PM.
10-08-2012, 08:25 PM
#144
MBWorld Fanatic!
About every 50K miles. I believe the maintenance manuals are available. It's a good idea to have a copy if the one that came with your car is missing.
10-08-2012, 09:35 PM
#145
Super Member
With ethanol blended gas in mind,.... I would suggest every 39K miles (60,000km) only because you'll be underneath the car anyways to do your partial transmission oil change at that time.
12-28-2012, 01:32 AM
#146
Newbie

Join Date: Dec 2012
Location: New Jersey, USA
Posts: 1
Likes: 0
Received 0 Likes
on
0 Posts
2007 C350 Luxury 4Matic
Oetiker Clamp Install and Removal Video
Hi,
I found this link which might be useful for this procedure. The key is using the special pliers which is about $20 US.
Good luck!
http://www.eaavideo.org/video.aspx?v=10529461001
Rob-Guy
I found this link which might be useful for this procedure. The key is using the special pliers which is about $20 US.
Good luck!
http://www.eaavideo.org/video.aspx?v=10529461001
Rob-Guy
Last edited by Rob-Guy; 12-28-2012 at 01:36 AM.
06-16-2013, 11:03 PM
#148
MBWorld Fanatic!
Thread Starter
Suggestion for getting those stuck hoses off - try grabbing the hose with a pair of pliers and twisting it on the nipple. Use just enough pressure to grab the hose - not enough to bend the nipple. You can usually break the hose free this way then just pull it off.
09-01-2013, 06:39 AM
#150
MBWorld Fanatic!
Join Date: Dec 2003
Location: Vancouver, BC, Canada
Posts: 3,127
Likes: 0
Received 211 Likes
on
202 Posts
2003 C230K Coupe Orion Blue
Finally performed this procedure on my car. According to the service pdf, they recommend 120,000 km. Not sure why some of you are saying to do it earlier.
The job took about 1h, including clean up. Tools you need:
10mm socket - to loosen underbody panel
2 hose clamps - these go on the ports marked tank and motor iirc. I just remember that 1 hose leaked per side.
T25 Torx driver for removing fuel filter
Tool for removing hose clamps - either a Clic-R tool, or the 2 flat head screwdrivers mentioned
Paper towels to soak up the giant puddle of gasoline as you remove the filter - inevitable even with hose clamps, as the filter is completely full when you do this
Optional tool - small file to enlarge underbody panel screw hole if needed
I just used the factory jack with a couple of pieces of plywood, and raised the car all the way. So high, that the front left wheel also left the ground. I slipped the spare tire underneath the rear left for safety, but also placed a jack stand under the differential. It was a bit uncomfortable, but the clearance was sufficient to crawl under and do this task.
The fuel that spilled out of the filter was brown - reminded me of muddy water you'd find in a puddle. Then again, I have no idea what colour gasoline is normally, so who knows.
Tips:
Don't start your car for a few hours before going this, so the fuel pressure is minimized. The amount of gasoline that came out through the Schrader valve was a tiny dribble - half a paper towel was more than enough to soak up everything.
The underbody panel does not need to be fully removed at all - use a 10mm hex and remove the 2 screws nearest the back wheel, then pull the end of the panel towards the ground. You'll have to force the panel downwards (ie reef on it) if the panel is slightly misaligned - don't worry, these panels are tough. I found I couldn't pop the panel back into the mounting points afterwards because of this misalignment, but this was easily fixed with a circular file after I saw where the screws were catching, and filed away the part of the panel that interfered. Took 10s. Be sure not to file away too much of the panel! However, if you do, it's no biggie as the points do not hold more than the weight of the panel. And it makes removing the panel way easier the next time.
To remove the factory Clic-R clips, I was able to get most of them off with a flat head screwdriver. For a couple of the stuck ones, I used a much smaller flat head (like the ones you'd use taking apart electronics), and literally stuck it into the hole in the clip (where the latch is) and cranked. Having the correct tool would be quite useful.
I bought 4 hose pinchers and used all 4, but I think you only need to clamp 2, which is the "bigger" hose on each side of the filter. Not sure where all the hoses go as I didn't read the full schematic. However, the smaller one on the L side only goes to the charcoal filter, and seems to only carries vapour. How do I know this? That hose clamp fell off during my install, and nothing came out.
The hoses are easiest removed from the filter while the filter is still bolted in. I used a flathead screwdriver, and reefed on the hose clamp while wiggling and twisting (the twisting is key) each hose.
I used 2 11mm fuel injector hose clamps (recommended over regular hose clamps as the sides are smooth and not grooved), and 2 13mm clamps from the stealer. Worked perfectly. You can buy from the stealer, or any home improvement shop. With that said, if I were to do this job again, I would use the proper Clic-R fasteners.
Last edited by slammer111; 01-03-2024 at 08:05 AM.


