C-Class (W203) 2001-2007, C160, C180, C200, C220, C230, C240, C270, C280, C300, C320, C230K, C350, Coupe

Another **DIY** By Evolved8: W203 Rear Diffuser Install Pictures+10 Easy steps

Thread Tools
 
Search this Thread
 
Rating: Thread Rating: 3 votes, 5.00 average.
 
Old 03-04-2010, 10:57 PM
  #1  
MBWorld Fanatic!
Thread Starter
 
Evolved8's Avatar
 
Join Date: Nov 2009
Location: Columbus, OH
Posts: 1,556
Likes: 0
Received 6 Likes on 6 Posts
Evo VIII/E55 AMG
Another **DIY** By Evolved8: W203 Rear Diffuser Install Pictures+10 Easy steps

This is just a Guide. Install at your own risk.

DIY: W203 Quad/Single Rear Diffuser Install With Pictures

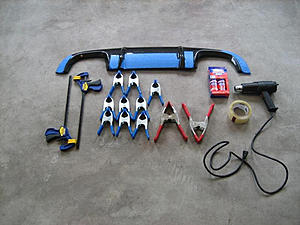
Tools Needed:

Misc Clamps
Clear Tape
Heatgun
Brake Cleaner/ Mineral Spirits
2 Part Heavy duty Epoxy
Microfiber's
Silver Paint marker
Silicone Spray
Ribbed Pliars
Tin snips
Paint brush
Blue Painters tape
Floor jack
Patience
Another **DIY** By Evolved8: W203 Rear Diffuser Install Pictures+10 Easy steps-diy1-1.jpg

Step 1:
Prep the Bottom part of the rear bumper by using mineral spirits, Or any kind of detergent that will pull the wax. Then Fully dry it with a clean Microfiber towel.
Another **DIY** By Evolved8: W203 Rear Diffuser Install Pictures+10 Easy steps-diy2.jpg

Step 2:
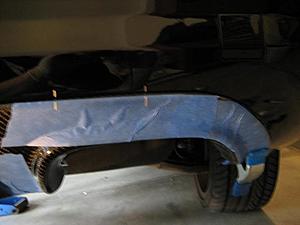
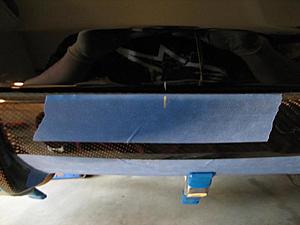
Tape up the Diffuser with blue painters tape to keep it from geting damaged by the heat/clamps then using your clamps dry test fit it to the bumper.


Step 3:
Once you have it exactly where it fits the best and fully clamped down mark it in 3 places on each corner, and one in the middle both on the bumper and on the diffuser (on the blue tape)
Another **DIY** By Evolved8: W203 Rear Diffuser Install Pictures+10 Easy steps-diy11.jpg
Another **DIY** By Evolved8: W203 Rear Diffuser Install Pictures+10 Easy steps-diy12.jpg

**If you are using the Dual outlet diffuser go to step 3.5 if not go straight to step 4.**

Step 3.5:
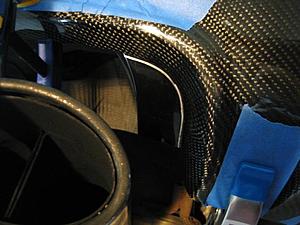
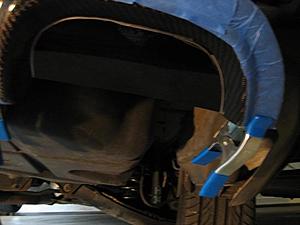
With the silver Paint marker trace out the new exhaust outlet and the partial part of the bumper that is left exposed by the driver's side exhaust opening.
Another **DIY** By Evolved8: W203 Rear Diffuser Install Pictures+10 Easy steps-diy6.jpg
Another **DIY** By Evolved8: W203 Rear Diffuser Install Pictures+10 Easy steps-diy7.jpg

Step 4:
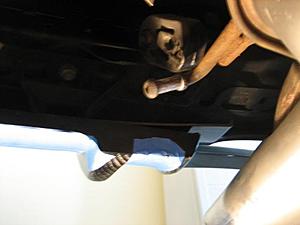
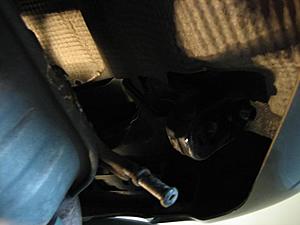
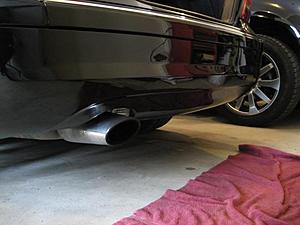
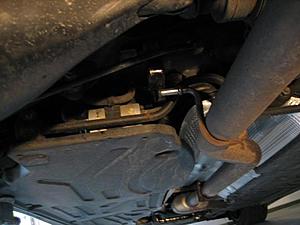
Jack up the rear enough to drop the 3 Exhaust hangers 2 on the Muffler and one twards the middle of the car If you have trouble use silicone spray and Ribbed Pliars. (this is to free the back half of the exhaust to be able to get clamps under the diffuser on the drivers side)
Another **DIY** By Evolved8: W203 Rear Diffuser Install Pictures+10 Easy steps-diy5.jpg
Another **DIY** By Evolved8: W203 Rear Diffuser Install Pictures+10 Easy steps-diy4.jpg
Another **DIY** By Evolved8: W203 Rear Diffuser Install Pictures+10 Easy steps-diy3.jpg

Step5:
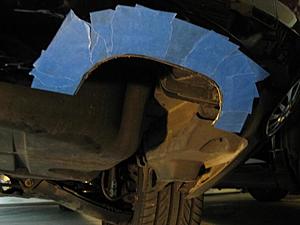
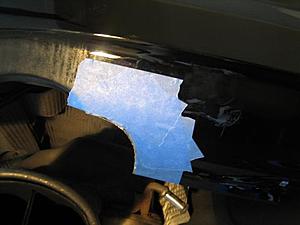
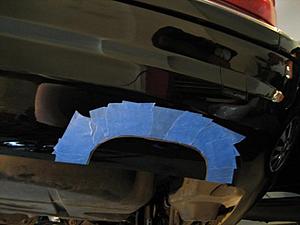
Using your Blue painters tape outline the Marks you made around the Exhaust outlets. Then Proceed to use your tin snips CAREFULLY cut around pulling the excess scrap out of your way as you cut. Repeat on the drivers side.
Another **DIY** By Evolved8: W203 Rear Diffuser Install Pictures+10 Easy steps-diy8.jpg
Another **DIY** By Evolved8: W203 Rear Diffuser Install Pictures+10 Easy steps-diy16.jpg
Click image for larger version

Name:	diy7.jpg
Views:	1401
Size:	55.4 KB
ID:	383289
Another **DIY** By Evolved8: W203 Rear Diffuser Install Pictures+10 Easy steps-diy9.jpg

Step 6:
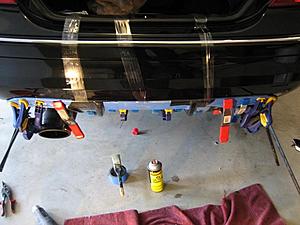
Prep the rear diffuser by cleaning the application surface and drying completly. Then start to heat your surfaces both bumper and rear diffuser with the heat gun.

Step 7:
TIME IS LIMITED SO WORK QUICKLY
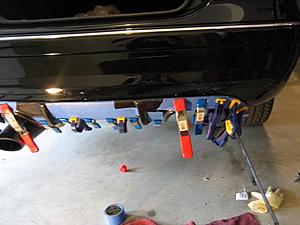
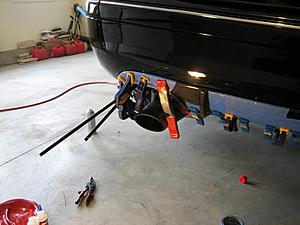
Start mixing your resion, and hardner then apply an even coat on the backside of the diffuser and to the back of the bumper. Then line up your center mark and slowly align the other marks using your free hand place a clamp in the middle of the diffuser on the bottom. Then Continue clamping all around it. Also use your clear tape to add some pressure at the top where you can not clamp.
Click image for larger version

Name:	diy11.jpg
Views:	1469
Size:	34.2 KB
ID:	383286
Another **DIY** By Evolved8: W203 Rear Diffuser Install Pictures+10 Easy steps-diy13.jpg
Another **DIY** By Evolved8: W203 Rear Diffuser Install Pictures+10 Easy steps-diy14.jpg
Another **DIY** By Evolved8: W203 Rear Diffuser Install Pictures+10 Easy steps-diy15.jpg
Step 8:
This must Sit at Room temp for at least 24 Hours to set properly. Once the Desired time is met slowly start to lift the side clamps ONE at a time If It looks Like it is starting to Lift Re clamp and wait another day to be safe.

Step 9:
Remove All clamps, With a little brake Cleaner on a microfiber remove the alignment mars on the bumper made by the paint marker.

Step 10:
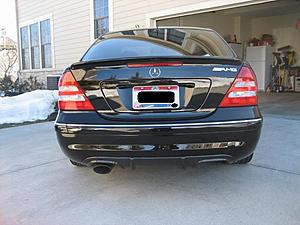
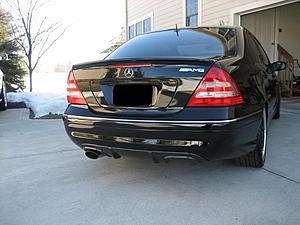
Hook Your Exhaust back up, Lower the jack, Stand back and admire your work and the money you just saved!!
Another **DIY** By Evolved8: W203 Rear Diffuser Install Pictures+10 Easy steps-done1.jpg

Dual Exhaust to Quad Exhaust tips Comming Soon
Thanks For looking. Enjoy!!
Attached Thumbnails Another **DIY** By Evolved8: W203 Rear Diffuser Install Pictures+10 Easy steps-diy7.jpg   Another **DIY** By Evolved8: W203 Rear Diffuser Install Pictures+10 Easy steps-diy11.jpg  

Last edited by Evolved8; 03-05-2010 at 11:47 AM.
The following users liked this post:
Gorilla Jones (11-01-2020)
Old 03-04-2010, 11:07 PM
  #2  
Senior Member
 
omg its nate's Avatar
 
Join Date: Apr 2009
Location: Minnesota
Posts: 459
Likes: 0
Received 0 Likes on 0 Posts
06 C230 6 Speed FTW
Nice work!
Old 03-04-2010, 11:10 PM
  #3  
MBWorld Fanatic!
Thread Starter
 
Evolved8's Avatar
 
Join Date: Nov 2009
Location: Columbus, OH
Posts: 1,556
Likes: 0
Received 6 Likes on 6 Posts
Evo VIII/E55 AMG
Thanks man!!
Old 03-05-2010, 12:35 AM
  #4  
Senior Member
 
howardyudoing's Avatar
 
Join Date: Mar 2009
Location: Fremont / Irvine, CA
Posts: 296
Likes: 0
Received 1 Like on 1 Post
07 c230 sport
i demand to see pictures of the full rear!
Old 03-05-2010, 12:45 AM
  #5  
MBWorld Fanatic!
 
bdgdl08's Avatar
 
Join Date: Mar 2009
Location: Saint Augustine, FL
Posts: 1,545
Likes: 0
Received 0 Likes on 0 Posts
1999 CLK320 (sold), 2007 C230 SS (gone), 2000 Grand Marquis, 2011 CR-Z, stay tuned...
Now get on the quad setup!!!
Old 03-05-2010, 01:06 AM
  #6  
MBWorld Fanatic!
 
B189s's Avatar
 
Join Date: Feb 2005
Location: Jakarta
Posts: 1,155
Likes: 0
Received 0 Likes on 0 Posts
1996 MB E320 & 2010 Nissan Elgrand
Good job
Old 03-05-2010, 02:16 AM
  #7  
MBWorld Fanatic!
 
ROLLNNN's Avatar
 
Join Date: Jan 2008
Location: So Cal... In between LA and OC
Posts: 3,595
Received 18 Likes on 15 Posts
2005 CLK320 Vert & 2005 CLK55 AMG
nice job and great write up... +1 on the full rear pics
Old 03-05-2010, 03:03 AM
  #8  
Super Member
 
nrg_mike's Avatar
 
Join Date: Feb 2010
Location: Los Angeles, CA
Posts: 732
Likes: 0
Received 0 Likes on 0 Posts
2005 C320 Sport, 2010 C300 Sport
Very nice! More photos pls! (just for showing off purposes that is.. lol).... It looks great tho!
Old 03-05-2010, 08:18 AM
  #9  
Super Member
 
ChristianJan's Avatar
 
Join Date: Jan 2005
Location: Chula Vista, San Diego
Posts: 952
Likes: 0
Received 0 Likes on 0 Posts
c230 Kompressor Coupe
Great DIY
Old 03-05-2010, 10:13 AM
  #10  
MBWorld Fanatic!
Thread Starter
 
Evolved8's Avatar
 
Join Date: Nov 2009
Location: Columbus, OH
Posts: 1,556
Likes: 0
Received 6 Likes on 6 Posts
Evo VIII/E55 AMG
More Pictures comming soon guys
Old 03-05-2010, 10:44 AM
  #11  
MBWorld Fanatic!
 
TemjinX2's Avatar
 
Join Date: Dec 2007
Location: Corona, CA
Posts: 5,034
Likes: 0
Received 6 Likes on 6 Posts
03 g35 coupe...........02 c32 Sold
awesome diy
Old 03-05-2010, 10:46 AM
  #12  
MBWorld Fanatic!
Thread Starter
 
Evolved8's Avatar
 
Join Date: Nov 2009
Location: Columbus, OH
Posts: 1,556
Likes: 0
Received 6 Likes on 6 Posts
Evo VIII/E55 AMG
Thanks man, I'am getting out in a little bit to snap some pictures
Old 03-05-2010, 11:48 AM
  #13  
Member
 
GuidosGottaBenz's Avatar
 
Join Date: Feb 2010
Location: Columbus, OH
Posts: 75
Likes: 0
Received 0 Likes on 0 Posts
05 C-230 Kompressor
Time to do my single rear diffuser soon Steve Looks amazing!!!!
Old 03-05-2010, 11:50 AM
  #14  
MBWorld Fanatic!
Thread Starter
 
Evolved8's Avatar
 
Join Date: Nov 2009
Location: Columbus, OH
Posts: 1,556
Likes: 0
Received 6 Likes on 6 Posts
Evo VIII/E55 AMG
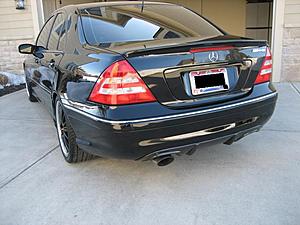
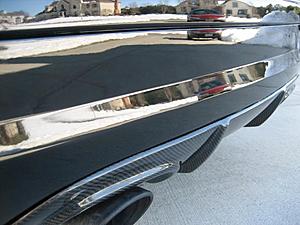
Thanks guys, This turned out Very well considering It was an Ebay Part.

Another **DIY** By Evolved8: W203 Rear Diffuser Install Pictures+10 Easy steps-done2.jpg
Another **DIY** By Evolved8: W203 Rear Diffuser Install Pictures+10 Easy steps-done3.jpg
Another **DIY** By Evolved8: W203 Rear Diffuser Install Pictures+10 Easy steps-done4.jpg
Old 03-05-2010, 12:58 PM
  #15  
Member
 
GuidosGottaBenz's Avatar
 
Join Date: Feb 2010
Location: Columbus, OH
Posts: 75
Likes: 0
Received 0 Likes on 0 Posts
05 C-230 Kompressor
That wont interfere with our trailers will it?
Old 03-05-2010, 02:11 PM
  #16  
Member
 
anthonyy's Avatar
 
Join Date: Apr 2009
Location: Bay Area, CA
Posts: 241
Likes: 0
Received 0 Likes on 0 Posts
2006 C280
very nice! amg badge?
Old 03-05-2010, 02:30 PM
  #17  
MBWorld Fanatic!
Thread Starter
 
Evolved8's Avatar
 
Join Date: Nov 2009
Location: Columbus, OH
Posts: 1,556
Likes: 0
Received 6 Likes on 6 Posts
Evo VIII/E55 AMG
Originally Posted by GuidosGottaBenz
That wont interfere with our trailers will it?
I sure hope not!!

Anthonyy,

Yes AMG badge, For I have the AMG sport package on my car.
Old 03-05-2010, 04:15 PM
  #18  
Super Moderator
 
samaritrey's Avatar
 
Join Date: Mar 2007
Location: VA
Posts: 5,294
Likes: 0
Received 21 Likes on 20 Posts
THE C350
AMG badge is not in the right spot lol
Old 03-05-2010, 05:35 PM
  #19  
MBWorld Fanatic!
Thread Starter
 
Evolved8's Avatar
 
Join Date: Nov 2009
Location: Columbus, OH
Posts: 1,556
Likes: 0
Received 6 Likes on 6 Posts
Evo VIII/E55 AMG
Originally Posted by samaritrey
AMG badge is not in the right spot lol

I didn't know there was a "wrong spot" when thats WHERE I wanted it.
The following users liked this post:
Gorilla Jones (11-01-2020)
Old 03-05-2010, 08:13 PM
  #20  
Member
 
quadoptix's Avatar
 
Join Date: Jul 2007
Location: Los Angeles
Posts: 158
Likes: 0
Received 1 Like on 1 Post
2007 C230 sport
thanks for putting this up. really appreciated.
Old 03-05-2010, 09:09 PM
  #21  
Senior Member
 
timmynabenz's Avatar
 
Join Date: Mar 2009
Location: Orange County, CA
Posts: 473
Likes: 0
Received 0 Likes on 0 Posts
2006 C230 SS, 2006 S500, 2008 CLS550 Lorinser
Thanks for the contribution! Your diffuser looks legit!!
Old 03-17-2010, 05:03 AM
  #22  
Super Moderator

 
nlpamg's Avatar
 
Join Date: Oct 2002
Location: So Cal.
Posts: 8,692
Received 58 Likes on 16 Posts
2019 GT3 RS, 2017 M3 30 Jahre
Thank you for your great contributions to the board.

This DIY has been added to the DIY sticky up top.
Old 08-24-2010, 12:45 PM
  #23  
MBWorld Fanatic!
Thread Starter
 
Evolved8's Avatar
 
Join Date: Nov 2009
Location: Columbus, OH
Posts: 1,556
Likes: 0
Received 6 Likes on 6 Posts
Evo VIII/E55 AMG
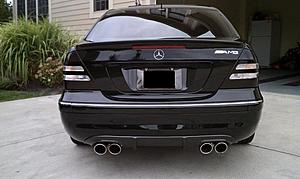
UPDATE 8/24/2010 quad exhaust is done and i tinted the Taillights.Thanks to my friends at IPS Motorsports they hooked me up with a 2.5 stainless system.
**NOTE black Mercedes symbol on the way and AMG badge is gone!!**
Another **DIY** By Evolved8: W203 Rear Diffuser Install Pictures+10 Easy steps-imag01681.jpg
Old 08-25-2010, 03:19 AM
  #24  
Junior Member
 
GIANNISANAG's Avatar
 
Join Date: Aug 2008
Posts: 66
Likes: 0
Received 0 Likes on 0 Posts
w203 c200K 2.0 mod 02
is this install possible without an amg rear bumper?
Old 08-25-2010, 03:32 AM
  #25  
Member
 
aigooalex's Avatar
 
Join Date: Nov 2009
Posts: 199
Likes: 0
Received 0 Likes on 0 Posts
2007 C230 Sport
Originally Posted by GIANNISANAG
is this install possible without an amg rear bumper?
you need the amg bumper

i used this write-up for my car and by far the best tutorial!!
the only thing that was hard to do was getting the hangers off =(


You have already rated this thread Rating: Thread Rating: 3 votes, 5.00 average.

Quick Reply: Another **DIY** By Evolved8: W203 Rear Diffuser Install Pictures+10 Easy steps


All times are GMT -4. The time now is 07:17 AM.