DIY: Hid Convert Kit Install - VVME product

 07-30-2010, 11:16 AM
#26
Super Member
Join Date: Apr 2010
Location: New Joisey
Posts: 858
Received 0 Likes
on
0 Posts
13 Jeep JKU Sahara w/4" lift Kit & the works,2015 Toyota Sienna XLE,2013 Hyundai Sonata Hybrid
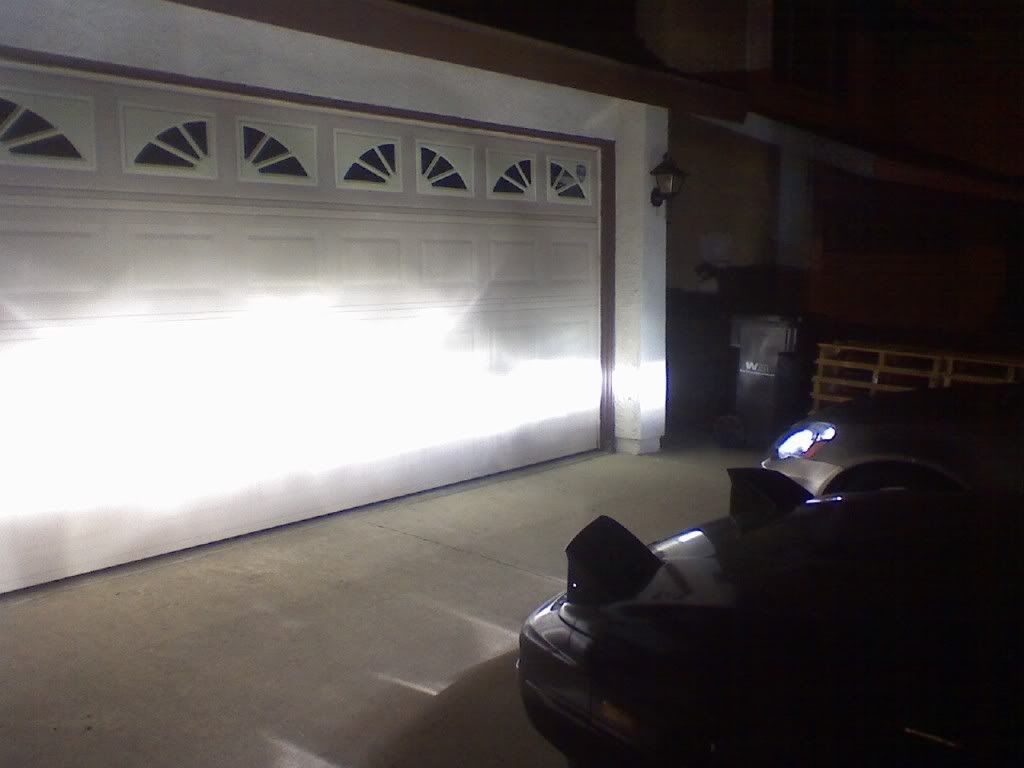
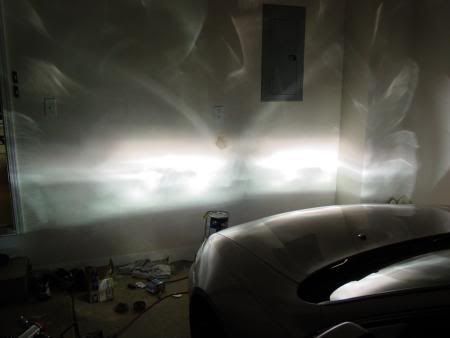
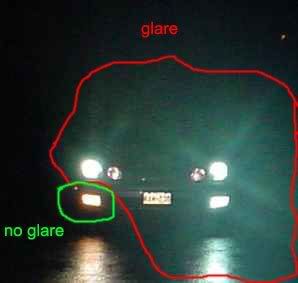
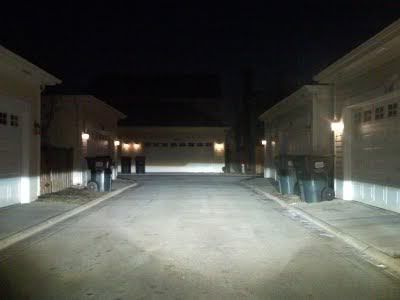
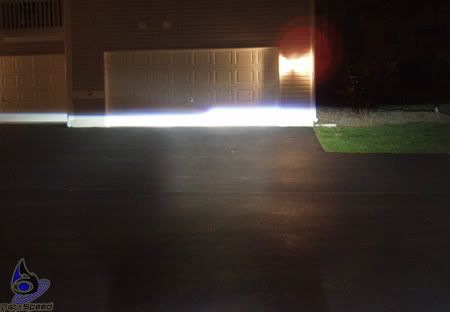
here are some pictures that will explaing what he ^^^ said above to explian better...............for some reason people don't get it at all........
Point your car to a garage and see if it does this....
and this
And this is what it looks like to on coming traffic........looks bright but it is not......it is annoying and god forbid it is an elderly driver...........goodluck then...
This is what a REAL HID SET UP SHOULD LOOK LIKE..........P.E.R.I.O.D
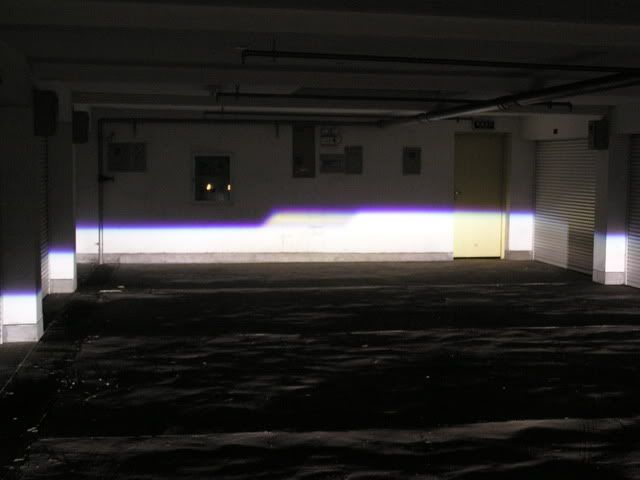
So please guys do your fellow drivers a favour and stop inserting HID pnp kits in a reflector assembly head lights.........save some money and go projectors............DEPO kits are a good starting point............
:peace:
Point your car to a garage and see if it does this....
and this
And this is what it looks like to on coming traffic........looks bright but it is not......it is annoying and god forbid it is an elderly driver...........goodluck then...
This is what a REAL HID SET UP SHOULD LOOK LIKE..........P.E.R.I.O.D
So please guys do your fellow drivers a favour and stop inserting HID pnp kits in a reflector assembly head lights.........save some money and go projectors............DEPO kits are a good starting point............
:peace:
 07-30-2010, 01:04 PM
#27
Super Member
Thread Starter
Join Date: Jul 2010
Location: Cali
Posts: 605
Likes: 0
Received 0 Likes
on
0 Posts
2006 C230 Sedan
the majority of the light will look like its the same as stock but the reason you got high beamed is probably because you have glare coming up above the cutoff line. That is whats giving you the appearance that it seems brighter. If you look at a projector equipped vehicle head on, the lights will not seem any brighter than any other car. It will only be noticeably brighter when your lower your head below its cutoff line.
If you park your car against a wall and look at your light, i can bet you will notice small amounts of light that dont seem very bright scattered above your main beam. Those glare spots are whats causing the blinding effect.
Also, xenons take a few seconds to fully charge up before it becomes bright so that's normal.
07-30-2010, 01:07 PM
#28
Super Member
Thread Starter
Join Date: Jul 2010
Location: Cali
Posts: 605
Likes: 0
Received 0 Likes
on
0 Posts
2006 C230 Sedan
Okay.. Thanks for the pictures. I understand now. DEPO kits. But I read they have a problem with their projectors.
07-30-2010, 01:16 PM
#29
Out Of Control!!
Yes, people have had problems with them. Headlights are one area that I'd say that OEM is the only true option.
Of course, you could always get clear headlights, keep these HIDS, and pocket the difference between them and BIX.
Of course, you could always get clear headlights, keep these HIDS, and pocket the difference between them and BIX.
07-30-2010, 01:58 PM
#30
Super Member
Join Date: Apr 2010
Location: New Joisey
Posts: 858
Received 0 Likes
on
0 Posts
13 Jeep JKU Sahara w/4" lift Kit & the works,2015 Toyota Sienna XLE,2013 Hyundai Sonata Hybrid
mbc...you don't like me and will make me do the hard work....lol......I will post some pics of the DEPO set up......"thats why i said starting point"......you get a good cut off from depo but not a nice even spread......I will post some pics and explain........thats why will wait and then do a retro and pop in the FX-R projectors later on as they fit very well and easy into the depo's from what I researched and found out from fellow members........and every one know's the FX-r projectors are the best projectors out there ...............
07-30-2010, 03:18 PM
#31
Super Member
Thread Starter
Join Date: Jul 2010
Location: Cali
Posts: 605
Likes: 0
Received 0 Likes
on
0 Posts
2006 C230 Sedan
 07-30-2010, 03:21 PM
#32
Super Member
Thread Starter
Join Date: Jul 2010
Location: Cali
Posts: 605
Likes: 0
Received 0 Likes
on
0 Posts
2006 C230 Sedan
mbc...you don't like me and will make me do the hard work....lol......I will post some pics of the DEPO set up......"thats why i said starting point"......you get a good cut off from depo but not a nice even spread......I will post some pics and explain........thats why will wait and then do a retro and pop in the FX-R projectors later on as they fit very well and easy into the depo's from what I researched and found out from fellow members........and every one know's the FX-r projectors are the best projectors out there ...............

Well, I would be intersted in knowing where to go with this. Hmmz, looks like you have a nice setup on your picture / ID. Is that the conversions that you are talking about?
07-30-2010, 03:24 PM
#33
Super Member
Thread Starter
Join Date: Jul 2010
Location: Cali
Posts: 605
Likes: 0
Received 0 Likes
on
0 Posts
2006 C230 Sedan
Okay. As suggested, I was looking at some DEPO headlights.
Will these do?
http://cgi.ebay.com/ebaymotors/REAL-...Q5fAccessories
The thing is, it stated that they are D2S. Will these work with my current setup HID H7?
I tried looking for DS2 setup at the HID company and there is no special HIDS for them.
Can someone clearify that.
Will these do?
http://cgi.ebay.com/ebaymotors/REAL-...Q5fAccessories
The thing is, it stated that they are D2S. Will these work with my current setup HID H7?
I tried looking for DS2 setup at the HID company and there is no special HIDS for them.
Can someone clearify that.
07-30-2010, 04:02 PM
#34
Super Member
Join Date: Apr 2010
Location: New Joisey
Posts: 858
Received 0 Likes
on
0 Posts
13 Jeep JKU Sahara w/4" lift Kit & the works,2015 Toyota Sienna XLE,2013 Hyundai Sonata Hybrid
you are looking at the Depo setup.....turst me it is much much better then any thing stock.........
07-30-2010, 04:29 PM
#35
Super Member
Thread Starter
Join Date: Jul 2010
Location: Cali
Posts: 605
Likes: 0
Received 0 Likes
on
0 Posts
2006 C230 Sedan
07-30-2010, 10:48 PM
#36
Super Member
Join Date: Apr 2010
Location: New Joisey
Posts: 858
Received 0 Likes
on
0 Posts
13 Jeep JKU Sahara w/4" lift Kit & the works,2015 Toyota Sienna XLE,2013 Hyundai Sonata Hybrid
no mine came with the HID kit installed on them I mean the ballast was installed on the headlight assembly so you dont need to hang it or tack it some place else on the car........there is a nice bracket that allows the ballast to be attached to the headlight assembly.............if you want I can PM you a link to the buyers ebay link....I cracked a deal with him off of ebay and paid like $280 shipped with HID kit mounted on it for a pair.......
07-30-2010, 11:04 PM
#37
Super Member
Thread Starter
Join Date: Jul 2010
Location: Cali
Posts: 605
Likes: 0
Received 0 Likes
on
0 Posts
2006 C230 Sedan
no mine came with the HID kit installed on them I mean the ballast was installed on the headlight assembly so you dont need to hang it or tack it some place else on the car........there is a nice bracket that allows the ballast to be attached to the headlight assembly.............if you want I can PM you a link to the buyers ebay link....I cracked a deal with him off of ebay and paid like $280 shipped with HID kit mounted on it for a pair.......
Thanks a bunch!!
 08-05-2010, 10:33 PM
#39
Newbie

Join Date: Jun 2010
Posts: 3
Likes: 0
Received 0 Likes
on
0 Posts
C200K
HID installation: No CEL, no flickering and no need Xenon=on
I've been reading and learning a lots from MBworld.org and now I would like to contribute a bit of my mod to be share with others.
DIY: Aftermarket HID Kit Installation on aftermarket headlight on W203 or any Mercedes.
This mod will eliminate annoying check engine light (CEL) warning, HID flickering and you don�t need to set Xenon=on. This DIY modification works on my car C200K with M271 engine. It has been a month now without any problem.
Procedures:
1. Get a pair of electrolytic capacitor 4700 microfarad (�F) 35V. Normal capacitor will have (+)ve (longer) and (-)ve (shorter) terminals, you need this type of capacitor. DO NOT buy NP (non-polar) capacitor.
2. Buy a set of H7 HID (high intensity discharge)kit. They are sold as a set, two bulbs and two ballasts. The colour temperature of the bulbs vary, 4300K (I am using it now), 5000K (hard to get), 6000K (white/bluish), 8000K (blue) etc. The best is 4300K, not to white with slight tint of yellow. Too blue, visibility at night during downpour and black wet road may suffer.
You can buy either a set with slim ballast or normal ballast (slightly bigger ballast).
3. Inspect each set; they will be supplied with ballasts, HID bulbs, brackets, screws and nuts. Each ballast and bulb is already factory fitted with proper wires and connectors. Put them apart. You are going to do the mod on the HID�s wires set. DO NOT do any mod on the wires that attached to the ballast.
4. Each HID bulb consists of red wire (positive terminal) black wire (negative terminal), attached to a flat head pin connector which has to be connected to the stock socket (Original socket that you find at the back of H7 halogen bulb).
5. Make a clean all round cut to the plastic insulator (DO NOT cut the wire) of the HID bulb�s wire for about one inch away from the flat head pin connector. Push aside the insulator with small flat head screwdriver/back of knife to expose the steel wires.
6. Inspect the capacitor, you�ll find it consists of two legs, one short and the other is longer. At the side on the casing, there will be big bar marks (---), indicating a negative terminal.
7. You have two options here; first, you can attach the positive terminal (longer leg) of the capacitor directly to the red wire by winding tightly at the cut and shorter leg to the black wire. Wrap all expose wires and capacitor legs with PVC insulating (electrical) tape.
8. Second option is by soldering the connection. Use soldering iron, solder a 2-3cm wire to each capacitor�s leg, then solder the other end of the wire to the (+)ve HID wire (red) at the cut and (-)ve to the black HID wire at the cut. Sometimes, soldering steel wires to copper wires is a bit problematic; this can be overcome by soldering paste. Dip both end of wire into soldering paste and apply some paste to the exposed cut, then apply solder. The hardened solder must be shiny and clean to avoid any problem later on. Wrap each expose wire with insulating tape.
9. Locate the low beam bulb in your car (Please refer all photos by 04MBC230). Remove the back cover, pull out the stock socket and remove the H7 bulb by pressing the spring clip until the bulb is dislodge from its seat.
10. Inspect the stock socket (socket at the back of your stock H7 bulb) for positive and negative terminals. You can check this by using H7 bulb or any auto bulb, attached a wire to each H7�s leg. Then Switch on the headlight. Touch any end of the wire to the (-)ve battery and the other end to the connector inside the stock socket. If the bulb turn bright (on) that terminal is live (+). For my car (W203), blue wire is live (+) and black is negative (-).
11. If you have a voltmeter, just touch any terminal in the socket with positive probe and negative probe to any expose metal surface on the body. No reading (0V) meaning that terminal is negative.
12. Switch off the headlight.
13. WARNING. Now this is a critical part and could be disastrous if mishandle. Since capacitor has positive and negative terminals, DO NOT reverse the polarity!!!!!!!!!..........the capacitor could explode!!!!..
14. Insert the RED WIRE pin connector to the female blue wire (+) of the stock socket and BLACK WIRE pin connector to female black (-) wire in the stock socket.
15. DO NOT REVERSE the connection. Please check and recheck all connections. If everything is alright, now it�s time for you to switch on the headlight and say...... Wooooow.......nice and bright. No more flickering and no more persistent check engine light (CEL) warning. Congratulation. You�ve done it.
16. Tidy up the connection by following the instruction in the box and put the capacitor neatly inside the lamp housing.
17. Warning: Do at your own risk. I�m not responsible for whatever happening to you or your car.
Last edited by Vitamin; 08-06-2010 at 03:31 AM. Reason: adding pictures
08-12-2010, 01:21 AM
#41
Newbie
Join Date: Jun 2010
Posts: 3
Likes: 0
Received 0 Likes
on
0 Posts
C200K
Here is the link to my mod:
http://www.mybenz.org/zoopp/html/mod...d=9044&forum=4
Dear 04mbc230 and Javvy,
I'm sorry for hijacking your posts. My mod is relevant to your earlier posts.
Thanks.
regards,
Vitamin
Dear 04mbc230 and Javvy,
I'm sorry for hijacking your posts. My mod is relevant to your earlier posts.
Thanks.
regards,
Vitamin
 08-16-2010, 12:49 PM
#44
MBWorld Fanatic!
Join Date: May 2009
Location: Toronto, NYC
Posts: 1,101
Likes: 0
Received 4 Likes
on
4 Posts
2002 Mercedes Benz C230 Coupe
Which country are you located in? (I ask because depending on the DRL laws in your country, the answer may be different)
What wattage does your HID consume (35W or 55W)?
08-16-2010, 02:05 PM
#45
Member
Join Date: Sep 2009
Posts: 137
Likes: 0
Received 0 Likes
on
0 Posts
c240
Thanks for the response jcnash.
I am located in the US. My car is a 2002 c240. It doesnt have DRL, and I installed the 35W HIDs standard from VVME.
BTW, I also installed a set of VVME 35w standard in my fog lamps, no errors / flickering. Why is that?
Will the error / decoder eliminate this issue?
I am located in the US. My car is a 2002 c240. It doesnt have DRL, and I installed the 35W HIDs standard from VVME.
BTW, I also installed a set of VVME 35w standard in my fog lamps, no errors / flickering. Why is that?
Will the error / decoder eliminate this issue?
08-16-2010, 02:31 PM
#46
MBWorld Fanatic!
Join Date: May 2009
Location: Toronto, NYC
Posts: 1,101
Likes: 0
Received 4 Likes
on
4 Posts
2002 Mercedes Benz C230 Coupe
Thanks for the response jcnash.
I am located in the US. My car is a 2002 c240. It doesnt have DRL, and I installed the 35W HIDs standard from VVME.
BTW, I also installed a set of VVME 35w standard in my fog lamps, no errors / flickering. Why is that?
Will the error / decoder eliminate this issue?
I am located in the US. My car is a 2002 c240. It doesnt have DRL, and I installed the 35W HIDs standard from VVME.
BTW, I also installed a set of VVME 35w standard in my fog lamps, no errors / flickering. Why is that?
Will the error / decoder eliminate this issue?
Now, what kind of flickering do you have? When you switch it on, do the lights come on and it flickers (on-off-on) as the engine vibrates, or does it turn on and go off as soon as you turn on the engine and stays off for a while. Then on-off again.
So basically is in on-off-on or off-on-off?
If it is on-off-on, try switching on the headlight manually without starting the engine. Do you still have flickering? If you dont, then the bulb/ballast is defective because it flickers only due to engine vibrations.
If it is off-on-off...that is because the cars computer is shutting it off. The error eliminator should fix this...but I have seen cases where it didnt. Xenon = present will fix it for sure.
08-17-2010, 12:02 AM
#47
Member
Join Date: Sep 2009
Posts: 137
Likes: 0
Received 0 Likes
on
0 Posts
c240
I tried the following:
1. Turn on the headlights when engine is off, no flickers. Then start the engine, no errors, no flickers, everything fine.
2. Start engine, turn on headlights, flickering occurs and errors -- sometimes both left and right and sometimes left only. Then light will be okay around 1 min, no flicker but with errors
From what I think, voltage is not steady or fluctuating when engine is running due to the alternator current thats why it flickers? what do you think?
I ordered the decoders/error eliminator, I do hope it solves this problem
08-17-2010, 03:19 PM
#48
MBWorld Fanatic!
Join Date: May 2009
Location: Toronto, NYC
Posts: 1,101
Likes: 0
Received 4 Likes
on
4 Posts
2002 Mercedes Benz C230 Coupe
I tried the following:
1. Turn on the headlights when engine is off, no flickers. Then start the engine, no errors, no flickers, everything fine.
2. Start engine, turn on headlights, flickering occurs and errors -- sometimes both left and right and sometimes left only. Then light will be okay around 1 min, no flicker but with errors
From what I think, voltage is not steady or fluctuating when engine is running due to the alternator current thats why it flickers? what do you think?
I ordered the decoders/error eliminator, I do hope it solves this problem
1. Turn on the headlights when engine is off, no flickers. Then start the engine, no errors, no flickers, everything fine.
2. Start engine, turn on headlights, flickering occurs and errors -- sometimes both left and right and sometimes left only. Then light will be okay around 1 min, no flicker but with errors
From what I think, voltage is not steady or fluctuating when engine is running due to the alternator current thats why it flickers? what do you think?
I ordered the decoders/error eliminator, I do hope it solves this problem
I have DDM HID's and have never had this problem. i did have the off-on-off flickerign which was fixed by the Xenon = present setting (Im in Canada and cannot disable DRL's so the error eliminators wont work for me).
Anyway try your luck with the error eliminator. If it doesnt work, dont wast emoney on doing the Zenon = Present setting. Just order 55W DDM Tuning HID's.


