
A/C Compressor Removal and Replacement
 08-12-2010 | 10:30 PM
#1

Thread Starter
Member
Joined: Feb 2009
Posts: 82
Likes: 0
C230
A/C Compressor Removal and Replacement
I am surprised that no one on here has ever done a DIY A/C compressor removal and install. (btw I have a 2005 c230)
Everyone I talk to claims the compressors on these cars are notorious for failing...and that MB is on their 7th iteration of compressor design.
Anyway, if any of you have ever done it or know of where a write up is, please pass it on.
If not, i'll be doing one next week when my MB factory service manual comes in the mail.
I assume everything will be coming out the top...
Thanks in advance,
Rob
Texas
08-14-2010 | 05:39 PM
#2

Junior Member
Joined: Dec 2008
Posts: 17
Likes: 0
c240
I am surprised that no one on here has ever done a DIY A/C compressor removal and install. (btw I have a 2005 c230)
Everyone I talk to claims the compressors on these cars are notorious for failing...and that MB is on their 7th iteration of compressor design.
Anyway, if any of you have ever done it or know of where a write up is, please pass it on.
If not, i'll be doing one next week when my MB factory service manual comes in the mail.
I assume everything will be coming out the top...
Thanks in advance,
Rob
Texas
Everyone I talk to claims the compressors on these cars are notorious for failing...and that MB is on their 7th iteration of compressor design.
Anyway, if any of you have ever done it or know of where a write up is, please pass it on.
If not, i'll be doing one next week when my MB factory service manual comes in the mail.
I assume everything will be coming out the top...
Thanks in advance,
Rob
Texas
08-14-2010 | 06:10 PM
#3
MBWorld Fanatic!
Joined: Dec 2007
Posts: 5,034
Likes: 6
From: Corona, CA
03 g35 coupe...........02 c32 Sold
technically its illegal unless you have a machine to vaccum out all the freon or you take it to a shop to have them vaccum it out for you. Replacing the compressor itself isnt hard since the engine is longitually mounted.
Last edited by TemjinX2; 08-14-2010 at 06:13 PM.
08-14-2010 | 06:48 PM
#4

Super Member
Joined: May 2010
Posts: 800
Likes: 1
His mama. Traded y0 mama in because she was squeaking.
Hmm. I thought R-134A was not damaging to the environment and can be vented into the atmosphere? Well, it has a modest global warming potential of 1300 (whatever the eff that means).
R-12, that's illegal to do, yes. But the guy's on R-134A, not R-12. So, technically, he could legally replace his own compressor. The only trick, of course, is vacuuming out the system after the new compressor goes on. Nothing a 15 dollar venturi pump or an 80 dollar electrical vacuum pump can't fix, though.
R-12, that's illegal to do, yes. But the guy's on R-134A, not R-12. So, technically, he could legally replace his own compressor. The only trick, of course, is vacuuming out the system after the new compressor goes on. Nothing a 15 dollar venturi pump or an 80 dollar electrical vacuum pump can't fix, though.
08-15-2010 | 06:33 AM
#5
MBWorld Fanatic!
Joined: Dec 2007
Posts: 5,034
Likes: 6
From: Corona, CA
03 g35 coupe...........02 c32 Sold
Hmm. I thought R-134A was not damaging to the environment and can be vented into the atmosphere? Well, it has a modest global warming potential of 1300 (whatever the eff that means).
R-12, that's illegal to do, yes. But the guy's on R-134A, not R-12. So, technically, he could legally replace his own compressor. The only trick, of course, is vacuuming out the system after the new compressor goes on. Nothing a 15 dollar venturi pump or an 80 dollar electrical vacuum pump can't fix, though.
R-12, that's illegal to do, yes. But the guy's on R-134A, not R-12. So, technically, he could legally replace his own compressor. The only trick, of course, is vacuuming out the system after the new compressor goes on. Nothing a 15 dollar venturi pump or an 80 dollar electrical vacuum pump can't fix, though.
So it seems like its still a pretty damaging to the environment. I think its one of those things where its not overly expensive to fix at a indy shop, I prefer to not contribute to the destruction to the environment, if its not a huge economic burden.
Last edited by TemjinX2; 08-15-2010 at 06:36 AM.
08-16-2010 | 08:58 AM
#6
Thread Starter
Member
Joined: Feb 2009
Posts: 82
Likes: 0
C230
I'm not worried about the legal issues. My neighbor is a licensed a/c man and has all the equipment.
I'm more interested in how to get the compressor out. If you have taken a look in the engine bay, yes the motor is longitudally mounted but the a/c compressor is in the worst possible place, Bottom right. In order to take it out the top it looks like the supercharger, radiator and fans, and a few other accessories need to come out. I guess the question is: What is the best way to take it out the top or the bottom?
Like I said, I assume no one has done it, but I'll have the shop manual this week and will have it done by this weekend.
Bossup.....who ever quoted you $350 bucks.....thats odd... Parts alone are over 500 and most shops labor is around $1000. Mercedes house wants 2k......
Definitely not paying that....whether it's legal or not...
Thanks ,
Rob
Trending Topics
 08-17-2010 | 05:30 PM
#10
Super Member
Joined: May 2010
Posts: 800
Likes: 1
His mama. Traded y0 mama in because she was squeaking.
Google saids its still a Tetrafluoroethane currently banned in wisconsin and going to be banned in all cars in the EU starting 2011.
So it seems like its still a pretty damaging to the environment. I think its one of those things where its not overly expensive to fix at a indy shop, I prefer to not contribute to the destruction to the environment, if its not a huge economic burden.
So it seems like its still a pretty damaging to the environment. I think its one of those things where its not overly expensive to fix at a indy shop, I prefer to not contribute to the destruction to the environment, if its not a huge economic burden.
Fair enough. I got my data from here: http://www.engineeringtoolbox.com/re...ies-d_145.html
Personally, I don't think the earth will blow up if he "accidentally" releases it into the atmosphere... Then again, I'm not a Leaf Licker (tree higher, environmentalist, etc).
08-19-2010 | 12:10 AM
#11
Thread Starter
Member
Joined: Feb 2009
Posts: 82
Likes: 0
C230
I may do a write up if I can get my camera to work.
I'm going to take my time and remove the radiator fans to make more room.
I also am going to replace the desiccant pouch and expansion valve.
I'd say other than a lack of pictures, the mercedes shop manual has good instructions.
Robert
I'm going to take my time and remove the radiator fans to make more room.
I also am going to replace the desiccant pouch and expansion valve.
I'd say other than a lack of pictures, the mercedes shop manual has good instructions.
Robert
08-20-2010 | 06:35 PM
#12
Thread Starter
Member
Joined: Feb 2009
Posts: 82
Likes: 0
C230
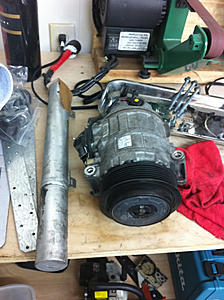
got the compressor out today...not too bad.
Worst part is getting the bolts out of the compressor
I just took my time and removed freon, the metal cross frame over the radiator that holds the hood latches, fan, coolant and then upper hose, intake plumbing including the "wideband silencer", belt, compressor
Now, tomorrow i'm taking it to a local rebuilder and see what's the problem and either fix or get a reconditioned one.
Robert
Last edited by rabney72; 08-20-2010 at 07:36 PM.
08-20-2010 | 07:16 PM
#14
Thread Starter
Member
Joined: Feb 2009
Posts: 82
Likes: 0
C230
Well I am going to do a short write up for now, maybe a better one later.
I pulled the car up on ramps and did the entire job that way (easy access to underneath is necessary)
1) The first thing to do is drain the coolant. You only have to drain enough to remove the coolant from the upper radiator hose but I did all of it as I figured the car is due for a flush (67k).
With a flat head, loosen the red petcock plug on the bottom drivers side of the radiator and have a catch can ready.
Remove the coolant hose once drained. This requires popping off the ring at the joint and pulling on the hose GENTLY
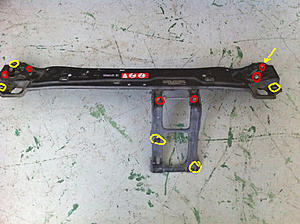
2) remove the three caps that "snap" the intake line to the "upper radiator frame support"
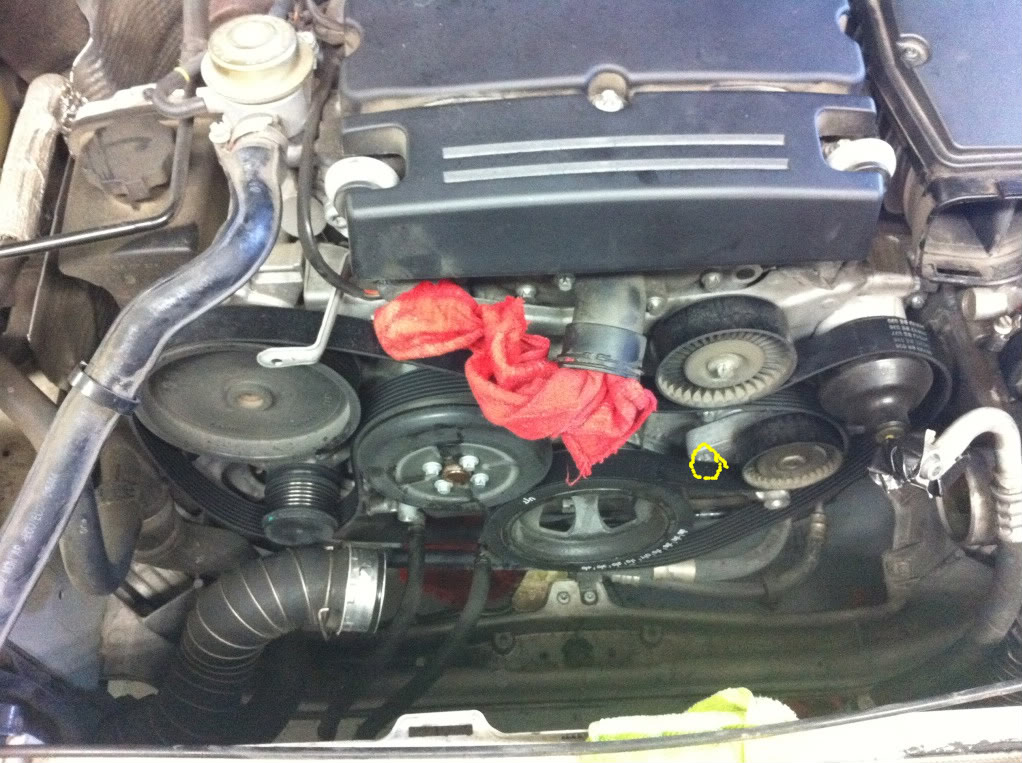
3) Remove the cross frame above the radiator support. To do this, there are 6 screws total, all 10mm hex circled in yellow in the picture (do not remove red). Two screws at each side on top (not the ones that hold the hood latches). Then remove the two screws that attach some sort of cooler (i assume power steering) to the frame mount in the center, these both face backwards (screw heads towards the engine, not they and not the two in the picture that hold a cross brace. At this point it should all pull out. Make sure to release the wire looms that are snapped in on the bottom as well as the cables from the hood latches. (the latch on the drivers side requires the plastic around the latch to be removed in order to get to the cable release spring)
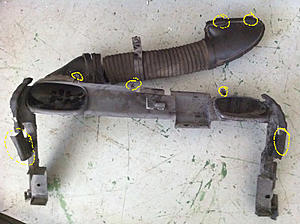
4) Next is the air intake pipe, because you removed the three "snaps" the intake pipe is released from the frame.
Now remove the side with the elbow that is attached to the filter housing. Just pull down and it will release.
Becareful not to pull apart the felt wrapping as I did. Then at this point, wiggle and pull up on the entire plastic piece (shown below), you may have to pull out the tabs that catch on the front bumper. All release, tension points circled in yellow
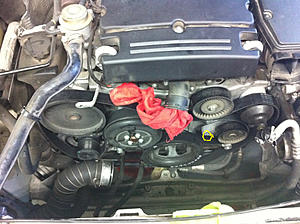
5) Remove the fan. First remove the connector from underneath (bottom drivers side). This takes pressing in 2 tabs, one on each side and pulling up on the entire shroud, simple as that.
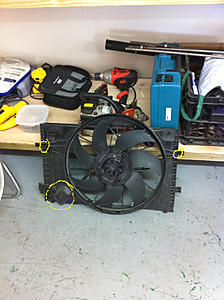
now the engine compartment should look like this

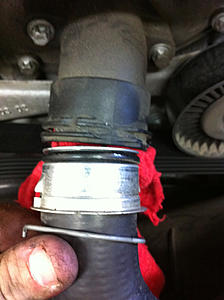
6) next is removal of the "wideband silencer". Just a couple hose clamps and two torx screws. Then again pull gently
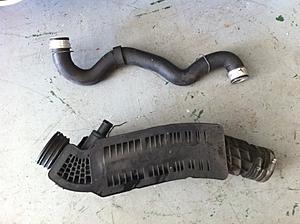
and the engine compartment now looks like this and is ready for the belt to be loosened and removed from the a/c pulley only. (replace if necessary.
The belt tensioner requires an torx (male) bit and is to be turned CCW. (position circled in yellow)
7) now it time to remove the compressor. I hope you have small hands because there are three torx head bolts that hold it in and are hard to get to. (The screw heads are on the drivers side of the compressor). Once removed (only one screw will completely remove, other 2 stay in compressor until removed from car), wiggle compressor around until you can see the allen head cap screws (2) that mount both the high and low pressure line to the compressor. You will need approx 12" of extensions and an allen driver and extend down between the right side of the motor and frame rail, while simultaneously positioning the compressor with your left hand, and remove the screws and then "pop" the lines out. Pull the compressor out forward
BTW the dryer is located under the radiator (shown in the pic above and is held in place by 3 small torx screws.
This is a rough write up, but i'll freshen up later
I pulled the car up on ramps and did the entire job that way (easy access to underneath is necessary)
1) The first thing to do is drain the coolant. You only have to drain enough to remove the coolant from the upper radiator hose but I did all of it as I figured the car is due for a flush (67k).
With a flat head, loosen the red petcock plug on the bottom drivers side of the radiator and have a catch can ready.
Remove the coolant hose once drained. This requires popping off the ring at the joint and pulling on the hose GENTLY

2) remove the three caps that "snap" the intake line to the "upper radiator frame support"
3) Remove the cross frame above the radiator support. To do this, there are 6 screws total, all 10mm hex circled in yellow in the picture (do not remove red). Two screws at each side on top (not the ones that hold the hood latches). Then remove the two screws that attach some sort of cooler (i assume power steering) to the frame mount in the center, these both face backwards (screw heads towards the engine, not they and not the two in the picture that hold a cross brace. At this point it should all pull out. Make sure to release the wire looms that are snapped in on the bottom as well as the cables from the hood latches. (the latch on the drivers side requires the plastic around the latch to be removed in order to get to the cable release spring)

4) Next is the air intake pipe, because you removed the three "snaps" the intake pipe is released from the frame.
Now remove the side with the elbow that is attached to the filter housing. Just pull down and it will release.
Becareful not to pull apart the felt wrapping as I did. Then at this point, wiggle and pull up on the entire plastic piece (shown below), you may have to pull out the tabs that catch on the front bumper. All release, tension points circled in yellow

5) Remove the fan. First remove the connector from underneath (bottom drivers side). This takes pressing in 2 tabs, one on each side and pulling up on the entire shroud, simple as that.

now the engine compartment should look like this
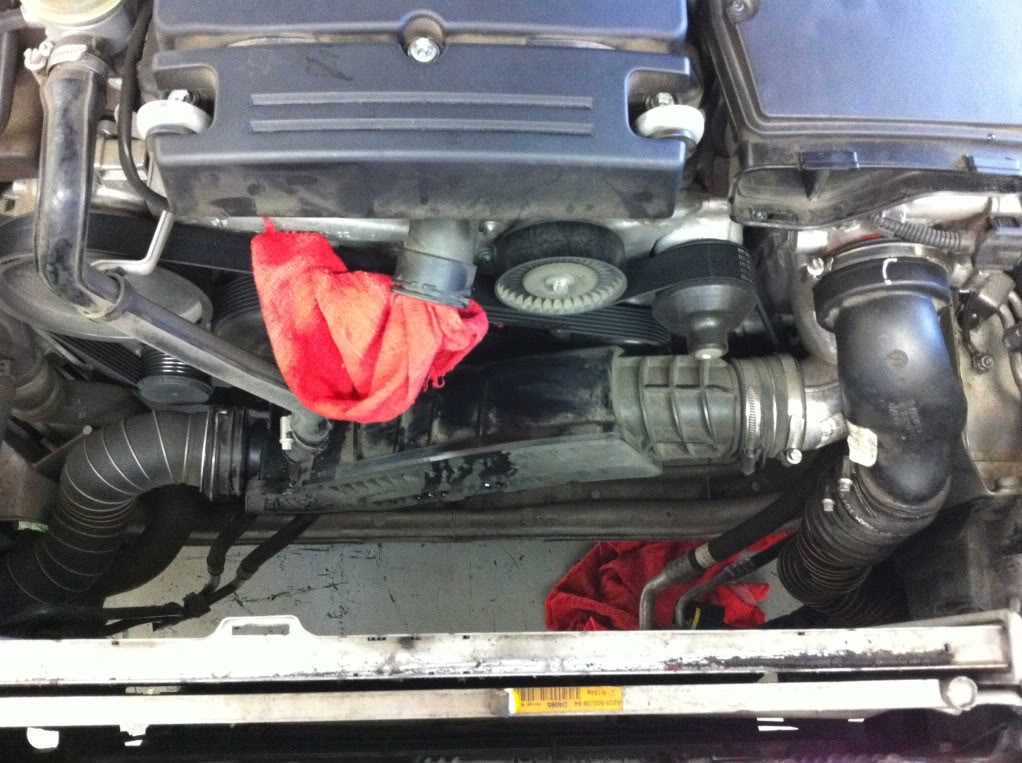
6) next is removal of the "wideband silencer". Just a couple hose clamps and two torx screws. Then again pull gently

and the engine compartment now looks like this and is ready for the belt to be loosened and removed from the a/c pulley only. (replace if necessary.
The belt tensioner requires an torx (male) bit and is to be turned CCW. (position circled in yellow)
7) now it time to remove the compressor. I hope you have small hands because there are three torx head bolts that hold it in and are hard to get to. (The screw heads are on the drivers side of the compressor). Once removed (only one screw will completely remove, other 2 stay in compressor until removed from car), wiggle compressor around until you can see the allen head cap screws (2) that mount both the high and low pressure line to the compressor. You will need approx 12" of extensions and an allen driver and extend down between the right side of the motor and frame rail, while simultaneously positioning the compressor with your left hand, and remove the screws and then "pop" the lines out. Pull the compressor out forward

BTW the dryer is located under the radiator (shown in the pic above and is held in place by 3 small torx screws.
This is a rough write up, but i'll freshen up later
Last edited by rabney72; 08-20-2010 at 10:22 PM.
 08-21-2010 | 10:38 PM
#16
Thread Starter
Member
Joined: Feb 2009
Posts: 82
Likes: 0
C230
a clanking noise at low rpm and initial ignition that would last for about 5 seconds, this would occur randomly for about 20k miles. Then one day it made the noise for a good 30 seconds and started blowing hot. The compressor is actually at the local ac rebuilder right now and getting diagnosed. I'll post more info once I know the details.
11-10-2010 | 10:01 AM
#21

Junior Member
Joined: Dec 2008
Posts: 35
Likes: 0
From: Rochester, New York
2014 E350 4Matic
Thanks Rabney, hopefully i'll be doing a complete rebuild on my BEHR a/c compressor late spring 2011.I'll let you all know if and when i get done with the project.
Last edited by pejaife; 11-10-2010 at 10:03 AM. Reason: Word error
11-15-2010 | 03:27 PM
#22
Thread Starter
Member
Joined: Feb 2009
Posts: 82
Likes: 0
C230
And I should note, counter to what most people think on this forum, these compressors are rebuildable.... So good luck
07-27-2011 | 03:53 PM
#23
Member
Joined: Nov 2010
Posts: 129
Likes: 0
From: Ottawa, Ontario
Mercedes C230 2005
Man this problem is a PITA!! I hate how my benz sounds like a piece of ish when it comes to a stop or start it with the AC already on.
So i bought the vehicle last January 2010 and didn't notice the problem obviously until summer time came. The 1st day I picked up my car I had the alternator/battery message. I had the alt replace at a hefty price, not knowing about these forums at the time. I'm sure glad I do now lol.
When it started to get warm this year the noise didn't come whatsoever. It's kind of a glitch... If I have the ac on prior to starting my car the sound is there. A grinding sound against metal.. Makes my heart stop! If i'm at a red light stopped the sound is there only if i start it then.
Now the gypsy part! If i'm driving on the highway and turn it on and come to a light or stopped, the sound isn't there anymore. Or does it come back unless the aforementioned.
I gotta thank rabney for pointing out atleast the main things.. Only thing is I had my alternator changed the 1st week and cost 800$.. Stupid stealership! Now i'm really in the mood to change idler and tensionner pully, along with the AC and ALT pulley.. Wondering if this pully on the AC can just be switched off?
To conclude... this sound is really annoying, especially since she's my baby. I'm cleaning the TB this weekend and hopefully this will do it some good.
As well, just wonder what everyone's normal RPM is when the car is in P or at a complete stop....
07-28-2011 | 12:48 AM
#24

Member
Joined: Nov 2008
Posts: 142
Likes: 5
From: New Orleans, LA
C230K Sedan
while you had that off I hope you changed out your belt tensioner pulley. With the compressor off you have a more easy acess to that stupid bolt they put in the middle. It lays right next to it .
08-10-2012 | 10:04 PM
#25

Junior Member
Joined: Jun 2012
Posts: 16
Likes: 0
From: West Virginia
2012 C300, 2002 C230
A/C compressor question
I am surprised that no one on here has ever done a DIY A/C compressor removal and install. (btw I have a 2005 c230)
Everyone I talk to claims the compressors on these cars are notorious for failing...and that MB is on their 7th iteration of compressor design.
Anyway, if any of you have ever done it or know of where a write up is, please pass it on.
If not, i'll be doing one next week when my MB factory service manual comes in the mail.
I assume everything will be coming out the top...
Thanks in advance,
Rob
Texas
Everyone I talk to claims the compressors on these cars are notorious for failing...and that MB is on their 7th iteration of compressor design.
Anyway, if any of you have ever done it or know of where a write up is, please pass it on.
If not, i'll be doing one next week when my MB factory service manual comes in the mail.
I assume everything will be coming out the top...
Thanks in advance,
Rob
Texas
. So, I went to pick up the car and had to wait for them to "put it back together", including "screwing in a panel". They were in a hurry because I was waiting so don't know what exactly they did. I drove about 50 miles on my way home (very hot outside and 60 mph most of the way) and all of a sudden the car cut out completely - just died while on the highway - very scary. I rolled over to breakdown lane and re-started it. I was lucky to be only 1/4 mile from an exit but had to restart several times when it just died again. I called the Mercedes tow service and they towed to a closer dealer. I called the dealer who worked on it and they said they didn't know how the the A/C service (whatever they were putting together again) could be related to the problem. I think it is too much of a coincidence that this happened the same day. My question is, since you have replaced the compressor, whether there are things in the car that need to be moved, tightened, or otherwise might affect the performance of the car - basically, something that would make the car die. The dealer where the car was towed diagnosed a oil separator problem but said that would make the car lose power but probably not make it cut out completely. I don't know enough about cars to even guess what could be wrong or if it is just a fluke that it happened the same day. Any ideas? Thanks very much.


