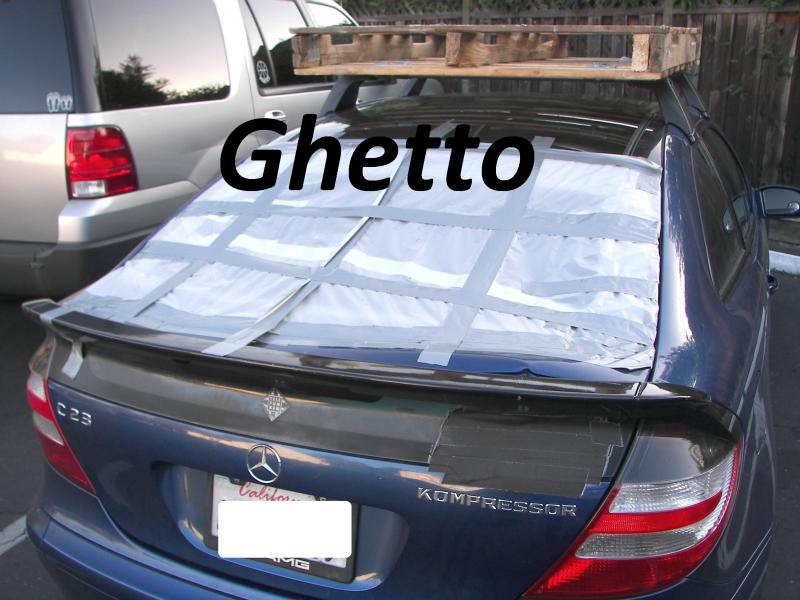
My car be lookin' pretty ghetto...but not for long! NEW HATCH INSTALL!
 10-08-2013, 09:26 PM
#1
MBWorld Fanatic!
Thread Starter
My car be lookin' pretty ghetto...but not for long! NEW HATCH INSTALL!
Well, sad state of affairs, what with the hit and run on the rear hatch I had a few years ago (and didn't repair)  , and then with the falling rocks shattering the rear glass on a recent camping trip.
Strapped a pallet to the roof racks, and made a ~200 mile RT to the
LKQ junkyard in Stockton Cali, and picked up a "new" color matching hatch which I had shipped down from Oregon. $433 including tax.
Too bad they cut the wiring harness, which means I'll have to remove
all the trim pieces, which will likely render them useless.
Took every back road possible back, to try to minimize the bumps. The edge of the hatch is about an inch of just glass before it gets to the steel, so I was crapping bricks all the way home.
Cali freeways, like 580 on Altamont pass pretty much are an embarrassment to the state Huge, potholes, giant dips. The top layer of asphalt is pretty much gone, and it's just rocky, bumpy horrible.
I always knew I didn't like that stretch of highway, I usually am tranversing it at night, but today, I could see it in the light when I pulled off at the summit, and hit the backroad.
Drove all the way from Altamont (Tracy) pass to San Jose without getting on a freeway.
Despite the pallet (the original plan), we ended up shoving it sideways into the rear of the car. Put a lot of strain on the glass I mentioned earlier, but the damn thing is so big, not sure it woulda fit on the pallet anyway.
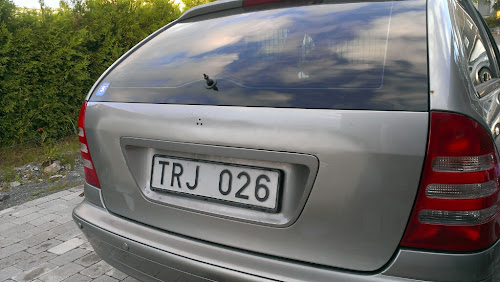
Well, I'm excited. Now I have just a few little dings left, and the car will no longer have that low, bad neighborhood look that some aspire to.
I won't miss it.
I've placed the new hatch in front of the TV where I will spend the entire evening...just looking at it.
My precious!

Well, a new project to figure out. I have the wiring snorkel, had it for years now, finally will get used.
I'll follow up with some install pics. Cheers!
So, to summarize. GHETTO. NOT GHETTO. Got it?

, and then with the falling rocks shattering the rear glass on a recent camping trip. Strapped a pallet to the roof racks, and made a ~200 mile RT to the
LKQ junkyard in Stockton Cali, and picked up a "new" color matching hatch which I had shipped down from Oregon. $433 including tax.
Too bad they cut the wiring harness, which means I'll have to remove
all the trim pieces, which will likely render them useless.
Took every back road possible back, to try to minimize the bumps. The edge of the hatch is about an inch of just glass before it gets to the steel, so I was crapping bricks all the way home.
Cali freeways, like 580 on Altamont pass pretty much are an embarrassment to the state Huge, potholes, giant dips. The top layer of asphalt is pretty much gone, and it's just rocky, bumpy horrible.
I always knew I didn't like that stretch of highway, I usually am tranversing it at night, but today, I could see it in the light when I pulled off at the summit, and hit the backroad.
Drove all the way from Altamont (Tracy) pass to San Jose without getting on a freeway.
Despite the pallet (the original plan), we ended up shoving it sideways into the rear of the car. Put a lot of strain on the glass I mentioned earlier, but the damn thing is so big, not sure it woulda fit on the pallet anyway.
Well, I'm excited. Now I have just a few little dings left, and the car will no longer have that low, bad neighborhood look that some aspire to.
I won't miss it.
I've placed the new hatch in front of the TV where I will spend the entire evening...just looking at it.
My precious!
Well, a new project to figure out. I have the wiring snorkel, had it for years now, finally will get used.
I'll follow up with some install pics. Cheers!
So, to summarize. GHETTO. NOT GHETTO. Got it?
Last edited by C230 Sport Coup; 10-08-2013 at 09:56 PM.
 10-09-2013, 12:49 AM
#3
Super Moderator
Wow just WOW i would be to embarrassed to even take that car out of the garage. Glad you are getting this fixed so you will no longer be an embarrassment to the Mercedes name. Love the pallet on the roof 
10-09-2013, 05:19 AM
#4
MBWorld Fanatic!
Join Date: Dec 2003
Location: Vancouver, BC, Canada
Posts: 3,108
Likes: 0
Received 208 Likes
on
199 Posts
2003 C230K Coupe Orion Blue
What's wrong with the trim pieces? You can simply put them back afterwards.. they just pop off. (I've taken my rear hatch apart before)
This may be a good opportunity to replace the rubber hose thing that covers the wires between the rear hatch and car. Mine had torn once - you may want to check.
This may be a good opportunity to replace the rubber hose thing that covers the wires between the rear hatch and car. Mine had torn once - you may want to check.
 10-09-2013, 01:03 PM
#6
MBWorld Fanatic!
Thread Starter
What's wrong with the trim pieces? You can simply put them back afterwards.. they just pop off. (I've taken my rear hatch apart before)
This may be a good opportunity to replace the rubber hose thing that covers the wires between the rear hatch and car. Mine had torn once - you may want to check.
This may be a good opportunity to replace the rubber hose thing that covers the wires between the rear hatch and car. Mine had torn once - you may want to check.
What I'm not sure about is the best way to deal with the wiring.
Do I pull the wiring harness off my existing door (and from under the headliner) attach to the new hatch, and then fish it back in under the headliner, or do I try to pull the wiring out of the hatch and fish it into the new one without touching the headliner?
I'm thinking, that it will be easier to get it all wired up with the hatch off the car, then feed the wire into the hole and reattach under the headliner. What do you guys think? Of course that means pulling the headliner.
10-09-2013, 01:22 PM
#7
MBWorld Fanatic!
Thread Starter
FYI- I found this pic of the wiring harness.
Left I believe is the headliner side, right the door side.
I also attached the pdf's for the headliner, but would i really need to completely remove it? Seems to me, since I have the new door in my living room, it would be easier to 1st attach the connections to the door,
and then fish it into the body....
but what do I know?
Need some opinions here.
Trending Topics
10-09-2013, 03:01 PM
#8
Member

Join Date: Jul 2012
Posts: 82
Likes: 0
Received 0 Likes
on
0 Posts
C180 Kompressor Wagon
Did this work to my wagon this summer. Twice.

Remove the plastic trim
Take pictures of harness in place
Back out the harness completely from the hatch
Remove all components
Replace the hatch
Thread the harness
Transfer components
Replace trim
Done.
No need to touch the headliner. Good luck.
Remove the plastic trim
Take pictures of harness in place
Back out the harness completely from the hatch
Remove all components
Replace the hatch
Thread the harness
Transfer components
Replace trim
Done.
No need to touch the headliner. Good luck.
Last edited by torake; 10-09-2013 at 03:07 PM. Reason: Clarification
10-09-2013, 03:37 PM
#9
MBWorld Fanatic!
Thread Starter
I hate to ask why you had to do it twice in one summer? But I'm asking anyway.
10-09-2013, 03:48 PM
#10
Member
Join Date: Jul 2012
Posts: 82
Likes: 0
Received 0 Likes
on
0 Posts
C180 Kompressor Wagon
There's a design flaw in the hatches, they rust from the inside. I welded up my hatch since a new one is €800+glass+paint.

After welding it needed to be test fitted, plus its my DD so the hatch stayed on until it was time for final paint
End result was satisfactory:

After welding it needed to be test fitted, plus its my DD so the hatch stayed on until it was time for final paint
End result was satisfactory:
10-09-2013, 05:43 PM
#11
MBWorld Fanatic!
Thread Starter
So, do you pull the harness from the hatch with the hatch attached to the car? And then reverse?
Do you have any more pics?
Do you have any more pics?
10-09-2013, 06:33 PM
#12
Super Moderator
If your friends in Newport Beach or Corona del Mar might need a high-end millwork specialist, we're booked solid through the holidays.
^THIS! :)
10-09-2013, 10:28 PM
#13
MBWorld Fanatic!

Coupe,
Sorry for the misfortune on your camping trip! Glad you got a replacement at a good price (even if the trip back with it was pretty harrowing! Best of luck getting your baby put back together again!
Sorry for the misfortune on your camping trip! Glad you got a replacement at a good price (even if the trip back with it was pretty harrowing! Best of luck getting your baby put back together again!
10-10-2013, 12:34 AM
#14
MBWorld Fanatic!
Thread Starter

Still waiting for Ed to weigh in on this.
10-10-2013, 03:08 AM
#15
MBWorld Fanatic!

Join Date: Jan 2005
Location: Orange County
Posts: 2,848
Likes: 0
Received 15 Likes
on
15 Posts
2005 C Wagon (No snickering please!)
The new door looks nice. It will be sensational mounted on the body.
I would leave the headliner in the car alone. Remove the door panels and photograph the wiring details. Remove the new door panels and insure the ground lugs are clean and shiny. Remove wiring and remove old door. Put the new grommet (snorkel) on the harness. Spray a little Windex in there to make thing slip easier and when putting it on the sheet metal. It will dry fine. Connect the wiring, and lay it as in your picture. Replace any Ty-Wraps you had to cut. Test the wiring, then replace the door panels.
Prior to stepping back to admire your work, remove the pallet from the roof.
10-10-2013, 09:08 AM
#16
Out Of Control!!
Couple of things:
1) Why would removing the hatch trim pieces ruin them? Unless you do a Hulk smash! to it, then you should be able to remove and reuse. Someone here had dyed their trim black, and had a nice little write-up with pics buried in someone else's thread, if memory serves. Should be worth doing a search for it.
2) torake already answered your question. Do as he and moviela said - remove wiring from the old hatch, thread through the new snorkle, reattach snorkle, then put wiring on new hatch. I would be wanting to use the wiring on the old hatch anyway, since it's a known quantity vs. the new hatch wiring, even if they hadn't messed with it.
3) PLEASE take pics and write up the process. I'll be doing some of what you're about to do myself in the spring when I redo (or at least partially redo and have a shop complete the process) my headliner.
Now get along, little doggie, and get started. Have fun!
1) Why would removing the hatch trim pieces ruin them?
Unless you do a Hulk smash! to it, then you should be able to remove and reuse. Someone here had dyed their trim black, and had a nice little write-up with pics buried in someone else's thread, if memory serves. Should be worth doing a search for it.2) torake already answered your question. Do as he and moviela said - remove wiring from the old hatch, thread through the new snorkle, reattach snorkle, then put wiring on new hatch. I would be wanting to use the wiring on the old hatch anyway, since it's a known quantity vs. the new hatch wiring, even if they hadn't messed with it.
3) PLEASE take pics and write up the process. I'll be doing some of what you're about to do myself in the spring when I redo (or at least partially redo and have a shop complete the process) my headliner.
Now get along, little doggie, and get started. Have fun!
10-10-2013, 12:42 PM
#18
MBWorld Fanatic!
Thread Starter
Ok, looks like it should be a cinch.
Tommy, why am I concerned about removing the hatch panels?
Well, I removed mine before and it's not easy to do without breaking some tabs.
1st order of biz of fishing the cut wiring harness out of the new hatch.
That will be good practice and give me the opp to take pics in advance of pulling the
good wiring harness from the old door.
Moviela, I pulled the pallet already you'll be happy to hear.
After the stressful drive home, we laughed our asses off when I looked at the car, with the hatch propped open and held closed with bungie cords, the pallet on top with our step stool still attached, which was what inspired to take a photo.
Of couse by then, I'd removed the step stool and the 'new' hatch....but still....
Hopefully complete this over the weekend, or at least before we get any rain!!!
10-10-2013, 01:21 PM
#20
Out Of Control!!
Can't tell with your "tarp", but is the original trim all messed up? If not, then bust everything around the trim, since you can screw up everything around it, and maintain the integrity of those trim pieces, then transfer to the new hatch, and you won't have to worry about breaking off the tabs.
That is good to know, though - I'll probably end up buying a new set and dying them, so I don't have to have the same concern. I doubt new trim would be too expensive from one of the online sources. Um, actually, looks like about $100, not too bad.
That is good to know, though - I'll probably end up buying a new set and dying them, so I don't have to have the same concern. I doubt new trim would be too expensive from one of the online sources. Um, actually, looks like about $100, not too bad.
10-10-2013, 03:08 PM
#21
Member
Join Date: Jul 2012
Posts: 82
Likes: 0
Received 0 Likes
on
0 Posts
C180 Kompressor Wagon
There's no need to touch anything inside the car to replace the hatch *except* if the hinges need adjustment due to variations in the hatches.
I took these photos to document how the harness was routed, but i wish i would have taken more, there was some guesswork when i re-threaded the harness.


When removing the trim around the window, use a pair of nylon wedges. If it is anything like the wagon hatch trim, and i think it is, the trim pieces just push straight into their 4-6 snap clips, but to get them out you have to loosen clip by clip with a pair of wedges. Out of the 16 or so clips for the white trim, i think only one of mine actually snapped off.
The trim on the bottom has visible pushpins.
I took these photos to document how the harness was routed, but i wish i would have taken more, there was some guesswork when i re-threaded the harness.
When removing the trim around the window, use a pair of nylon wedges. If it is anything like the wagon hatch trim, and i think it is, the trim pieces just push straight into their 4-6 snap clips, but to get them out you have to loosen clip by clip with a pair of wedges. Out of the 16 or so clips for the white trim, i think only one of mine actually snapped off.
The trim on the bottom has visible pushpins.
10-10-2013, 03:59 PM
#22
MBWorld Fanatic!
Join Date: Jul 2008
Posts: 1,005
Likes: 0
Received 0 Likes
on
0 Posts
2013 UFO
There's no need to touch anything inside the car to replace the hatch *except* if the hinges need adjustment due to variations in the hatches.
I took these photos to document how the harness was routed, but i wish i would have taken more, there was some guesswork when i re-threaded the harness.
When removing the trim around the window, use a pair of nylon wedges. If it is anything like the wagon hatch trim, and i think it is, the trim pieces just push straight into their 4-6 snap clips, but to get them out you have to loosen clip by clip with a pair of wedges. Out of the 16 or so clips for the white trim, i think only one of mine actually snapped off.
The trim on the bottom has visible pushpins.
10-10-2013, 04:20 PM
#23
Member
Join Date: Jul 2012
Posts: 82
Likes: 0
Received 0 Likes
on
0 Posts
C180 Kompressor Wagon
The trim around the window looks like it's more or less the same, judging from your picture above. Likewise the hinges and the gas shocks.
10-10-2013, 05:46 PM
#24
MBWorld Fanatic!
Thread Starter
Where do I aquire these wedges, and what do they look like?
I've seen them on the MB special tool list...guessing I might need a pair?
I found this info on removing the trim from Kompressorkid.
Yes, I've had mine off before but I broke lots of clips.
1. Remove all the plastic "rivets", simply pry the center
portion of these up and the whole thing can be pulled
out. These are used to secure the carpeting and handle
cover.
2. Next remove the plastic moldings running up and
down the rear hatch. Careful as these are tucked into
the upper piece closest to the hinges. Undo the cargo
cover bungie points (they turn out like screws). Pull
panels outward parallel with glass away from the hatch
but again don't move the portion closest to the hinges
as the upper piece is basically held in place by a series
of clips. If any of these break it does not fit snug. then
tilt them slight and the tucked in section should pop
out.
3. Next the remove the screws retaining the center
section where the 3rd brake light is. Once removed this
piece is held in place by two clips that pop out fairly
easy with mild force.
There's no need to touch anything inside the car to replace the hatch *except* if the hinges need adjustment due to variations in the hatches.
I took these photos to document how the harness was routed, but i wish i would have taken more, there was some guesswork when i re-threaded the harness.
When removing the trim around the window, use a pair of nylon wedges. If it is anything like the wagon hatch trim, and i think it is, the trim pieces just push straight into their 4-6 snap clips, but to get them out you have to loosen clip by clip with a pair of wedges. Out of the 16 or so clips for the white trim, i think only one of mine actually snapped off.
The trim on the bottom has visible pushpins.
I took these photos to document how the harness was routed, but i wish i would have taken more, there was some guesswork when i re-threaded the harness.
When removing the trim around the window, use a pair of nylon wedges. If it is anything like the wagon hatch trim, and i think it is, the trim pieces just push straight into their 4-6 snap clips, but to get them out you have to loosen clip by clip with a pair of wedges. Out of the 16 or so clips for the white trim, i think only one of mine actually snapped off.
The trim on the bottom has visible pushpins.
Last edited by C230 Sport Coup; 10-10-2013 at 06:03 PM.


