


Warning Triangle Install Picture
Thread Starter
MBWorld Fanatic!


Joined: May 2003
Posts: 4,005
Likes: 106
From: Houston, TX
2015 E250D
Warning Triangle Install Picture
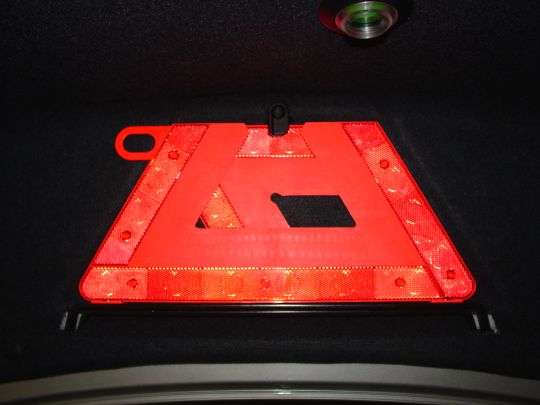
This is a picture of the rear warning trangle installed. You can use the same felt piece under the trunk and cut the necessary points for the top bracket and the feet of the trangle. Again, all original OEM parts.
Trending Topics
Super Member
Joined: Sep 2002
Posts: 987
Likes: 0
From: Houston, TX
2002 C230 Coupe Black/Charcoal C5 C7 Auto
its sad german cars are starting to skimp on little things to save a few bucks when we're more than paying the premium for the little things. I heard '05 c class will no longer have free maintenance is this true?
MB World Stories
The Best of Mercedes & AMG

7 Craziest Things AMG Gas Ever Built
Verdad Gallardo
New Electric Mercedes-AMG GT 4-Door Coupe Unveiled: 10 Things You Need to Know
Verdad Gallardo
6 Mercedes Models That Did NOT Age Well (But Are Somehow Still Cool)
Verdad Gallardo
Manual Mercedes? 6 Times Sindelfingen Let Drivers Have All The Fun
Verdad Gallardo
Mercedes SLR McLaren 722 S Is Extremely Rare Example Modified by McLaren
Verdad Gallardo
8 Classic Boxy Mercedes Designs That Have Aged Like Fine Wine
Verdad Gallardo
Flawlessly Restored Mercedes 190E Evo II Heads to Auction
Verdad Gallardo
Electric Mercedes C-Class Unveiled: 11 Things You Need to Know
Verdad Gallardo
Mercedes EQS Gets A Major Update: Everything You Need to Know
Verdad GallardoAlmost a Member!
Joined: Jun 2003
Posts: 57
Likes: 0
From: Boston,MA
C320 sports
Originally Posted by sunman
This is a picture of the rear warning trangle installed. You can use the same felt piece under the trunk and cut the necessary points for the top bracket and the feet of the trangle. Again, all original OEM parts.
This is a good safety mod.

What's the part number and how much it cost
TIA
MBWorld Fanatic!
Joined: Oct 2002
Posts: 7,737
Likes: 1
From: San Diego, Ca
2003 Citron Green C230KMT
id buy it, but i dont wanna have the case sitting in my trunk. wish it had a place to stay. i wonder if i could attach it to the side of the trunk?
Last edited by CitronC230K_03; Jun 29, 2004 at 07:30 PM.
MBWorld Fanatic!
Joined: Jun 2003
Posts: 9,498
Likes: 4
From: San Diego, CA & San Jose, Costa Rica & Stuttgart, Germany
1959 220S / 1979 230 G / 2002 A210 AMG / 2003 C320 SC / 2004.5 C320 SS / 2005 ML350 SE / 2008 smart
as pictured before, here's my "old-skool" MercedesBenz-BURGER reflective Warning Triangle:

(old picture - before AMG rear bumper, before Parktronic, before AMG exhaust, etc...)
I just installed the new Mercedes-Benz OEM Warning Triangle on my wife's C320 Sport Sedan, so I'm uploading pictures now, and I'll let her post my installation notes and pics.
Carlos

Saprissa@aol.com
(old picture - before AMG rear bumper, before Parktronic, before AMG exhaust, etc...)
I just installed the new Mercedes-Benz OEM Warning Triangle on my wife's C320 Sport Sedan, so I'm uploading pictures now, and I'll let her post my installation notes and pics.
Carlos
Saprissa@aol.com
Member
Joined: Oct 2004
Posts: 81
Likes: 4
From: San Diego, CA
2004.5 C320 Sport Sedan (Metallic Pewter 723) & 2005 ML350 Special Edition (Alabaster White 960)
OK... these are Carlos' ( ) warning triangle (sedan) installation instructions and pictures. I can't believe I'm up doing this right now ! But it sure does look cool in the end !
ZQ
:p
----------------------------------
First off, Part #'s:
- warning triangle (warndreieck) - A 203 890 01 97 - Made in Hungary
- bracket (halder) - A 202 890 00 14 - Made in Germany
Price: approx $100 depending on EURO to US$ exchange rate.
Where to get it: special order from any European/German MB dealer. Europe only part.
Installation instructions:
0) tools needed: torx-15 screwdriver, 2 flat-head screwdrivers, sharp cutting exacto knife, a little bit of patience !
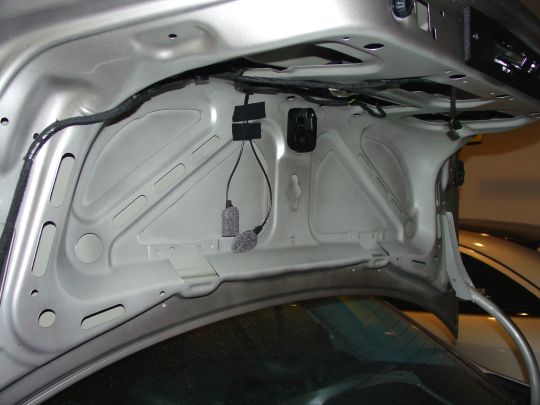
1) Remove trunk-lid liner:
a- disconnect plastic trunk-arm covers. Carefully popping off each little strap.
b- remove 13 button clips from liner & 2 from arm covers

c- using Torx 15 driver, unscrew left-most torx screw to release liner from trunk locking mechanism.
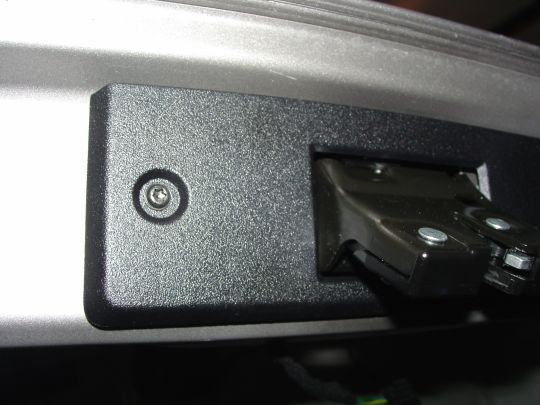
d- unplug wires from green trunk escape button
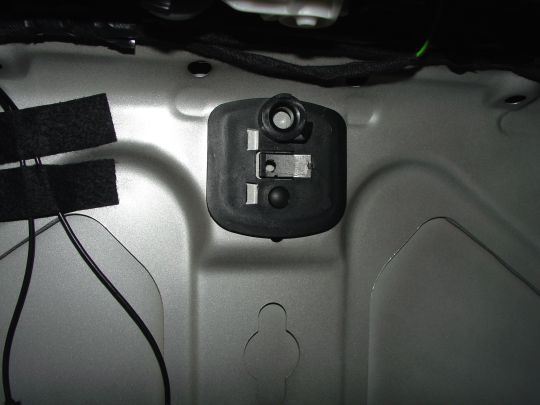
2) The holding bracket:
a- on the holding bracket, there is a hinge pin. Remove it by pushing from behind, pulling from the front.


b- the next part is tricky... The sliding piece must also come out. From behind you need to squeeze the 4 anchors towards each other (middle). Using a second person to help you may be necessary. Use 2 flat-head screwdrivers. Once aligned you can pull out the sliding assembly from the front.
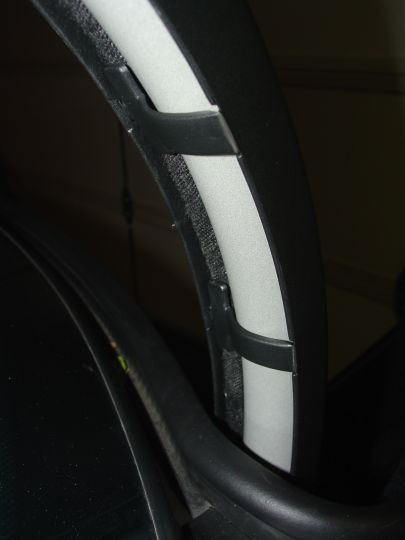
c- Take the holding bracket and insert as pictured into trunk-lid slots.

3) Cutting holes in the lid-liner:
a- before cutting anything, place the warning triangle on the trunk lid, without the liner, so you can get a feel to where it goes and how it should be placed. The liner itself has a triangular indentation, so you know it was meant to be there, but only on European spec cars. Here are some pics:

notice how the legs of the triangle fit into those 2 compartments in the deck lid:

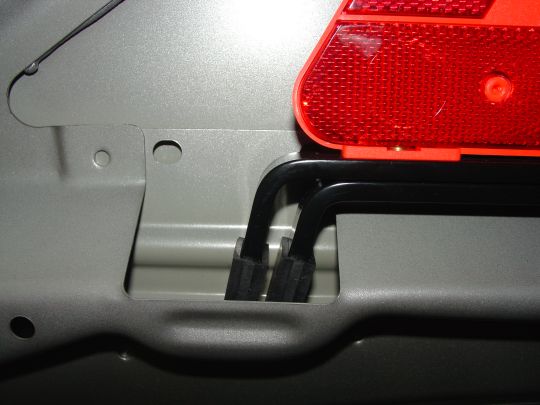
b- by whatever method you prefer best, (measuring, outlining with white chalk, eyeballing it, etc...) cut incisions into the liner so that the legs of the triangle will go through the liner and rest in their slots.


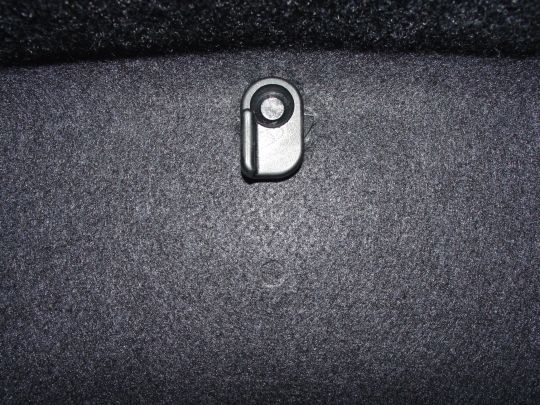
c- align the lid liner to the deck lid and feel where the small circular hole from the holding bracket needs to come through, and a hole needs to be cut. You will need to reinsert the 2 pieces removed above in steps 2a and 2b.
d- cut hole through liner, making sure it matches up. Use other button clip holes in liner to ensure everything is placed/cut correctly.

to be continued......
) warning triangle (sedan) installation instructions and pictures. I can't believe I'm up doing this right now ! But it sure does look cool in the end !ZQ
:p
----------------------------------
First off, Part #'s:
- warning triangle (warndreieck) - A 203 890 01 97 - Made in Hungary
- bracket (halder) - A 202 890 00 14 - Made in Germany
Price: approx $100 depending on EURO to US$ exchange rate.
Where to get it: special order from any European/German MB dealer. Europe only part.
Installation instructions:
0) tools needed: torx-15 screwdriver, 2 flat-head screwdrivers, sharp cutting exacto knife, a little bit of patience !
1) Remove trunk-lid liner:
a- disconnect plastic trunk-arm covers. Carefully popping off each little strap.
b- remove 13 button clips from liner & 2 from arm covers
c- using Torx 15 driver, unscrew left-most torx screw to release liner from trunk locking mechanism.
d- unplug wires from green trunk escape button
2) The holding bracket:
a- on the holding bracket, there is a hinge pin. Remove it by pushing from behind, pulling from the front.
b- the next part is tricky... The sliding piece must also come out. From behind you need to squeeze the 4 anchors towards each other (middle). Using a second person to help you may be necessary. Use 2 flat-head screwdrivers. Once aligned you can pull out the sliding assembly from the front.
c- Take the holding bracket and insert as pictured into trunk-lid slots.
3) Cutting holes in the lid-liner:
a- before cutting anything, place the warning triangle on the trunk lid, without the liner, so you can get a feel to where it goes and how it should be placed. The liner itself has a triangular indentation, so you know it was meant to be there, but only on European spec cars. Here are some pics:
notice how the legs of the triangle fit into those 2 compartments in the deck lid:
b- by whatever method you prefer best, (measuring, outlining with white chalk, eyeballing it, etc...) cut incisions into the liner so that the legs of the triangle will go through the liner and rest in their slots.
c- align the lid liner to the deck lid and feel where the small circular hole from the holding bracket needs to come through, and a hole needs to be cut. You will need to reinsert the 2 pieces removed above in steps 2a and 2b.
d- cut hole through liner, making sure it matches up. Use other button clip holes in liner to ensure everything is placed/cut correctly.
to be continued......
Last edited by Only4ZQ; Apr 18, 2005 at 03:04 AM.
Member
Joined: Oct 2004
Posts: 81
Likes: 4
From: San Diego, CA
2004.5 C320 Sport Sedan (Metallic Pewter 723) & 2005 ML350 Special Edition (Alabaster White 960)
Warning Triangle Installation (...continued)
4) Replacing Lid Liner:
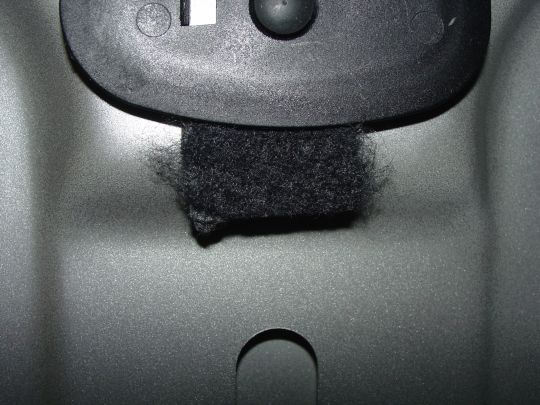
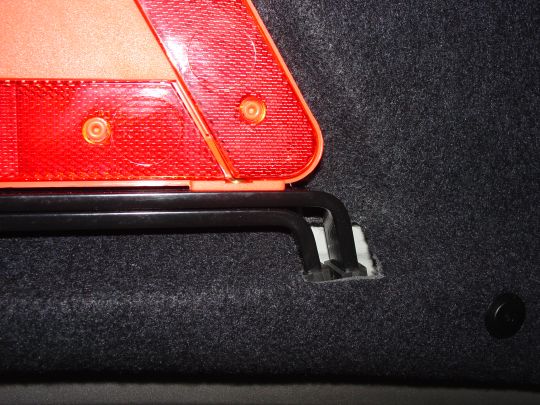
a- before replacing the lid liner, tip #1: place a piece of lid liner felt that you just cut out, directly under bracket, because the hole for one of the button clips will not be able to be replaced with the button clip, because the holding bracket partially obstructs it. See pics:

b- before replacing the lid liner, tip #2: re-attach the wires to the green trunk escape button.
c- replace lid liner aligning all holes and screwing in left torx screw in trunk locking mechanism. Note: you may have to loosen the right torx screw too, to get the liner correctly behind the trunk locking mechanism.
d- replace all 12 button clips (remember one button clip) will not be able to go back in (save it as a spare). Here's what the liner will look like with the holding bracket hole protruding through the hole you cut:
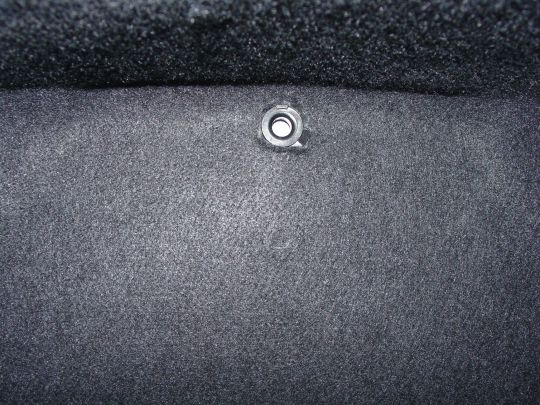 also notice, that the felt camouflages that button-clip hole that could not be plugged.
5) finishing touches:
a- replace deck lid plastic arm covers, securing the straps and button clips

b- replace sliding piece onto the holding bracket hole

c- replace the hinge pin into the holding bracket hole through the sliding piece
d- insert warning triangle into your newly formed cut outs within the lid liner, and hold in place by swinging the sliding piece down as designed.


and you're all done !!
Carlos
Saprissa@aol.com

ZQ
:p
a- before replacing the lid liner, tip #1: place a piece of lid liner felt that you just cut out, directly under bracket, because the hole for one of the button clips will not be able to be replaced with the button clip, because the holding bracket partially obstructs it. See pics:
b- before replacing the lid liner, tip #2: re-attach the wires to the green trunk escape button.
c- replace lid liner aligning all holes and screwing in left torx screw in trunk locking mechanism. Note: you may have to loosen the right torx screw too, to get the liner correctly behind the trunk locking mechanism.
d- replace all 12 button clips (remember one button clip) will not be able to go back in (save it as a spare). Here's what the liner will look like with the holding bracket hole protruding through the hole you cut:
also notice, that the felt camouflages that button-clip hole that could not be plugged.5) finishing touches:
a- replace deck lid plastic arm covers, securing the straps and button clips
b- replace sliding piece onto the holding bracket hole
c- replace the hinge pin into the holding bracket hole through the sliding piece
d- insert warning triangle into your newly formed cut outs within the lid liner, and hold in place by swinging the sliding piece down as designed.
and you're all done !!
Carlos
Saprissa@aol.com
ZQ
:p


MBWorld Fanatic!
Joined: Jun 2003
Posts: 9,498
Likes: 4
From: San Diego, CA & San Jose, Costa Rica & Stuttgart, Germany
1959 220S / 1979 230 G / 2002 A210 AMG / 2003 C320 SC / 2004.5 C320 SS / 2005 ML350 SE / 2008 smart
Originally Posted by W0n6_3d4n
That triangle thing is standard on my C, hmm, i thought it was sth compulsry to have red triangle.
Carlos
Saprissa@aol.com
Super Member
Joined: Jul 2002
Posts: 784
Likes: 0
From: Brisbane/Sydney, Australia
Originally Posted by CitronC230K_03
i wish the coupes had a place the the triangle rather than lying in the trunk.
MBWorld Fanatic!
Joined: Feb 2006
Posts: 1,489
Likes: 110
From: WNY
2005 w203 C230
How in the world do you remove this trim? I gave it a go for a little bit today, only not to be able to remove this plastic trim and so I could not remove the trunk liner. The directions here (thank you) are very good AFTER you have the liner out...Is there any way to explain better how to remove this trim, get to and unplug the trunk pop button so that you can remove the trunk liner?
Thank you,
Jake
(I will post pictures once I figure it out...)
Thank you,
Jake
(I will post pictures once I figure it out...)


