


2011 LED DRL installed - Having issue

Thread Starter
Super Member
Joined: Apr 2010
Posts: 770
Likes: 9
2017 C43
2011 LED DRL installed - Having issue
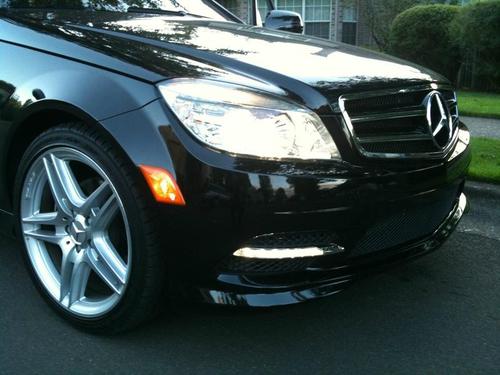
Ok, I'll make this short at first, I'll explain more later and put up some pics when i get more time.
I got the lights all hooked up, and currently have them wired to the (orange) side marker lights.
The lights work fine when standing still, but as soon as i start the car, back out of the garage and park, the lights start turning on and off at random intervals. usually something like ' on for 10 seconds, off for 2, on for 5 seconds, off for one'
Is this what people describe as flickering? I have not lined in a capacitor yet, is that the issue here? I just need to put a capacitor in line to bandaid the voltage drop?
Too bad there are only a couple of us on here that have done it..

Super Member
Joined: Dec 2007
Posts: 580
Likes: 0
C300 Sport 6MT
Did you wire the LEDs in parallel with the sidemarkers, i.e. they also turn on? If so, you've added an additional load to the marker circuit, hence the flickering. Easy experiment would be to disconnect the markers and see if the flickering is still there w/ the LEDs...

Super Member
Joined: Mar 2011
Posts: 955
Likes: 0
From: NNJ
'11 C350 '13 F150 lariat
the problem is your feeding them 12 volts, they want 3.7 volts. whats happening is the car being idle gives them a steady 12v and they can operate at a fixed voltage. once teh car is driven the alternator fluctuates and the LEDs cant keep up. Thats why you need a capacitor to reduce the voltage because your alternator will never get below 11 volts and the cap will always be downgradings teh voltage. You also take a chance frying the LEDs w that much juice so get a cap in line with the + feed ASAP. You can prob get one at radioshack, I can look up the proper rating if you need it......
Senior Member
Joined: Jun 2003
Posts: 433
Likes: 2
From: Los Angeles
2008 C300 Sport Sedan: Panarama Roof, P2, Multimedia
Ok, I'll make this short at first, I'll explain more later and put up some pics when i get more time.
I got the lights all hooked up, and currently have them wired to the (orange) side marker lights.
The lights work fine when standing still, but as soon as i start the car, back out of the garage and park, the lights start turning on and off at random intervals. usually something like ' on for 10 seconds, off for 2, on for 5 seconds, off for one'
Is this what people describe as flickering? I have not lined in a capacitor yet, is that the issue here? I just need to put a capacitor in line to bandaid the voltage drop?
Too bad there are only a couple of us on here that have done it..
I got the lights all hooked up, and currently have them wired to the (orange) side marker lights.
The lights work fine when standing still, but as soon as i start the car, back out of the garage and park, the lights start turning on and off at random intervals. usually something like ' on for 10 seconds, off for 2, on for 5 seconds, off for one'
Is this what people describe as flickering? I have not lined in a capacitor yet, is that the issue here? I just need to put a capacitor in line to bandaid the voltage drop?
Too bad there are only a couple of us on here that have done it..
I have a question about retrofitting it though. Was everything a direct bolt on without any modifications other then the wiring? Did you have to do any physical modification?
Thread Starter
Super Member
Joined: Apr 2010
Posts: 770
Likes: 9
2017 C43
got the issue resolved - capacitor was needed. got them all wired in and all is well so far! They look really good, I'm really happy I did the mod. Now I can feel all hoity toity like I'm driving a 2011 
Trending Topics
MB World Stories
The Best of Mercedes & AMG

7 Craziest Things AMG Gas Ever Built
Verdad Gallardo
New Electric Mercedes-AMG GT 4-Door Coupe Unveiled: 10 Things You Need to Know
Verdad Gallardo
6 Mercedes Models That Did NOT Age Well (But Are Somehow Still Cool)
Verdad Gallardo
Manual Mercedes? 6 Times Sindelfingen Let Drivers Have All The Fun
Verdad Gallardo
Mercedes SLR McLaren 722 S Is Extremely Rare Example Modified by McLaren
Verdad Gallardo
8 Classic Boxy Mercedes Designs That Have Aged Like Fine Wine
Verdad Gallardo
Flawlessly Restored Mercedes 190E Evo II Heads to Auction
Verdad Gallardo
Electric Mercedes C-Class Unveiled: 11 Things You Need to Know
Verdad Gallardo
Mercedes EQS Gets A Major Update: Everything You Need to Know
Verdad Gallardo
Thread Starter
Super Member
Joined: Apr 2010
Posts: 770
Likes: 9
2017 C43
Senior Member
Joined: Jun 2003
Posts: 433
Likes: 2
From: Los Angeles
2008 C300 Sport Sedan: Panarama Roof, P2, Multimedia
Do you get any error messages? I can't wait for your write up DIY! I really want to do this mod...
Senior Member
Joined: Jun 2003
Posts: 433
Likes: 2
From: Los Angeles
2008 C300 Sport Sedan: Panarama Roof, P2, Multimedia

Super Member
Joined: May 2010
Posts: 816
Likes: 21
2008 W204
is yours 08 a sport model?
Very good idea hooking it up to the side marker as that is almost always getting voltage.
As far as the parts, what did you need? Obviously the DRLs, but any type of control box or mounting brackets?
Very good idea hooking it up to the side marker as that is almost always getting voltage.
As far as the parts, what did you need? Obviously the DRLs, but any type of control box or mounting brackets?
Last edited by LandSeaAir; Jul 29, 2011 at 10:27 PM.
Thread Starter
Super Member
Joined: Apr 2010
Posts: 770
Likes: 9
2017 C43

Here are some pics. I need to grab my part number sheet tomorrow and I will send out PMs and also post the numbers on here. I'll do a short write up now for how I installed them and wired them
Thread Starter
Super Member
Joined: Apr 2010
Posts: 770
Likes: 9
2017 C43
Step one: Acquire parts
1. LED fixtures (R/L)
2. Mounting backings (plastic) R/L
3. Front facing grills (visible mesh surround) R/L
4. Chromed plastic LED bezels R/L
5. Misc wiring/soldering supplies
6. 2 Capacitors (50-150 uf @25v) Aluminum,radial lead normal or high temp range will work.
Step 2. Remove bumper
See this DIY Vid for good instructions on removing the front bumper
http://www.youtube.com/watch?v=XU6bSJ-b0mk
Step 3. Cut out old fog light mounting plastic from bumper
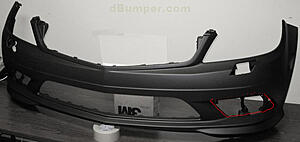
You can see in the picture where you necessarily need to cut. Use some common sense when doing this. don't cut into anything that is visible from the front of the car with the plastic mesh piece in place.
I recommend using a dremel with a small diameter cut off wheel for this (to get in the tight spots).
*Pro-tip: retain the screw backings that are slipped onto the plastic pieces from the bumper which you are removing. those can be used on the new backings which you will be installing the new LEDs into
Step 3.5 - Now you're going to need to install the chrome bezel onto the LED fixture. you will notice that there is a tab that is meant to index into the bumper. Now, it is up to you if you want to chance slitting the bumper in the right spot. I, however just clipped off this tab from the chrome bezel and ground it flush. No problems yet and the light is plenty sturdy without it. a bit like a vestigial tail if you ask me.
Step 4. Assemble LED into the backing plastic (may need to scrounge for some hardware) I used some 8mm bolts screwed into a clip nut that was slid over some corresponding holes on the LED fixture.
Step 5. Finagle the light/chrome bezel/backing plastic assembly into the newly cleaned out bumper holes (from the rear) (thats what she said), once in place you can sandwich in the front mesh piece and screw it all together. once it is tight you are all done with the light install.
You will find that some various screws/mounting hardware are necessary for this. I recommend installing these at someones house that has lots of extra random junk like this lying around. Other than the hardware to bold the LEDs to the backings, you should have enough screws from the OE stuff you are removing.
Step 6. Now it is time to wire em up.
**Disclaimer - You should try to find the electrical plug from the dealership, the one that is meant to plug into the back of the LEDs. This will make your life easier**
I created my own plug and it was a mess of hacking up PC pin connectors, soldering stuff, melting plastic together at the right pin width.. I wasted way too much time on this, pay whatever price the dealership wants for these plugs and save yourself the headache.
Once you have your OEM plug, put in your capacitor (one per side) in parallel (positive to positive,negative to negative) with the circuit. (note the directional arrows or polarity noted on the Capacitor. If it is backwards you will find out quickly due to it exploding in a 'pop-it' sized firework explosion. (some are non polarized if you feel like being lazy) Make sure it is securely soldered in and then you can plug the wiring into the vehicle side electrical connection of your choice.
I chose the side markers since I had already made some connectors and had wires ran out from there. you could just as easily use the fog light connectors, it just depends how you want to activate them.
*I have no errors from my fogs being disconnected.
Anyway. at this point the lights should work and not flicker. You're ready to install the bumper again. Just line up the index points on the sides near the marker lights and then re-bolt the bumper. after that you're set and now a certified owner of a 2011 c class. Oh and for extra pro-points get the mirror cover updates which I also have ($139 on ebay).
Any questions, feel free to ask. I'll try to get that part number list tomorrow.
1. LED fixtures (R/L)
2. Mounting backings (plastic) R/L
3. Front facing grills (visible mesh surround) R/L
4. Chromed plastic LED bezels R/L
5. Misc wiring/soldering supplies
6. 2 Capacitors (50-150 uf @25v) Aluminum,radial lead normal or high temp range will work.
Step 2. Remove bumper
See this DIY Vid for good instructions on removing the front bumper
http://www.youtube.com/watch?v=XU6bSJ-b0mk
Step 3. Cut out old fog light mounting plastic from bumper

You can see in the picture where you necessarily need to cut. Use some common sense when doing this. don't cut into anything that is visible from the front of the car with the plastic mesh piece in place.
I recommend using a dremel with a small diameter cut off wheel for this (to get in the tight spots).
*Pro-tip: retain the screw backings that are slipped onto the plastic pieces from the bumper which you are removing. those can be used on the new backings which you will be installing the new LEDs into
Step 3.5 - Now you're going to need to install the chrome bezel onto the LED fixture. you will notice that there is a tab that is meant to index into the bumper. Now, it is up to you if you want to chance slitting the bumper in the right spot. I, however just clipped off this tab from the chrome bezel and ground it flush. No problems yet and the light is plenty sturdy without it. a bit like a vestigial tail if you ask me.
Step 4. Assemble LED into the backing plastic (may need to scrounge for some hardware) I used some 8mm bolts screwed into a clip nut that was slid over some corresponding holes on the LED fixture.
Step 5. Finagle the light/chrome bezel/backing plastic assembly into the newly cleaned out bumper holes (from the rear) (thats what she said), once in place you can sandwich in the front mesh piece and screw it all together. once it is tight you are all done with the light install.
You will find that some various screws/mounting hardware are necessary for this. I recommend installing these at someones house that has lots of extra random junk like this lying around. Other than the hardware to bold the LEDs to the backings, you should have enough screws from the OE stuff you are removing.
Step 6. Now it is time to wire em up.
**Disclaimer - You should try to find the electrical plug from the dealership, the one that is meant to plug into the back of the LEDs. This will make your life easier**
I created my own plug and it was a mess of hacking up PC pin connectors, soldering stuff, melting plastic together at the right pin width.. I wasted way too much time on this, pay whatever price the dealership wants for these plugs and save yourself the headache.
Once you have your OEM plug, put in your capacitor (one per side) in parallel (positive to positive,negative to negative) with the circuit. (note the directional arrows or polarity noted on the Capacitor. If it is backwards you will find out quickly due to it exploding in a 'pop-it' sized firework explosion. (some are non polarized if you feel like being lazy) Make sure it is securely soldered in and then you can plug the wiring into the vehicle side electrical connection of your choice.
I chose the side markers since I had already made some connectors and had wires ran out from there. you could just as easily use the fog light connectors, it just depends how you want to activate them.
*I have no errors from my fogs being disconnected.
Anyway. at this point the lights should work and not flicker. You're ready to install the bumper again. Just line up the index points on the sides near the marker lights and then re-bolt the bumper. after that you're set and now a certified owner of a 2011 c class
. Oh and for extra pro-points get the mirror cover updates which I also have ($139 on ebay). Any questions, feel free to ask. I'll try to get that part number list tomorrow.
Super Member
Joined: May 2010
Posts: 816
Likes: 21
2008 W204
Step one: Acquire parts
1. LED fixtures (R/L)
2. Mounting backings (plastic) R/L
3. Front facing grills (visible mesh surround) R/L
4. Chromed plastic LED bezels R/L
5. Misc wiring/soldering supplies
6. 2 Capacitors (50-150 uf @25v) Aluminum,radial lead normal or high temp range will work.
Step 2. Remove bumper
See this DIY Vid for good instructions on removing the front bumper
http://www.youtube.com/watch?v=XU6bSJ-b0mk
Step 3. Cut out old fog light mounting plastic from bumper

You can see in the picture where you necessarily need to cut. Use some common sense when doing this. don't cut into anything that is visible from the front of the car with the plastic mesh piece in place.
I recommend using a dremel with a small diameter cut off wheel for this (to get in the tight spots).
*Pro-tip: retain the screw backings that are slipped onto the plastic pieces from the bumper which you are removing. those can be used on the new backings which you will be installing the new LEDs into
Step 3.5 - Now you're going to need to install the chrome bezel onto the LED fixture. you will notice that there is a tab that is meant to index into the bumper. Now, it is up to you if you want to chance slitting the bumper in the right spot. I, however just clipped off this tab from the chrome bezel and ground it flush. No problems yet and the light is plenty sturdy without it. a bit like a vestigial tail if you ask me.
Step 4. Assemble LED into the backing plastic (may need to scrounge for some hardware) I used some 8mm bolts screwed into a clip nut that was slid over some corresponding holes on the LED fixture.
Step 5. Finagle the light/chrome bezel/backing plastic assembly into the newly cleaned out bumper holes (from the rear) (thats what she said), once in place you can sandwich in the front mesh piece and screw it all together. once it is tight you are all done with the light install.
You will find that some various screws/mounting hardware are necessary for this. I recommend installing these at someones house that has lots of extra random junk like this lying around. Other than the hardware to bold the LEDs to the backings, you should have enough screws from the OE stuff you are removing.
Step 6. Now it is time to wire em up.
**Disclaimer - You should try to find the electrical plug from the dealership, the one that is meant to plug into the back of the LEDs. This will make your life easier**
I created my own plug and it was a mess of hacking up PC pin connectors, soldering stuff, melting plastic together at the right pin width.. I wasted way too much time on this, pay whatever price the dealership wants for these plugs and save yourself the headache.
Once you have your OEM plug, put in your capacitor (one per side) in parallel (positive to positive,negative to negative) with the circuit. (note the directional arrows or polarity noted on the Capacitor. If it is backwards you will find out quickly due to it exploding in a 'pop-it' sized firework explosion. (some are non polarized if you feel like being lazy) Make sure it is securely soldered in and then you can plug the wiring into the vehicle side electrical connection of your choice.
I chose the side markers since I had already made some connectors and had wires ran out from there. you could just as easily use the fog light connectors, it just depends how you want to activate them.
*I have no errors from my fogs being disconnected.
Anyway. at this point the lights should work and not flicker. You're ready to install the bumper again. Just line up the index points on the sides near the marker lights and then re-bolt the bumper. after that you're set and now a certified owner of a 2011 c class. Oh and for extra pro-points get the mirror cover updates which I also have ($139 on ebay).
Any questions, feel free to ask. I'll try to get that part number list tomorrow.
1. LED fixtures (R/L)
2. Mounting backings (plastic) R/L
3. Front facing grills (visible mesh surround) R/L
4. Chromed plastic LED bezels R/L
5. Misc wiring/soldering supplies
6. 2 Capacitors (50-150 uf @25v) Aluminum,radial lead normal or high temp range will work.
Step 2. Remove bumper
See this DIY Vid for good instructions on removing the front bumper
http://www.youtube.com/watch?v=XU6bSJ-b0mk
Step 3. Cut out old fog light mounting plastic from bumper
You can see in the picture where you necessarily need to cut. Use some common sense when doing this. don't cut into anything that is visible from the front of the car with the plastic mesh piece in place.
I recommend using a dremel with a small diameter cut off wheel for this (to get in the tight spots).
*Pro-tip: retain the screw backings that are slipped onto the plastic pieces from the bumper which you are removing. those can be used on the new backings which you will be installing the new LEDs into
Step 3.5 - Now you're going to need to install the chrome bezel onto the LED fixture. you will notice that there is a tab that is meant to index into the bumper. Now, it is up to you if you want to chance slitting the bumper in the right spot. I, however just clipped off this tab from the chrome bezel and ground it flush. No problems yet and the light is plenty sturdy without it. a bit like a vestigial tail if you ask me.
Step 4. Assemble LED into the backing plastic (may need to scrounge for some hardware) I used some 8mm bolts screwed into a clip nut that was slid over some corresponding holes on the LED fixture.
Step 5. Finagle the light/chrome bezel/backing plastic assembly into the newly cleaned out bumper holes (from the rear) (thats what she said), once in place you can sandwich in the front mesh piece and screw it all together. once it is tight you are all done with the light install.
You will find that some various screws/mounting hardware are necessary for this. I recommend installing these at someones house that has lots of extra random junk like this lying around. Other than the hardware to bold the LEDs to the backings, you should have enough screws from the OE stuff you are removing.
Step 6. Now it is time to wire em up.
**Disclaimer - You should try to find the electrical plug from the dealership, the one that is meant to plug into the back of the LEDs. This will make your life easier**
I created my own plug and it was a mess of hacking up PC pin connectors, soldering stuff, melting plastic together at the right pin width.. I wasted way too much time on this, pay whatever price the dealership wants for these plugs and save yourself the headache.
Once you have your OEM plug, put in your capacitor (one per side) in parallel (positive to positive,negative to negative) with the circuit. (note the directional arrows or polarity noted on the Capacitor. If it is backwards you will find out quickly due to it exploding in a 'pop-it' sized firework explosion. (some are non polarized if you feel like being lazy) Make sure it is securely soldered in and then you can plug the wiring into the vehicle side electrical connection of your choice.
I chose the side markers since I had already made some connectors and had wires ran out from there. you could just as easily use the fog light connectors, it just depends how you want to activate them.
*I have no errors from my fogs being disconnected.
Anyway. at this point the lights should work and not flicker. You're ready to install the bumper again. Just line up the index points on the sides near the marker lights and then re-bolt the bumper. after that you're set and now a certified owner of a 2011 c class
. Oh and for extra pro-points get the mirror cover updates which I also have ($139 on ebay). Any questions, feel free to ask. I'll try to get that part number list tomorrow.
About the wiring, How many wires are there coming from the actual light? Is it two, a pos and a negative? And instead of making your own connecter or buying one from the dealer, was there something from stopping you from just cutting the connector off and hard wiring it?
Also, on the 2011's, when you turn on your headlights the DRLs dim, because yours is hardwired it obviously wouldn't do that, so do you know if yours are always really bright, or are they always dim?

Banned
Joined: Jul 2011
Posts: 1,304
Likes: 6
From: New York, NY
C63 AMG
Step one: Acquire parts
1. LED fixtures (R/L)
2. Mounting backings (plastic) R/L
3. Front facing grills (visible mesh surround) R/L
4. Chromed plastic LED bezels R/L
5. Misc wiring/soldering supplies
6. 2 Capacitors (50-150 uf @25v) Aluminum,radial lead normal or high temp range will work.
Step 2. Remove bumper
See this DIY Vid for good instructions on removing the front bumper
http://www.youtube.com/watch?v=XU6bSJ-b0mk
Step 3. Cut out old fog light mounting plastic from bumper
You can see in the picture where you necessarily need to cut. Use some common sense when doing this. don't cut into anything that is visible from the front of the car with the plastic mesh piece in place.
I recommend using a dremel with a small diameter cut off wheel for this (to get in the tight spots).
*Pro-tip: retain the screw backings that are slipped onto the plastic pieces from the bumper which you are removing. those can be used on the new backings which you will be installing the new LEDs into
Step 3.5 - Now you're going to need to install the chrome bezel onto the LED fixture. you will notice that there is a tab that is meant to index into the bumper. Now, it is up to you if you want to chance slitting the bumper in the right spot. I, however just clipped off this tab from the chrome bezel and ground it flush. No problems yet and the light is plenty sturdy without it. a bit like a vestigial tail if you ask me.
Step 4. Assemble LED into the backing plastic (may need to scrounge for some hardware) I used some 8mm bolts screwed into a clip nut that was slid over some corresponding holes on the LED fixture.
Step 5. Finagle the light/chrome bezel/backing plastic assembly into the newly cleaned out bumper holes (from the rear) (thats what she said), once in place you can sandwich in the front mesh piece and screw it all together. once it is tight you are all done with the light install.
You will find that some various screws/mounting hardware are necessary for this. I recommend installing these at someones house that has lots of extra random junk like this lying around. Other than the hardware to bold the LEDs to the backings, you should have enough screws from the OE stuff you are removing.
Step 6. Now it is time to wire em up.
**Disclaimer - You should try to find the electrical plug from the dealership, the one that is meant to plug into the back of the LEDs. This will make your life easier**
I created my own plug and it was a mess of hacking up PC pin connectors, soldering stuff, melting plastic together at the right pin width.. I wasted way too much time on this, pay whatever price the dealership wants for these plugs and save yourself the headache.
Once you have your OEM plug, put in your capacitor (one per side) in parallel (positive to positive,negative to negative) with the circuit. (note the directional arrows or polarity noted on the Capacitor. If it is backwards you will find out quickly due to it exploding in a 'pop-it' sized firework explosion. (some are non polarized if you feel like being lazy) Make sure it is securely soldered in and then you can plug the wiring into the vehicle side electrical connection of your choice.
I chose the side markers since I had already made some connectors and had wires ran out from there. you could just as easily use the fog light connectors, it just depends how you want to activate them.
*I have no errors from my fogs being disconnected.
Anyway. at this point the lights should work and not flicker. You're ready to install the bumper again. Just line up the index points on the sides near the marker lights and then re-bolt the bumper. after that you're set and now a certified owner of a 2011 c class. Oh and for extra pro-points get the mirror cover updates which I also have ($139 on ebay).
Any questions, feel free to ask. I'll try to get that part number list tomorrow.
1. LED fixtures (R/L)
2. Mounting backings (plastic) R/L
3. Front facing grills (visible mesh surround) R/L
4. Chromed plastic LED bezels R/L
5. Misc wiring/soldering supplies
6. 2 Capacitors (50-150 uf @25v) Aluminum,radial lead normal or high temp range will work.
Step 2. Remove bumper
See this DIY Vid for good instructions on removing the front bumper
http://www.youtube.com/watch?v=XU6bSJ-b0mk
Step 3. Cut out old fog light mounting plastic from bumper
You can see in the picture where you necessarily need to cut. Use some common sense when doing this. don't cut into anything that is visible from the front of the car with the plastic mesh piece in place.
I recommend using a dremel with a small diameter cut off wheel for this (to get in the tight spots).
*Pro-tip: retain the screw backings that are slipped onto the plastic pieces from the bumper which you are removing. those can be used on the new backings which you will be installing the new LEDs into
Step 3.5 - Now you're going to need to install the chrome bezel onto the LED fixture. you will notice that there is a tab that is meant to index into the bumper. Now, it is up to you if you want to chance slitting the bumper in the right spot. I, however just clipped off this tab from the chrome bezel and ground it flush. No problems yet and the light is plenty sturdy without it. a bit like a vestigial tail if you ask me.
Step 4. Assemble LED into the backing plastic (may need to scrounge for some hardware) I used some 8mm bolts screwed into a clip nut that was slid over some corresponding holes on the LED fixture.
Step 5. Finagle the light/chrome bezel/backing plastic assembly into the newly cleaned out bumper holes (from the rear) (thats what she said), once in place you can sandwich in the front mesh piece and screw it all together. once it is tight you are all done with the light install.
You will find that some various screws/mounting hardware are necessary for this. I recommend installing these at someones house that has lots of extra random junk like this lying around. Other than the hardware to bold the LEDs to the backings, you should have enough screws from the OE stuff you are removing.
Step 6. Now it is time to wire em up.
**Disclaimer - You should try to find the electrical plug from the dealership, the one that is meant to plug into the back of the LEDs. This will make your life easier**
I created my own plug and it was a mess of hacking up PC pin connectors, soldering stuff, melting plastic together at the right pin width.. I wasted way too much time on this, pay whatever price the dealership wants for these plugs and save yourself the headache.
Once you have your OEM plug, put in your capacitor (one per side) in parallel (positive to positive,negative to negative) with the circuit. (note the directional arrows or polarity noted on the Capacitor. If it is backwards you will find out quickly due to it exploding in a 'pop-it' sized firework explosion. (some are non polarized if you feel like being lazy) Make sure it is securely soldered in and then you can plug the wiring into the vehicle side electrical connection of your choice.
I chose the side markers since I had already made some connectors and had wires ran out from there. you could just as easily use the fog light connectors, it just depends how you want to activate them.
*I have no errors from my fogs being disconnected.
Anyway. at this point the lights should work and not flicker. You're ready to install the bumper again. Just line up the index points on the sides near the marker lights and then re-bolt the bumper. after that you're set and now a certified owner of a 2011 c class
. Oh and for extra pro-points get the mirror cover updates which I also have ($139 on ebay). Any questions, feel free to ask. I'll try to get that part number list tomorrow.

Thread Starter
Super Member
Joined: Apr 2010
Posts: 770
Likes: 9
2017 C43
Wonderful job, you are the first person I've seen on here to do it successfully and explained it quite simply.
About the wiring, How many wires are there coming from the actual light? Is it two, a pos and a negative? And instead of making your own connecter or buying one from the dealer, was there something from stopping you from just cutting the connector off and hard wiring it?
Also, on the 2011's, when you turn on your headlights the DRLs dim, because yours is hardwired it obviously wouldn't do that, so do you know if yours are always really bright, or are they always dim?
there are Two leads coming out of the back of the LED fixture, but they are probably 1/2 inch down a recessed area. I could have hard wired them but my soldering iron is a big big and clunky, I would have surely melted part of the plastic housing. I also told myself that I was going to go back and buy the plugs, but my improved versions have held so far.
and yes, just Positive and negative out of the LED.
Mine are on bright all the time. At night they are bright, but not anything that blinds people as far as I can tell. I havent had anyone flash their lights at me yet. I'm actually glad that they are bright all the time
Super Member
Joined: May 2010
Posts: 816
Likes: 21
2008 W204
there are Two leads coming out of the back of the LED fixture, but they are probably 1/2 inch down a recessed area. I could have hard wired them but my soldering iron is a big big and clunky, I would have surely melted part of the plastic housing. I also told myself that I was going to go back and buy the plugs, but my improved versions have held so far.
and yes, just Positive and negative out of the LED.
Mine are on bright all the time. At night they are bright, but not anything that blinds people as far as I can tell. I havent had anyone flash their lights at me yet. I'm actually glad that they are bright all the time
and yes, just Positive and negative out of the LED.
Mine are on bright all the time. At night they are bright, but not anything that blinds people as far as I can tell. I havent had anyone flash their lights at me yet. I'm actually glad that they are bright all the time
Sorry to keep being a pest, but do you think you could post the part numbers?
 This is the first mod I am going to do, and I am hopefully getting the car this Thursday!!
Heres a cart I have on Parts.com, am I missing anything?
http://i1104.photobucket.com/albums/...9/Picture1.png
Last edited by LandSeaAir; Aug 2, 2011 at 12:41 AM.
Senior Member
Joined: Jun 2003
Posts: 433
Likes: 2
From: Los Angeles
2008 C300 Sport Sedan: Panarama Roof, P2, Multimedia
Nice write up! Where did you get the capacitor from? Is there a specific type? Do you have a picture of it? Also, what did you do with your foglight wiring since you didn't connect them to it? Is it just dangling? I know you indicated that there's no error message.
Step one: Acquire parts
1. LED fixtures (R/L)
2. Mounting backings (plastic) R/L
3. Front facing grills (visible mesh surround) R/L
4. Chromed plastic LED bezels R/L
5. Misc wiring/soldering supplies
6. 2 Capacitors (50-150 uf @25v) Aluminum,radial lead normal or high temp range will work.
Step 2. Remove bumper
See this DIY Vid for good instructions on removing the front bumper
http://www.youtube.com/watch?v=XU6bSJ-b0mk
Step 3. Cut out old fog light mounting plastic from bumper
You can see in the picture where you necessarily need to cut. Use some common sense when doing this. don't cut into anything that is visible from the front of the car with the plastic mesh piece in place.
I recommend using a dremel with a small diameter cut off wheel for this (to get in the tight spots).
*Pro-tip: retain the screw backings that are slipped onto the plastic pieces from the bumper which you are removing. those can be used on the new backings which you will be installing the new LEDs into
Step 3.5 - Now you're going to need to install the chrome bezel onto the LED fixture. you will notice that there is a tab that is meant to index into the bumper. Now, it is up to you if you want to chance slitting the bumper in the right spot. I, however just clipped off this tab from the chrome bezel and ground it flush. No problems yet and the light is plenty sturdy without it. a bit like a vestigial tail if you ask me.
Step 4. Assemble LED into the backing plastic (may need to scrounge for some hardware) I used some 8mm bolts screwed into a clip nut that was slid over some corresponding holes on the LED fixture.
Step 5. Finagle the light/chrome bezel/backing plastic assembly into the newly cleaned out bumper holes (from the rear) (thats what she said), once in place you can sandwich in the front mesh piece and screw it all together. once it is tight you are all done with the light install.
You will find that some various screws/mounting hardware are necessary for this. I recommend installing these at someones house that has lots of extra random junk like this lying around. Other than the hardware to bold the LEDs to the backings, you should have enough screws from the OE stuff you are removing.
Step 6. Now it is time to wire em up.
**Disclaimer - You should try to find the electrical plug from the dealership, the one that is meant to plug into the back of the LEDs. This will make your life easier**
I created my own plug and it was a mess of hacking up PC pin connectors, soldering stuff, melting plastic together at the right pin width.. I wasted way too much time on this, pay whatever price the dealership wants for these plugs and save yourself the headache.
Once you have your OEM plug, put in your capacitor (one per side) in parallel (positive to positive,negative to negative) with the circuit. (note the directional arrows or polarity noted on the Capacitor. If it is backwards you will find out quickly due to it exploding in a 'pop-it' sized firework explosion. (some are non polarized if you feel like being lazy) Make sure it is securely soldered in and then you can plug the wiring into the vehicle side electrical connection of your choice.
I chose the side markers since I had already made some connectors and had wires ran out from there. you could just as easily use the fog light connectors, it just depends how you want to activate them.
*I have no errors from my fogs being disconnected.
Anyway. at this point the lights should work and not flicker. You're ready to install the bumper again. Just line up the index points on the sides near the marker lights and then re-bolt the bumper. after that you're set and now a certified owner of a 2011 c class. Oh and for extra pro-points get the mirror cover updates which I also have ($139 on ebay).
Any questions, feel free to ask. I'll try to get that part number list tomorrow.
1. LED fixtures (R/L)
2. Mounting backings (plastic) R/L
3. Front facing grills (visible mesh surround) R/L
4. Chromed plastic LED bezels R/L
5. Misc wiring/soldering supplies
6. 2 Capacitors (50-150 uf @25v) Aluminum,radial lead normal or high temp range will work.
Step 2. Remove bumper
See this DIY Vid for good instructions on removing the front bumper
http://www.youtube.com/watch?v=XU6bSJ-b0mk
Step 3. Cut out old fog light mounting plastic from bumper
You can see in the picture where you necessarily need to cut. Use some common sense when doing this. don't cut into anything that is visible from the front of the car with the plastic mesh piece in place.
I recommend using a dremel with a small diameter cut off wheel for this (to get in the tight spots).
*Pro-tip: retain the screw backings that are slipped onto the plastic pieces from the bumper which you are removing. those can be used on the new backings which you will be installing the new LEDs into
Step 3.5 - Now you're going to need to install the chrome bezel onto the LED fixture. you will notice that there is a tab that is meant to index into the bumper. Now, it is up to you if you want to chance slitting the bumper in the right spot. I, however just clipped off this tab from the chrome bezel and ground it flush. No problems yet and the light is plenty sturdy without it. a bit like a vestigial tail if you ask me.
Step 4. Assemble LED into the backing plastic (may need to scrounge for some hardware) I used some 8mm bolts screwed into a clip nut that was slid over some corresponding holes on the LED fixture.
Step 5. Finagle the light/chrome bezel/backing plastic assembly into the newly cleaned out bumper holes (from the rear) (thats what she said), once in place you can sandwich in the front mesh piece and screw it all together. once it is tight you are all done with the light install.
You will find that some various screws/mounting hardware are necessary for this. I recommend installing these at someones house that has lots of extra random junk like this lying around. Other than the hardware to bold the LEDs to the backings, you should have enough screws from the OE stuff you are removing.
Step 6. Now it is time to wire em up.
**Disclaimer - You should try to find the electrical plug from the dealership, the one that is meant to plug into the back of the LEDs. This will make your life easier**
I created my own plug and it was a mess of hacking up PC pin connectors, soldering stuff, melting plastic together at the right pin width.. I wasted way too much time on this, pay whatever price the dealership wants for these plugs and save yourself the headache.
Once you have your OEM plug, put in your capacitor (one per side) in parallel (positive to positive,negative to negative) with the circuit. (note the directional arrows or polarity noted on the Capacitor. If it is backwards you will find out quickly due to it exploding in a 'pop-it' sized firework explosion. (some are non polarized if you feel like being lazy) Make sure it is securely soldered in and then you can plug the wiring into the vehicle side electrical connection of your choice.
I chose the side markers since I had already made some connectors and had wires ran out from there. you could just as easily use the fog light connectors, it just depends how you want to activate them.
*I have no errors from my fogs being disconnected.
Anyway. at this point the lights should work and not flicker. You're ready to install the bumper again. Just line up the index points on the sides near the marker lights and then re-bolt the bumper. after that you're set and now a certified owner of a 2011 c class
. Oh and for extra pro-points get the mirror cover updates which I also have ($139 on ebay). Any questions, feel free to ask. I'll try to get that part number list tomorrow.

Thread Starter
Super Member
Joined: Apr 2010
Posts: 770
Likes: 9
2017 C43
Haha I know guys, I looked for the packing slip over the weekend but I couldn't find it. I am going to head out and take one more look this morning before I head to work.. I'll keep you posted.
Thread Starter
Super Member
Joined: Apr 2010
Posts: 770
Likes: 9
2017 C43

Okay guys, here are the part numbers. I have attached my parts.com list as I looked some up using their site and others I simply entered part numbers. The description that comes up when you enter the part numbers is much more vague than when you look the part up through their site.
Here they are:
LEDS (R/L)
221-820-17-56
221-820-18-56
BACKING PLASTIC MOUNT (R/L)
204-885-28-14
204-885-29-14
FRONT MESH GRILLS (R/L)
204-885-0053
204-885-0753
CHROME DECORATIVE MOLDING (R/L)
204-885-27-74
204-885-28-74
And a capacitor looks like this :

Note how that one says like 10v and 2000uf you want one that says 25v and between 50 and 150 uf


