

Just installed some lightly smoked side marker lights on my C250 Coupe and I figured I do a walk-through for anyone as it's a pretty quick and simple upgrade to improve the look of your ride.
All in all it takes about 10 minutes per side and you can install just by removing a few fastener rivets and pulling back the plastic shield in the tire well.
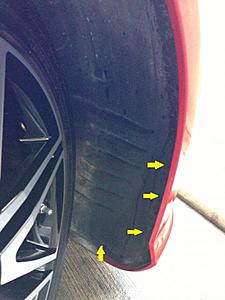
1) Cut the wheel as far as it will go to give you room to remove the fasteners
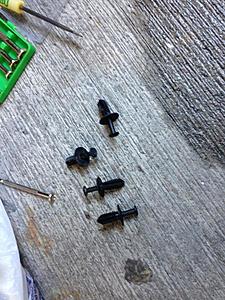
2) Remove the 4 plastic fastener rivets that attach the plastic shield to the bumper. I marked the rivets you need to detach, just use a really small flat head screwdriver and pop the pin in the center out and once you pull that out a little the rivet will easily pull out. There's one rivet under the bumper that you'll have to pull out as well to be able to pull the plastic shield back enough to get to the side markers
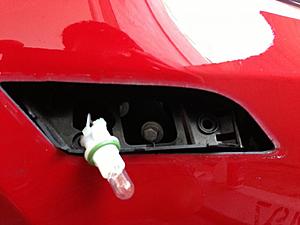
3) Once the rivets are removed, gently pull the plastic shield back and be careful not to chip the paint on the bumper so pull that a little towards yourself. After this step you should be able to easily touch the back of the side marker.
4) You will see two wires attached to a white housing, this is the bulb housing, simply turn it until it detaches from the side marker (direction doesn't matter)
5) Next you'll remove the old side marker, to do this push forward on the clip clip that connects the side marker to the side marker back housing. Be very careful not to break this clip as the side marker will be useless if you break this (just in case you need to switch back).
Here's an image of the clip I'm referring to (right side of picture)

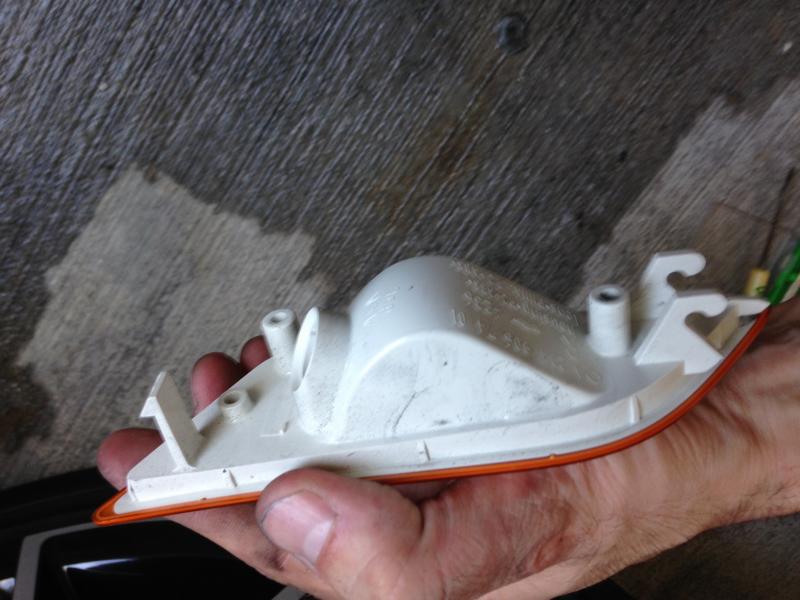
6) Once the back of the side marker is unclipped you simply need to pull that end towards you and the side marker will unclip from the front where it is hooked in.
Here's an image of the hooks I'm referring to (right side of picture)

7) Now you should be left with the black housing that the side marker was attached to and what you'll have to attach the new side marker to.
8) To install the new side marker simply take the steps in reverse. If you are putting in a new bulb feel free to do this now. Easiest way that worked for me is to slightly angle the black housing out through the bumper so you can first hook in the new side marker to the black housing.
9) Once the new side marker is hooked in to the front of the housing you should be able to easily clip in the back side of the housing to secure it in place.
10) At this point you can twist the light housing back into the side marker
11) Test the bulb works before putting the rivets back on
12) Once you confirm the light is working pop the plastic shield back in place and pop in the 4 rivets back into place.
End Result
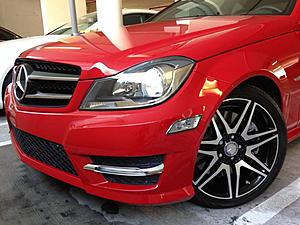
If I was unclear at all, let me know and I can provide more details if needed. Enjoy!
All in all it takes about 10 minutes per side and you can install just by removing a few fastener rivets and pulling back the plastic shield in the tire well.
1) Cut the wheel as far as it will go to give you room to remove the fasteners
2) Remove the 4 plastic fastener rivets that attach the plastic shield to the bumper. I marked the rivets you need to detach, just use a really small flat head screwdriver and pop the pin in the center out and once you pull that out a little the rivet will easily pull out. There's one rivet under the bumper that you'll have to pull out as well to be able to pull the plastic shield back enough to get to the side markers


3) Once the rivets are removed, gently pull the plastic shield back and be careful not to chip the paint on the bumper so pull that a little towards yourself. After this step you should be able to easily touch the back of the side marker.
4) You will see two wires attached to a white housing, this is the bulb housing, simply turn it until it detaches from the side marker (direction doesn't matter)
5) Next you'll remove the old side marker, to do this push forward on the clip clip that connects the side marker to the side marker back housing. Be very careful not to break this clip as the side marker will be useless if you break this (just in case you need to switch back).
Here's an image of the clip I'm referring to (right side of picture)

6) Once the back of the side marker is unclipped you simply need to pull that end towards you and the side marker will unclip from the front where it is hooked in.
Here's an image of the hooks I'm referring to (right side of picture)
7) Now you should be left with the black housing that the side marker was attached to and what you'll have to attach the new side marker to.

8) To install the new side marker simply take the steps in reverse. If you are putting in a new bulb feel free to do this now. Easiest way that worked for me is to slightly angle the black housing out through the bumper so you can first hook in the new side marker to the black housing.
9) Once the new side marker is hooked in to the front of the housing you should be able to easily clip in the back side of the housing to secure it in place.
10) At this point you can twist the light housing back into the side marker
11) Test the bulb works before putting the rivets back on
12) Once you confirm the light is working pop the plastic shield back in place and pop in the 4 rivets back into place.
End Result

If I was unclear at all, let me know and I can provide more details if needed. Enjoy!
Member
Thanks. Nice write-up. That will be my next (and final....maybe) mod.
Member
where did you buy the new lights from
ebay for $50, excellent fit especially given the price - http://www.ebay.com/itm/Mercedes-2012-13-C250-C350-COUPE-Light-Smoked-Side-marker-Bulbs-Free-shipping/161073255120?_trksid=p2047675.m1850&_trkparms=aid%3D222002%26algo%3DSIC.FIT%26ao%3D1%26asc%3D11%26meid%3D176186326381879723%26pid%3D100011%26prg%3D1005%26rk%3D1%26rkt%3D5%26sd%3D310708344999%26
Junior Member
Quote:
All in all it takes about 10 minutes per side and you can install just by removing a few fastener rivets and pulling back the plastic shield in the tire well.
1) Cut the wheel as far as it will go to give you room to remove the fasteners
2) Remove the 4 plastic fastener rivets that attach the plastic shield to the bumper. I marked the rivets you need to detach, just use a really small flat head screwdriver and pop the pin in the center out and once you pull that out a little the rivet will easily pull out. There's one rivet under the bumper that you'll have to pull out as well to be able to pull the plastic shield back enough to get to the side markers
Attachment 264078
Attachment 264072
3) Once the rivets are removed, gently pull the plastic shield back and be careful not to chip the paint on the bumper so pull that a little towards yourself. After this step you should be able to easily touch the back of the side marker.
4) You will see two wires attached to a white housing, this is the bulb housing, simply turn it until it detaches from the side marker (direction doesn't matter)
5) Next you'll remove the old side marker, to do this push forward on the clip clip that connects the side marker to the side marker back housing. Be very careful not to break this clip as the side marker will be useless if you break this (just in case you need to switch back).
Here's an image of the clip I'm referring to (right side of picture)
Attachment 264073
6) Once the back of the side marker is unclipped you simply need to pull that end towards you and the side marker will unclip from the front where it is hooked in.
Here's an image of the hooks I'm referring to (right side of picture)
Attachment 264075
7) Now you should be left with the black housing that the side marker was attached to and what you'll have to attach the new side marker to.
Attachment 264074
8) To install the new side marker simply take the steps in reverse. If you are putting in a new bulb feel free to do this now. Easiest way that worked for me is to slightly angle the black housing out through the bumper so you can first hook in the new side marker to the black housing.
9) Once the new side marker is hooked in to the front of the housing you should be able to easily clip in the back side of the housing to secure it in place.
10) At this point you can twist the light housing back into the side marker
11) Test the bulb works before putting the rivets back on
12) Once you confirm the light is working pop the plastic shield back in place and pop in the 4 rivets back into place.
End Result
Attachment 264077
If I was unclear at all, let me know and I can provide more details if needed. Enjoy!
Thank You so much for the writeup, this is why i love forums. People like you helping other people out Originally Posted by bristal
Just installed some lightly smoked side marker lights on my C250 Coupe and I figured I do a walk-through for anyone as it's a pretty quick and simple upgrade to improve the look of your ride. All in all it takes about 10 minutes per side and you can install just by removing a few fastener rivets and pulling back the plastic shield in the tire well.
1) Cut the wheel as far as it will go to give you room to remove the fasteners
2) Remove the 4 plastic fastener rivets that attach the plastic shield to the bumper. I marked the rivets you need to detach, just use a really small flat head screwdriver and pop the pin in the center out and once you pull that out a little the rivet will easily pull out. There's one rivet under the bumper that you'll have to pull out as well to be able to pull the plastic shield back enough to get to the side markers
Attachment 264078
Attachment 264072
3) Once the rivets are removed, gently pull the plastic shield back and be careful not to chip the paint on the bumper so pull that a little towards yourself. After this step you should be able to easily touch the back of the side marker.
4) You will see two wires attached to a white housing, this is the bulb housing, simply turn it until it detaches from the side marker (direction doesn't matter)
5) Next you'll remove the old side marker, to do this push forward on the clip clip that connects the side marker to the side marker back housing. Be very careful not to break this clip as the side marker will be useless if you break this (just in case you need to switch back).
Here's an image of the clip I'm referring to (right side of picture)
Attachment 264073
6) Once the back of the side marker is unclipped you simply need to pull that end towards you and the side marker will unclip from the front where it is hooked in.
Here's an image of the hooks I'm referring to (right side of picture)
Attachment 264075
7) Now you should be left with the black housing that the side marker was attached to and what you'll have to attach the new side marker to.
Attachment 264074
8) To install the new side marker simply take the steps in reverse. If you are putting in a new bulb feel free to do this now. Easiest way that worked for me is to slightly angle the black housing out through the bumper so you can first hook in the new side marker to the black housing.
9) Once the new side marker is hooked in to the front of the housing you should be able to easily clip in the back side of the housing to secure it in place.
10) At this point you can twist the light housing back into the side marker
11) Test the bulb works before putting the rivets back on
12) Once you confirm the light is working pop the plastic shield back in place and pop in the 4 rivets back into place.
End Result
Attachment 264077
If I was unclear at all, let me know and I can provide more details if needed. Enjoy!


Thanks


