When you click on links to various merchants on this site and make a purchase, this can result in this site earning a commission. Affiliate programs and affiliations include, but are not limited to, the eBay Partner Network.
DIY Backup Camera Install - Facelift W204's 2012-2014
I've never been able to find one spot for the backup Camera Install for facelift W204's years 2012-2014. So here it is. I may have skipped some general instructions on how to remove a panel here or there, but the main stuff is here.
This only works for COMAND online (NTG 4.5). This is not for Audio 20, that Becker map thing, or non-nav units.
I've pasted the PDF as I've seen old threads lose the pictures.
Hopefully this helps some. Enjoy.
Patrick
Last edited by lemonstand; 05-13-2015 at 08:24 PM.
You should have an SD card slot on the front of the unit. Or another way to tell is you should have a globe at the far top right of the COMAND menu.
Ok strange, because I have the SD slot but I do not have the globe show up. Also, when I go into the engineering menu, #18. Reverse Camera, does not show up. There are only two pages ending with #14.
I have attached a photo showing the display (without the globe) and another two of the engineering menu. Say that I don't have the NTG 4.5, there must still be a way to activate the reverse camera! I will look it up, but not sure if I can find anything. As I am very eager to make this work, and have already ordered all the parts, I am hoping someone has the magic answer!!
Thanks for all your help on this so far @lemonstand.
Radio menu, not showing the globe icon at the top. Not sure if I have the COMMAND online NTG 4.5
Page 1 of 2, of the HW Settings in the Engineering menu
Page 2 of 2, of the HW Settings in the Engineering menu. There seems to be no option of selecting rearview camera anywhere...
Ok strange, because I have the SD slot but I do not have the globe show up. Also, when I go into the engineering menu, #18. Reverse Camera, does not show up. There are only two pages ending with #14.
Do you have the Becker pre-wired navigation? Or the built in hard drive navi?
No problem. Just to make sure, after you enable SRVC, give it a few hours then do the 2nd part of the COMAND setting by going to the systems setting (normal mode not engineering mode) and go to System Settings > Select Rearview Camera > Enable �Activate by R Gear".
After you select that option it should switch to the video input while you're in reverse but it'll just be a black screen. You should also see "check entire surroundings I believe". This will show you for sure that it's switching to the video aux feed even if anything isn't plugged in yet it should work.
OK - so I am back. I got all the parts in mail and started the install this evening. I am having problembs removing the command unit, actually I haven't even gotten to it yet - I am having problems wit the trim. I unclipped the trims from the passenger side and the vent has come loose on the passenger side, but on the driver side the vent dosnt seem to be moving much at all. It is stuck on the driver side. I think the problem may be with the clips inside the vent. Am I supposed to push them in (toward the steering wheel) or out (towards the passenger??).
Any help on this ASAP would be greatly appreciated as I am stuck!
Even after I successfully Unclipped the clips within the AC vents I had issues with it getting stuck by the drivers side so be careful. From what I recall. Both of the clips within the AC vents had to be pushed towards the direction of the closest door. (Clip closest to the drivers door, push the clip in towards the direction of the drivers door). Those AC vent clips will be the only ones that snag and need to be pushed in before it releases. . The rest will be pressure clips similar to the ones you've already got done on the passenger side.
Even after I successfully Unclipped the clips within the AC vents I had issues with it getting stuck by the drivers side so be careful. From what I recall. Both of the clips within the AC vents had to be pushed towards the direction of the closest door. (Clip closest to the drivers door, push the clip in towards the direction of the drivers door). Those AC vent clips will be the only ones that snag and need to be pushed in before it releases. . The rest will be pressure clips similar to the ones you've already got done on the passenger side.
Thanks @lemonstand!
Ok - so I tried my best but it didn't work out (... yet ).
I just cannot get the Driver's side inner vent clip to come loose. I can push it in about 1/3" and then nothing happens. I got the clips off the entire trim and the passenger side inner vent clip as well... I'm not sure if maybe I am doing something wrong?
I will try to stop by the mercedes dealership here in Vancouver but last time they weren't very friendly.
As for the camera, I managed to install it on the trunk and pull the wires down along the hinge. I accidentally ordered the wrong size 'Add a Fuse' so I'll have to wait on hooking up the power until I can get the size I need.
If you can think of anything I can try with the vent clips, I'd greatly appreciate it
Sorry about all the questions... but one more quick one...
I ordered the ATM Add-a-Fuse from ebay. It fits ok into slot 71 but the existing fuse in 71 won't fit into this Add-a-Fuse. Can I just get a smaller fuse that would fit this Add-a-Fuse, or did I order the wrong size ATM Add-A-Fuse and should re-order a larger one that will fill all of slot 71 and fit the 15 AMP fuse that's already there?
In theory I think if it fits into the #71 slot then the inputs at the top should accommodate the same size fuse. But if doesn't fit I would order a larger one since they're so inexpensive. FYI. Autozone has these readily available too if u want to avoid ordering online.
In theory I think if it fits into the #71 slot then the inputs at the top should accommodate the same size fuse. But if doesn't fit I would order a larger one since they're so inexpensive. FYI. Autozone has these readily available too if u want to avoid ordering online.
Hopefully no more snags for you.
Here is an update on the Add-a-Fuse:
I ordered the ATM-Add-a-Fuse off ebay (exactly same as the link in the instructions you made @lemonstand). What I now figured out is that this is the Mini style (theres also the normal style which would be called ATO-Add-a-Fuse. This one that I got off ebay is rated up to 15 amps as per the ebay page. Did you use the mini style?
The problem - slot #71 in the fuse box, where this is supposed to go into, is a larger slot (for the Normal size fuses, not the Mini size fuses. Currently slot #71 already has a (regular size) fuse in it that is rated 15amps. I understand from the instructions that this is for the cigarette lighter (which I don't use). I could wedge the mini add-a-fuse into #71 but then I wouldn't be able to replace the regular size 15amp fuse for the cigarette lighter as the mini add-a-circuit would require the mini fuses.
The obvious solution would be to just buy a regular size add-a-fuse but the problem is that none of the 4 stores I went to here in Vancouver (Canada) seem to carry a regular add-a-fuse that is rated up to 15amps (they all stop at 10amps). I checked the fuse box and there seems to be no slot anywhere for a mini-add-a-fuse
Do I:
A) Plug the mini add-a-fuse into #71, then buy 2 mini 15amp fuses.
B) Plug the regular size add-a-fuse that is rated up to 10amps into slot #71, buy two 10amp regular size fuses which would go into that (and just never use the cigarette lighter). The question here is, can you plug a 10 amp fuse into a 15A rated slot? In theory, I do not think the camera would require that much power anyways.
C) Buy the regular size add-a-fuse that is rated up to 10amps and find another slot in the fuse box to plug it into? Then just use a matching rated fuse and plug in the camera into the add-a-fuse. The following slots are empty right now:
#70 (5A) - Tire Pressure Monitoring System
#83 (7.5A) - TeleAid
#84 (7.5A) - Satellite Tuner
#85 (7.5A) - Tuner TV
#87 (7.5A) - TeleAid
What do you think? As you can tell I know nothing of cars going into this but am learning a lot
I ordered the ATM-Add-a-Fuse off ebay (exactly same as the link in the instructions you made @lemonstand)
Sorry man. I'll update those instructions and clarify to purchase the regular sized ATO add a fuse. As far as which way you should proceed that's up to you. . Honestly I M not knowledgable about the amps as I (carelessly) didn't pay attention to that part. I just purchased a regular size add a fuse (could have been the proper 15 amp or 10 amps for all I know) and plugged 2 15 fuses and both my camera and cigarette lighters work. Your call. Sorry for that mixup again. I definitely would avoid the other fuses to avoid issues.
Sorry man. I'll update those instructions and clarify to purchase the regular sized ATO add a fuse. As far as which way you should proceed that's up to you. . Honestly I M not knowledgable about the amps as I (carelessly) didn't pay attention to that part. I just purchased a regular size add a fuse (could have been the proper 15 amp or 10 amps for all I know) and plugged 2 15 fuses and both my camera and cigarette lighters work. Your call. Sorry for that mixup again. I definitely would avoid the other fuses to avoid issues.
No problem @lemonstand. I did lots of research and what I will do is, install the regular size ATO add-a-circuit (that is rated up to 10A) into an empty 5A slot (designated for tire pressure monitoring), then add a single 5A fuse for the camera and attach. Now the last hurdle is to figure out how I will get that centre console air vent and trim detached... tricky clip inside the driver side vent.... Once all done (hopefully this weekend) I will post an updated with the steps that I followed. Thanks for all your help!
UPDATE: I finally got the air vents out. The inner clips have to be pulled inwards to release them. With that done, I was able to get the head unit out quite easily. I am again stuck (making baby steps every time it seems). It's the Farka cable connection.
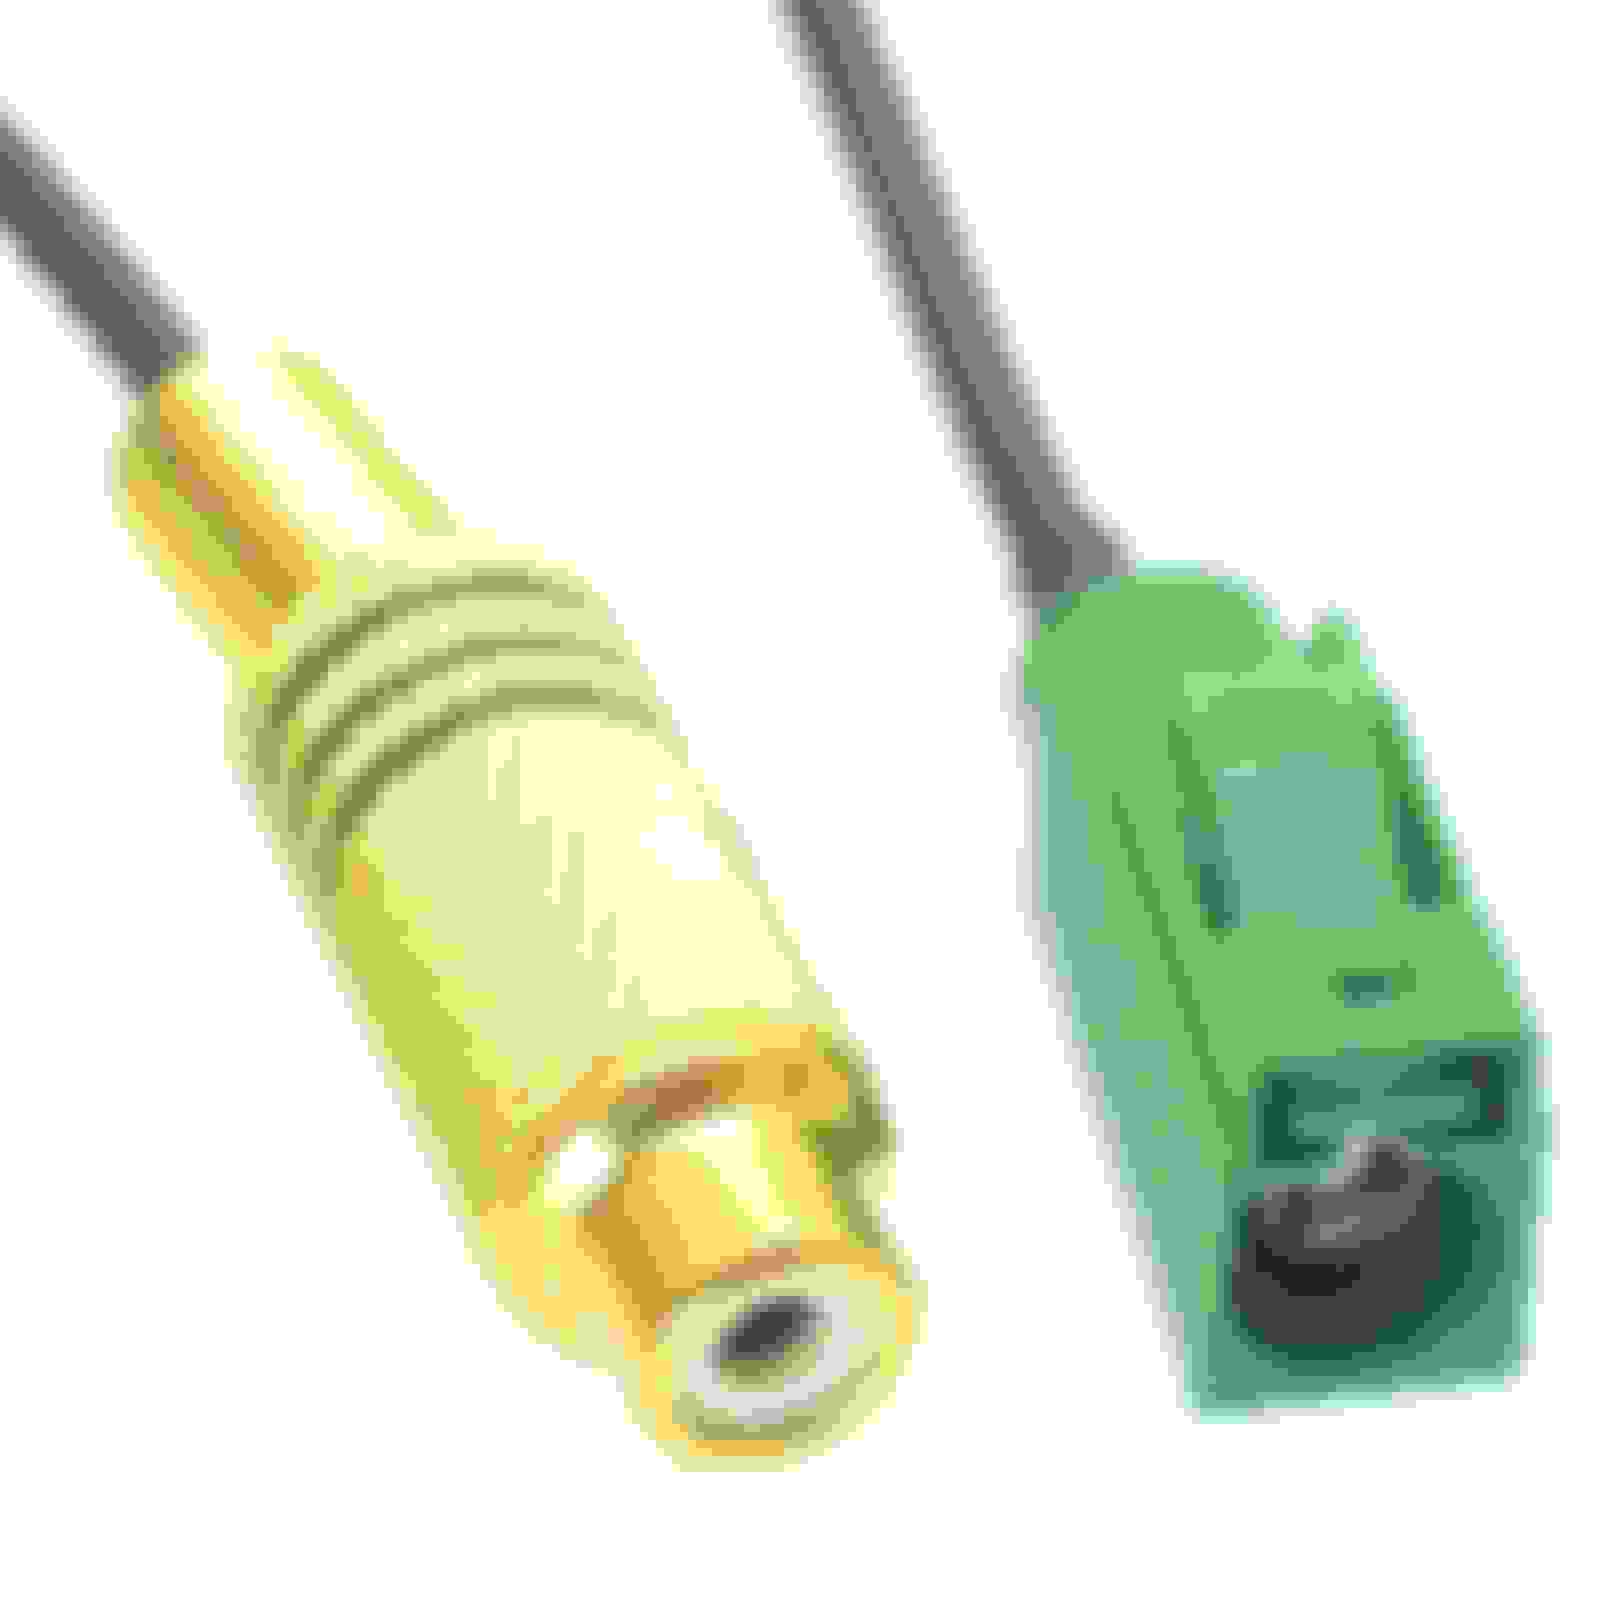
The back of my HU has a twin green Farka connector, the right connector already has a cord installed. The left is empty. However, the fittings are different between the current slot and the Farka cable you used and suggested (which I bough on ebay as per the provided link). See images below. I went to an auto parts store and they didn't even know what a Farka cable is! I'll try another tomorrow.... see images below. I am looking for some kind of a different plug ending tho I can't find it online. Any thoughts?
Farka Female to RCA as per instructions, bought on ebay.
What I found when I slid the HU out. There is a twin connector with the right slot already in use. I need to find a way to connect my RCA plug to that. I am wondering if there is a way to modify the Farka female plug I bought??
The back of my HU has a twin green Farka connector, the right connector already has a cord installed. The left is empty. However, the fittings are different between the current slot and the Farka cable you used and suggested (which I bough on ebay as per the provided link). See images below. I
What I found when I slid the HU out. There is a twin connector with the right slot already in use. I need to find a way to connect my RCA plug to that. I am wondering if there is a way to modify the Farka female plug I bought??
Interesting. From the looks of the picture it appears there is a green tab at the bottom of that green fakra connection that seems like it can be Unclipped? I would try to see if that green plastic guide over the double green fakras can come off.
I had to remove plastic housing on the fakra/rca cable when I installed mine. However mine didn't have that plastic guide on the head unit like yours. That's new to me. Little by little your getting there. Sorry for all the bumps thus far (assuming I may have caused them) ..
UPDATE: I am getting closer!! I got the air vents out, the HU out, power to the camera (plugged a 5A Fuse into a 10A rated Add-a-Fuse into slot #70). The back of the HU Green Fakra connector didn't match the female end of my RCA Video to Farka cable, so I had to remove the housing of the Green Farka connector I bought online. In the process I broke the cable!
I have ordered a new one and will have to wait another 2 weeks. But, I was able to test out the camera with a separate monitor and it works!!
UPdate: Sorry I didn't get back to posting here earlier, but I was finally successful in installing this and have been using the camera happily for the last 2 months - works like a charm! Would be nice if the camera was slanted at a slightly lower angle so to get a broader view but it works well for what it is. Thanks for all your help everyone!
I've never been able to find one spot for the backup Camera Install for facelift W204's years 2012-2014. So here it is. I may have skipped some general instructions on how to remove a panel here or there, but the main stuff is here.
This only works for COMAND online (NTG 4.5). This is not for Audio 20, that Becker map thing, or non-nav units.
I've pasted the PDF as I've seen old threads lose the pictures.
Hopefully this helps some. Enjoy.
Patrick
@lemonstand thank you so much for sharing your great research...I'm still asking myself after spending hours here, hours on internet and get no answers ): Why some people are selling video adaptor for 200$ to connect the rear camera with the same setup as yours ? i have C218 and ntg4.5 2014 with all engineering camera menu like you..And i still don't know if i need this adaptor or not ): some people are talking also about coding...arggg really need your help please ...anyone ...i will be really thanfull
 05-13-2015, 04:26 PM