PROBLEM: Water entering thru hole via Driver Wiper Arm of windshield cowl causing electrical issues.
I have been experiencing ongoing issues with the front LEDs burning out and apparently a surging issue.
OVERVIEW:
I bought an iCarsoft MB II and noticed a lot of CAN BUS issues. Most recently the overhead console lights stopped.
All other options work including the sunroof. The scanner shows a malfunction issue with the overhead console. The button shows on or off when pressed. No lights.
So I started researching....
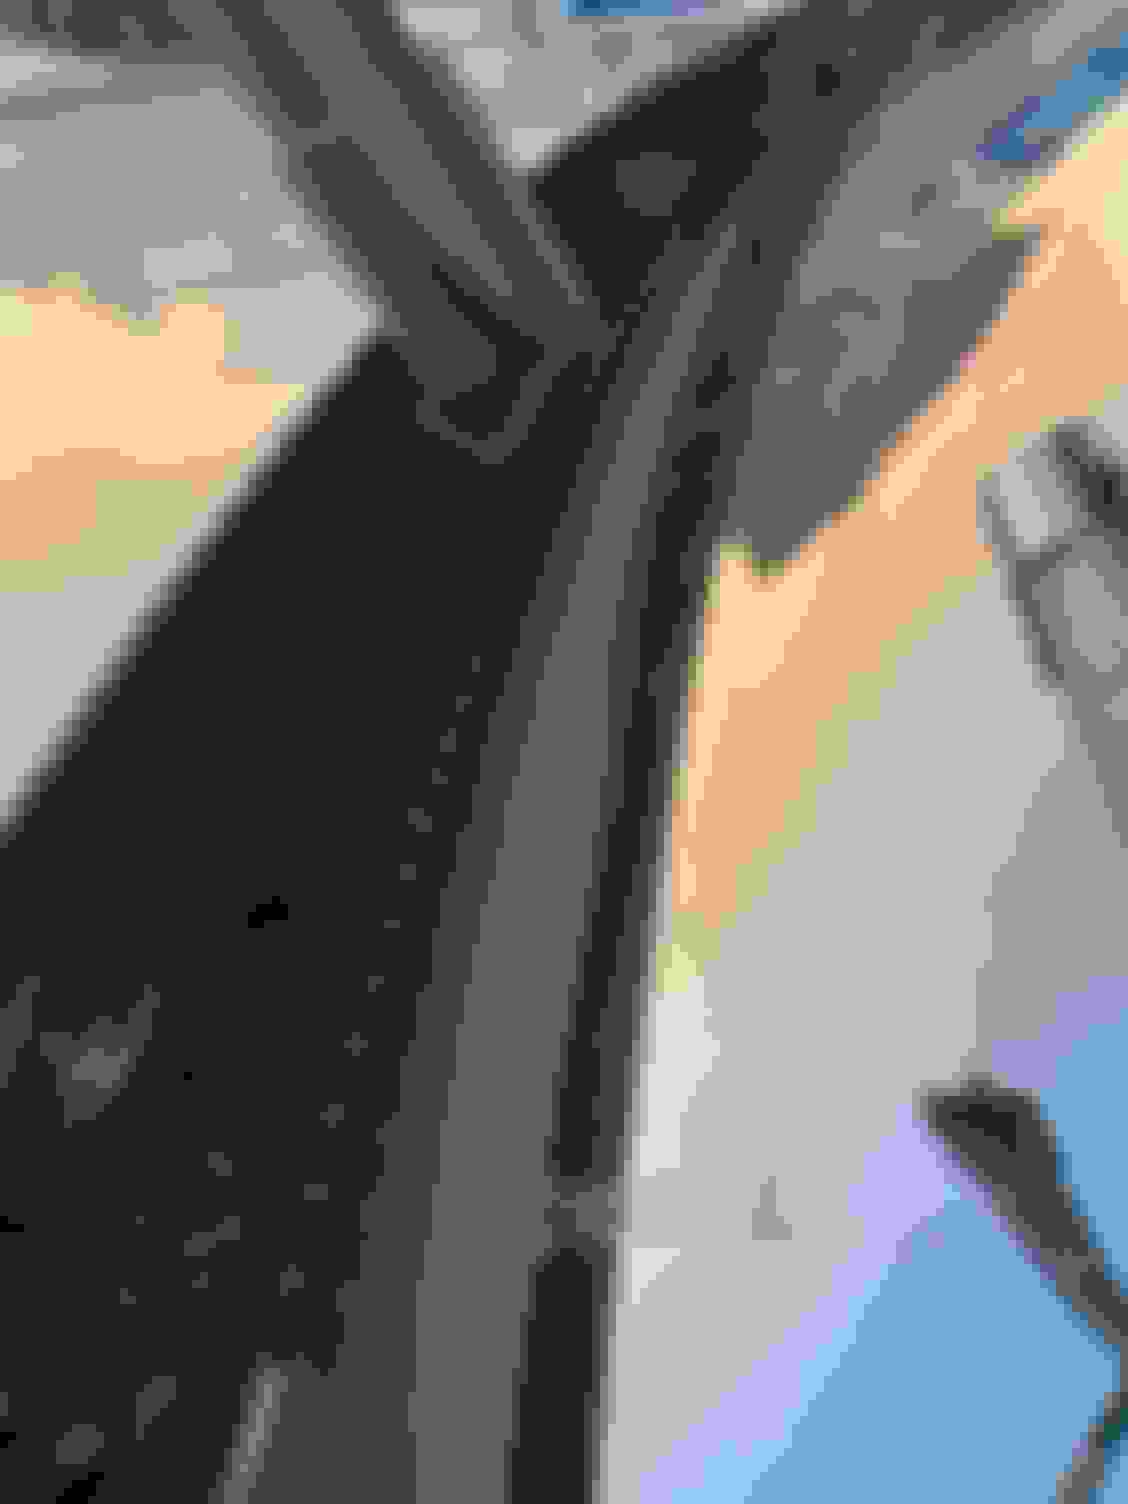
It appears that W204 has a design flaw. The windshield cowl as a seal around the wiper arm. That seal is gone. See pic or watch video.
See the attached video for more clarity.
Q. Has anyone dealt with this issue? Can it be repaired or is it best to buy a new cowl and then add some silicone for sun and heat?
My 09 C300 with 68K miles, like yours, had the driver's (lt (USA) side seal around the wiper post fail like yours but not as bad but enough that there was water on the SAM cover. Since the seals are integral with whole plastic cover didn't feel like undoing it all and also didn't want the expense.
Home DIY worked well, no more water entry despite some pretty good rains here in western NC.
Tools/items need: Permatex black RTV gasket maker (WalMart...about $4.50)
16 mm socket.socket wrench(best) or 16mm closed wrench
WD40 or PBBlaster equivalent
Acetone/brake cleaner
Open hood and lift to full open taking advantage of the MB nearly 90 degree feature
Lift up the plastic cover on the lower wiper arm and remove...clean and ArmorAll it if OC
Place a piece of masking tape to mark position of top rubber wiper edge on glass. Check up/down play in wiper arm and place tape at uppermost spot.
Remove 16mm nut on wiper post
Spray WD40 or the like on post..mine had that white corrosion in this area since wiper arm made of the pot metal type material
(same stuff as logo brake caliper covers if you still have them)
Wiggle the arm up/down a bit as penetrant does its job. Despite the corrosion my arm came off after 10-15 wiggles with pulling tension up (cover metal lower arm with hand as you do this so when it gives way suddenly you don't whack the painted edge of the hood/bonett with it and chip the paint. OCer's..clean off corrosion from post area. Mine extended to outer surface so black paint touched up.
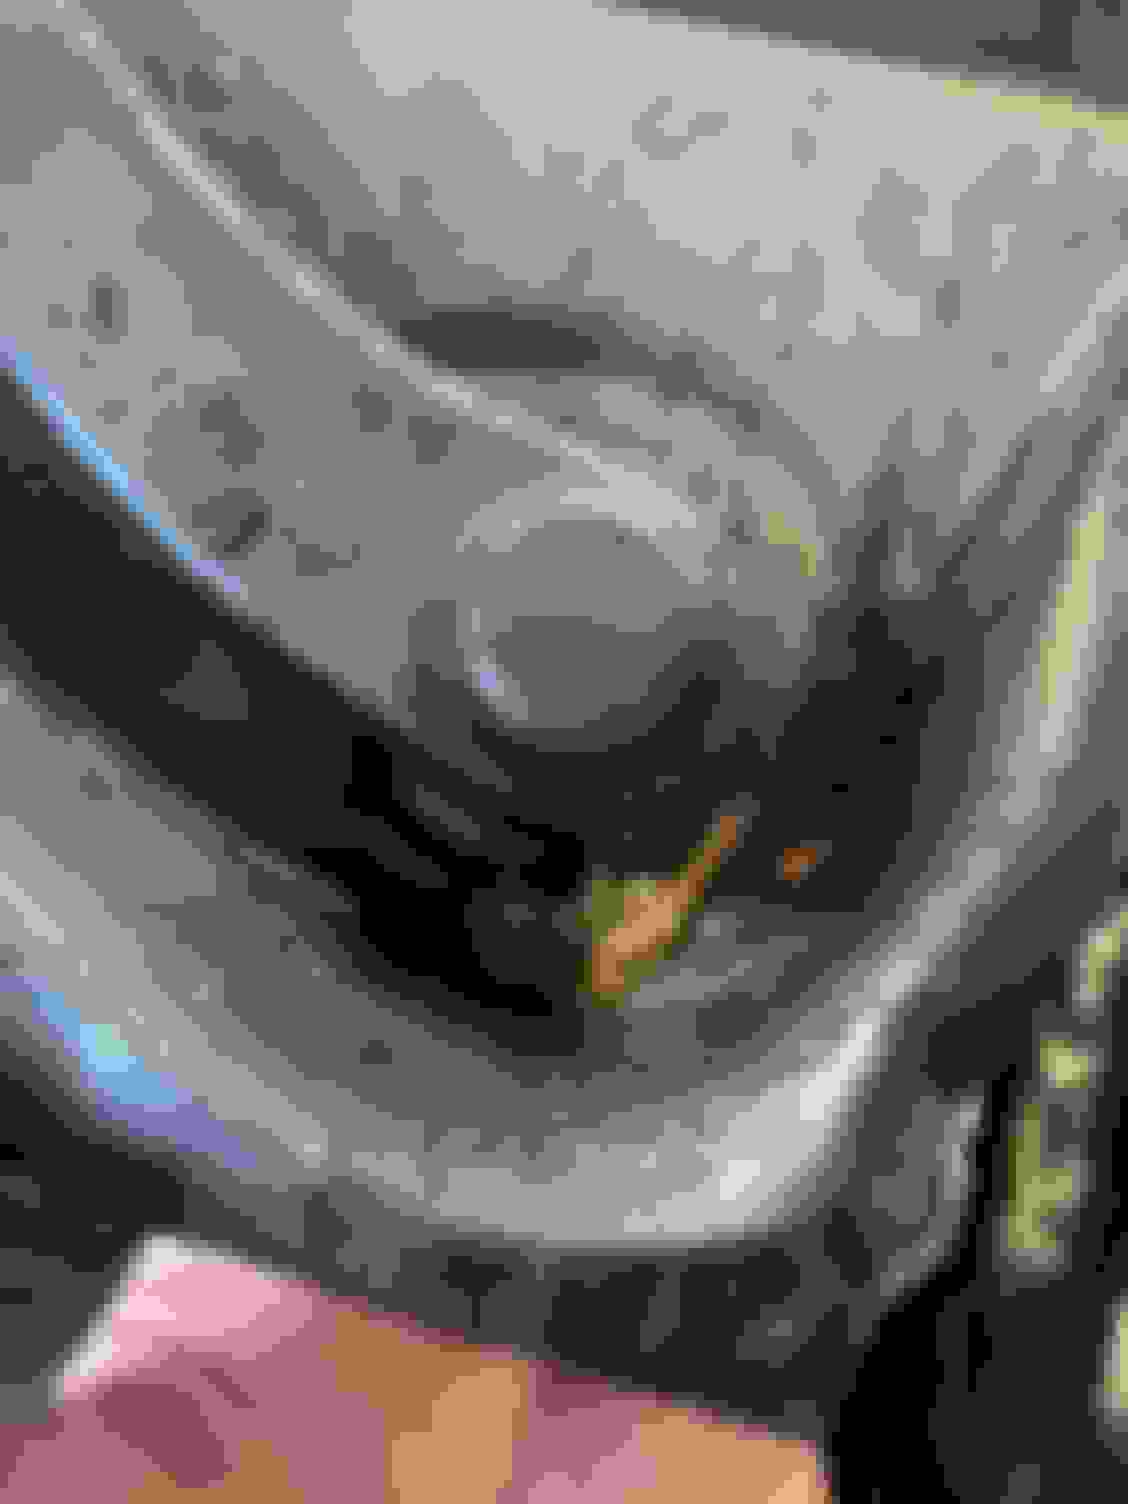
The rubber seal is now fully exposed (at least the top)....clean off all the grunge/dirt from the area and plastic surrounding area so Permatex has good surface to set/seal. Place a cloth under the cowl where the wiper arm mechanisms are so the solvent doesn't hit paint/SAM plastic cover.
Apply gasket sealer to areas that have failed..a good light helps here. The cowl/seal can be lifted up/down a bit you'll notice ..don't do that because it will disturb the patched ares perhaps to their detriment. Same goes if you follow the next step below this one.The failure seems to occur in the rubber area right inward of the outer seal edge where it dips down down. I prophylactically applied RTV to this still intact area (make sure that has been cleaned well). Avoid RTV hitting the center wiper spindle for obvious reasons. It would probably break free on wiper activation but it might take some of the RTV patched area with it.
Again, it OC, let the top RTV set pretty well and then you can blindly smear some RTV on the underneath side of the rubber seal after you use your fingers to get a feel for where it is.
Replace wiper arm according to tape position. You don't have to seat the arm completely, if enough thread are showing, put on the nut and hand tighten so you know its not cross threaded. I got about 2 and 1/2 turns to hand tight, then slowly wrench the rest of the way until snug (don't Gorilla it) wipers and confirm no interference between blades at full speed., holding the arm to the tape position so it doesn't move(tendency on tightening it to move upward until the splines kick in.
Remove tape/cloth under cowl.
Activate wipers at full speed to confirm no blade interference. ( I waited til the RTV had set overnight just to be extra cautious)
My 09 C300 with 68K miles, like yours, had the driver's (lt (USA) side seal around the wiper post fail like yours but not as bad but enough that there was water on the SAM cover. Since the seals are integral with whole plastic cover didn't feel like undoing it all and also didn't want the expense.
Home DIY worked well, no more water entry despite some pretty good rains here in western NC.
Tools/items need: Permatex black RTV gasket maker (WalMart...about $4.50)
16 mm socket.socket wrench(best) or 16mm closed wrench
WD40 or PBBlaster equivalent
Acetone/brake cleaner
Open hood and lift to full open taking advantage of the MB nearly 90 degree feature
Lift up the plastic cover on the lower wiper arm and remove...clean and ArmorAll it if OC
Place a piece of masking tape to mark position of top rubber wiper edge on glass. Check up/down play in wiper arm and place tape at uppermost spot.
Remove 16mm nut on wiper post
Spray WD40 or the like on post..mine had that white corrosion in this area since wiper arm made of the pot metal type material
(same stuff as logo brake caliper covers if you still have them)
Wiggle the arm up/down a bit as penetrant does its job. Despite the corrosion my arm came off after 10-15 wiggles with pulling tension up (cover metal lower arm with hand as you do this so when it gives way suddenly you don't whack the painted edge of the hood/bonett with it and chip the paint. OCer's..clean off corrosion from post area. Mine extended to outer surface so black paint touched up.
The rubber seal is now fully exposed (at least the top)....clean off all the grunge/dirt from the area and plastic surrounding area so Permatex has good surface to set/seal. Place a cloth under the cowl where the wiper arm mechanisms are so the solvent doesn't hit paint/SAM plastic cover.
Apply gasket sealer to areas that have failed..a good light helps here. The cowl/seal can be lifted up/down a bit you'll notice ..don't do that because it will disturb the patched ares perhaps to their detriment. Same goes if you follow the next step below this one.The failure seems to occur in the rubber area right inward of the outer seal edge where it dips down down. I prophylactically applied RTV to this still intact area (make sure that has been cleaned well). Avoid RTV hitting the center wiper spindle for obvious reasons. It would probably break free on wiper activation but it might take some of the RTV patched area with it.
Again, it OC, let the top RTV set pretty well and then you can blindly smear some RTV on the underneath side of the rubber seal after you use your fingers to get a feel for where it is.
Replace wiper arm according to tape position. You don't have to seat the arm completely, if enough thread are showing, put on the nut and hand tighten so you know its not cross threaded. I got about 2 and 1/2 turns to hand tight, then slowly wrench the rest of the way until snug (don't Gorilla it) wipers and confirm no interference between blades at full speed., holding the arm to the tape position so it doesn't move(tendency on tightening it to move upward until the splines kick in.
Remove tape/cloth under cowl.
Activate wipers at full speed to confirm no blade interference. ( I waited til the RTV had set overnight just to be extra cautious)
Many thanks for this excellent write up.
1. I checked the other seal and it's showing signs that will lead to failure. I'm debating on buying a new one or even used.
2. I took the fuse cover off and saw that the wires are melting. That would suggest bad ground, correct?
Short answer...had longer one but hit a delete by mistake... Melting/hot wires equal high resistance somewhere, not just the ground ( the "ultimate" high resistance where there is no ground at all isn't a problem for heat since there is no flow, i.e. amps)..could be end electrical part(motor, et. al), inline switch, connector or ground as you mentioned. In your case, the moderate aggravation of unbolting the ft. SAM will allow access to the under surface wires/connections which may have been sitting in a puddle thanks to that seal leak. Visual inspection for corrosion, connection tightness, a clean with electronics spray can't hurt. Hot , obviously badly melted wires usually blow fuses unless pre-fused length of wire involved.
Can you show a full picture of the new cowl?
What is the part number for it?
So you need 3 new washer nozzles and the hose to install the new cowl?
Part numbers for those?
How long did it take you to remove the cowl? Anything out of the ordinary that you ran into while removing the cowl?
Can you show a full picture of the new cowl?
What is the part number for it?
So you need 3 new washer nozzles and the hose to install the new cowl?
Part numbers for those?
How long did it take you to remove the cowl? Anything out of the ordinary that you ran into while removing the cowl?
1. Removal is about 15-20 mins at most. I would use a Phillips for the tight spaced expanding "cowl rivets", 123-990-05-92 near the driver side. I broke two. They are about $2.00 each.
Use a Trim/Moulding Tool Kit for removal of the other rivets.
There may be a metal shelf that the cowl inserts onto. It could be sharp so I would be mindful of that.
You need to mark the areas where the wipers sit so you re-install correctly.
2. Part Number for new cowl is 204-830-32-13. It looks like the old cowl except the spray nozzle holes are different and thus nozzles also redesigned. See pics above.
3. Dealership ordered new nozzle assembly which has 3 sprayers included. I don't think you can buy just new nozzles. He mentioned this over the phone. I did not get the part number.
204-860-16-92 might be it not sure. There is heated and non-heated.
Since a lot of parts are VIN specific and they could have redesigned this again, I would verify with the dealer.
SUMMARY
The new sprayers are more accurate as they are easily adjustable wit a Mercedes tool. But to attach the new hose assembly to the pump means getting under the car which is a pain in the ***.
I'm going to try to find a decent used cowl and then use silicone to seal. Then re-spray the hell out of with satin black.
Going thru the dealer to upgrade all the parts would turn this into $470-ish job including labor. And the net benefit is not really worth that.
Do you have the old cowl still around so you could compare dimensions..is new cowl slightly longer so it buckles in the middle ? If that's not it, coat prominent areas on the underside of the poorly fitting portion with White-out or similar coating that could transfer to show "proud" obstructing surfaces.
Do you have the old cowl still around so you could compare dimensions..is new cowl slightly longer so it buckles in the middle ? If that's not it, coat prominent areas on the underside of the poorly fitting portion with White-out or similar coating that could transfer to show "proud" obstructing surfaces.
I do not have the old cowl.
There has been no dimension changes. After the new windshield was put in, the old cowl was not seated properly either. Pelican parts says no glue is needed.
There must be a "specific method" to installing this.
It fits into a grove below the windshield and takes a fair bit of effort to get it pushed in. Take a close look at the back edge of the piece and also take a close look at the groove its supposed to go in and make sure there isnt a bunch of debris or glue
It fits into a grove below the windshield and takes a fair bit of effort to get it pushed in. Take a close look at the back edge of the piece and also take a close look at the groove its supposed to go in and make sure there isnt a bunch of debris or glue
I've made 2 attempts by taking it off and have failed both times.
The groove or "track" has been cleaned. It is not that. There is no glue used by Mercedes to my knowledge.
The very far ends go in fine. It's the areas center left and center right from middle that push up.
My impression is that tension is causing the "bubbling up" and that a "specific method" is needed.
I just went to a car I have that had the cowl off and reinstalled it twice with minimal issue. The vehicle was wrecked and the aluminum heat shields behind the engine were pushed in slightly and that was one issue effecting the front edge but I dont think you should have that problem. The other issues was just making sure the rubber wasnt getting pushed in. I pushed the cover on a few inches at a time with my palm pushing down and slightly forward to keep the rubber from being pushed down by the plastic edge. In your picture it looks like the middle is over an 1/8 inch away from the rubber and not in the groove at all. The back edge should be installed first without the front clips installed and you should maybe try installing from one end and working towards the other side rather than installing the ends first and working to the middle. I was able to do it either way but its possible to get the two end in and the middle not be in the groove.
I just went to a car I have that had the cowl off and reinstalled it twice with minimal issue. The vehicle was wrecked and the aluminum heat shields behind the engine were pushed in slightly and that was one issue effecting the front edge but I dont think you should have that problem. The other issues was just making sure the rubber wasnt getting pushed in. I pushed the cover on a few inches at a time with my palm pushing down and slightly forward to keep the rubber from being pushed down by the plastic edge. In your picture it looks like the middle is over an 1/8 inch away from the rubber and not in the groove at all. The back edge should be installed first without the front clips installed and you should maybe try installing from one end and working towards the other side rather than installing the ends first and working to the middle. I was able to do it either way but its possible to get the two end in and the middle not be in the groove.
sounds like it needs to be angled 📐 just right. I�m amazed that something seemingly simple is difficult. I�ll grab an LED flashlight 🔦 to inspect. I�m clearly missing something. Thanks!
I just went to a car I have that had the cowl off and reinstalled it twice with minimal issue. The vehicle was wrecked and the aluminum heat shields behind the engine were pushed in slightly and that was one issue effecting the front edge but I dont think you should have that problem. The other issues was just making sure the rubber wasnt getting pushed in. I pushed the cover on a few inches at a time with my palm pushing down and slightly forward to keep the rubber from being pushed down by the plastic edge. In your picture it looks like the middle is over an 1/8 inch away from the rubber and not in the groove at all. The back edge should be installed first without the front clips installed and you should maybe try installing from one end and working towards the other side rather than installing the ends first and working to the middle. I was able to do it either way but its possible to get the two end in and the middle not be in the groove.
Got it perfect from driver's side ONLY just past middle.
I did find the firewall metal driver side obstructed it and took off rubber ribbon.
Past the middle it bubbles again.
The far right corner for passenger attaches. There must be something underneath that I can't see.
At least the driver side SAM is safe from water exposure.
I have been going through the same as you in this thread. I bought a new cowl and the sprayer kit. I cannot get the new cowl to fit properly for the life of me. Did you ever figure this out?
One thing to note. I transferred a metal piece that attached and curls. All other metal brackets hold the hose.
This bracket appears to be some sort of support piece. It’s on the passenger side near the spray nozzle.
Maybe I need to take it off?
Here are pics where:
1. You can it’s flush on ends.
2. In middle section where it’s pushing up.
I know this is an old thread, and I haven't finished reading it, but I also had my windshield replaced this year by Safelite and have the same problem with the cowl not fitting into the grove at the bottom center of the windshield. I'm thinking this is more decorative than functional, but I will read on...
Slideshow: A one-of-one U.S.-spec Mercedes-Benz SLR McLaren Roadster became even rarer after a factory-backed transformation at McLaren's headquarters.


 That would suggest bad ground, correct?