
torque screw holding on fender?
 06-12-2009 | 12:21 AM
#1

Thread Starter
MBWorld Fanatic!
Joined: Jun 2003
Posts: 4,705
Likes: 2
From: nj
a car that can't do the throttle reset.
torque screw holding on fender?
The channel under the trunk when open... where the water runs off when it rains next to the fender on both sides of trunk.. there is a black plastic trim piece held on by two plastic push in pieces and one torx screw (t8?). Well, I removed that plastic piece by pulling on it to clean all the leaves and crap out from underneath. Unfortunately the plastic piece popped out from under the screw easily and now I can't push it back in. I would have to remove the screw, but it is really torqued down. Am I better off just leaving it alone? I fear it is holding the fender gap perfect.
Last edited by pointman; 06-12-2009 at 02:59 PM.
06-12-2009 | 03:32 PM
#6

Super Member
Joined: Nov 2008
Posts: 844
Likes: 1
I DON'T COME HERE ANYMORE
It may be-but thats the beauty of screws-take it out, pop the plastic back on-and adjust with the screw as needed......you'll be fine-if you havent gotten the bug to randomly take pieces off your car to see how they went on or what they do-nows a good time to start 
Trending Topics
06-13-2009 | 02:10 PM
#8
Super Member
Joined: Jul 2006
Posts: 925
Likes: 2
From: Maine
Not an AMG :(

 06-14-2009 | 06:58 PM
#12
Super Member
Joined: Jul 2006
Posts: 925
Likes: 2
From: Maine
Not an AMG :(
Look at this composite I made to make sure we are talking about the correct plastic push-in fastener. If this is the correct one, then I have one left that I can send you.
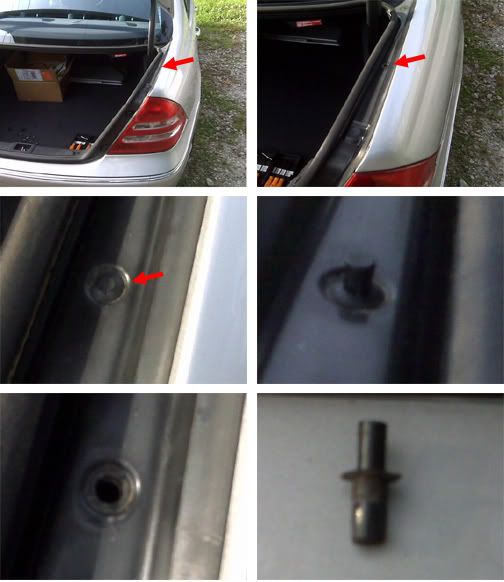
Regarding the Torx screw, I cannot find the screw you are talking about. Can you take another photo zoomed out so that I can see where it is exactly that you are talking about?
Last edited by boohooramblers; 06-14-2009 at 11:14 PM.
 06-15-2009 | 01:58 PM
#15
Super Member
Joined: Jul 2006
Posts: 925
Likes: 2
From: Maine
Not an AMG :(
You Sir have now been exposed as a POSER. I just PM'ed CylinderHead to take over from here.
You don't have a C32, do you?! Go on - admit it!
Joking of course!
So.... it looks like the molding is different between our cars. I don't have a torx screw in that position. Check out the photo composite below.
My molding is different than yours and it is all fastened down using plastic push-in fasteners.

That said, I would back out the torx screw for definite. It's doing no good in that position and will lead to water running inside that hole.
As alluded to earlier, I have many different sizes of torx screws so if you back that one out and give me the dimensions, I can send you one. In addition, depending on the damage to the plastic, you can easily fix it to the point that you don't get water running down the hole using 'Plastic Welder' or a sealant.
You don't have a C32, do you?! Go on - admit it!
Joking of course!
So.... it looks like the molding is different between our cars. I don't have a torx screw in that position. Check out the photo composite below.
My molding is different than yours and it is all fastened down using plastic push-in fasteners.
That said, I would back out the torx screw for definite. It's doing no good in that position and will lead to water running inside that hole.
As alluded to earlier, I have many different sizes of torx screws so if you back that one out and give me the dimensions, I can send you one. In addition, depending on the damage to the plastic, you can easily fix it to the point that you don't get water running down the hole using 'Plastic Welder' or a sealant.
06-15-2009 | 02:09 PM
#16
Super Moderator Alumni
Joined: May 2006
Posts: 4,539
Likes: 4
From: Southern Cal
a C32 AMG & S-Works Tarmac
I just checked mine and it is the same as boohoo's. Sorry Pointman, you have a freak, one-of car I guess.
06-15-2009 | 04:56 PM
#17
Thread Starter
MBWorld Fanatic!
Joined: Jun 2003
Posts: 4,705
Likes: 2
From: nj
a car that can't do the throttle reset.
Thanks Rambler! I don't know why our piece is different. Maybe by year? Mines an 04.
I am definitely gonna take that one out and let you know. I fear that I will do additional damage cause its soooo damn tight. I have never seen a screw that tight.
I am definitely gonna take that one out and let you know. I fear that I will do additional damage cause its soooo damn tight. I have never seen a screw that tight.
06-15-2009 | 04:57 PM
#18
Thread Starter
MBWorld Fanatic!
Joined: Jun 2003
Posts: 4,705
Likes: 2
From: nj
a car that can't do the throttle reset.
And curious... is your push in tab, the same as the other holes? Cause mine have two push ins on top.. then that one torx screw on the bottom.
Also, good work on that pic. Love it.
Also, good work on that pic. Love it.
06-15-2009 | 06:17 PM
#19
Super Member
Joined: Jul 2006
Posts: 925
Likes: 2
From: Maine
Not an AMG :(
That said, it just secures the plastic deflector so don't worry!
 I couldn't resist!
When I initially replied with that photo, I noticed that there was a sudden surge in members viewing the thread. I think some people have keywords such as 'Poser' set in their user preferences to alert them when the word pops up!
 06-16-2009 | 01:52 PM
#21
Thread Starter
MBWorld Fanatic!
Joined: Jun 2003
Posts: 4,705
Likes: 2
From: nj
a car that can't do the throttle reset.
Thanks for all the advice Rambler. Gonna take a stab at it today. Good to know it just holds that piece in line. I don't get why they would use the He-Man of screws for such a trivial piece.
06-18-2009 | 08:08 PM
#23
Super Member
Joined: Jul 2006
Posts: 925
Likes: 2
From: Maine
Not an AMG :(
If not - go ahead and remove all the plastic fasteners (be careful when prying up on them that they don't go flying!).
When you have the plastic off from around that area, you may have more room to work with. Since you've tried to extract it using a Grabit and it didn't work, I'm assuming there is absolutely no thread left whatsoever? In this case, aside from attempting extraction with a vice grip (if there's enough of a head), you may not have any recourse except for drilling the screw out.
Speaking of the fasteners - I'm thinking mine are different also. Is your plastic fastener a 2-piece fastener like bottom right photo (in post #12 above)?
Aside from having a special tool, the best way I get them out is to pull up on the center cylinder-like piece with a pointed hook (again be careful not to let it catapult upwards!).
06-18-2009 | 11:27 PM
#24
Thread Starter
MBWorld Fanatic!
Joined: Jun 2003
Posts: 4,705
Likes: 2
From: nj
a car that can't do the throttle reset.
Hey Rambler. I definitely removed the plastic piece first. I attempted to use vice grips and nearly lost a finger. haha It won't budge at all. I am guessing I will try to drill it out... but have never done that and fear making the situation even worse.
I went to the dealer and bought the plastic piece... they gave me the same ones from post 12 and said that the top piece is pushed into the hole. So thats what I did, and it fit perfect. I just gotta get this damn torx screw out and cap it I guess.
I went to the dealer and bought the plastic piece... they gave me the same ones from post 12 and said that the top piece is pushed into the hole. So thats what I did, and it fit perfect. I just gotta get this damn torx screw out and cap it I guess.
06-19-2009 | 01:06 AM
#25
Super Member
Joined: Jul 2006
Posts: 925
Likes: 2
From: Maine
Not an AMG :(
Hey Rambler. I definitely removed the plastic piece first. I attempted to use vice grips and nearly lost a finger. haha It won't budge at all. I am guessing I will try to drill it out... but have never done that and fear making the situation even worse.
I went to the dealer and bought the plastic piece... they gave me the same ones from post 12 and said that the top piece is pushed into the hole. So thats what I did, and it fit perfect. I just gotta get this damn torx screw out and cap it I guess.
I went to the dealer and bought the plastic piece... they gave me the same ones from post 12 and said that the top piece is pushed into the hole. So thats what I did, and it fit perfect. I just gotta get this damn torx screw out and cap it I guess.
1. Look behind the scenes. Pull off the liner inside [see the composite below]. Remove the rectangular- and round-headed plastic fasteners and pull away the liner to see what's going on with the panel. You should be able to see the screw - I've shown a plastic fastener above the spring in the lower right image. You may be able to spray some anti-seize on the reverse of the screw and back it out using vice-grips.

If that doesn't work:
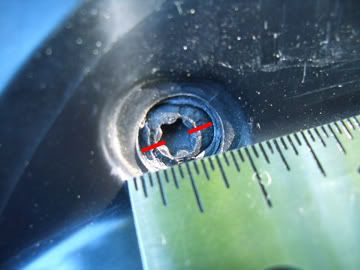
2. You can try to use a hacksaw (or Dremel with a metal-cutting plate for that matter) to cut a slot across the head of the screw [see your photo below with red lines showing where to cut - i.e. in such a way that you can fit the blade in that space]. That way you can then use a wide-slotted screwdriver to try and extract the screw.
3. If the above doesn't work: Drill out the exact center of the screw with a small drill-bit. You may want to use a punch prior to drilling to ensure you are centered properly. Then you can lightly hammer / tap a square driver (like one you get in a drill driver set) or the handle end of a file into the center until it bites and try torquing it with a wrench.
4. If the above still doesn't work: Use a larger drill-bit and widen the center hole. Now try to get a small star/Phillips head screwdriver and tap it into the hole. Try extracting.
5. If the above still doesn't work! Drill the screw out completely! Be careful to use the correct sized drill-bit and don't go wider than the hole itself. You should find with the right diameter bit that the screw is suddenly torqued loose and can be extracted easily.


