

 *hint hint*

TemjinX2's s2k projector retrofit.
Thread Starter
MBWorld Fanatic!
Joined: Dec 2007
Posts: 5,034
Likes: 6
From: Corona, CA
03 g35 coupe...........02 c32 Sold
TemjinX2's s2k projector retrofit.
Hey guys, i wasn't quite as happy as i thought i would be on my tsx retro.
I bought some s2000 projectors for insanely cheap.
So I decided to pick up some new aftermarket head lights with a completely clear head light cover with no glare lines.
s2000 projectors

with the head light cover off.

here's the vision, s2k projector with the head light cover on mock up

I bought some s2000 projectors for insanely cheap.
So I decided to pick up some new aftermarket head lights with a completely clear head light cover with no glare lines.
s2000 projectors

with the head light cover off.

here's the vision, s2k projector with the head light cover on mock up

Thread Starter
MBWorld Fanatic!
Joined: Dec 2007
Posts: 5,034
Likes: 6
From: Corona, CA
03 g35 coupe...........02 c32 Sold
i'm using door mending brackets to hold the s2k projector

drilled the holes to hold the screws

here's a pic of the cut off.
s2k projecter with shield spacer 35watt with stock philips 4300k

as you can see even with 4300k bulbs, the s2k projectors produce a lot of blue


drilled the holes to hold the screws

here's a pic of the cut off.
s2k projecter with shield spacer 35watt with stock philips 4300k

as you can see even with 4300k bulbs, the s2k projectors produce a lot of blue

Thread Starter
MBWorld Fanatic!
Joined: Dec 2007
Posts: 5,034
Likes: 6
From: Corona, CA
03 g35 coupe...........02 c32 Sold
i should have more updates soon. i bought the wrong nuts to hold my screws so i need to go back and buy some new ones. This retro seems a lot easier then my last one.
If i used some fx-r's or tsx's projectors, this would probably be more of a bolt on project. The s2k lacking any real mounting holes is adding some additional challenges.
If i used some fx-r's or tsx's projectors, this would probably be more of a bolt on project. The s2k lacking any real mounting holes is adding some additional challenges.
Senior Member
Joined: Nov 2007
Posts: 358
Likes: 1
From: Snellville, GA
'03 C32, '08 ML63
I like this. I squeezed in a set of infiniti fx projectors into the black depo housings with a set of new lenses with edge grinding done. Puts off the same nice blue flair like that does and I love it. :-) (It was also a huge pain in the butt to do...I don't recommend it...)
Good luck!
Good luck!
Thread Starter
MBWorld Fanatic!
Joined: Dec 2007
Posts: 5,034
Likes: 6
From: Corona, CA
03 g35 coupe...........02 c32 Sold
thanks guys. i got a pretty smoking deal on the s2k's that i couldn't pass up. This project is actually a lot easier then my other one. I'm just being kinda lazy and just taking my time.
Thread Starter
MBWorld Fanatic!
Joined: Dec 2007
Posts: 5,034
Likes: 6
From: Corona, CA
03 g35 coupe...........02 c32 Sold
here's some new pics. i lost some sharpness in my cut off when i installed my chinese 5k bulbs. i'm guessing its because the chinese bulbs aren't made to oem spec like the philips bulbs and therefore changing the distance between the bulb and light shield.
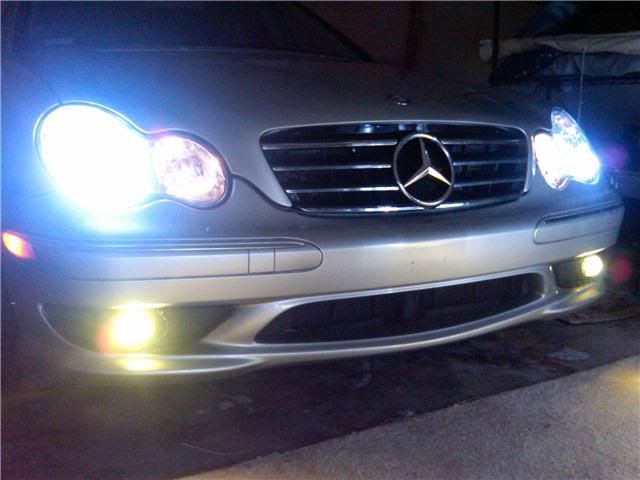
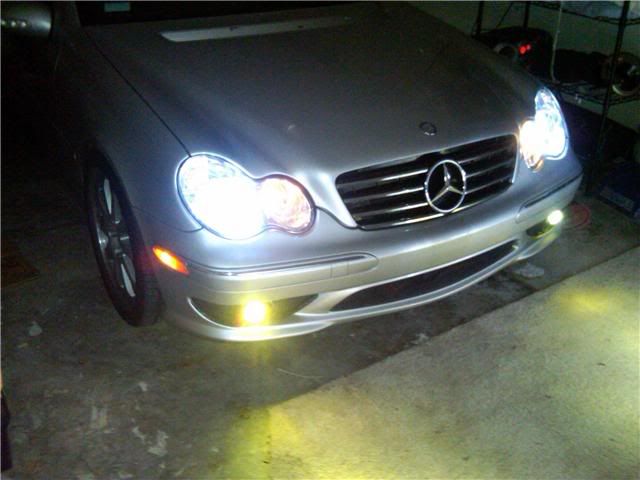
but here's the pics mounted on my car. they look great. I miss the wide beam of a tsx but i do like the brightness of the s2k.


but here's the pics mounted on my car. they look great. I miss the wide beam of a tsx but i do like the brightness of the s2k.


Trending Topics
MB World Stories
The Best of Mercedes & AMG

6 Mercedes Models That Did NOT Age Well (But Are Somehow Still Cool)
Verdad Gallardo
Manual Mercedes? 6 Times Sindelfingen Let Drivers Have All The Fun
Verdad Gallardo
Mercedes SLR McLaren 722 S Is Extremely Rare Example Modified by McLaren
Verdad Gallardo
8 Classic Boxy Mercedes Designs That Have Aged Like Fine Wine
Verdad Gallardo
Flawlessly Restored Mercedes 190E Evo II Heads to Auction
Verdad Gallardo
Electric Mercedes C-Class Unveiled: 11 Things You Need to Know
Verdad Gallardo
Mercedes EQS Gets A Major Update: Everything You Need to Know
Verdad Gallardo
5 Underrated Mercedes-Benz Models That Don't Get the Love They Deserve
Verdad Gallardo
Mercedes 300D Has Pushed Well Past 1 Million Miles and It Ain't Stopping
Verdad Gallardo
Thread Starter
MBWorld Fanatic!
Joined: Dec 2007
Posts: 5,034
Likes: 6
From: Corona, CA
03 g35 coupe...........02 c32 Sold
i fixed my blurrness. I went back to the stock s2k lens instead of the tsx replica lens and i put back the philips 4300k bulbs. The cut off is much sharper now.
i'm pretty happy how the rotational alignment turned out.


No flash at iso 250


i'm pretty happy how the rotational alignment turned out.


No flash at iso 250


Thread Starter
MBWorld Fanatic!
Joined: Dec 2007
Posts: 5,034
Likes: 6
From: Corona, CA
03 g35 coupe...........02 c32 Sold

Thread Starter
MBWorld Fanatic!
Joined: Dec 2007
Posts: 5,034
Likes: 6
From: Corona, CA
03 g35 coupe...........02 c32 Sold
hey chris,
sorry i missed it on your PM. I'll sell you my old setup for the price i mentioned in the PM. The passenager one is already mounted and aligned. All you would probably need to do is lower it since i aimed them high since i was lowered. All you would need to do is retro the driver side.
Let me know, I can meet you somewhere in the middle.
Thread Starter
MBWorld Fanatic!
Joined: Dec 2007
Posts: 5,034
Likes: 6
From: Corona, CA
03 g35 coupe...........02 c32 Sold
There's a more detailed item list on my original tsx thread.
The screws and washers i used for this project are the same as my tsx thread. Hope this helps.
https://mbworld.org/forums/c32-amg-c...t-project.html
The screws and washers i used for this project are the same as my tsx thread. Hope this helps.
https://mbworld.org/forums/c32-amg-c...t-project.html


Newbie
Joined: Apr 2010
Posts: 1
Likes: 0
nissan
i should have more updates soon. i bought the wrong nuts to hold my screws so i need to go back and buy some new ones. This retro seems a lot easier then my last one.
If i used some fx-r's or tsx's projectors, this would probably be more of a bolt on project. The s2k lacking any real mounting holes is adding some additional challenges.
If i used some fx-r's or tsx's projectors, this would probably be more of a bolt on project. The s2k lacking any real mounting holes is adding some additional challenges.

Thread Starter
MBWorld Fanatic!
Joined: Dec 2007
Posts: 5,034
Likes: 6
From: Corona, CA
03 g35 coupe...........02 c32 Sold
i'll try to take some more shots later. I'm very happy with the retrofit. I drove it around LA last night and on the freeways.
Here's a materials bought break down
1. eagle eye black head lights $207
2. tsx projectors $160
3. harness $45
4. 50watt hid ballasts and bulbs $150
5. miscellous screws, bolts and springs $30
6. oem nissan sealant $20 per roll (bought 2, only needed 1 )
total $632
retrofitted tsx projectors priceless.
items used, but not bought
drill
dremel
heat gun
300watt computer ps for ballast testing
updated 5-9-08
i figure i would give a update. I'm almost done with the first side. i might do a little more of a adjustment then start on the second side.
here's a pic of the cut off with 3 washers on the bottom holes


i drew out the mounting holes with a blue pen


here's my projector setup
i used 8-34 screws with 8-34 nuts. I added rubber stoppers as well to relief some pressure being put on the plastic reflector. I added springs as well between the top of the projector and where the screws meet the reflector.
The spring is designed to keep tension on the projector so it will absorb the impact when you go over a speed bump. Without it, you'll notice your light will flicker when you go over bumps or drive on a bumpy road. It doesn't do anything to the bulb, but it gets kind of annoying.
When i mounted this i realized its better to have the screws facing the other way. This way you can just tighter the nut and adjust for the rotational, the tension from the spring will keep the projector moving in or out based on how i tighten the nut.


here's a pic of it mounted to the reflector


pic of the rotational once mounted on the reflector
its slightly off to the right, but i think i can live with it. I might adjust a little more later before the jb weld.


i figure i would give a update. I'm almost done with the first side. i might do a little more of a adjustment then start on the second side.
here's a pic of the cut off with 3 washers on the bottom holes

i drew out the mounting holes with a blue pen

here's my projector setup
i used 8-34 screws with 8-34 nuts. I added rubber stoppers as well to relief some pressure being put on the plastic reflector. I added springs as well between the top of the projector and where the screws meet the reflector.
The spring is designed to keep tension on the projector so it will absorb the impact when you go over a speed bump. Without it, you'll notice your light will flicker when you go over bumps or drive on a bumpy road. It doesn't do anything to the bulb, but it gets kind of annoying.
When i mounted this i realized its better to have the screws facing the other way. This way you can just tighter the nut and adjust for the rotational, the tension from the spring will keep the projector moving in or out based on how i tighten the nut.

here's a pic of it mounted to the reflector

pic of the rotational once mounted on the reflector
its slightly off to the right, but i think i can live with it. I might adjust a little more later before the jb weld.


