


C55 Carbon Fiber interior trim

Thread Starter
Junior Member
Joined: Dec 2010
Posts: 22
Likes: 0
From: Knoxville, TN
2005 C55
C55 Carbon Fiber interior trim
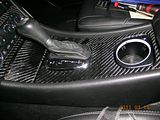
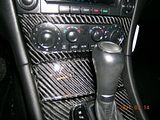
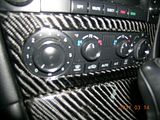
Well my Carbon Fiber interior trim is in the car! I researched a bit before undertaking this project. There are quite a few instructional sites for reference. I wanted to write my own DIY to basically show the parts of this project that were not generic to the carbon fiber wrap process itself and were specific to my trim pieces, and then also add a few observations.
I am not sure whether it is permissible to reference the vendors where I purchased the materials for this project so I am leaving them out for now. If someone can tell me it is OK to post, then I will add the vendor for the interior parts and the carbon fiber and resin. All highly recommended.
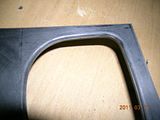
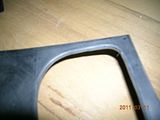
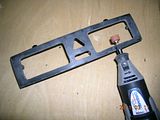
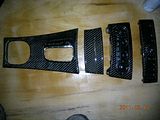
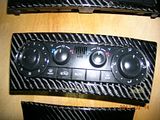
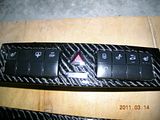
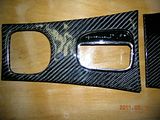
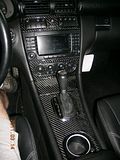
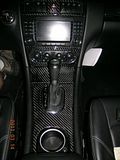
This phase of my project involved the center console, ashtray cover, bezel for climate control and upper button panel. I removed all sheet metal from the parts to leave only the ABS part itself.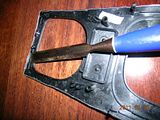 Afterward, this involved a little decision process about how to successfully wrap these parts. Around the perimeter of each part, the metal wraps around to the back of the part so that was simple�just wrap the carbon fiber around in the same manner. But on the interior cut outs (and on some edges), the metal trim only wraps partially and rests on a plastic lip. I knew I would not be able to successfully cut the carbon fiber short enough to rest on that lip without it fraying, pulling, and/or loosing the weave pattern. I chose to grind the lip away with a dremel and I have a few before and after pictures below. This turned out to work very well and I had very minimal adjustments to make in order to get the trim to fit over the corresponding parts.
I roughed the surface of all parts using 150 grit dry sandpaper.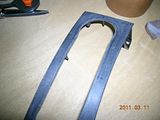 I used a mix of resin and solvent (without hardener) to base coat the face of the parts to be wrapped and allowed several hours for this base to become tacky. I carefully spread the carbon fiber fabric onto a flat surface instead of cutting the pieces out individually, then laid the piece on the carbon fiber at the correct angle. The resin is tacky enough to cause the carbon fiber to adhere so I cut it with a roller fabric cutter. I then used a foam paint roller to apply slight pressure to conform the carbon fiber to the face of the part. Laying the part back down on its face, I sprayed 3M adhesive strictly along the edges of the part and just slightly onto the back side and also along the interior openings of the part. I carefully wrapped the fabric around the perimeter and cut out the interior openings, with slices at the corners to allow the fabric to meet the contour. One thing I did differently than all the instructions I reviewed was to leave the wrap intact and not to trim at this point. I only trimmed the excess after applying the first coat of epoxy, being careful to stop the epoxy along the bottom edge of each part. After it dried, I came back with several different cutters to trim the wrap flush along the backside. I also used the dremel to trim the fabric flush along the backside as needed. Breathing protection is absolutely a must at this point, as this will cause lots of tiny particles to go airborne.
The epoxy coating process is fairly well documented. I don�t have much to add to that except to say the first two times I mixed more than I needed. Afterward, I began mixing in a cough syrup cup where I could mix about 3 ozs. at a time. I did NOT sand between epoxy coats and used three coats on each part. In retrospect, I should have used four coats of epoxy and will in the future. I had some pitting in my finish so I mixed more epoxy and dabbed epoxy into the low spots. Once the final coat was dry, I sanded using 150, 220, 320, and then wet sanded using 400 and 600. My wet sanding was done at a running faucet with frequent rinsing. I finished the pieces off with a spray enamel clear coat with 400 and 600 wet sanding between spray coats. I ended up with some slight pitting in this finish as well, so I sprayed clear coat into the lid and dabbed the clear coat into the pits using a wooden skewer. I think I ended up using about 8 coats of clear finish.
I test fit the trim to each respective component and used the dremel to make small grinding passes to get a better fit.
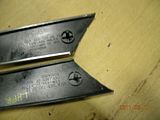
Removal of these pieces are easy. The Center console just lifts out in the front and then with the cup holder in the up position, you slide the piece forward to remove. You can disconnect the plugs from the shifter and then depress the tabs that hold the gearshift trim and gear indicator in place. Then turn the lock ring and pull upward on the shifter to remove if from the shift rod.
The ashtray has two tabs the hold it in place. Once out, you can locate the two slide tabs at the top of the ashtray lid and pry in a twisting manner with a small screwdrive to release the trim lid from the ashtray. VERY little force is required here so if it isn�t coming off easy, you are probably doing the wrong thing. I can post pictures of this if necessary.
The climate control cluster has two torx screws at the bottom. Once unscrewed, that piece simply slides out, as it has guides at the top.
I used a link on another site to figure out how to remove the upper vents so I could get to the button panel screws. Like the climate control, it has two torx screws at the top and guides at the bottom.
I consider it a success, however, my job was far from flawless. My second phase (all door trim) will go much easier. Below are finished pictures.
I am not sure whether it is permissible to reference the vendors where I purchased the materials for this project so I am leaving them out for now. If someone can tell me it is OK to post, then I will add the vendor for the interior parts and the carbon fiber and resin. All highly recommended.
This phase of my project involved the center console, ashtray cover, bezel for climate control and upper button panel. I removed all sheet metal from the parts to leave only the ABS part itself.
 Afterward, this involved a little decision process about how to successfully wrap these parts. Around the perimeter of each part, the metal wraps around to the back of the part so that was simple�just wrap the carbon fiber around in the same manner. But on the interior cut outs (and on some edges), the metal trim only wraps partially and rests on a plastic lip. I knew I would not be able to successfully cut the carbon fiber short enough to rest on that lip without it fraying, pulling, and/or loosing the weave pattern. I chose to grind the lip away with a dremel and I have a few before and after pictures below. This turned out to work very well and I had very minimal adjustments to make in order to get the trim to fit over the corresponding parts.


I roughed the surface of all parts using 150 grit dry sandpaper.
 I used a mix of resin and solvent (without hardener) to base coat the face of the parts to be wrapped and allowed several hours for this base to become tacky. I carefully spread the carbon fiber fabric onto a flat surface instead of cutting the pieces out individually, then laid the piece on the carbon fiber at the correct angle. The resin is tacky enough to cause the carbon fiber to adhere so I cut it with a roller fabric cutter. I then used a foam paint roller to apply slight pressure to conform the carbon fiber to the face of the part. Laying the part back down on its face, I sprayed 3M adhesive strictly along the edges of the part and just slightly onto the back side and also along the interior openings of the part. I carefully wrapped the fabric around the perimeter and cut out the interior openings, with slices at the corners to allow the fabric to meet the contour. One thing I did differently than all the instructions I reviewed was to leave the wrap intact and not to trim at this point. I only trimmed the excess after applying the first coat of epoxy, being careful to stop the epoxy along the bottom edge of each part. After it dried, I came back with several different cutters to trim the wrap flush along the backside. I also used the dremel to trim the fabric flush along the backside as needed. Breathing protection is absolutely a must at this point, as this will cause lots of tiny particles to go airborne.
The epoxy coating process is fairly well documented. I don�t have much to add to that except to say the first two times I mixed more than I needed. Afterward, I began mixing in a cough syrup cup where I could mix about 3 ozs. at a time. I did NOT sand between epoxy coats and used three coats on each part. In retrospect, I should have used four coats of epoxy and will in the future. I had some pitting in my finish so I mixed more epoxy and dabbed epoxy into the low spots. Once the final coat was dry, I sanded using 150, 220, 320, and then wet sanded using 400 and 600. My wet sanding was done at a running faucet with frequent rinsing. I finished the pieces off with a spray enamel clear coat with 400 and 600 wet sanding between spray coats. I ended up with some slight pitting in this finish as well, so I sprayed clear coat into the lid and dabbed the clear coat into the pits using a wooden skewer. I think I ended up using about 8 coats of clear finish.
I test fit the trim to each respective component and used the dremel to make small grinding passes to get a better fit.
Removal of these pieces are easy. The Center console just lifts out in the front and then with the cup holder in the up position, you slide the piece forward to remove. You can disconnect the plugs from the shifter and then depress the tabs that hold the gearshift trim and gear indicator in place. Then turn the lock ring and pull upward on the shifter to remove if from the shift rod.
The ashtray has two tabs the hold it in place. Once out, you can locate the two slide tabs at the top of the ashtray lid and pry in a twisting manner with a small screwdrive to release the trim lid from the ashtray. VERY little force is required here so if it isn�t coming off easy, you are probably doing the wrong thing. I can post pictures of this if necessary.
The climate control cluster has two torx screws at the bottom. Once unscrewed, that piece simply slides out, as it has guides at the top.
I used a link on another site to figure out how to remove the upper vents so I could get to the button panel screws. Like the climate control, it has two torx screws at the top and guides at the bottom.
I consider it a success, however, my job was far from flawless. My second phase (all door trim) will go much easier. Below are finished pictures.


Last edited by mcelroyx; Mar 15, 2011 at 10:16 PM. Reason: pictures aren't displaying

Super Member
Joined: Jul 2009
Posts: 734
Likes: 27
2021 Yukon XL Denali, 2017 GLS450 4MATIC, 1993 Chevy Corvette
Looks awesome IMO. If there was a relatively cheap replacement for the standard "aluminum" plastic trim pieces, I would swap them out immediately. The stock trim (not the dark wood burl) does nothing for me, scratches and dirties easily, and does not look that high-end.
Super Member
Joined: Jun 2008
Posts: 704
Likes: 2
From: New mexico
2005 E55 AMG
Looks awesome IMO. If there was a relatively cheap replacement for the standard "aluminum" plastic trim pieces, I would swap them out immediately. The stock trim (not the dark wood burl) does nothing for me, scratches and dirties easily, and does not look that high-end.
MBWorld Fanatic!
Joined: Oct 2009
Posts: 2,510
Likes: 2
From: bay area, california
Aston Martin V8 Vantage
Looks awesome IMO. If there was a relatively cheap replacement for the standard "aluminum" plastic trim pieces, I would swap them out immediately. The stock trim (not the dark wood burl) does nothing for me, scratches and dirties easily, and does not look that high-end.
Trending Topics
Thread Starter
Junior Member
Joined: Dec 2010
Posts: 22
Likes: 0
From: Knoxville, TN
2005 C55
Looks awesome IMO. If there was a relatively cheap replacement for the standard "aluminum" plastic trim pieces, I would swap them out immediately. The stock trim (not the dark wood burl) does nothing for me, scratches and dirties easily, and does not look that high-end.
MB World Stories
The Best of Mercedes & AMG

Manual Mercedes? 6 Times Sindelfingen Let Drivers Have All The Fun
Verdad Gallardo
Mercedes SLR McLaren 722 S Is Extremely Rare Example Modified by McLaren
Verdad Gallardo
8 Classic Boxy Mercedes Designs That Have Aged Like Fine Wine
Verdad Gallardo
Flawlessly Restored Mercedes 190E Evo II Heads to Auction
Verdad Gallardo
Electric Mercedes C-Class Unveiled: 11 Things You Need to Know
Verdad Gallardo
Mercedes EQS Gets A Major Update: Everything You Need to Know
Verdad Gallardo
5 Underrated Mercedes-Benz Models That Don't Get the Love They Deserve
Verdad Gallardo
Mercedes 300D Has Pushed Well Past 1 Million Miles and It Ain't Stopping
Verdad Gallardo
10 Most Reliable Mercedes-Benz Models You Can Buy Used
Verdad Gallardo


Super Member
Joined: Jul 2009
Posts: 734
Likes: 27
2021 Yukon XL Denali, 2017 GLS450 4MATIC, 1993 Chevy Corvette
I agree to an extent, but I actually think the the thick weave works well with the black leather interior of his car. I have the "ash" gray leather interior and I definitely think a milder/finer CF weave would be necessary as the thick weave would be a bit overpowering for the lighter colored leather and make it "pop" too much.

MBWorld Fanatic!

Joined: Mar 2009
Posts: 2,136
Likes: 6
From: GA
2016 Chevrolet SS, 2006 Cadillac STS-V
Wow, very nicely done! I'm not a huge fan of carbon fiber at all but you've done this the proper way where it looks like it could have come that way. I agree with others about the aluminum trim, I liked it at first but then it always seemed like it was dirty. I'm also not usually a fan of wood trims, but I was a picture of the rare designo Brown Poplar trim and then I had to have it! Loved it even more when I found out it was real wood.

Member
Joined: Sep 2008
Posts: 154
Likes: 0
From: CO
02 C32 AMG, 2012 S550
WOW!!! I did the same thing about a month ago but didn't go through half the prep work you did. Congrats on the job but I think our outcome is similar, you didn't prolly have to due all the prep work you did. 3M is really good material, doesn't need sanding, etc.
But I love the way it looks in our cars....congrats!!!
But I love the way it looks in our cars....congrats!!!
Out Of Control!!
Joined: Apr 2008
Posts: 10,275
Likes: 10
From: Jerzy
04 CLK 320 > CLK32K
I applaud the time and effort you put into that. I took the easy way out and sent my trim out to get done. I can't put my finger on it, but something looks off with the final product. This is how mine came out.
Out Of Control!!
Joined: Dec 2004
Posts: 14,212
Likes: 9
From: Boston, MA
00 MB ML55, 91 Toyota Supra Turbo(sold), 06 E500(gone), 03 BMW M3
damn great job... can you PM me where you got the resin and hardener from? I have a few yards of CF that I am thinking about using to wrap some parts in my A4 with
Thread Starter
Junior Member
Joined: Dec 2010
Posts: 22
Likes: 0
From: Knoxville, TN
2005 C55
Yours looks better than mine. Perhaps flatter? Finish looks better as well. I could do this better now that I have this experience under my belt. I don't know if I am willing to start over at this point, but the thought has crossed my mind. I don't think I would try to tackle door pulls in any event, that takes some definite skill. Yours looks great!
Out Of Control!!
Joined: Apr 2008
Posts: 10,275
Likes: 10
From: Jerzy
04 CLK 320 > CLK32K
Yours looks better than mine. Perhaps flatter? Finish looks better as well. I could do this better now that I have this experience under my belt. I don't know if I am willing to start over at this point, but the thought has crossed my mind. I don't think I would try to tackle door pulls in any event, that takes some definite skill. Yours looks great!
lol, I tired to do it myself over the summer, but it didn't turn out so well. I think you're right about the flatter part. Also my trim and door handles were done with the vacuum, not by laying the CF. It's much easier to conform to the pieces that way.


