


DIY Headers Installation?
MBWorld Fanatic!


Joined: Mar 2010
Posts: 5,890
Likes: 323
From: Land of mountains, cheese, chocolate and watches
12' W204 C63 AMG coupe "T-Rex", 12' W451 Smart Fortwo Pulse (99' W202 C43 AMG + Ultima Can-Am sold)
Thread Starter
MBWorld Fanatic!
Joined: Mar 2007
Posts: 1,948
Likes: 3
From: Houston, TX
C32/C55 AMG

MBWorld Fanatic!


Joined: Oct 2004
Posts: 4,152
Likes: 60
From: NJ, NYC
Something Slow
So these are the only parts needed ? just want to make sure before i go buy All the Parts you first Listed
Gasket 112 142 01 80 (6 req.)
Stud 272 990 00 05 (12 req.)
Nut (M6) 112 142 00 72 (12 req.)
EDIT i also got these :-)
129-990-04-10 (4 req) Manifold Bolt
000-990-25-52 (4 req) Manifold Nut
Gasket 112 142 01 80 (6 req.)
Stud 272 990 00 05 (12 req.)
Nut (M6) 112 142 00 72 (12 req.)
EDIT i also got these :-)
129-990-04-10 (4 req) Manifold Bolt
000-990-25-52 (4 req) Manifold Nut
Last edited by WaveyKat; Apr 24, 2012 at 03:26 PM.
MBWorld Fanatic!
Joined: Mar 2010
Posts: 5,890
Likes: 323
From: Land of mountains, cheese, chocolate and watches
12' W204 C63 AMG coupe "T-Rex", 12' W451 Smart Fortwo Pulse (99' W202 C43 AMG + Ultima Can-Am sold)
Thread Starter
MBWorld Fanatic!
Joined: Mar 2007
Posts: 1,948
Likes: 3
From: Houston, TX
C32/C55 AMG
Part Number: 1121420180
Exhaust system - Exhaust manifold - Manifold gasket Manifold gasket, cl500 2000 - 2006
$1.87 x 6
Part Number: 2024920181
Exhaust system - Exhaust components - Flange - Seal Seal Left - 600 1993 - 2002
$5.95 x 1
Part Number: 0009903250
NUT
$1.62 x 4
Part Number: 1299900310
SCREW
$2.13 x 2
Part Number: 1404920281
SEAL RING
$7.86 x 1
Part Number: 1404920245
Exhaust system - Exhaust components - Flange Flange - 600 1993 - 2002
$11.05 x 1
Part Number: 1299900410
SCREW
$2.13 x 4
Part Number: 1709900010
Exhaust system - Exhaust components - Mount bolt Mount bolt - 5.0 liter & 5.5 liter-v8 2000 - 2006
$1.28 x 6
I used a few of the bolts and will be using a few of the nuts, but I don't think I needed all of it. It's been so long since I bought the parts, I don't know which ones I used.
MBWorld Fanatic!

Joined: Aug 2011
Posts: 3,428
Likes: 288
From: New Zealand
Thanks for the advice. I just got the gaskets and nuts. Assuming all goes well, that is all I will need. If I break some studs then it will be a long wait for parts from Singapore.
Did you have to crimp anything to get the leads to stay connected properly?
Did you have to crimp anything to get the leads to stay connected properly?
Thread Starter
MBWorld Fanatic!
Joined: Mar 2007
Posts: 1,948
Likes: 3
From: Houston, TX
C32/C55 AMG
I'm still stuck on the passenger side. For what ever reason the copper nut that I stripped is still super tight and I still can't get the bottom nut closest to the firewall. The starter is in the way and I can't get enough room to get on the nut. I think I'm going to give up on the passenger side. I'm going to put everything back together and see if I can get a shop to take care of it.
Does anyone know a good shop in Houston and how much they charge?
Last edited by loudandheard; Apr 24, 2012 at 11:20 PM.
MB World Stories
The Best of Mercedes & AMG

Manual Mercedes? 6 Times Sindelfingen Let Drivers Have All The Fun
Verdad Gallardo
Mercedes SLR McLaren 722 S Is Extremely Rare Example Modified by McLaren
Verdad Gallardo
8 Classic Boxy Mercedes Designs That Have Aged Like Fine Wine
Verdad Gallardo
Flawlessly Restored Mercedes 190E Evo II Heads to Auction
Verdad Gallardo
Electric Mercedes C-Class Unveiled: 11 Things You Need to Know
Verdad Gallardo
Mercedes EQS Gets A Major Update: Everything You Need to Know
Verdad Gallardo
5 Underrated Mercedes-Benz Models That Don't Get the Love They Deserve
Verdad Gallardo
Mercedes 300D Has Pushed Well Past 1 Million Miles and It Ain't Stopping
Verdad Gallardo
10 Most Reliable Mercedes-Benz Models You Can Buy Used
Verdad GallardoMBWorld Fanatic!
Joined: Aug 2011
Posts: 3,428
Likes: 288
From: New Zealand
Hey sorry i was meaning the magnecor ignition leads, just wondering if you had to crimp the ends onto the spark plugs to get them to stay or if you never had any issues with them.
If everything is loose and you have undone most nuts recently so they obviously aren't seized and if you leave half the covers off (if suitable) it shouldn't take a shop very long at all. Usually having a hoist makes a huge difference on its own but the hundreds of different extensions and spanners and bars shops have will help. I have just about every size I thought I would ever need but still come across situations I don't have the right stuff.
If everything is loose and you have undone most nuts recently so they obviously aren't seized and if you leave half the covers off (if suitable) it shouldn't take a shop very long at all. Usually having a hoist makes a huge difference on its own but the hundreds of different extensions and spanners and bars shops have will help. I have just about every size I thought I would ever need but still come across situations I don't have the right stuff.
Thread Starter
MBWorld Fanatic!
Joined: Mar 2007
Posts: 1,948
Likes: 3
From: Houston, TX
C32/C55 AMG
Hey sorry i was meaning the magnecor ignition leads, just wondering if you had to crimp the ends onto the spark plugs to get them to stay or if you never had any issues with them.
If everything is loose and you have undone most nuts recently so they obviously aren't seized and if you leave half the covers off (if suitable) it shouldn't take a shop very long at all. Usually having a hoist makes a huge difference on its own but the hundreds of different extensions and spanners and bars shops have will help. I have just about every size I thought I would ever need but still come across situations I don't have the right stuff.
If everything is loose and you have undone most nuts recently so they obviously aren't seized and if you leave half the covers off (if suitable) it shouldn't take a shop very long at all. Usually having a hoist makes a huge difference on its own but the hundreds of different extensions and spanners and bars shops have will help. I have just about every size I thought I would ever need but still come across situations I don't have the right stuff.
Yeah I hope it's not too expensive to get the rest of the job done. We're going to try one more thing before I take it to a shop.
Thread Starter
MBWorld Fanatic!
Joined: Mar 2007
Posts: 1,948
Likes: 3
From: Houston, TX
C32/C55 AMG
So I finally got everything just about done. A friend of my dad's finished taking off the manifold in about 20 minutes. Apparently I stripped a nut on the bottom closest to the firewall. He took a chisel and a hammer and made a groove in the nut. He then was able to loosen the nut enough to get it off by hand. He used a grinder to break off the nut on the top and the whole manifold came loose.
I'm not sure what it was about the nut on the bottom of the manifold closest to the firewall, but I couldn't get it out because there was not a lot of room. The starter is in the way and the divet in the manifold just does not allow you to get a socket wrench on the nut, but we managed to get it out. Mine was installed super tight and it just didn't want to come out.
I finally got to installing the header on the driver's side, but it was very difficult. I installed all new studs and exhaust gaskets. I get the header in from underneath the car and then I had to pull them in from the top. I then threaded the nuts on to the studs. I managed to get all the nuts threaded except for one. The stud stuck out to the point that it was touching one of the tubes. We had to loosen all the nuts I had tightened to get the header out enough to thread the nut on to that stud. Once it was on, we couldn't get a wrench on the nut to tighten it. We had to take out the motor mount and the mount that attaches to the engine to get enough room to tighten the nut. We managed to take all that out with the header still attached to the engine. Then we were able to tighten that one nut. We managed to put all the pieces back together and were able to tighten all the rest of the nuts on the manifold.
Next was the fun part, installing the down pipes. First I propped the down pipe up and attached the mid section to the pipe loosely and then I attached the rear portion loosely. Now the down pipe is hanging on its own and it's going to be a bit easier to install the down pipe to the header. I bought a whole bunch of bolts from the list above, which gave me 4 copper looking nuts and 4 long bolts, these bolts look just like the bolts that are used in the rear of the exhaust to attach the down pipes to the rear exhaust. If you can get another person to help, now is the time. One person has to hold the down pipe to the header while the other attaches the bolt and the nut on top. Then one person has to hold a wrench up top, while the other uses a ratchet down low. This has to be done twice per side. Once we finished that, we tightened the rest of nuts and bolts.
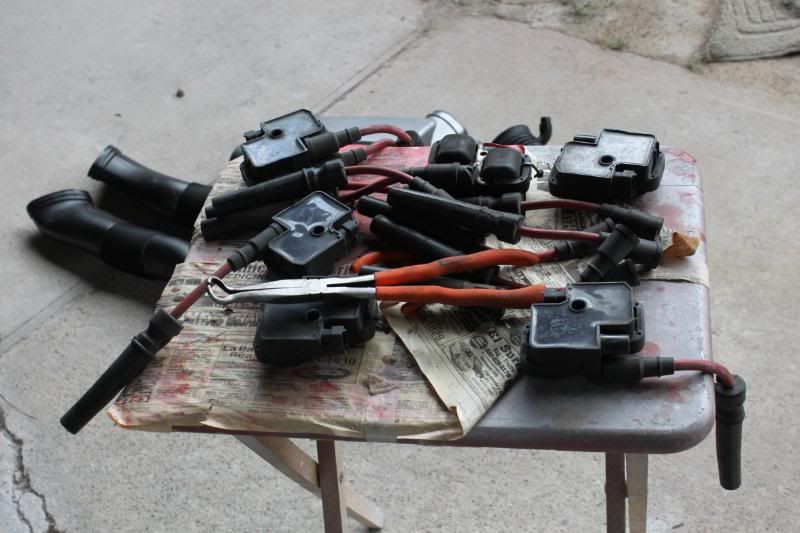
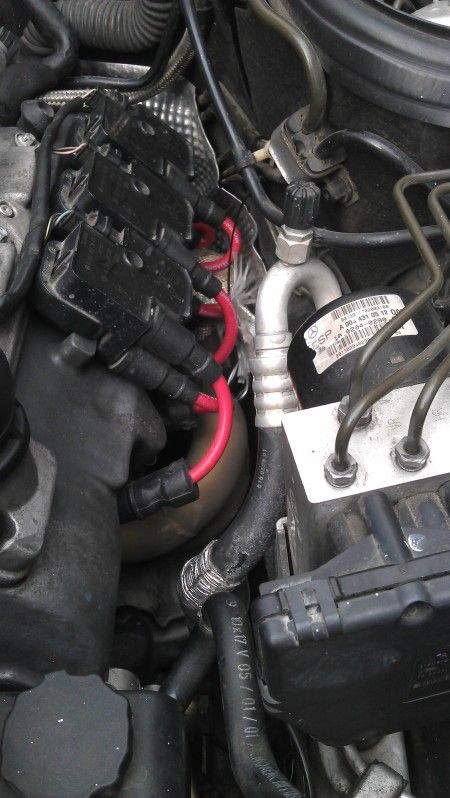
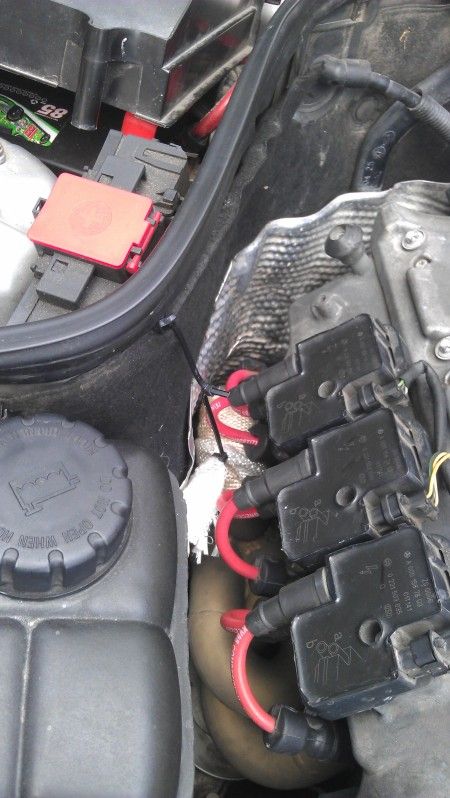
I figured the tough part was over, but I had to reinstall the spark plug wires and coil packs. All of my coil packs were numbered 1-6. The passenger side closest to the front of the car uses coil pack 1, then 2, and then 3. The drivers side beginning from the front of the car is 4, then, 5, and then 6. The valve covers have a basic guide as to which coil packs goes where and which wire goes where. The easiest way to do the job is to start closest to the firewall and work your way to the front of the car. My headers are so close to the spark plug wires that it was a pain even getting the wires on to the plugs. To make things worse, the wires closest to the firewall touch the headers. So I need to buy some heat reflective sleeves.
I managed to start the car shortly and so far everything seems good, but I haven't had a chance to drive the car yet.
The diffiuclties I experienced with the install has to do with the design of my header, this is probably the most difficult design to install. So if you can get your stock manifolds off, you should be able to install your new header. If mine can be installed, yours definitely can be installed. Give yourself plenty of time and don't give up. I'll post a few pics tomorrow.
I'm not sure what it was about the nut on the bottom of the manifold closest to the firewall, but I couldn't get it out because there was not a lot of room. The starter is in the way and the divet in the manifold just does not allow you to get a socket wrench on the nut, but we managed to get it out. Mine was installed super tight and it just didn't want to come out.
I finally got to installing the header on the driver's side, but it was very difficult. I installed all new studs and exhaust gaskets. I get the header in from underneath the car and then I had to pull them in from the top. I then threaded the nuts on to the studs. I managed to get all the nuts threaded except for one. The stud stuck out to the point that it was touching one of the tubes. We had to loosen all the nuts I had tightened to get the header out enough to thread the nut on to that stud. Once it was on, we couldn't get a wrench on the nut to tighten it. We had to take out the motor mount and the mount that attaches to the engine to get enough room to tighten the nut. We managed to take all that out with the header still attached to the engine. Then we were able to tighten that one nut. We managed to put all the pieces back together and were able to tighten all the rest of the nuts on the manifold.
Next was the fun part, installing the down pipes. First I propped the down pipe up and attached the mid section to the pipe loosely and then I attached the rear portion loosely. Now the down pipe is hanging on its own and it's going to be a bit easier to install the down pipe to the header. I bought a whole bunch of bolts from the list above, which gave me 4 copper looking nuts and 4 long bolts, these bolts look just like the bolts that are used in the rear of the exhaust to attach the down pipes to the rear exhaust. If you can get another person to help, now is the time. One person has to hold the down pipe to the header while the other attaches the bolt and the nut on top. Then one person has to hold a wrench up top, while the other uses a ratchet down low. This has to be done twice per side. Once we finished that, we tightened the rest of nuts and bolts.
I figured the tough part was over, but I had to reinstall the spark plug wires and coil packs. All of my coil packs were numbered 1-6. The passenger side closest to the front of the car uses coil pack 1, then 2, and then 3. The drivers side beginning from the front of the car is 4, then, 5, and then 6. The valve covers have a basic guide as to which coil packs goes where and which wire goes where. The easiest way to do the job is to start closest to the firewall and work your way to the front of the car. My headers are so close to the spark plug wires that it was a pain even getting the wires on to the plugs. To make things worse, the wires closest to the firewall touch the headers. So I need to buy some heat reflective sleeves.
I managed to start the car shortly and so far everything seems good, but I haven't had a chance to drive the car yet.
The diffiuclties I experienced with the install has to do with the design of my header, this is probably the most difficult design to install. So if you can get your stock manifolds off, you should be able to install your new header. If mine can be installed, yours definitely can be installed. Give yourself plenty of time and don't give up. I'll post a few pics tomorrow.
Last edited by loudandheard; Apr 29, 2012 at 11:26 PM.
Thread Starter
MBWorld Fanatic!
Joined: Mar 2007
Posts: 1,948
Likes: 3
From: Houston, TX
C32/C55 AMG
So I had some heat wrap that I used to temporarily test the car and I think I may have an exhaust leak. I'm not 100% sure, but I'm going to drive it a bit longer to see if anything happens. I had a strange idle surge when I put it in park, the tack would idle up to 2k and stay there, but it seems to have fixed itself.
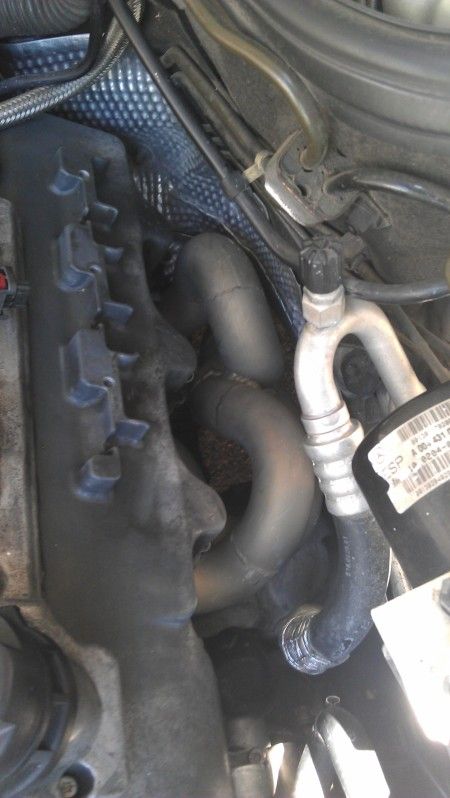
I'm hoping the exhaust leaks are just in the pipes and not the header attached to the engine.
I'm hoping the exhaust leaks are just in the pipes and not the header attached to the engine.
MBworld Guru
Joined: Apr 2002
Posts: 22,058
Likes: 18
From: Diamond Bar, CA
W206 PHEV AMG
So I had some heat wrap that I used to temporarily test the car and I think I may have an exhaust leak. I'm not 100% sure, but I'm going to drive it a bit longer to see if anything happens. I had a strange idle surge when I put it in park, the tack would idle up to 2k and stay there, but it seems to have fixed itself.
I'm hoping the exhaust leaks are just in the pipes and not the header attached to the engine.
I'm hoping the exhaust leaks are just in the pipes and not the header attached to the engine.
The rpm surge might be just the ecu trying to adapt the extra flow and adjusting.
When you get a chance to push it get ready to listen to the header howls.

Thread Starter
MBWorld Fanatic!
Joined: Mar 2007
Posts: 1,948
Likes: 3
From: Houston, TX
C32/C55 AMG
I still haven't pushed it hard, but it sounds fairly tame at idle. I'm going to see if I can get a video of it.
Thread Starter
MBWorld Fanatic!
Joined: Mar 2007
Posts: 1,948
Likes: 3
From: Houston, TX
C32/C55 AMG
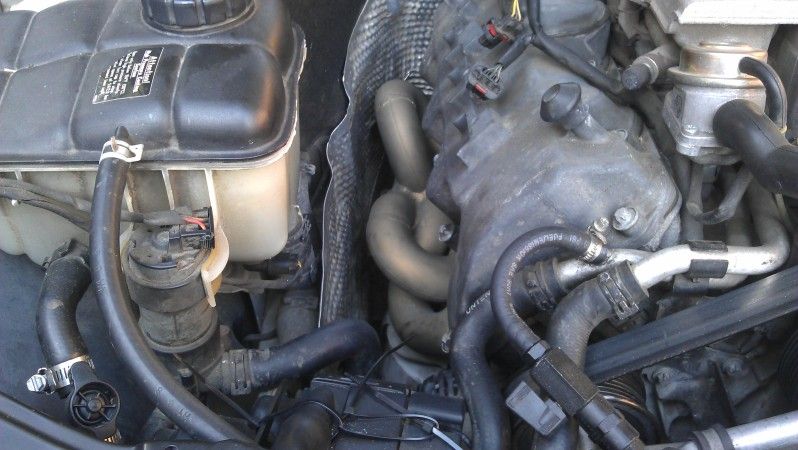
I feel like something is bogging down my engine, hopefully it's just the intercooler pump and not the intercooler leaking. There wasn't a huge increase in exhaust sound, but I feel like I have much better top end on the freeway. Seems likes the engine enjoys being at higher speeds. I still have primary and secondary cats and they seemed to be in good condition.
Member
Joined: Feb 2014
Posts: 134
Likes: 10
From: New Hampshire
C 32 AMG & FG2 Civic Si
Hey all, just ordered Eurocharged shorty headers for the C32. I'll most likely replace the engine mounts and the transmission mount at the same time since I'll need the same stuff to get to that area anyway.
Has anyone had better luck at installing headers on our car? Seems like a real pain. Any other tips that would make the job easier? I'm not looking forward to the installation process at all... actually, how much do you guy think an exhaust shop would charge for this?
how's the increase in power and sound?

MBWorld Fanatic!
Joined: Mar 2004
Posts: 2,073
Likes: 27
From: North NJ
2002 C32 AMG, 2013 GLK 350/4, 2015 E63S AMG Wagon
Hey all, just ordered Eurocharged shorty headers for the C32. I'll most likely replace the engine mounts and the transmission mount at the same time since I'll need the same stuff to get to that area anyway.
Has anyone had better luck at installing headers on our car? Seems like a real pain. Any other tips that would make the job easier? I'm not looking forward to the installation process at all... actually, how much do you guy think an exhaust shop would charge for this?
how's the increase in power and sound?
Has anyone had better luck at installing headers on our car? Seems like a real pain. Any other tips that would make the job easier? I'm not looking forward to the installation process at all... actually, how much do you guy think an exhaust shop would charge for this?
how's the increase in power and sound?
Member
Joined: Feb 2014
Posts: 134
Likes: 10
From: New Hampshire
C 32 AMG & FG2 Civic Si
Job done! Took 3 days and close to 20 hours of labor from me and my girlfriend but we replaced both engine mounts and the transmission mount, installed the Eurocharged headers, and flashed the new Eurocharged tune successfully. Thanks to you guys, the job was a bit easier than it would have been otherwise.
My advice to any who are thinking about doing this job is to set aside a couple of days and plan to finish a day early. There are TONS of things that can go wrong (nuts rounding, threads stripping, etc.) that could leave you without a car until you get new parts. I luckily didn't round any nuts (though the copper ones on the headers are extremely soft) but I did have to drive almost an hour to get 2 studs that hold the headers to the engine because my local dealerships did not stock them.
The procedure itself is pretty simple, the hard part is just getting to some of the nuts and bolts.
You will need:
1) Penetrating Oil (like $5 from any hardware store, I used Liquid Wrench)
2) Blue Loctite (A few bucks, for engine and transmission mounts bolts, from Walmart or hardware store)
3) A few socket extensions, preferably with one that's around 10 inches (Got my Stanley extensions from Walmart, maybe around $10)
4) Universal socket joints (Stanley, Walmart, don't remember price)
5) 16mm Mercedes engine mount wrench. This is not an OEM part, but it can be found on eBay or Amazon and it's around $15-20 and worth every penny. It will make removing and tightening the top bolts on the engine mounts an absolute breeze.
6) 17mm Mercedes spark plug boot wrench. This is not an OEM part either, and it can be found on eBay or Amazon for around $15-20 too. Without this, you will be furious trying to get the boots off.
7) New gaskets and nuts for headers (came with Eurocharged headers)
8) New headers and/or engine mounts! I used Lemfoerder engine and trans mounts, and I'm extremely confident in their quality.
Optional: Someone to help you, floor creeper (got a really great metal Craftsman one for only $27), bright flashlight (got a Coast one from Amazon for $10), bright headlamp (Amazon, $30), music to pass them time, zip ties to hold the ignition coil cables together if you don't want to completely remove them, cold drinks, lots of different sized ratchets and sockets, wrenches, and ratcheting wrenches.
*The day or night before, locate the exhaust nuts and bolts that will need to be removed and spray the heck out of them with penetrating oil.
1. Put the car on quality jackstands or ramps, disconnect the negative battery terminal, and remove the two belly pans under the engine and transmission.
2. Remove air intake
3. Remove ignition coils. These are held on by a T27, not a T25 so make sure you have the correct socket beforehand. If your set is missing that size, Home Depot sells them individually for like $2. I would definitely not recommend using a T25.
4. Pull the spark plug boots off the plugs with the spark plug wrench. Leverage against the engine only, not the ignition coils! Set the ignition coils out of the way.
5. Remove the exhaust section that spans from the primary cats to around the middle of the car (not too difficult to get to with a long extension)
6. Remove the bottom engine mount bolts with a long extension.
7. Use around a 3"x8" piece of wood to jack the engine up and let it down at your choosing. Don't jack up the area near the steering rack. There is a better area behind the black crossmember with more of the engine exposed for you to jack up. Lift the engine up and down a couple of inches each time you can't get to one of the nuts. It will help to get to them.
8. Remove the stock headers (and gaskets) with TONS of different combinations of extensions and those swivel joints (be very, very careful not to strip these). Be really patient with these.
9. If any of the studs come out with the nut, don't worry. The part number is on an earlier post and they were about $3 each. Again, make sure you have time set aside for this kind of stuff to happen.
10. If you are replacing engine mounts (recommended if they are original and you are installing new headers), jack the engine up a couple inches and use the engine mount wrench and a long extension (I used a 10") along with a breaker bar or long ratchet and loosen the top bolts. It will not be very difficult at all. If you aren't replacing the engine mounts, you still might want to take yours out to make access to the headers easier.
11. Replace the engine mounts and take care to line up the notch on the top of it with the slit that it goes in to. The debris covers are optional. Mine did not have them on either side but I installed the new ones with both on. Use a dab of blue Loctite on these bolts, as they come that way from the factory. Torque top ones to spec.
12. To replace the transmission mount: jack it up by the pan by just a couple of millimeters with a block of wood to support it and relieve some strain on the bolts that support the mount.
13. Remove two bolts from the crossmember that holt the transmission mount is place, then remove the two bolts on the side of the transmission mount. Replace mount, use blue Loctite, and torque to spec.
10. Throw on the new gaskets and headers and tighten away. Torque spec was 20 nm if I remember correctly, so just get it as tight as you can since a torque wrench will not be able to fit. Be very careful not to strip the nuts. Take your time. Lift the engine and lower it back down at your will to make access easier.
11. Torque down the bottom engine mount bolts, also with a little Loctite.
The rest is pretty self explanatory, just put everything back together (to spec). One big issue that I had was fitting the passenger side exhaust pipe back into place with the header, but I don't think many people will have that problem. Take your time and be patient with everything.
If you are getting more into doing your own maintenance and/or mods, I highly recommend getting a copy of the WIS on eBay or something. You will need VMware Fusion but it is highly, highly helpful. It gives all torque specs, part numbers including part numbers that have been superceded, procedures for basically everything you could ever need to do on your car, etc. Don't confuse this with the STAR DAS system, which costs thousands of dollars. You can get the WIS for like $25 on eBay and it will be the best $25 you've ever spent. I've had it for maybe a year now and I've used it dozens of times and I feel super lucky to have it because it makes everything so much easier.
If anyone has any questions about the install process for headers or engine and transmission mounts, feel free to let me know while it's all fresh in my memory. Hope this helps someone!
EDIT: Forgot to mention disconnecting/connecting the O2 sensors. They're pretty self-explanatory when you see them. Just make sure you route the wires back into all their clips properly.
Last edited by ez53436; Apr 4, 2015 at 06:32 PM.


Junior Member
Joined: Nov 2015
Posts: 57
Likes: 1
From: Boston, MA
2003 Mercedes C32 AMG
3.5-4 seems a lot more reasonable. Does anyone think 6-9 hours is reasonable?


