


Saaboteur's C55
Thread Starter
MBWorld Fanatic!


Joined: May 2009
Posts: 1,846
Likes: 29
From: Canada
eclectic assortment of cars
Some more nicely machined parts came in:
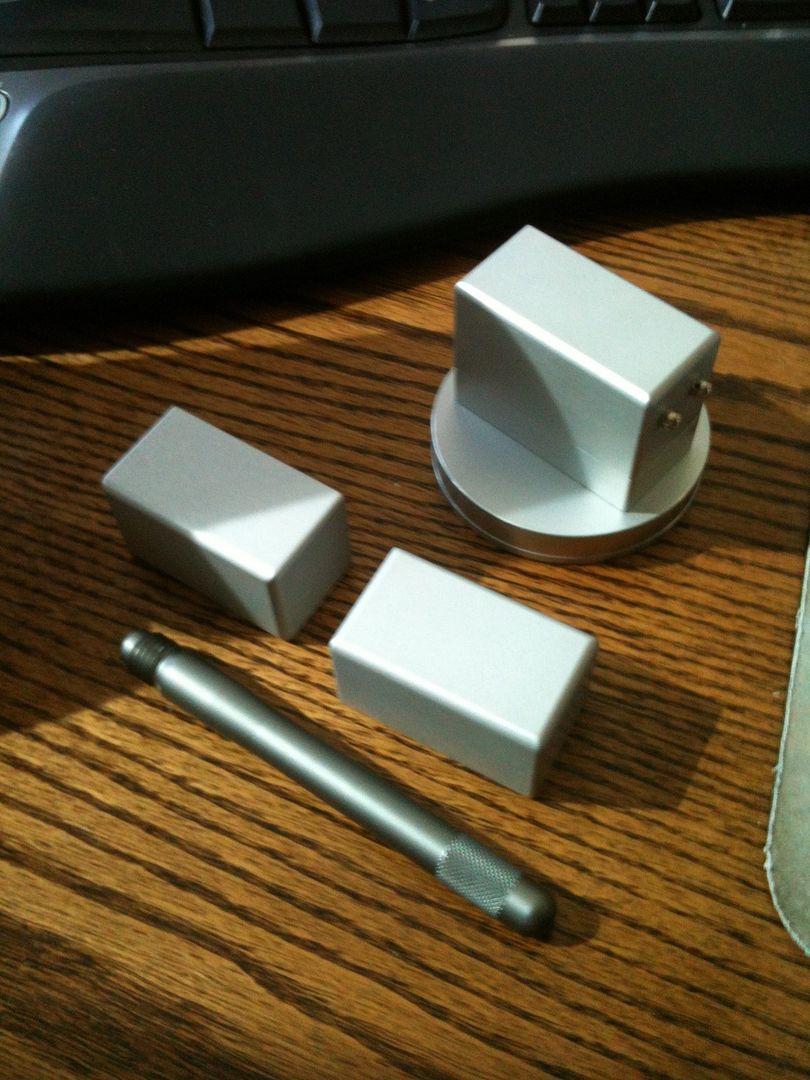
Reverse Logic jackpad adaptor for the jack and also for jackstands. I picked up a set of aluminum jackstands and will modify them locally (Reverse Logic also sells the jackstands and modifies them to suit). Lug bolt guide is there too, but may be a bit overkill - the hubcentric nature of the wheels makes them pretty easy to mount.
I also added new jacking point pads on the car, as the original ones I managed to mangle by not using the adaptors!
MBWorld Fanatic!
Joined: Jul 2008
Posts: 3,191
Likes: 7
From: Va Beach, VA
05 C230K SS (sold), 06 C55 (sold), 08 Yamaha R1 (sold), 16 X5M
ya the spacers make mounting the rear wheels quite difficult for me...maybe have a 1/2mm of lip to try and sit on...usually have to hold it with one hand and put a bolt in with the other...are those jack stand adapters and jack adapter universal or specific to their products?
Thread Starter
MBWorld Fanatic!
Joined: May 2009
Posts: 1,846
Likes: 29
From: Canada
eclectic assortment of cars
They are basically universal to jacks and jackstands, but there are certain dimensions in which they will fit, ie. if your jack lifting head is too small in diameter, the adaptor won't fit in there properly.
Check out the site and they will have more info with the dimensions. They mention using the Torin brand of jackstands. I managed to find locally ones that look exactly like that brand, so I picked them up rather than having them shipped.
Also today ordered a Weathertech trunk mat. Went nuts on the Weathertech site actually - ordered front and rear floor mats for my Audi winter beater, plus front and rear mats and a trunk liner for the wife's LR3 too. Hoping to pick up a second hand Weathertech trunk mat for the Audi too. All this after I cleaned up the Audi's OE rubber mats too...BTW, am I the only one who uses tire shine foam for this purpose? They are slippery for a little while at first, but it does give the mats a good cleaning without much effort required.
MBWorld Fanatic!
Joined: Jul 2008
Posts: 3,191
Likes: 7
From: Va Beach, VA
05 C230K SS (sold), 06 C55 (sold), 08 Yamaha R1 (sold), 16 X5M
ive never thought of that but i use this new turtle wax stuff that is awesome! puts this film over the rubber that last for weeks! My mom actually introduced me to it that she uses back in FL on her jeep and so i got a can for my benz and used them on my 18" rims when they were on and it was truly amazing!
MBWorld Fanatic!
Joined: Jul 2008
Posts: 3,191
Likes: 7
From: Va Beach, VA
05 C230K SS (sold), 06 C55 (sold), 08 Yamaha R1 (sold), 16 X5M
and did you pick up the 40mm headless bolt or 55mm hex head bolt? Any idea what the difference is, cant find much on their site and no pics!
and its cheaper to get the stands off of amazon and then just order the pads seperate
and its cheaper to get the stands off of amazon and then just order the pads seperate
Thread Starter
MBWorld Fanatic!
Joined: May 2009
Posts: 1,846
Likes: 29
From: Canada
eclectic assortment of cars
I ordered the 40mm headless bolts, they are basically studs, because I couldn't figure out how to disasseble the jackstand. But I'm going to pick up some 55mm socket head bolts instead. The Reverse Logic guy, Fred, is very helpful and pointed me to a thread that describes how to do it.
http://www.gtrlife.com/forums/topic/...m-jack-stands/
http://www.gtrlife.com/forums/topic/...m-jack-stands/
MB World Stories
The Best of Mercedes & AMG

Manual Mercedes? 6 Times Sindelfingen Let Drivers Have All The Fun
Verdad Gallardo
Mercedes SLR McLaren 722 S Is Extremely Rare Example Modified by McLaren
Verdad Gallardo
8 Classic Boxy Mercedes Designs That Have Aged Like Fine Wine
Verdad Gallardo
Flawlessly Restored Mercedes 190E Evo II Heads to Auction
Verdad Gallardo
Electric Mercedes C-Class Unveiled: 11 Things You Need to Know
Verdad Gallardo
Mercedes EQS Gets A Major Update: Everything You Need to Know
Verdad Gallardo
5 Underrated Mercedes-Benz Models That Don't Get the Love They Deserve
Verdad Gallardo
Mercedes 300D Has Pushed Well Past 1 Million Miles and It Ain't Stopping
Verdad Gallardo
10 Most Reliable Mercedes-Benz Models You Can Buy Used
Verdad Gallardo
Thread Starter
MBWorld Fanatic!
Joined: May 2009
Posts: 1,846
Likes: 29
From: Canada
eclectic assortment of cars
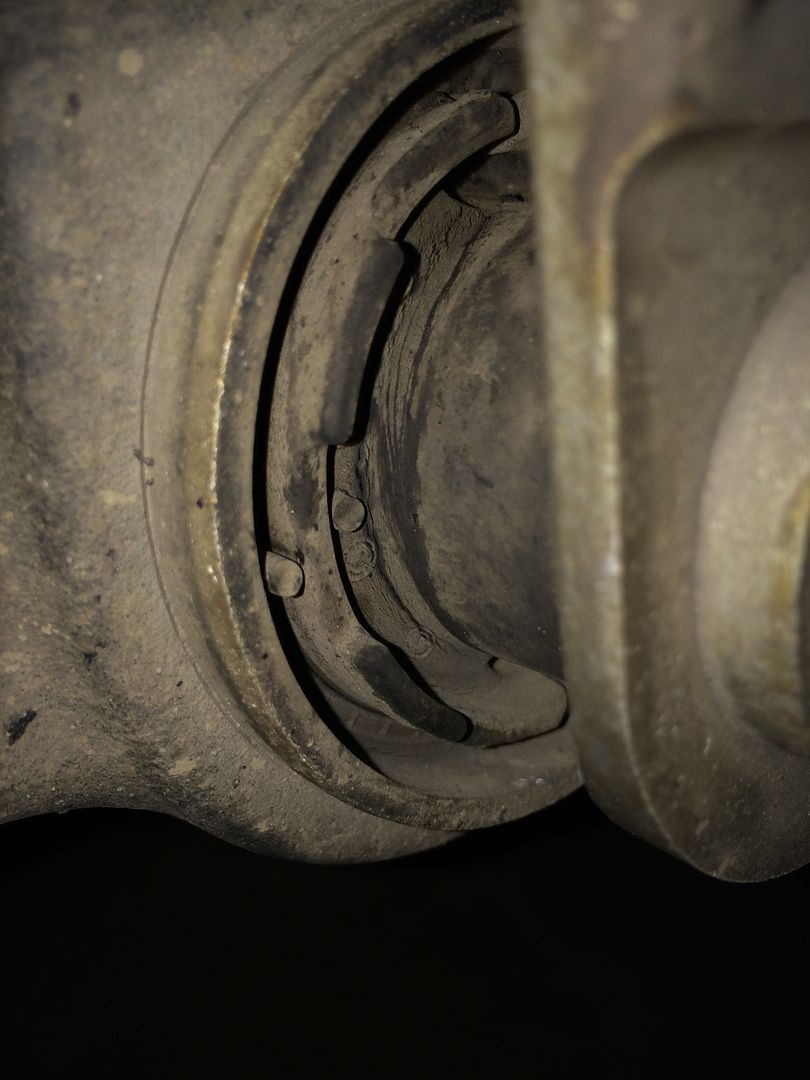
Picked up some 55mm bolts this morning, and then went to my engine builder/machinist. A few minutes on the lathe and two neat holes were drilled into the jackstand saddle tops. Even though the jackstands are aluminum construction, I'm glad I just let my engine builder do the work. The saddle top is basically 40mm thick, it would have taken a while. Interestingly, he didn't use the drill press. Rather, he spun the jackstand saddle and worked the drill bit into the jackstand. Much tidier job than I could have done.
I neglected to get some lock washers, so I'll do that at lunch and then my new set up is ready to go! Pity that I probably won't use them for a little while - just did the oil change a couple weekends go! Although I guess I will swap the rubber off in another month or so for my winter tires (just for the 'shoulder' seasons). Gotta finish getting the Audi winter beater ready to go.
I neglected to get some lock washers, so I'll do that at lunch and then my new set up is ready to go! Pity that I probably won't use them for a little while - just did the oil change a couple weekends go! Although I guess I will swap the rubber off in another month or so for my winter tires (just for the 'shoulder' seasons). Gotta finish getting the Audi winter beater ready to go.
Thread Starter
MBWorld Fanatic!
Joined: May 2009
Posts: 1,846
Likes: 29
From: Canada
eclectic assortment of cars
With the 40mm (and what I actually did order), the jackstand block will just sit on top of the jackstand sadle, but obviously with the bolt keeping it in place. However, with th 55mm bolt, the jackstand block is Scylla clamped onto the jackstand saddle, with a positive engagement. It's more secure for sure, but then you can't use the jackstand on other cars without removing the bolt. Not a big deal for me, as I have a lot of other jackstands and bought this set just for use with the C55.
I did, however, just find that with a lock washer in place, head of the bolt sticks downwards enough to just interfere with the lock pin which secures the inner jackstand saddle to the outer one. Going to have to ditch the lock washer to allow full range.
Don't be too afraid of drilling - aluminum is very soft compared to steel. Just measure several times to be sure you are dead centre on the jackstand saddle, otherwise the jackstand block may not sit properly in the saddle.

Newbie
Joined: Sep 2013
Posts: 4
Likes: 0
2004 C32 ///AMG
I completed the "paddle shift mod" about a month ago. It took some time to get the steering wheel bored out to properly house the paddle mechanism. Take your time. It's worth it in the end you can get a OEM look to it and they have a much better feel as compared to the plastic button. Much more positive feedback.
Thread Starter
MBWorld Fanatic!
Joined: May 2009
Posts: 1,846
Likes: 29
From: Canada
eclectic assortment of cars
I think you'll need some coding done with Star diagnostics. There's a thread on this forum about it somewhere, I remember reading it. However, unfortunately I can't help more as I've only done the mod on my C55 and it was plug and play.
MBWorld Fanatic!
Joined: Jul 2008
Posts: 3,191
Likes: 7
From: Va Beach, VA
05 C230K SS (sold), 06 C55 (sold), 08 Yamaha R1 (sold), 16 X5M
With the 40mm (and what I actually did order), the jackstand block will just sit on top of the jackstand sadle, but obviously with the bolt keeping it in place. However, with th 55mm bolt, the jackstand block is Scylla clamped onto the jackstand saddle, with a positive engagement. It's more secure for sure, but then you can't use the jackstand on other cars without removing the bolt. Not a big deal for me, as I have a lot of other jackstands and bought this set just for use with the C55.
I did, however, just find that with a lock washer in place, head of the bolt sticks downwards enough to just interfere with the lock pin which secures the inner jackstand saddle to the outer one. Going to have to ditch the lock washer to allow full range.
Don't be too afraid of drilling - aluminum is very soft compared to steel. Just measure several times to be sure you are dead centre on the jackstand saddle, otherwise the jackstand block may not sit properly in the saddle.
I did, however, just find that with a lock washer in place, head of the bolt sticks downwards enough to just interfere with the lock pin which secures the inner jackstand saddle to the outer one. Going to have to ditch the lock washer to allow full range.
Don't be too afraid of drilling - aluminum is very soft compared to steel. Just measure several times to be sure you are dead centre on the jackstand saddle, otherwise the jackstand block may not sit properly in the saddle.
MBWorld Fanatic!
Joined: Jul 2008
Posts: 3,191
Likes: 7
From: Va Beach, VA
05 C230K SS (sold), 06 C55 (sold), 08 Yamaha R1 (sold), 16 X5M
oh and i used them all yesterday as I replaced my rear driver side spring due to some rubbing issues. lol didnt actually attach the blocks to the jack...lol probably not the best idea looking back but i figured the block locked up inside the rectangular rubber surround on the car secure enough where it shouldnt make a difference. Altough I must say the "AMG" adapter for the lift is a bit overkill...infact you probably don't even need it to be frank. at least not on my side sills
Thread Starter
MBWorld Fanatic!
Joined: May 2009
Posts: 1,846
Likes: 29
From: Canada
eclectic assortment of cars
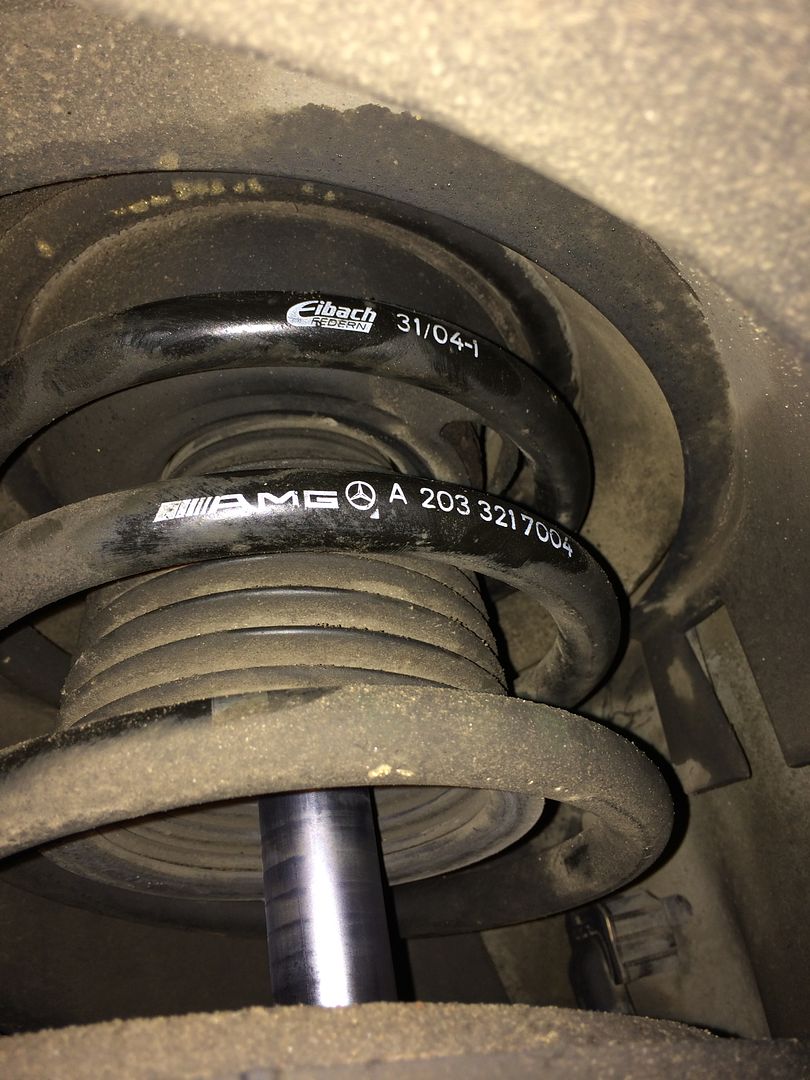
Couple of small revelations yesterday. Whilst my car is currently hibernating for the winter, I am planning some work for it in the coming months once spring comes. Last summer I noticed that the front control arms were starting to show wear, so last night I inspected them again. Local price for OE quality Lemfoerder pieces is going to be about C$700-800. I can get the same stuff through AutohausAZ for about $500. No brainer, especially as I'll be traveling down to the US again later this month.
At any rate, the first revelation was that it seems that the front control arm part numbers now update to 204 body part numbers. I guess the 204 must use the same pieces up front.
The other revelation is that whilst I was under the car, I noticed the markings on the springs. AMG specific, made by Eibach. Pretty cool.
Chassis side of the front rearward arm:
Chassis side of the front forward arm:

AMG by Eibach:
I could probably get away with leaving the forward arm, but I might as well do them. I could probably even get away with leaving them for another season too, but I want to keep the car meticulous.
At any rate, the first revelation was that it seems that the front control arm part numbers now update to 204 body part numbers. I guess the 204 must use the same pieces up front.
The other revelation is that whilst I was under the car, I noticed the markings on the springs. AMG specific, made by Eibach. Pretty cool.
Chassis side of the front rearward arm:

Chassis side of the front forward arm:

AMG by Eibach:

I could probably get away with leaving the forward arm, but I might as well do them. I could probably even get away with leaving them for another season too, but I want to keep the car meticulous.
MBWorld Fanatic!


Joined: Jun 2012
Posts: 1,155
Likes: 4
From: SF Bay Area
C55 AMG, 300D-T & Karmann Ghia
I had my control arms replaced a couple of months ago and noticed the last time I was under the front of the car that the part number started with 204. Glad I'm not the only one!
Thread Starter
MBWorld Fanatic!
Joined: May 2009
Posts: 1,846
Likes: 29
From: Canada
eclectic assortment of cars
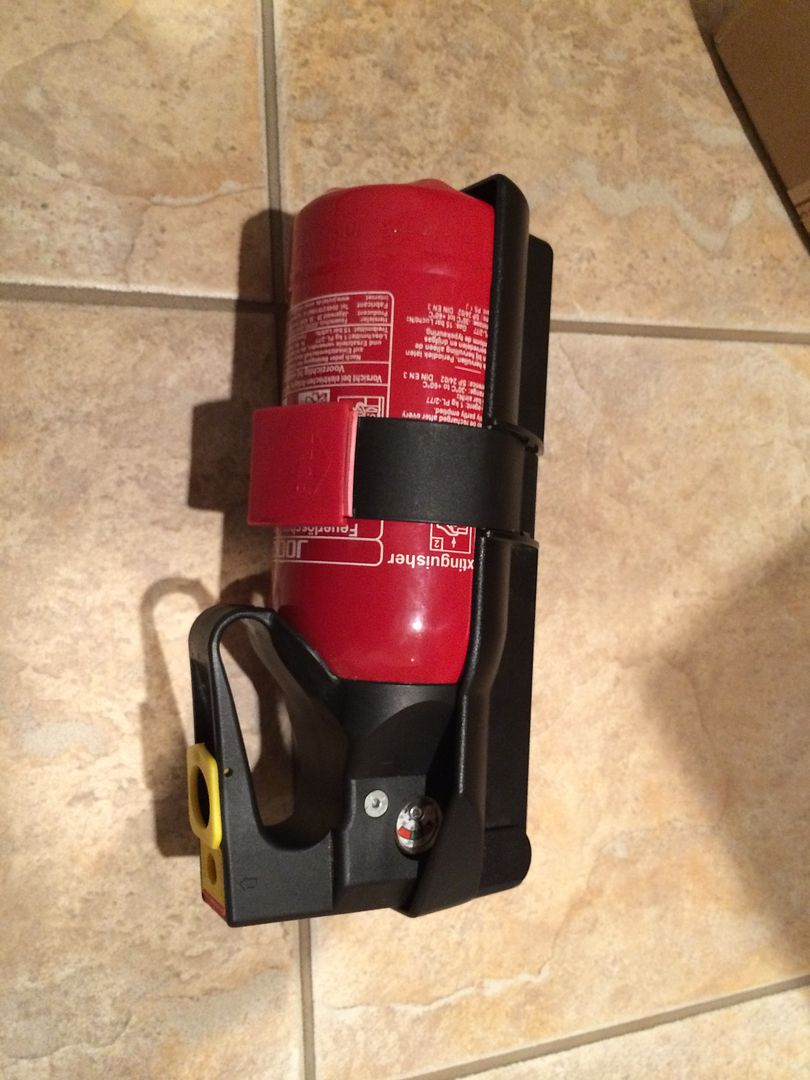
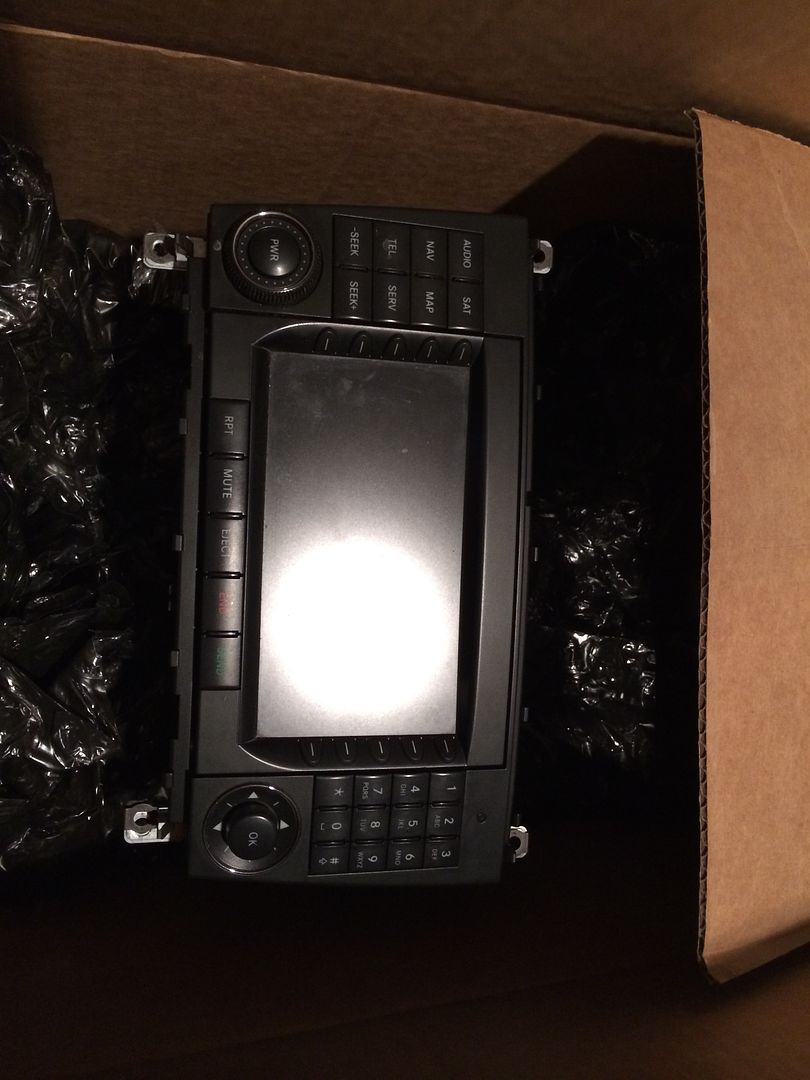
Picked up a few various items:
OE fire extinguisher:
Lemfoerder front control arms, ball joint removal tool to help with install of the arms, plus a transmission coupler and some oil filters:
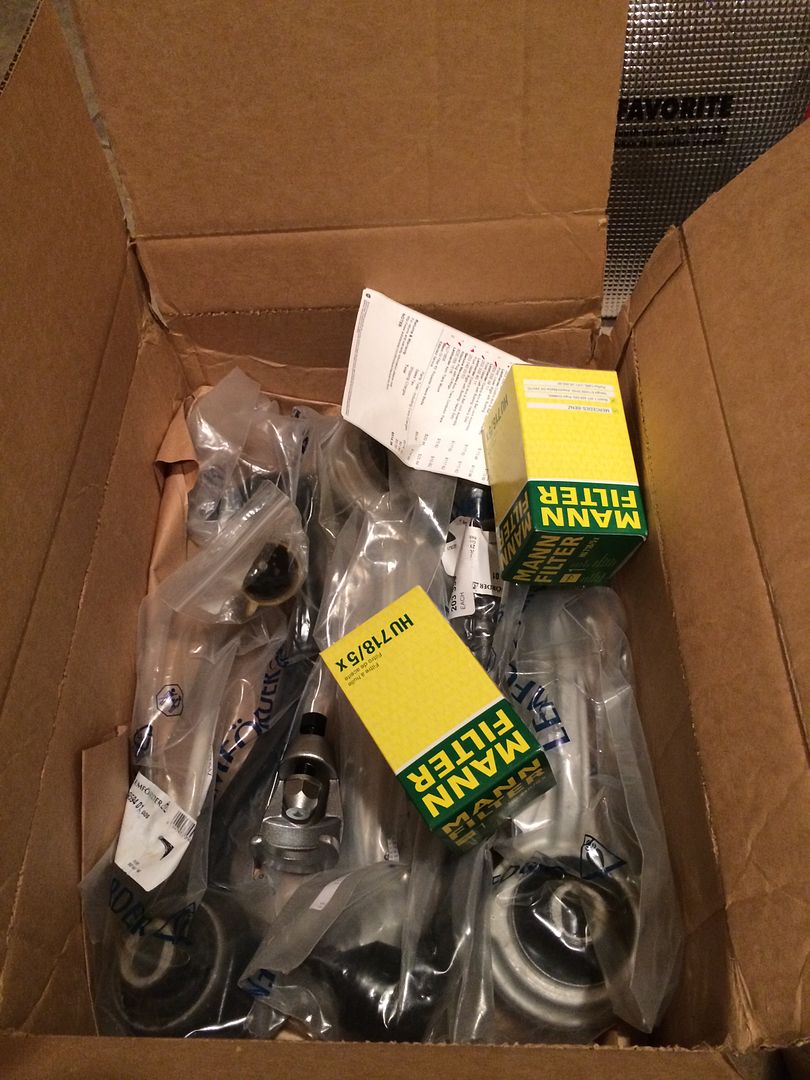
Comand:
Funny t-shirt, have to be an F1 / Kimi Raikkonen fan to get it:

Currently looking into getting the OE emergency triangle for the trunk, and the appropriate coding done for the Comand.
OE fire extinguisher:
Lemfoerder front control arms, ball joint removal tool to help with install of the arms, plus a transmission coupler and some oil filters:
Comand:
Funny t-shirt, have to be an F1 / Kimi Raikkonen fan to get it:
Currently looking into getting the OE emergency triangle for the trunk, and the appropriate coding done for the Comand.

MBWorld Fanatic!
Joined: Aug 2006
Posts: 7,053
Likes: 398
From: A.D., U.A.E
2000 (W202 C200) & 2000 (W202 C55)
Good work Vince, i like this T-shirt a lot, its reflects soo many good guys lives....") ,,
,,
BTW;
MB has "3" part #s for trunk Triangle:
"203 890 01 97" & "211 890 01 97" & "000 590 46 12",,
do you have an idea what's the difference between them....??
ZAYED,,
,,BTW;
MB has "3" part #s for trunk Triangle:
"203 890 01 97" & "211 890 01 97" & "000 590 46 12",,
do you have an idea what's the difference between them....??
ZAYED,,
Thread Starter
MBWorld Fanatic!
Joined: May 2009
Posts: 1,846
Likes: 29
From: Canada
eclectic assortment of cars
Yeah, the cracking. My mechanic buddy saw them too and figured I should swap them out. The car has about 112,000 km, so not a lot. I have the original owner's service records, and he got an estimate to R&R the arms, but never did them. I might be doing them prematurely, but I'm a great believer in preventative maintenance. And also that the parts are so much cheaper in the US, so whenever I'm down visiting relatives in Vancouver, it just makes sense for me to hop over the border to grab parts from the shipping depot.
No idea re: the different warning triangle part numbers. I'm gonna ask for quotes on them all. Oh, the when I checked the EPC, the 203 part number was supposed to be Euro, the 000 one was US. I don't know how a warning triangle can be different from continent to continent though!
No idea re: the different warning triangle part numbers. I'm gonna ask for quotes on them all. Oh, the when I checked the EPC, the 203 part number was supposed to be Euro, the 000 one was US. I don't know how a warning triangle can be different from continent to continent though!
Thread Starter
MBWorld Fanatic!
Joined: May 2009
Posts: 1,846
Likes: 29
From: Canada
eclectic assortment of cars
So I heard back from the parts guy at the independent Benz shop I use. Both the 203 and the 211 part numbers for the emergency triangles are about C$150 each, but the 000 triangle is only about C$50. No brainer there. The bracket is only about C$8, so I'm gonna get that all sorted out too.
Member
Joined: Aug 2013
Posts: 242
Likes: 0
From: Oxford, PA
C55 AMG
So I heard back from the parts guy at the independent Benz shop I use. Both the 203 and the 211 part numbers for the emergency triangles are about C$150 each, but the 000 triangle is only about C$50. No brainer there. The bracket is only about C$8, so I'm gonna get that all sorted out too.
Thread Starter
MBWorld Fanatic!
Joined: May 2009
Posts: 1,846
Likes: 29
From: Canada
eclectic assortment of cars
So it turns out that the fire extinguisher actually requires another metal bracket for proper attachment to the seat frame. The seller I bought it from didn't include it because he didn't use it!
Thankfully, the metal bracket is only about C$25, so I've ordered it, along with a few other bits and pieces.
Here are a couple links:
Fire extinguisher bracket part numbers:
https://mbworld.org/forums/c-class-w...r-ordered.html
But the part numbers in that post don't include the extinguisher itself. The extinguisher is 000 860 33 80 - but then I'm not sure if that includes all the bracketry and such. The extinguisher is clamped to the plastic bracket (as set out with the part numbers in the post above), and then that plastic bracket mounts to a metal 'angle' bracket which is screwed into the seat frame.
...and one with the WIS document number for fitting the extinguisher:
https://mbworld.org/forums/c-class-w...r-install.html
Next...contemplating tires. Leaning towards Conti DWs, per some other recent discussion. A bit more expensive than the Bridgestone 790s I was considering, but I'll give the Contis a try.
Last edited by Saaboteur; Feb 3, 2014 at 05:48 PM.
Newbie
Joined: Feb 2014
Posts: 10
Likes: 0
From: San Francisco, CA
2005 C55 AMG & 2010 E350
AWESOME thread! Thank you so much for sharing. When I was reading about your new rims, I thought that you didn't need spacers. I recently put 19x8.5 offset 32 with 235/35 in front and 19x9.5 offset 35 with 255/30 in back with no spacers and my c55 runs just fine. I know it looks really, really close when you test fit the rims and the car is in the air, but everything works when you lower it. Did you try the rims with no spacers?


