


DIY: 63 paddle shifter retrofit to C55
Thread Starter
MBWorld Fanatic!


Joined: May 2009
Posts: 1,846
Likes: 29
From: Canada
eclectic assortment of cars
DIY: 63 paddle shifter retrofit to C55
So I had read a few previous threads about retrofitting the ‘63’ shifter paddles to the C55, but really only kjb55’s thread discussed some of the details of the installation:
https://mbworld.org/forums/c32-amg-c...ed-05-c55.html
Even so, that thread wasn’t really picture intensive, and didn’t go over ALL of the details. So here’s my DIY thread for retrofitting the 63 paddles onto my C55.
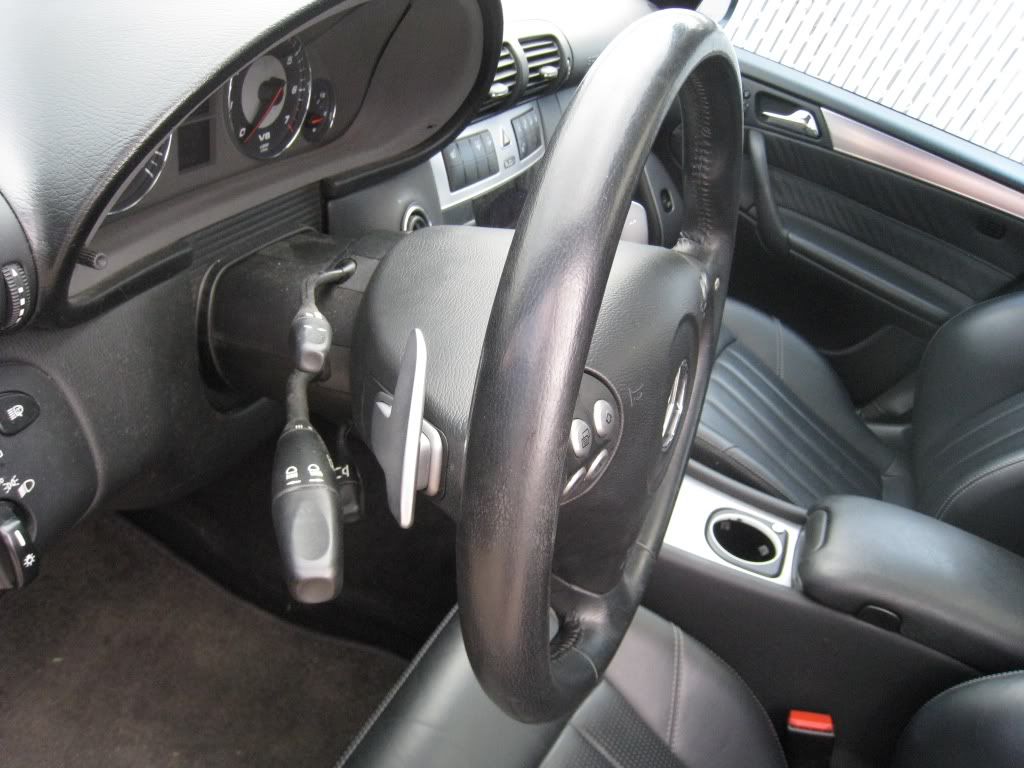
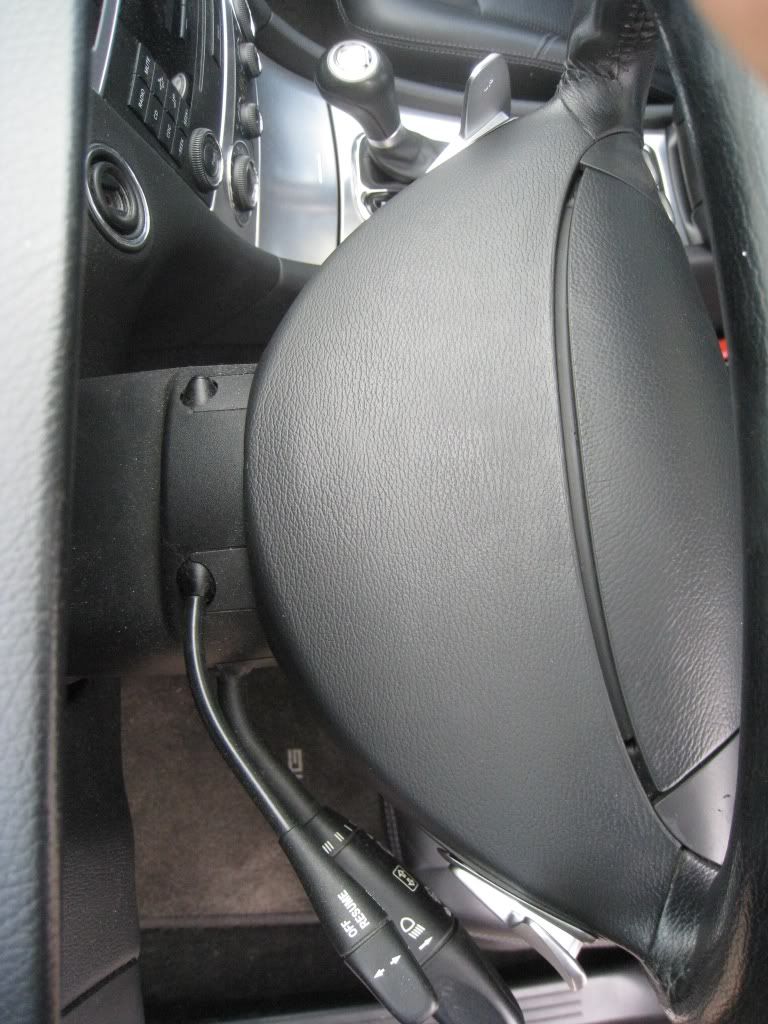
I used the WIS instructions to remove the steering wheel and airbag. I may come back to this thread with PDFs of those two WIS documents, but it is pretty straight forward. Roughly, the steps are: park the car with the steering wheel centred; extend steering wheel out as far as possible; disconnect battery; loosen two torx screws behind the wheel (these attach the airbag to the wheel itself); disconnect all the electrical connectors behind the airbag – (see this post from the above thread for details on the two airbag connectors: https://mbworld.org/forums/2040883-post19.html); remove the airbag; remove the bolt holding the wheel to the steering column.
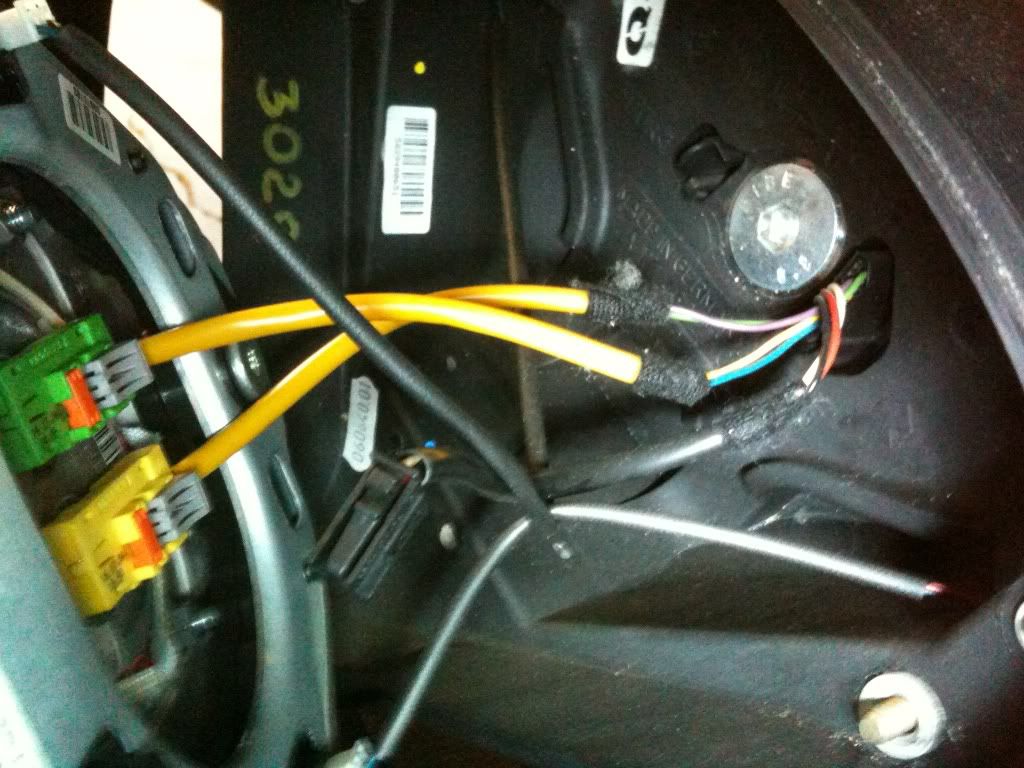
Note the orientation of the wires, but it would be impossible to mix them up. One black connector goes to the top of the airbag and only fits there; the airbag squibs are colour coded; and if you mix up the shifter paddle connectors you should be shot!
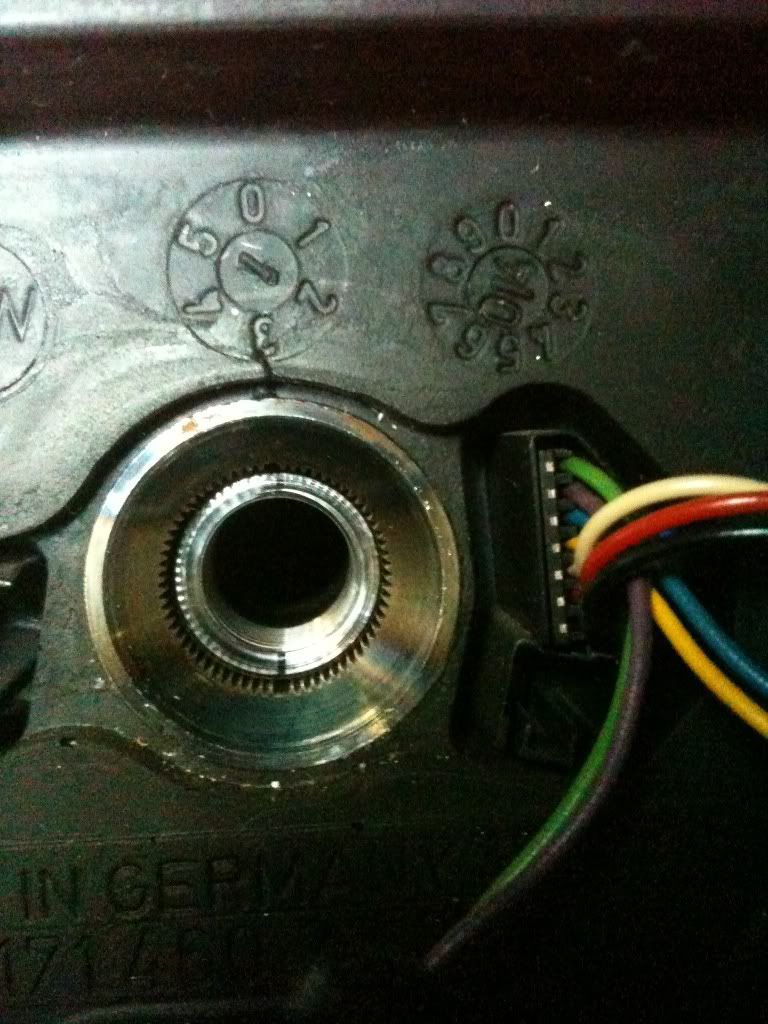
Also, note the helpful marks that orient the wheel and the column – love Mercedes’ attention to detail:
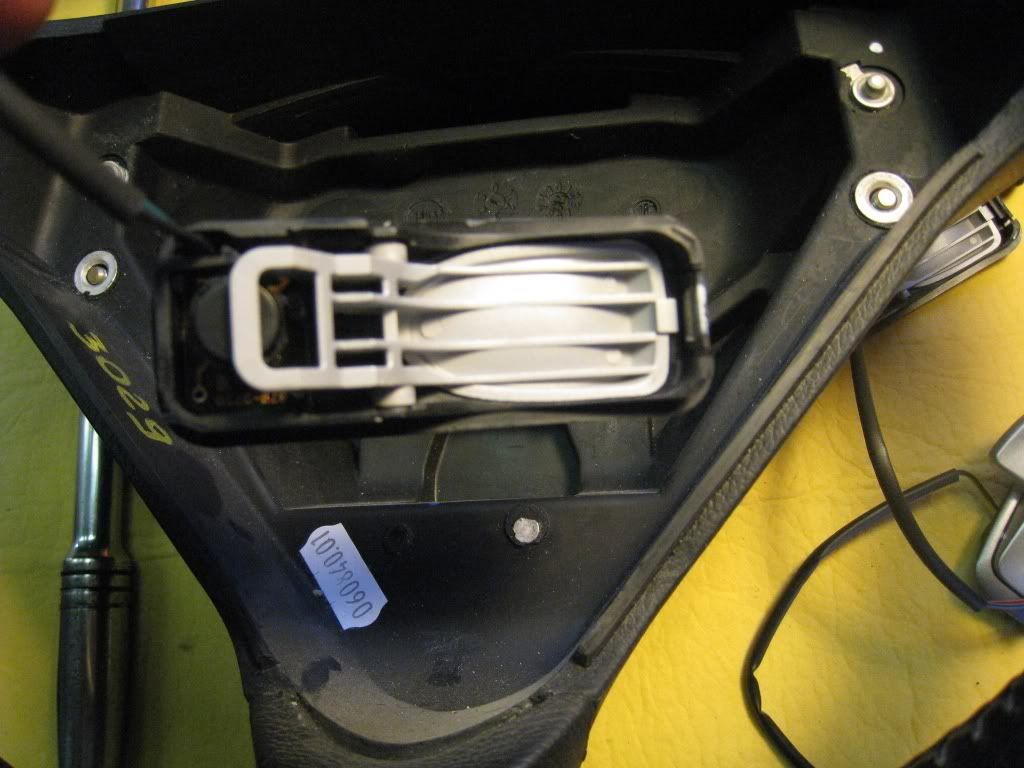
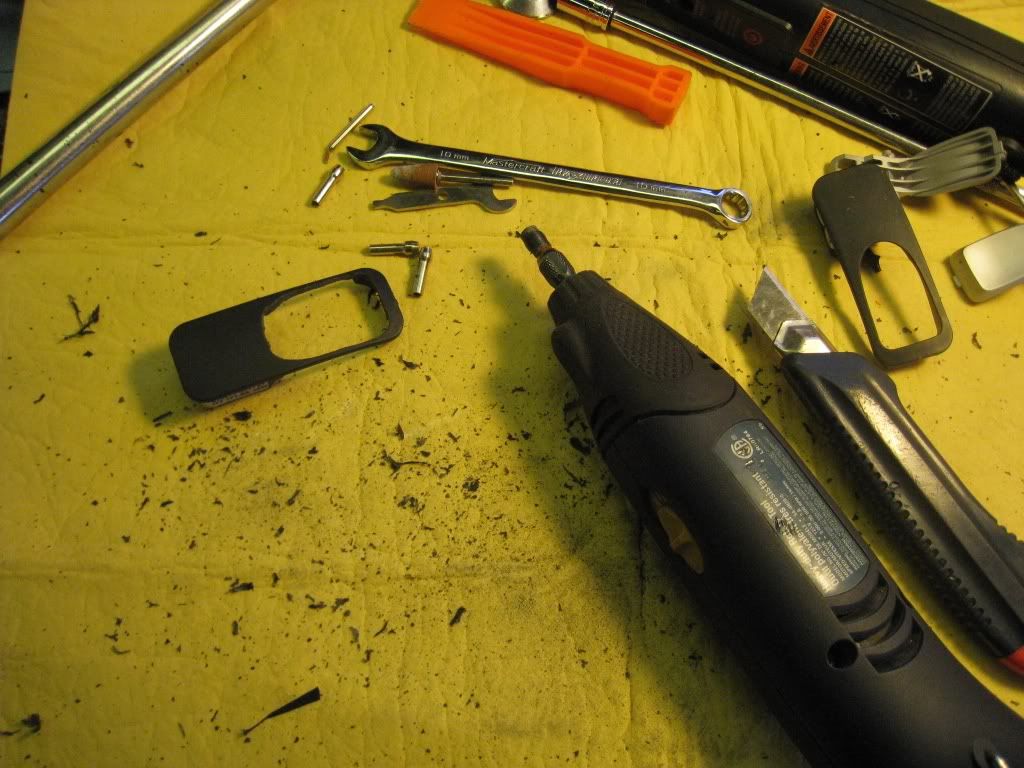
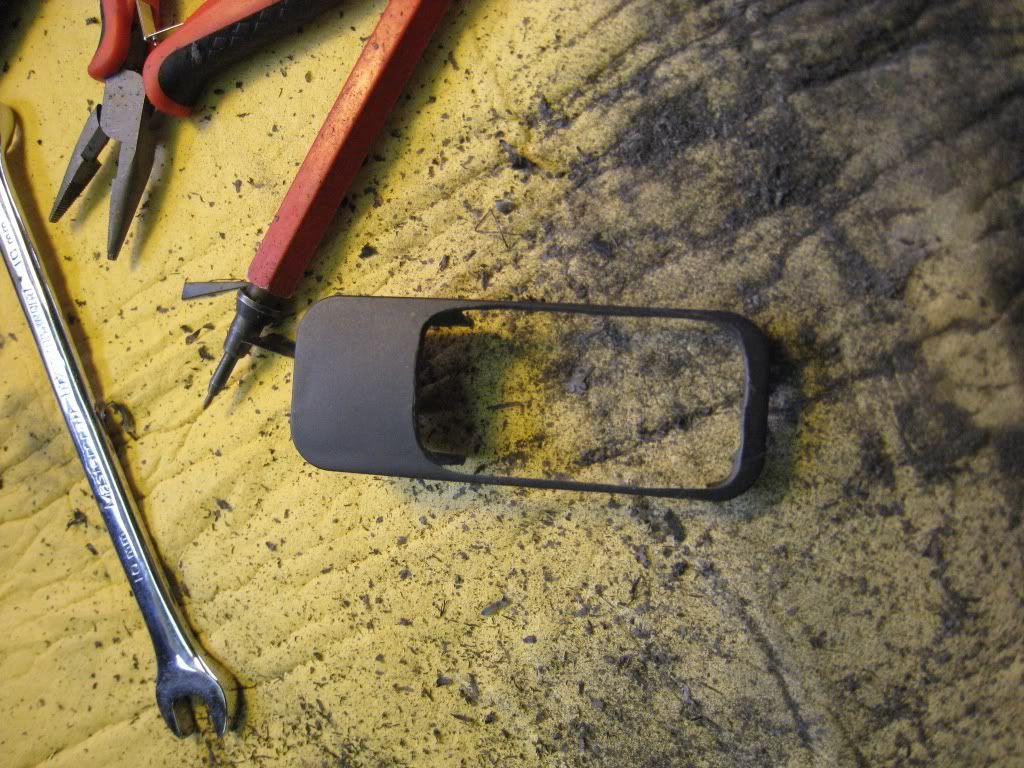
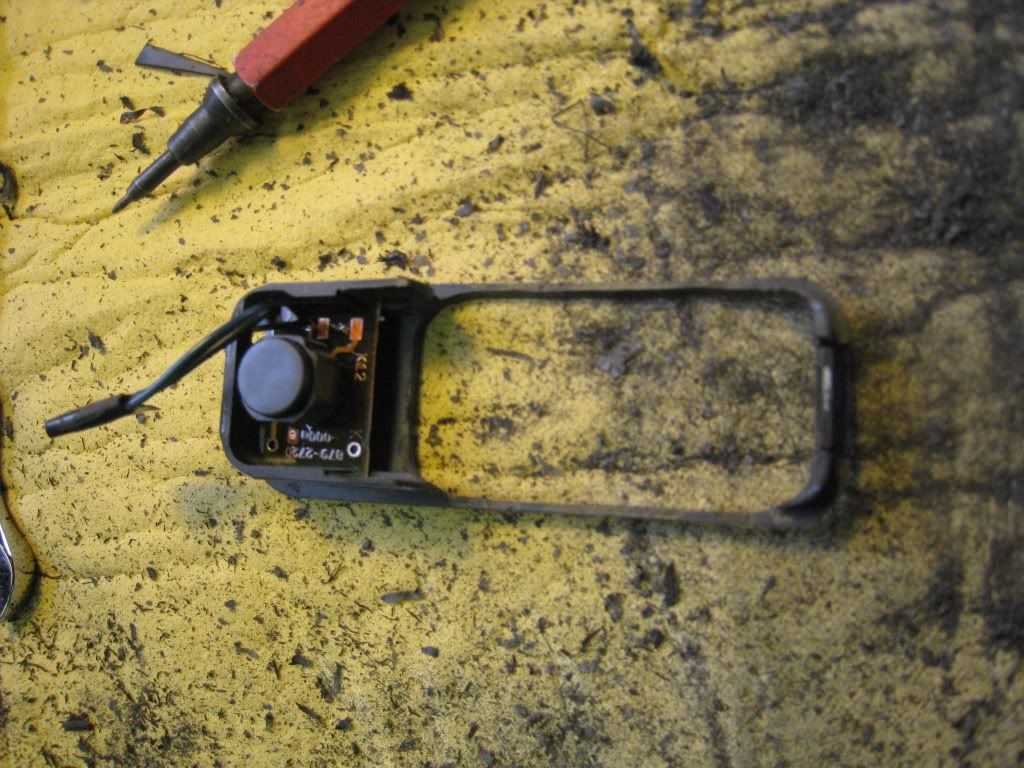
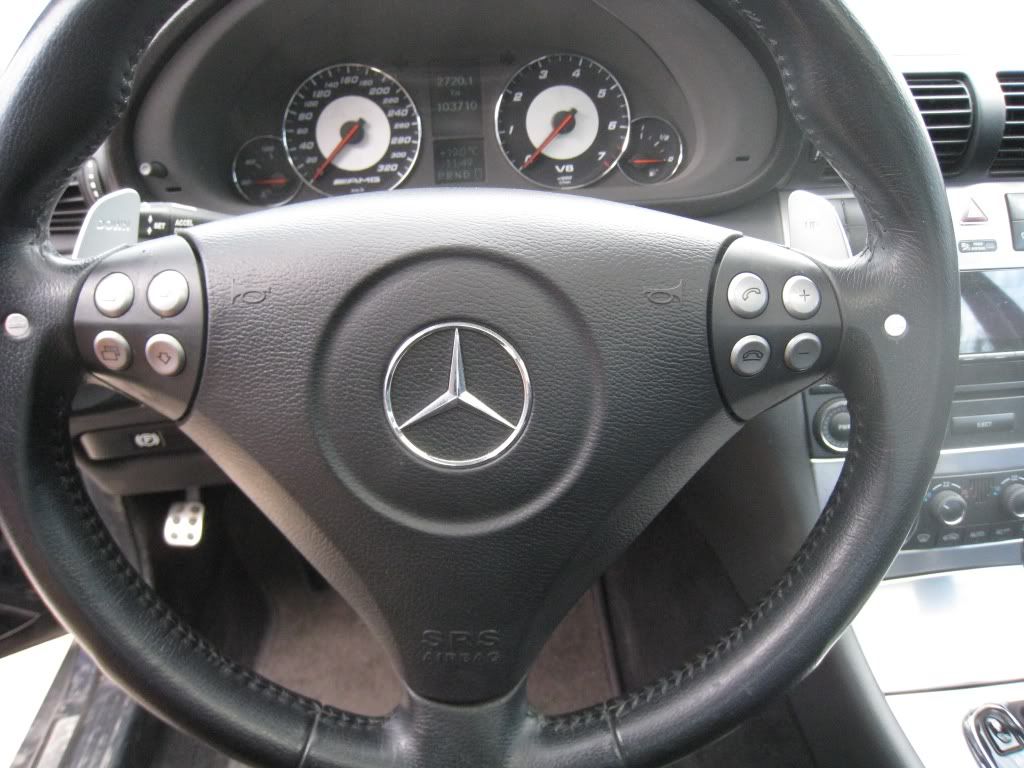
First, pop the button shifters out of the wheel. They are just a press fit, use a plastic pry tool to avoid damaging anything. Then pop the grey button itself out of the surround. You’ll see that the button doesn’t actually activate the shift, rather it is a rocker that presses on the black button which actually does the shifting. I think this system was cool in ’05 when it came out, but it definitely feels that you are pressing a button as opposed to working a paddle:
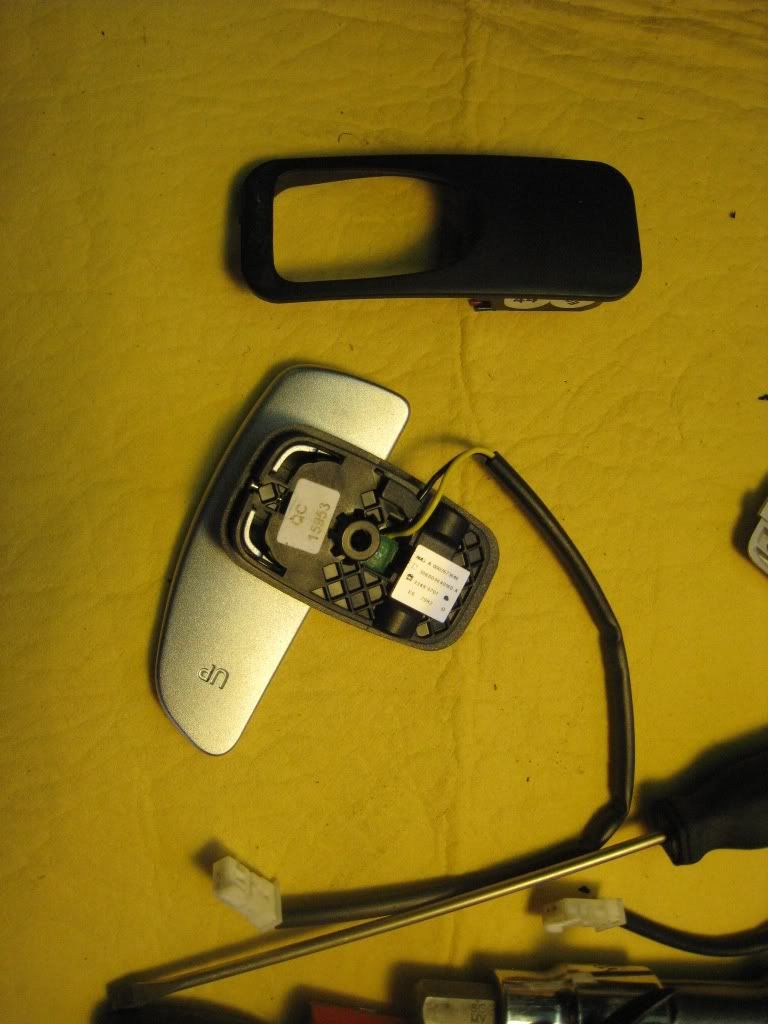
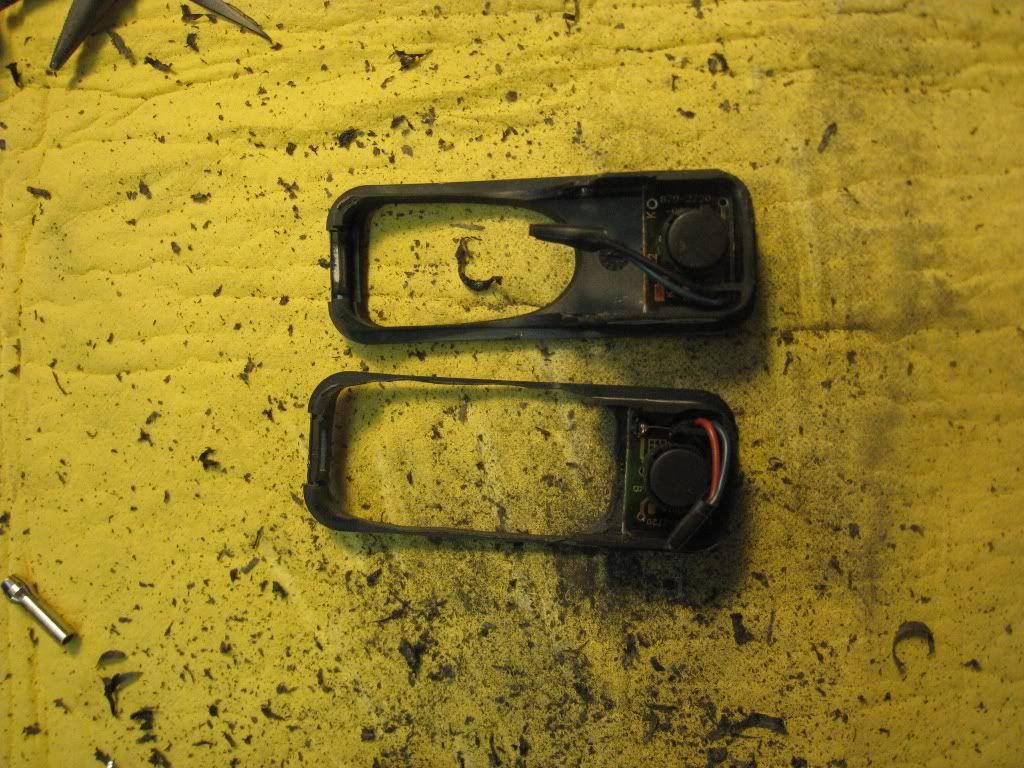
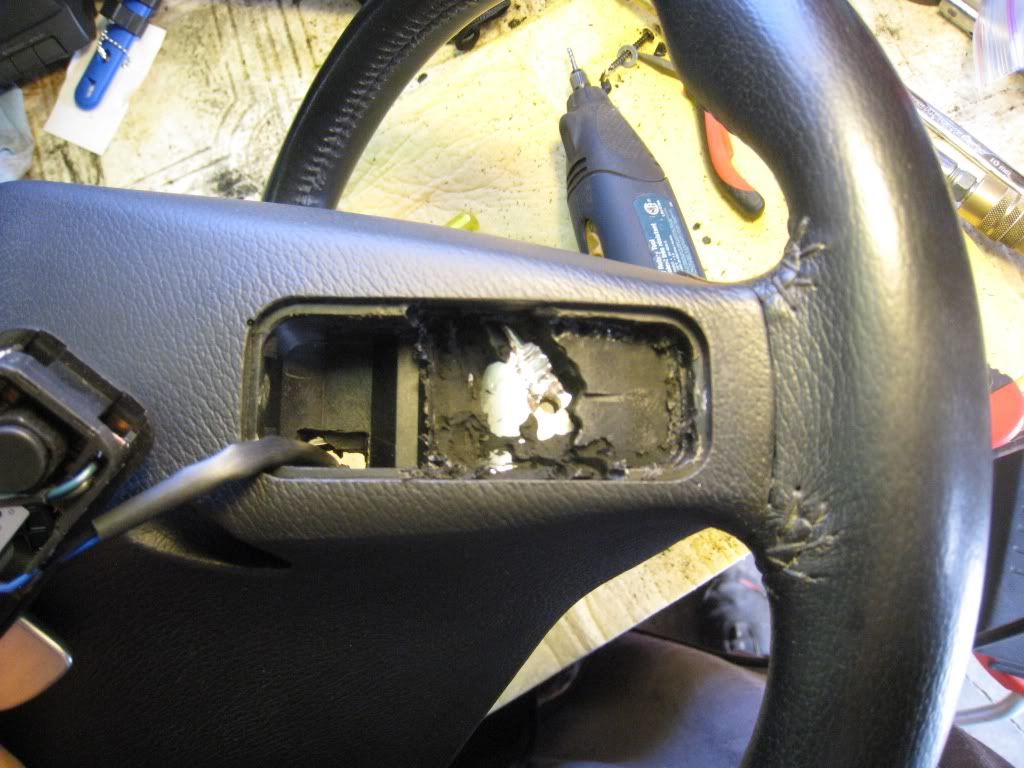
Once you have the button out, you can see that as kjb55 mentioned, modification is required to the wheel and to the button shift surrounds to properly fit the 63 paddles. The button shift is effectively destroyed in the process, so don’t count on going back to stock with this mod, unless you are doing it with a spare wheel. Basically what needs to happen is that the button shift surround has to be hogged out to accommodate the 63 paddle shifter module. Some material also has to be removed from the back of the wheel for the same reason. The paddle shifter module is a wider and deeper than the button shifter, hence the need for the modifications.
As another member had advised, take your time with the modifications, especially hogging out the button shift surround. You need to remove a lot of material, and once finished, it’s left with just a little material, which could easily break. I used a dremel with a variety of attachments to cut and grind away sufficient material. The first side took maybe an hour and half, the other side a bit less because I knew better how much material had to be removed.
Comparison before work began:
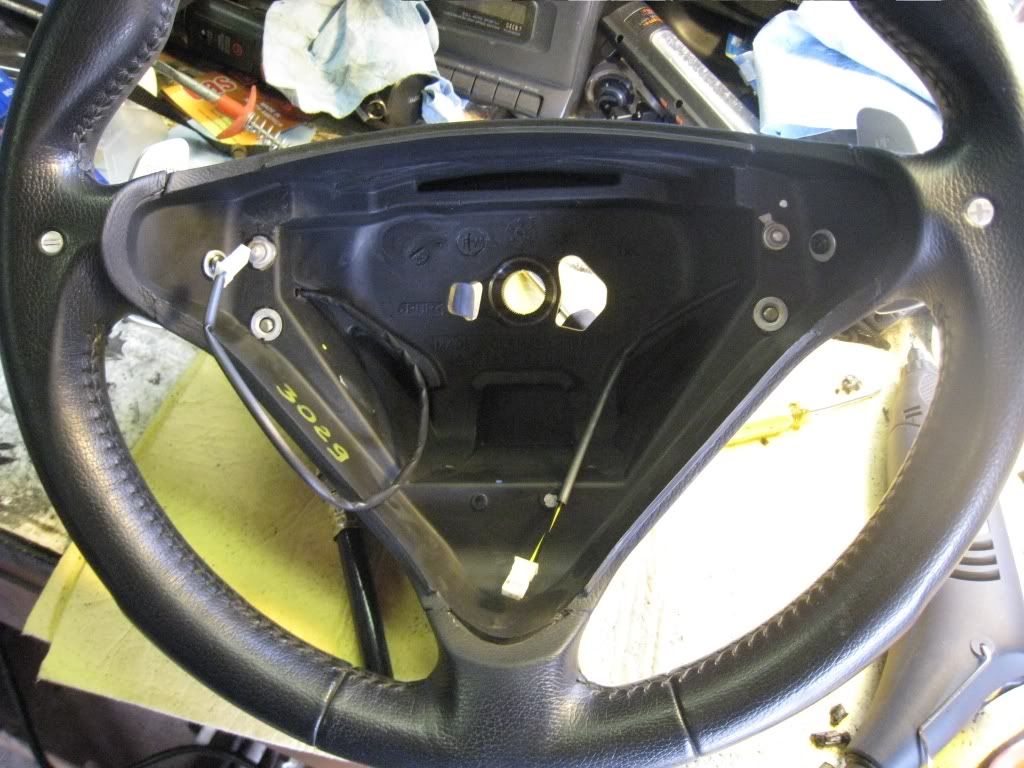
I also snipped the button’s wiring out as it would just get in the way.
Work in progress:
Views of the completed modifications:

Just be very very careful when hogging out the shifter surround. It would totally suck to fracture the thing. I got mine to be a nice and snug fit. Then refitting to the wheel, it became apparent that the wheel itself needed modification too. The indentation where the button shift sits is too shallow to accommodate the 63 paddle shifter modules. More hogging out.
The pictures show the first side I did, the second side went much easier (and tidier!) when I figured out how much material had to be removed, and where.
View before the material removal began, showing the hole drilled through the wheel to fix to the paddle shifter module to the wheel:

About 2/3s done. Unfortunately, it appears I neglected to snap photos of the finished state, but a bit more material has to be removed nearer the wheel’s outer diameter. But when you are doing it, it will be quite apparent how much and where material has to be removed – otherwise the paddle shifter won’t sit nice and flush.
There is a plastic ‘dish’ that sits into the foam material. You can see how I had to cut out a lot of the dish and some of the foam. Makes for a great big mess on the work bench.
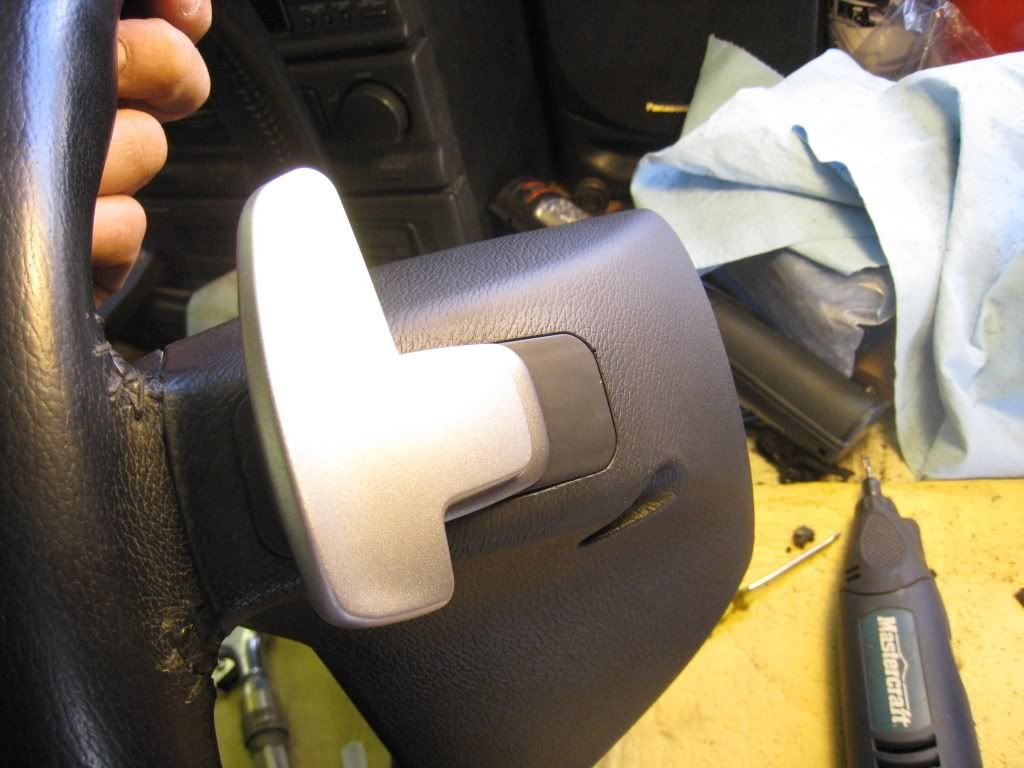
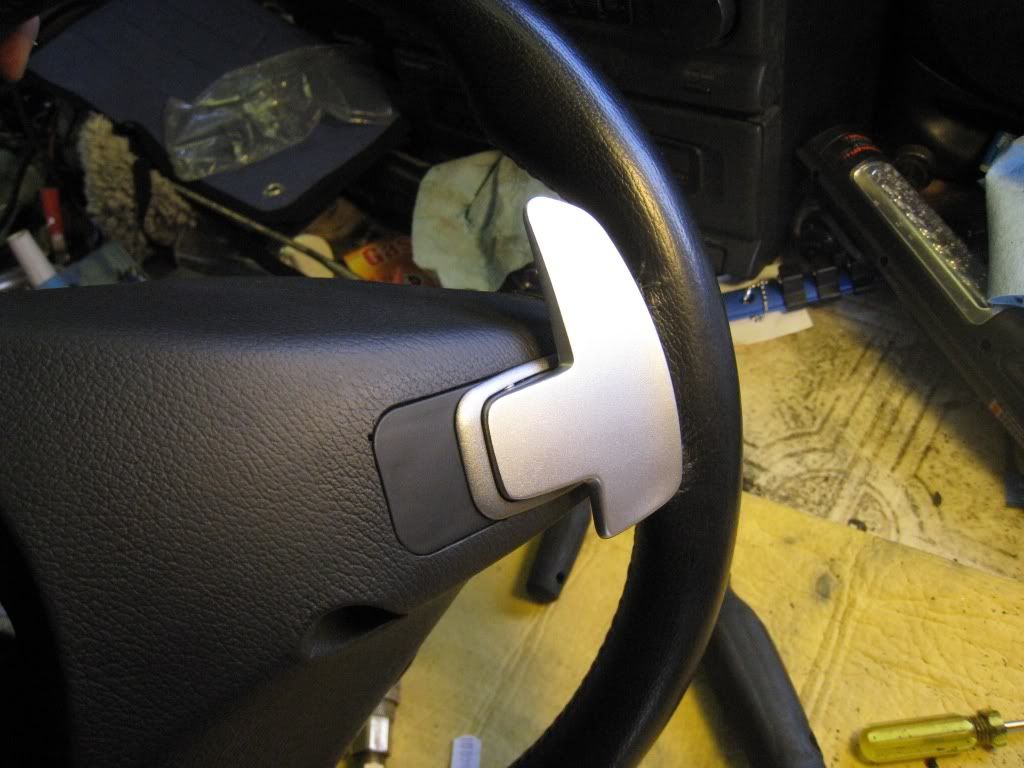
Paddle shifters fitted, hiding the hack job material removal behind everything!
As mentioned, the paddle shifter modules have to be fixed with some screws. Kjb55 mentioned he just used some automotive trim screws with integrated washer. I’d recommend the same, as opposed to using a screw with a separate washer. The first screw and washer I used protruded to far out – interfering with the airbag assembly, preventing it from fitting onto the wheel nicely. Moved to a shorter screw with integrated washer and no worries.
Back onto the car:
Reconnect the battery, select manual mode, then off you go for your favourite Formula 1 driver impression!
https://mbworld.org/forums/c32-amg-c...ed-05-c55.html
Even so, that thread wasn’t really picture intensive, and didn’t go over ALL of the details. So here’s my DIY thread for retrofitting the 63 paddles onto my C55.
I used the WIS instructions to remove the steering wheel and airbag. I may come back to this thread with PDFs of those two WIS documents, but it is pretty straight forward. Roughly, the steps are: park the car with the steering wheel centred; extend steering wheel out as far as possible; disconnect battery; loosen two torx screws behind the wheel (these attach the airbag to the wheel itself); disconnect all the electrical connectors behind the airbag – (see this post from the above thread for details on the two airbag connectors: https://mbworld.org/forums/2040883-post19.html); remove the airbag; remove the bolt holding the wheel to the steering column.
Note the orientation of the wires, but it would be impossible to mix them up. One black connector goes to the top of the airbag and only fits there; the airbag squibs are colour coded; and if you mix up the shifter paddle connectors you should be shot!
Also, note the helpful marks that orient the wheel and the column – love Mercedes’ attention to detail:
First, pop the button shifters out of the wheel. They are just a press fit, use a plastic pry tool to avoid damaging anything. Then pop the grey button itself out of the surround. You’ll see that the button doesn’t actually activate the shift, rather it is a rocker that presses on the black button which actually does the shifting. I think this system was cool in ’05 when it came out, but it definitely feels that you are pressing a button as opposed to working a paddle:
Once you have the button out, you can see that as kjb55 mentioned, modification is required to the wheel and to the button shift surrounds to properly fit the 63 paddles. The button shift is effectively destroyed in the process, so don’t count on going back to stock with this mod, unless you are doing it with a spare wheel. Basically what needs to happen is that the button shift surround has to be hogged out to accommodate the 63 paddle shifter module. Some material also has to be removed from the back of the wheel for the same reason. The paddle shifter module is a wider and deeper than the button shifter, hence the need for the modifications.
As another member had advised, take your time with the modifications, especially hogging out the button shift surround. You need to remove a lot of material, and once finished, it’s left with just a little material, which could easily break. I used a dremel with a variety of attachments to cut and grind away sufficient material. The first side took maybe an hour and half, the other side a bit less because I knew better how much material had to be removed.
Comparison before work began:
I also snipped the button’s wiring out as it would just get in the way.
Work in progress:
Views of the completed modifications:
Just be very very careful when hogging out the shifter surround. It would totally suck to fracture the thing. I got mine to be a nice and snug fit. Then refitting to the wheel, it became apparent that the wheel itself needed modification too. The indentation where the button shift sits is too shallow to accommodate the 63 paddle shifter modules. More hogging out.
The pictures show the first side I did, the second side went much easier (and tidier!) when I figured out how much material had to be removed, and where.
View before the material removal began, showing the hole drilled through the wheel to fix to the paddle shifter module to the wheel:
About 2/3s done. Unfortunately, it appears I neglected to snap photos of the finished state, but a bit more material has to be removed nearer the wheel’s outer diameter. But when you are doing it, it will be quite apparent how much and where material has to be removed – otherwise the paddle shifter won’t sit nice and flush.
There is a plastic ‘dish’ that sits into the foam material. You can see how I had to cut out a lot of the dish and some of the foam. Makes for a great big mess on the work bench.
Paddle shifters fitted, hiding the hack job material removal behind everything!
As mentioned, the paddle shifter modules have to be fixed with some screws. Kjb55 mentioned he just used some automotive trim screws with integrated washer. I’d recommend the same, as opposed to using a screw with a separate washer. The first screw and washer I used protruded to far out – interfering with the airbag assembly, preventing it from fitting onto the wheel nicely. Moved to a shorter screw with integrated washer and no worries.
Back onto the car:
Reconnect the battery, select manual mode, then off you go for your favourite Formula 1 driver impression!
Last edited by Saaboteur; May 22, 2012 at 05:42 PM.
Member
Joined: Jun 2013
Posts: 125
Likes: 1
From: El Paso, Texas
2005 Ferrari F430, 2006 E55 AMG, 2005 C55 AMG (Sold), 2001 E430
Great instructions! I just did this mod and it came out awesome. Totally worth it and only cost $110 for shifters and $60 for a dremel. Better than paying over a grand for a new wheel. Definately would not have considered doing it without Saaboteur's instructions post. Thanks!
Trending Topics
MB World Stories
The Best of Mercedes & AMG

Manual Mercedes? 6 Times Sindelfingen Let Drivers Have All The Fun
Verdad Gallardo
Mercedes SLR McLaren 722 S Is Extremely Rare Example Modified by McLaren
Verdad Gallardo
8 Classic Boxy Mercedes Designs That Have Aged Like Fine Wine
Verdad Gallardo
Flawlessly Restored Mercedes 190E Evo II Heads to Auction
Verdad Gallardo
Electric Mercedes C-Class Unveiled: 11 Things You Need to Know
Verdad Gallardo
Mercedes EQS Gets A Major Update: Everything You Need to Know
Verdad Gallardo
5 Underrated Mercedes-Benz Models That Don't Get the Love They Deserve
Verdad Gallardo
Mercedes 300D Has Pushed Well Past 1 Million Miles and It Ain't Stopping
Verdad Gallardo
10 Most Reliable Mercedes-Benz Models You Can Buy Used
Verdad GallardoMember
Joined: Jun 2013
Posts: 125
Likes: 1
From: El Paso, Texas
2005 Ferrari F430, 2006 E55 AMG, 2005 C55 AMG (Sold), 2001 E430
Btw, after the paddle shifter mod, did you end up getting a TCU tune? I've been considering it; unfortunately I read some threads with people having some issues/problems with it. Guess I'll wait and see...")
Thread Starter
MBWorld Fanatic!
Joined: May 2009
Posts: 1,846
Likes: 29
From: Canada
eclectic assortment of cars
My car is stock, no tune. The previous owned deleted the secondary cats and reasonator though. Nice pops and bangs from the exhaust on quick throttle lift offs.


Junior Member
Joined: Apr 2014
Posts: 46
Likes: 2
c55 amg
hi guys I hope I'm in the right area,I am in the process of developing a quick change from buttons to paddles using the same switches it's a five minute swap if anyone is interested contact me on my email address
Super Member
Joined: Jan 2010
Posts: 769
Likes: 4
From: Orlando FL
CLK55 AMG
nice write up. i did this the same way. fits perfectly and works awesomely. the only issue i noticed is that after a while the chip from the old paddles likes to move after being pressed 1000+ times
Super Member
Joined: Jan 2010
Posts: 769
Likes: 4
From: Orlando FL
CLK55 AMG
this is only plug and play on models 05+ so the 32 guys and the prefacelift w209 clk55 guys need to untilize the stock chip from the stock buttons. you have to dremel the frame of the new paddles to fit the stock chip in. use an electrical safe silicon to secure the back of the chip from corrosion and contaminates. soder up the connections and install new paddles as posted above. i did this on my 03 clk55. ill post pics later when im not at school

Super Member

Joined: Dec 2007
Posts: 846
Likes: 45
From: ATL
2017 GLS 550
I know this topic has been beaten' to death but I just had a question, to see if anyone knows.
I know the 2007+ SLK55 wheel is similar to the C55 wheel, can I just order the paddles for a SLK55 and then just pop them in without needing the mods like the C63 paddles or are they more than likely the same part number and even though the wheel looks the same from the front the button/paddle holes are different.
Thanks
MBWorld Fanatic!

Joined: Jun 2012
Posts: 1,155
Likes: 4
From: SF Bay Area
C55 AMG, 300D-T & Karmann Ghia
The procedure is the same with both paddles, and as far as I know the paddles are identical despite different part numbers. In fact, the paddle part number I ordered were for the SLK55. You will definitely still need to hog out material in order to make the paddles fit the C55 wheel per the instructions. Well worth it though! Good luck!
Member
Joined: Jun 2013
Posts: 125
Likes: 1
From: El Paso, Texas
2005 Ferrari F430, 2006 E55 AMG, 2005 C55 AMG (Sold), 2001 E430
I agree with the previous statement. I did this mod and I believe the paddle shifters are pretty much the same btwn slk55 and c63. The larger shifter buttons do not fit onto the oem wheel without modification by dremeling a larger whole as the per the above instructions. The only other way is to buy an slk55 steering wheel, which can be pricey...
Member
Joined: Jan 2012
Posts: 136
Likes: 7
From: Monrovia
2005 C55 AMG


I'm gonna help my coworker/mentor do this mod on his 06' SLK 55. I will post pics with same approach I took, including the proper bit.
Using a screw to tap into the plastic of the 63 paddle housing is ok but i decided to use a soldering iron to push in an M3 nut into the hole on the 63 paddle's, then proceeded to follow Saaboteur's hole drilling into the side.
The dremel bit i used was key, it allowed me to remove plastic and the foam without causing it to ripple. I also used a professional AC powered dremel. not a battery powered one. the battery operated rotary tools simply don't have enough RPM and torque to obliterate plastic and foam properly.
Once you do the left side hacking, plug all of the steering wheel electronics back in, (except the paddle shifters of course). plug in the battery and start the car, turn the wheel 180 degrees so that the wheel is upside down and the right side is facing you while you are looking in from the driver side door.
continue with the hack on the right side.
i will post pics of my method with the SLK 55, next week or so.
MBWorld Fanatic!
Joined: Sep 2010
Posts: 1,545
Likes: 6
From: Washington DC
1999 E320 4matic Wagon, 2005 C55 AMG - sold, 1998 VW Jetta TDI - sold, 2006 C230 Sport - Totaled :(
Subscribing since I may do this soon...just can't bring myself to start hacking up the steering wheel!
I'm going to look into actually just getting the shift surrounds for the paddles too, then the only hacking needed is inside the steering wheel itself...
I'm going to look into actually just getting the shift surrounds for the paddles too, then the only hacking needed is inside the steering wheel itself...


