This should be simple, right? C36 driving light
 02-07-2011, 01:33 PM
#1
Newbie
Thread Starter

Join Date: Feb 2011
Location: Puyallup, WA
Posts: 8
Likes: 0
Received 0 Likes
on
0 Posts
1996 C36 AMG
This should be simple, right? C36 driving light
Hi, guys. I'm new to the forum and to C36 AMG ownership. I recently acquired my dad's 1996 Black on Black C36 with 98,000 miles in awesome condition. All original, not molested in any way.
Anyway, there is one issue that is driving me nuts. The driver's side driving light (the one in the headlight assembly) doesn't work. It's not the bulb (I've swapped it with the passenger side one that's working). It's getting 12V and the bulb base is grounded when installed. What on earth is going on? Any help would be greatly appreciated. I'd like to use them.
Anyway, there is one issue that is driving me nuts. The driver's side driving light (the one in the headlight assembly) doesn't work. It's not the bulb (I've swapped it with the passenger side one that's working). It's getting 12V and the bulb base is grounded when installed. What on earth is going on? Any help would be greatly appreciated. I'd like to use them.
 02-07-2011, 05:16 PM
#2
MBWorld Fanatic!
Hi, guys. I'm new to the forum and to C36 AMG ownership. I recently acquired my dad's 1996 Black on Black C36 with 98,000 miles in awesome condition. All original, not molested in any way.
Anyway, there is one issue that is driving me nuts. The driver's side driving light (the one in the headlight assembly) doesn't work. It's not the bulb (I've swapped it with the passenger side one that's working). It's getting 12V and the bulb base is grounded when installed. What on earth is going on? Any help would be greatly appreciated. I'd like to use them.
Anyway, there is one issue that is driving me nuts. The driver's side driving light (the one in the headlight assembly) doesn't work. It's not the bulb (I've swapped it with the passenger side one that's working). It's getting 12V and the bulb base is grounded when installed. What on earth is going on? Any help would be greatly appreciated. I'd like to use them.
 02-08-2011, 02:15 PM
#3
Newbie
Thread Starter
Join Date: Feb 2011
Location: Puyallup, WA
Posts: 8
Likes: 0
Received 0 Likes
on
0 Posts
1996 C36 AMG
Yeah, I've done all that. I thought that maybe there was a resistance discrepancy somewhere that was causing a fault somewhere or something. But, I'm not getting any sort of warning lights, and everything else works great. Thanks for your thoughts.
02-08-2011, 08:38 PM
#4
MBWorld Fanatic!
Found this...
Step 1: Replace the bulb

1 of 1
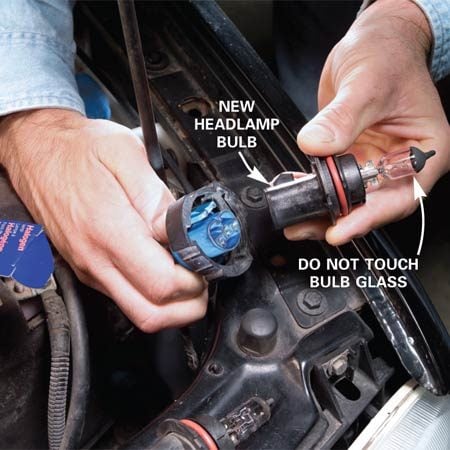
Start with the obvious suspect
Many new car bulbs are easily accessed from under the hood by turning a retaining ring and pulling the bulb socket out, but if you have to access the bulb by removing a lens (see your owner's manual), you may need to buy a �torxrdquo tip screwdriver. Remove the old bulb and insert the new bulb. Don't touch the glass of the bulb with your bare hands because the oils on your skin can cause the bulb to fail. Reinsert the socket into the headlamp housing and turn on your lights. If they work, you're done; if they don't, go on to the next step.
When a headlight goes out, the problem is usually a bad bulb, which is easily replaced. However, the problem could also be a corroded socket or a bad wire. Keep in mind that when several lights are out, such as both headlamps or both taillights, the problem is most likely a fuse. If the fuse is bad, you can replace it and most likely be on your way.
In this article, we'll show you how to replace the bulb, and if that fails, we'll show you how to diagnose a bad socket and probe the wiring with a simple 12-volt automotive test light.
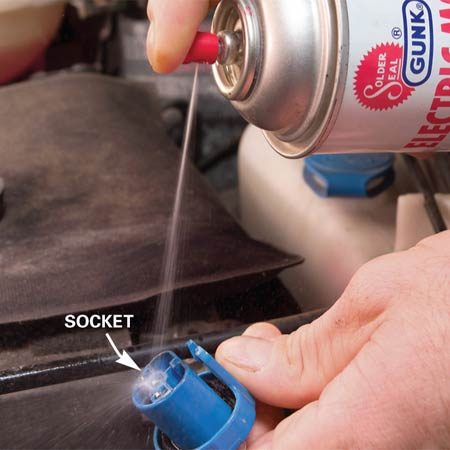
Step 2: Clean the socket

1 of 1
Be suspicious of corrosion
Turn off the light switch and remove the bulb again. Clean the socket with electrical contact cleaner, which is available at auto parts stores. If you see heavy corrosion, scrape it off with a small screwdriver or wire brush. Then move on to Step 3.
Step 3: Test the socket

1 of 2
Check all contacts
Test for power at the socket. Turn on the light switch, then ground the tester to a clean screw on the body of the car. Probe the contacts to see if the tester lights. If the contacts look corroded, scratch the surface, but be careful not to bend or distort them. The tester should light for two out of three contacts (one won't because it's a ground). If two of them light, insert the bulb. If the bulb still doesn't work, replace the socket. If only one or no contact shows power, go to Step 4.
Be careful not to touch two contacts at the same time or you could cause a short circuit and blow a fuse.

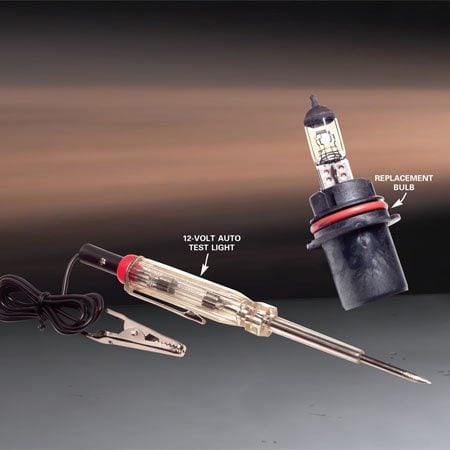
2 of 2
Replacement bulb and test light
If a new bulb doesn't do the trick, use a tester to help find the problem.
Step 4: Test for power at the wires

1 of 1
The socket may have gone bad
Push the point of the tester through the wire insulation behind the socket to make contact with the wire. The tester should light for two of the three wires (the ground wire won't light). If it lights for two wires, the wiring is good. Simply replace the socket. If not, you may have a bad wire or connector somewhere, so check for any visible problems. You may have a problem you can't find. In that case, make an appointment with your mechanic to check it out.
Tip: Make sure your test light works before doing any diagnostics. Connect it to the negative battery terminal (or any good body ground) and touch the probe end to the positive-side battery terminal. The test light should light up.
Step 1: Replace the bulb
1 of 1
Start with the obvious suspect
Many new car bulbs are easily accessed from under the hood by turning a retaining ring and pulling the bulb socket out, but if you have to access the bulb by removing a lens (see your owner's manual), you may need to buy a �torxrdquo tip screwdriver. Remove the old bulb and insert the new bulb. Don't touch the glass of the bulb with your bare hands because the oils on your skin can cause the bulb to fail. Reinsert the socket into the headlamp housing and turn on your lights. If they work, you're done; if they don't, go on to the next step.
When a headlight goes out, the problem is usually a bad bulb, which is easily replaced. However, the problem could also be a corroded socket or a bad wire. Keep in mind that when several lights are out, such as both headlamps or both taillights, the problem is most likely a fuse. If the fuse is bad, you can replace it and most likely be on your way.
In this article, we'll show you how to replace the bulb, and if that fails, we'll show you how to diagnose a bad socket and probe the wiring with a simple 12-volt automotive test light.
Step 2: Clean the socket
1 of 1
Be suspicious of corrosion
Turn off the light switch and remove the bulb again. Clean the socket with electrical contact cleaner, which is available at auto parts stores. If you see heavy corrosion, scrape it off with a small screwdriver or wire brush. Then move on to Step 3.
Step 3: Test the socket

1 of 2
Check all contacts
Test for power at the socket. Turn on the light switch, then ground the tester to a clean screw on the body of the car. Probe the contacts to see if the tester lights. If the contacts look corroded, scratch the surface, but be careful not to bend or distort them. The tester should light for two out of three contacts (one won't because it's a ground). If two of them light, insert the bulb. If the bulb still doesn't work, replace the socket. If only one or no contact shows power, go to Step 4.
Be careful not to touch two contacts at the same time or you could cause a short circuit and blow a fuse.
2 of 2
Replacement bulb and test light
If a new bulb doesn't do the trick, use a tester to help find the problem.
Step 4: Test for power at the wires

1 of 1
The socket may have gone bad
Push the point of the tester through the wire insulation behind the socket to make contact with the wire. The tester should light for two of the three wires (the ground wire won't light). If it lights for two wires, the wiring is good. Simply replace the socket. If not, you may have a bad wire or connector somewhere, so check for any visible problems. You may have a problem you can't find. In that case, make an appointment with your mechanic to check it out.
Tip: Make sure your test light works before doing any diagnostics. Connect it to the negative battery terminal (or any good body ground) and touch the probe end to the positive-side battery terminal. The test light should light up.


