


Spring preparation 2012
Thread Starter
MBWorld Fanatic!


Joined: Mar 2010
Posts: 5,891
Likes: 323
From: Land of mountains, cheese, chocolate and watches
12' W204 C63 AMG coupe "T-Rex", 12' W451 Smart Fortwo Pulse (99' W202 C43 AMG + Ultima Can-Am sold)
Yes very glad you are on the mend. Now if you had made it to Olly's you would not have been exerting yourself and who knows ?
Great write up excellent photo's.If only,mind you not a lot of DIY you can do on a CL and now that Olly has my C43 which is now a C55. I'm so glad Olly bought it.
Get well very soon.
Great write up excellent photo's.If only,mind you not a lot of DIY you can do on a CL and now that Olly has my C43 which is now a C55. I'm so glad Olly bought it.
Get well very soon.
 I am determined to get well asap and manage to go over to see Olly one day (soon I hope....). Also get to see other 43 and MB aficionado over on the Island.
I'll probably do a similar write up on the "other" forum when everything is finished. Shh, nobody saw me and don't say a word to the missus, but I managed to assemble the front brakes on the other side
 I just have to connect the SS pipes and I can get on to other things, probably in the engine bay.
Keep tuned
P.S. A 55 conversion remains my dream mod

Senior Member
Joined: Feb 2009
Posts: 317
Likes: 1
From: Germany
C43 AMG 5.5 - 396.4HP
Quality is perfect and even the spring is stiffer, comfort is better. The double pipe shocks make installation rather easy. You dont need to hold them squeezed during mounting.
But ride high adjustment is a little tricky... 5mm windings maybe results into 20mm car level. First it was to high, then I lowered a little and it was much to low... And you need to tighten the spring every time.
But ride high adjustment is a little tricky... 5mm windings maybe results into 20mm car level. First it was to high, then I lowered a little and it was much to low... And you need to tighten the spring every time.
Thread Starter
MBWorld Fanatic!
Joined: Mar 2010
Posts: 5,891
Likes: 323
From: Land of mountains, cheese, chocolate and watches
12' W204 C63 AMG coupe "T-Rex", 12' W451 Smart Fortwo Pulse (99' W202 C43 AMG + Ultima Can-Am sold)
Quality is perfect and even the spring is stiffer, comfort is better. The double pipe shocks make installation rather easy. You dont need to hold them squeezed during mounting.
But ride high adjustment is a little tricky... 5mm windings maybe results into 20mm car level. First it was to high, then I lowered a little and it was much to low... And you need to tighten the spring every time.
But ride high adjustment is a little tricky... 5mm windings maybe results into 20mm car level. First it was to high, then I lowered a little and it was much to low... And you need to tighten the spring every time.
If you have this set up, where to you start with the adjustments on the spring perch pad? 1/4, 1/2 distance? I don't want something too low as some roads I drive are pretty bad and I don't want to scrape underneath
Thread Starter
MBWorld Fanatic!
Joined: Mar 2010
Posts: 5,891
Likes: 323
From: Land of mountains, cheese, chocolate and watches
12' W204 C63 AMG coupe "T-Rex", 12' W451 Smart Fortwo Pulse (99' W202 C43 AMG + Ultima Can-Am sold)
This afternoon a parcel arrived from Australia.... Yes the K-Mac kit for the front and rear suspension. This will probably wait till next winter for installation as I don't have the time and I want to drive T Rex before dinosaurs become extinct.
The bushings look FIRST class stuff and come with a removal puller too, special grease, etc. The orange ones are for the rear and the BIG ones for the front
The bushings look FIRST class stuff and come with a removal puller too, special grease, etc. The orange ones are for the rear and the BIG ones for the front
Thread Starter
MBWorld Fanatic!
Joined: Mar 2010
Posts: 5,891
Likes: 323
From: Land of mountains, cheese, chocolate and watches
12' W204 C63 AMG coupe "T-Rex", 12' W451 Smart Fortwo Pulse (99' W202 C43 AMG + Ultima Can-Am sold)
I also managed to shred the brake fixing bolt to the top of the flexpipe on the passenger side 
Agrrrr , that puts me back some more in my timing
Agrrrr , that puts me back some more in my timing
Thread Starter
MBWorld Fanatic!
Joined: Mar 2010
Posts: 5,891
Likes: 323
From: Land of mountains, cheese, chocolate and watches
12' W204 C63 AMG coupe "T-Rex", 12' W451 Smart Fortwo Pulse (99' W202 C43 AMG + Ultima Can-Am sold)
Hi everyone!
Before taking off for 2 weeks of cardio rehabilitation, I mounted the rear springs. Nice to see the flat finish on the top side of the spring so as to fit snugly on the adjustable pad. I have dialed in 10mm to start with as I have no idea what that gives. No specific instructions in the technical details either. I also added a bit of plastic tape so as to avoid possible movement of the adjusting ring. I doubt it will move but better prevent than having to cure.
Next up will the the front springs, then I will have to get the brake lines repaired. My trusted technician who was going to do all the fluid changes (engine, tranny, rear diff, cooling, etc.) is taking off on vacation tomorrow until June 29. That gives me some time to finish all things on the vehicle.
See ya all soon and keep the driving cool 
Before taking off for 2 weeks of cardio rehabilitation, I mounted the rear springs. Nice to see the flat finish on the top side of the spring so as to fit snugly on the adjustable pad. I have dialed in 10mm to start with as I have no idea what that gives. No specific instructions in the technical details either. I also added a bit of plastic tape so as to avoid possible movement of the adjusting ring. I doubt it will move but better prevent than having to cure.
Next up will the the front springs, then I will have to get the brake lines repaired. My trusted technician who was going to do all the fluid changes (engine, tranny, rear diff, cooling, etc.) is taking off on vacation tomorrow until June 29. That gives me some time to finish all things on the vehicle.
See ya all soon
and keep the driving cool
Last edited by DRBC43AMG; May 31, 2012 at 12:16 PM. Reason: Completed post
MB World Stories
The Best of Mercedes & AMG

Manual Mercedes? 6 Times Sindelfingen Let Drivers Have All The Fun
Verdad Gallardo
Mercedes SLR McLaren 722 S Is Extremely Rare Example Modified by McLaren
Verdad Gallardo
8 Classic Boxy Mercedes Designs That Have Aged Like Fine Wine
Verdad Gallardo
Flawlessly Restored Mercedes 190E Evo II Heads to Auction
Verdad Gallardo
Electric Mercedes C-Class Unveiled: 11 Things You Need to Know
Verdad Gallardo
Mercedes EQS Gets A Major Update: Everything You Need to Know
Verdad Gallardo
5 Underrated Mercedes-Benz Models That Don't Get the Love They Deserve
Verdad Gallardo
Mercedes 300D Has Pushed Well Past 1 Million Miles and It Ain't Stopping
Verdad Gallardo
10 Most Reliable Mercedes-Benz Models You Can Buy Used
Verdad Gallardo
Thread Starter
MBWorld Fanatic!
Joined: Mar 2010
Posts: 5,891
Likes: 323
From: Land of mountains, cheese, chocolate and watches
12' W204 C63 AMG coupe "T-Rex", 12' W451 Smart Fortwo Pulse (99' W202 C43 AMG + Ultima Can-Am sold)
I'm back in business and for a very long time I hope... 
Assembled the front springs this afternoon and started to dismantle and remove the front passenger side brake pipe so as to get a new screw to replace the one which was cross threaded and trashed. It is a bit fiddly to get out because it routes under the engine block (rather oily under the pan and to the front = a small oil leak somewhere?) Will get some pictures posted asap
Assembled the front springs this afternoon and started to dismantle and remove the front passenger side brake pipe so as to get a new screw to replace the one which was cross threaded and trashed. It is a bit fiddly to get out because it routes under the engine block (rather oily under the pan and to the front = a small oil leak somewhere?) Will get some pictures posted asap
Last edited by DRBC43AMG; Jun 23, 2012 at 05:29 AM. Reason: Added photo
Thread Starter
MBWorld Fanatic!
Joined: Mar 2010
Posts: 5,891
Likes: 323
From: Land of mountains, cheese, chocolate and watches
12' W204 C63 AMG coupe "T-Rex", 12' W451 Smart Fortwo Pulse (99' W202 C43 AMG + Ultima Can-Am sold)
That's excellent info and a ratio I will keep in mind when I do my fine tuning. What value (clicks) did you adjust your shocks?Just a quick question:
When installing the front springs, I managed to place the front left (driver side) perfectly on and in the recess of the lower wishbone. The end of the spring is snug against the end (see 1st photo). However on the right hand side, I cannot manage to place the spring snug against the end of the grove because it is 180� on the inside and on the higher side of the wishbone. I just placed the end of the spring in the same position as the left side (see second and third photo).
Is this the normal position ?

P.S. No problem on the rear, both springs sit nice and snug in the lower position groove
Last edited by DRBC43AMG; Jun 23, 2012 at 07:39 AM.
Senior Member
Joined: Feb 2009
Posts: 317
Likes: 1
From: Germany
C43 AMG 5.5 - 396.4HP
Yep... its a little stuipid that spring end is in rear, so you dont see. Just turn the spring clockwise until it stops. Take care there is no dirt.
Another suggestion to comress the spring... If you compress the spring you will come to a point the spring begins to turn and it is difficult to hold it manually. Just use a second car lifter and raise the arm so the spring is compressed again... In the end you can lower the lifter and the spring comes out.
Bye,
Stephan
Thread Starter
MBWorld Fanatic!
Joined: Mar 2010
Posts: 5,891
Likes: 323
From: Land of mountains, cheese, chocolate and watches
12' W204 C63 AMG coupe "T-Rex", 12' W451 Smart Fortwo Pulse (99' W202 C43 AMG + Ultima Can-Am sold)
Thanks Stephan
Simple and I should have thought about it. And it's no excuse as I have 2 hydraulic lifters available
Simple and I should have thought about it. And it's no excuse as I have 2 hydraulic lifters available
Thread Starter
MBWorld Fanatic!
Joined: Mar 2010
Posts: 5,891
Likes: 323
From: Land of mountains, cheese, chocolate and watches
12' W204 C63 AMG coupe "T-Rex", 12' W451 Smart Fortwo Pulse (99' W202 C43 AMG + Ultima Can-Am sold)
Today, I changed all the dry and brittle oil vent pipes. What a PITA as the space back in the intake area is small and the old pipes where stuck on very solid. I removed the MAF which gave me some extra space. Made sure to cover the intake so as not to let "gremlins" in the engine
Tomorrow I will finish the rear brakes assembly, before attacking and routing back in the front left and right brake pipes. New copper pipes with new end screws but I have to do all the bends myself
Tomorrow I will finish the rear brakes assembly, before attacking and routing back in the front left and right brake pipes. New copper pipes with new end screws but I have to do all the bends myself
Thread Starter
MBWorld Fanatic!
Joined: Mar 2010
Posts: 5,891
Likes: 323
From: Land of mountains, cheese, chocolate and watches
12' W204 C63 AMG coupe "T-Rex", 12' W451 Smart Fortwo Pulse (99' W202 C43 AMG + Ultima Can-Am sold)
Both new copper front brake pipes back in place. I have ordered a set of Goodridge SS flex hoses as the ones I had and purchased in the UK have a different threading. That was the reason why I cross threaded the SS attachments and screwed the pipes 
Reassembled all the missing parts in the engine bay. Putting back in place the carpets and linings, battery in the trunk/boot
Just need to wait for the new SS hoses and then I can finish the brakes, flush and bleed with some new ATE Super Blue
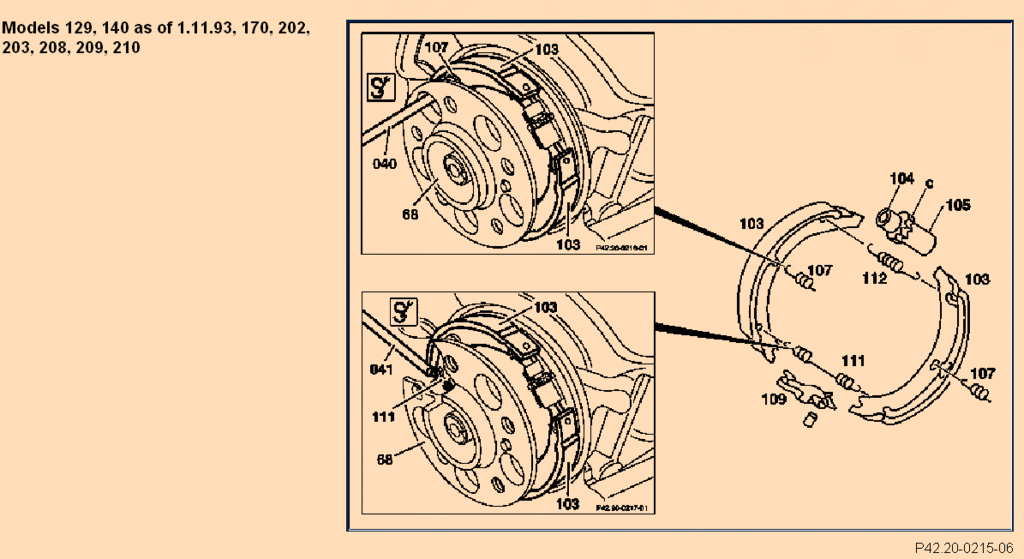
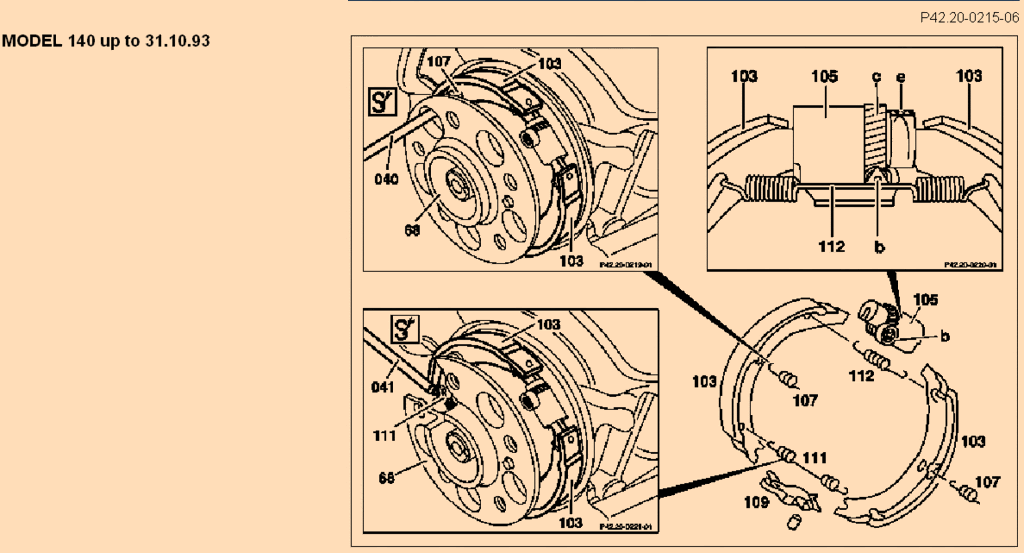
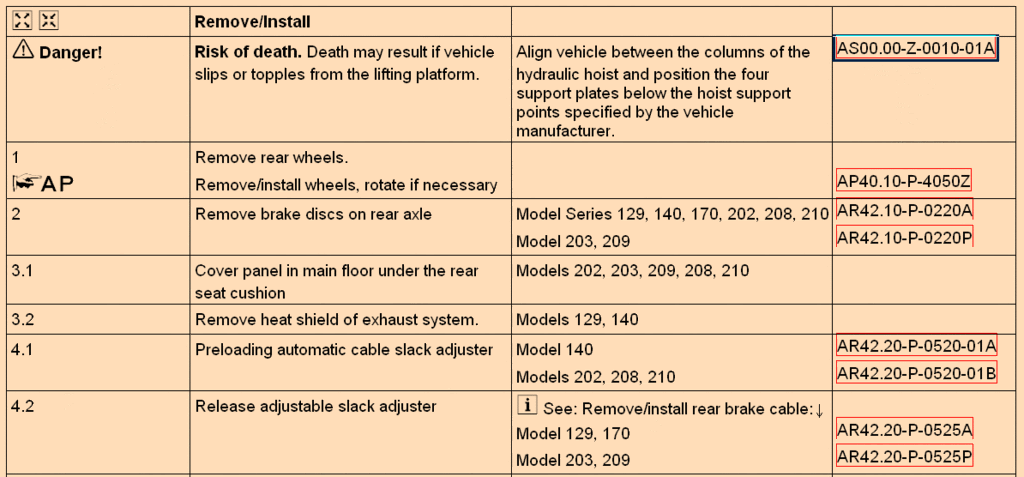
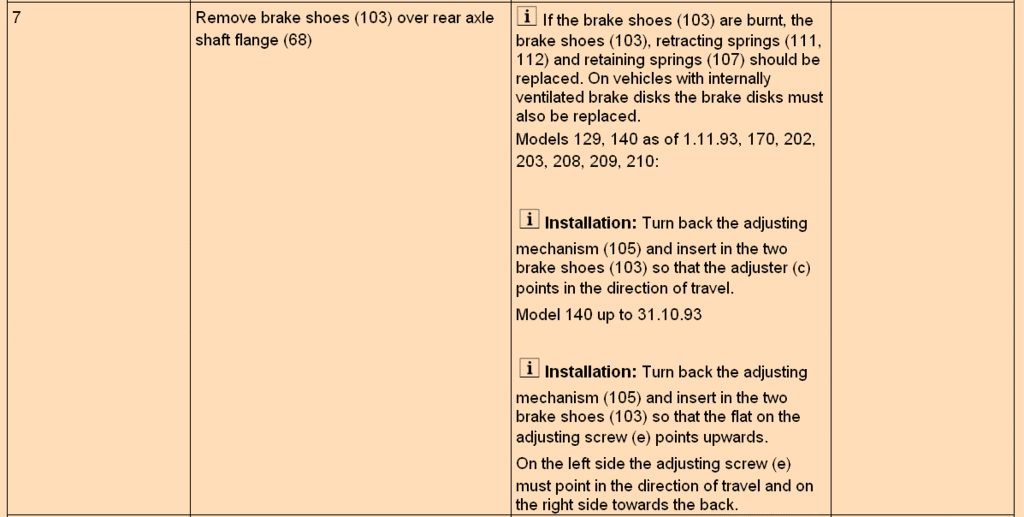
I still need to figure out the assembly of the rear passenger side e-brake shoes, springs, etc.
I posted and requested some WIS instructions for the e-brake but nobody came forward for the moment, so guess it will be touch and go until it fits
Reassembled all the missing parts in the engine bay. Putting back in place the carpets and linings, battery in the trunk/boot
Just need to wait for the new SS hoses and then I can finish the brakes, flush and bleed with some new ATE Super Blue
I still need to figure out the assembly of the rear passenger side e-brake shoes, springs, etc.
I posted and requested some WIS instructions for the e-brake but nobody came forward for the moment, so guess it will be touch and go until it fits
MBWorld Fanatic!
Joined: Apr 2010
Posts: 4,437
Likes: 43
From: PDX
1999 C43, 2008 P30 E63, 2014 SQ5, 2024 Model Y Performance
Both new copper front brake pipes back in place. I have ordered a set of Goodridge SS flex hoses as the ones I had and purchased in the UK have a different threading. That was the reason why I cross threaded the SS attachments and screwed the pipes
Reassembled all the missing parts in the engine bay. Putting back in place the carpets and linings, battery in the trunk/boot
Just need to wait for the new SS hoses and then I can finish the brakes, flush and bleed with some new ATE Super Blue
I still need to figure out the assembly of the rear passenger side e-brake shoes, springs, etc.
I posted and requested some WIS instructions for the e-brake but nobody came forward for the moment, so guess it will be touch and go until it fits


Hope this helps
Thread Starter
MBWorld Fanatic!
Joined: Mar 2010
Posts: 5,891
Likes: 323
From: Land of mountains, cheese, chocolate and watches
12' W204 C63 AMG coupe "T-Rex", 12' W451 Smart Fortwo Pulse (99' W202 C43 AMG + Ultima Can-Am sold)
Jason, you are a CHAMP
I owe you a case of beer
I owe you a case of beer
MBWorld Fanatic!
Joined: Apr 2010
Posts: 4,437
Likes: 43
From: PDX
1999 C43, 2008 P30 E63, 2014 SQ5, 2024 Model Y Performance
Thread Starter
MBWorld Fanatic!
Joined: Mar 2010
Posts: 5,891
Likes: 323
From: Land of mountains, cheese, chocolate and watches
12' W204 C63 AMG coupe "T-Rex", 12' W451 Smart Fortwo Pulse (99' W202 C43 AMG + Ultima Can-Am sold)
Last afternoon on axle stands (for the moment....)

A view of my new shoes in PS3 format on my 18" Monos


9 months of dust....

Made a little door on each side of the rear boot lining so as to be able to access the top of the shocks and fine tune rebound

So what do you think of the initial stance?
I guess it could be a tad lower, but I think I'll let things settle in before touching the adjustable pads. Initial ride is very firm but still acceptable and not spine jarring.
Rear wheel:

Front wheel:

A view of my new shoes in PS3 format on my 18" Monos
9 months of dust....
Made a little door on each side of the rear boot lining so as to be able to access the top of the shocks and fine tune rebound
So what do you think of the initial stance?
I guess it could be a tad lower, but I think I'll let things settle in before touching the adjustable pads. Initial ride is very firm but still acceptable and not spine jarring.
Rear wheel:
Front wheel:

Banned
Joined: Feb 2006
Posts: 0
Likes: 36
you feel like a kid again don't ya?
drop looks gorgeous.
rotors/brakecalipers looks great but the yellow pad contrast color looks somehow weird to silver I dunno?
I think you've done a great job to your car, lots of money spent, make sure you keep your C43 in the family 4-ever.
Btw.
Having a great mod doing to my car this week, make sure you keep updated.................
what ya going to do with your monie if you don't spend it on your car? 
drop looks gorgeous.
rotors/brakecalipers looks great but the yellow pad contrast color looks somehow weird to silver I dunno?
I think you've done a great job to your car, lots of money spent, make sure you keep your C43 in the family 4-ever.
Btw.
Having a great mod doing to my car this week, make sure you keep updated.................
what ya going to do with your monie if you don't spend it on your car?
Thread Starter
MBWorld Fanatic!
Joined: Mar 2010
Posts: 5,891
Likes: 323
From: Land of mountains, cheese, chocolate and watches
12' W204 C63 AMG coupe "T-Rex", 12' W451 Smart Fortwo Pulse (99' W202 C43 AMG + Ultima Can-Am sold)
you feel like a kid again don't ya?
drop looks gorgeous.
rotors/brakecalipers looks great but the yellow pad contrast color looks somehow weird to silver I dunno?
I think you've done a great job to your car, lots of money spent, make sure you keep your C43 in the family 4-ever.
Btw.
Having a great mod doing to my car this week, make sure you keep updated.................
what ya going to do with your monie if you don't spend it on your car?
, but I'll be keeping it even after I die, as I want to drive through those "Pearly gates" in style...I'll be moving on soon to a new project now: building an Ultima (480bhp to drive 980kg)

MBWorld Fanatic!
Joined: Apr 2010
Posts: 4,437
Likes: 43
From: PDX
1999 C43, 2008 P30 E63, 2014 SQ5, 2024 Model Y Performance
The drop looks good, I think the front could be a tad lower but the rear ride height looks like mine.
I wish I had gone with the KW suspension but I guess that just leaves more mods for the future
Take a picture from farther away so we can get a better view if the stance.
Please keep us updated on the ride quality and which settings you are using.
I wish I had gone with the KW suspension but I guess that just leaves more mods for the future
Take a picture from farther away so we can get a better view if the stance.
Please keep us updated on the ride quality and which settings you are using.
Super Member
Joined: Dec 2009
Posts: 940
Likes: 0
From: Chapel Hill, NC/Montreal, QC
1995 C36 AMG, 1998 C43 AMG
Gorgeous Monos! Hopefully mine will be that clean soon. Love the mirror polished lip.
And fantastic idea on the boot lining. I'll have to do that soon when I put on the Konis
Thread Starter
MBWorld Fanatic!
Joined: Mar 2010
Posts: 5,891
Likes: 323
From: Land of mountains, cheese, chocolate and watches
12' W204 C63 AMG coupe "T-Rex", 12' W451 Smart Fortwo Pulse (99' W202 C43 AMG + Ultima Can-Am sold)
The drop looks good, I think the front could be a tad lower but the rear ride height looks like mine.
I wish I had gone with the KW suspension but I guess that just leaves more mods for the future
Take a picture from farther away so we can get a better view if the stance.
Please keep us updated on the ride quality and which settings you are using.
I wish I had gone with the KW suspension but I guess that just leaves more mods for the future
Take a picture from farther away so we can get a better view if the stance.
Please keep us updated on the ride quality and which settings you are using.
Thread Starter
MBWorld Fanatic!
Joined: Mar 2010
Posts: 5,891
Likes: 323
From: Land of mountains, cheese, chocolate and watches
12' W204 C63 AMG coupe "T-Rex", 12' W451 Smart Fortwo Pulse (99' W202 C43 AMG + Ultima Can-Am sold)
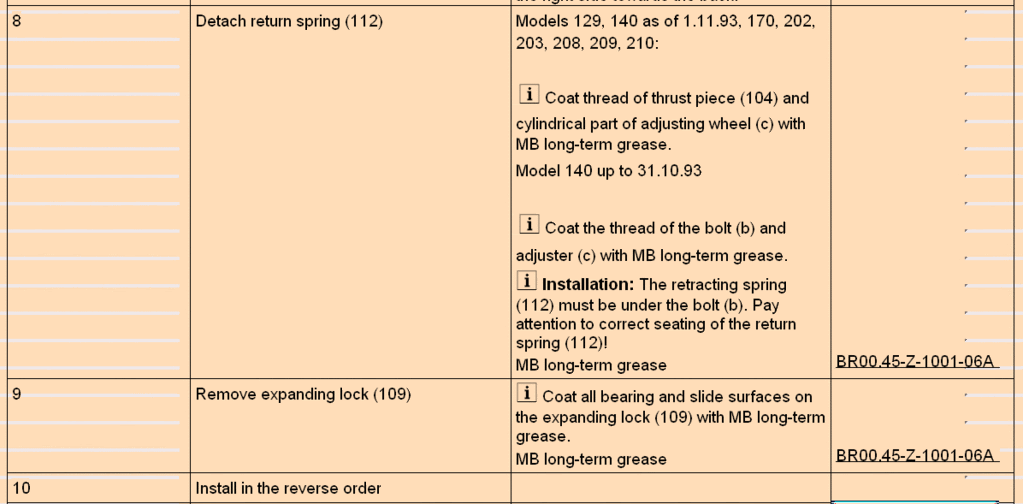
I purchased in the US of A and received (too late as the job is finished) the MB special tool for removing or installing those b**ger springs holding the rear brake shoes. Impossible to obtain as the dealer refuses to sell it saying it's not in stock  The job will be sooooo much easier now and I tried several variants previously (string, thin rope, wire and other special brake tools) with disappointing results. Anyway, I now have it for both my w202's and I could lend it out selectively but expensively (just kidding). If anyone is interested I can link the seller
Enjoy:

The job will be sooooo much easier now and I tried several variants previously (string, thin rope, wire and other special brake tools) with disappointing results. Anyway, I now have it for both my w202's and I could lend it out selectively but expensively (just kidding). If anyone is interested I can link the seller Enjoy:
Last edited by DRBC43AMG; Jul 17, 2012 at 06:30 AM. Reason: Replaced photo


