


rear diffuser removal

Thread Starter
Member
Joined: Jul 2009
Posts: 155
Likes: 1
From: NoVA
'09 C63 AMG
rear diffuser removal
Hi,
I've just received the Euroteck CF diffuser, and have heard that it can be a difficult DIY, but I'm not even at that point yet! I'm having a hard time figuring out how to remove the screws from the stock rear diffuser. The standard instructions are not so great. There are the "middle" screws w/c are just inside/medial to the exhaust tips and the "outside" screws w/c connect to inside of the painted bumper cover, lateral to the exhaust tips.
middle screw (red arrow is screw, yellow is right exhaust for orientation):

middle screw close-up:

outside screw (red arrow):

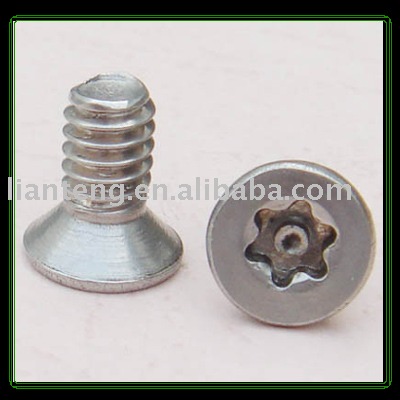
First off, I can't figure out what type of screw heads these screws are using, Torx and Allen did not work. Second, access to the "outside" screws seems severely impeded by the exhaust tips.
Any advise on these two issues for those of you who have done this? I guess I'm kind of a novice at this, but I've done plenty of stuff (bodywork, interior trim pieces, wiring, etc.) on my previous cars...
Thanks.
I've just received the Euroteck CF diffuser, and have heard that it can be a difficult DIY, but I'm not even at that point yet! I'm having a hard time figuring out how to remove the screws from the stock rear diffuser. The standard instructions are not so great. There are the "middle" screws w/c are just inside/medial to the exhaust tips and the "outside" screws w/c connect to inside of the painted bumper cover, lateral to the exhaust tips.
middle screw (red arrow is screw, yellow is right exhaust for orientation):
middle screw close-up:
outside screw (red arrow):
First off, I can't figure out what type of screw heads these screws are using, Torx and Allen did not work. Second, access to the "outside" screws seems severely impeded by the exhaust tips.
Any advise on these two issues for those of you who have done this? I guess I'm kind of a novice at this, but I've done plenty of stuff (bodywork, interior trim pieces, wiring, etc.) on my previous cars...
Thanks.
Last edited by dockt; Oct 28, 2009 at 01:41 PM.
MBWorld Fanatic!
Joined: Apr 2008
Posts: 3,809
Likes: 4
From: Chino Hills, CA
Mercedes C300 Sport, BMW 745Li, VW Mk6 Golf TDI
from the pics, looks like your screw head was screwed up. I believe I used a torx screw. To get access to the outer side, it's easier to come up from under the car, and reach in from behind the exhaust tip. There should be enough room for you to get through there. You won't be able to get to it from the outside back, so you'll have to get dirty. If you're skinny enough, you should be able to wiggle/slide in under your car with a broken cardboard box under you. If not you'll have to lift it up.
Thread Starter
Member
Joined: Jul 2009
Posts: 155
Likes: 1
From: NoVA
'09 C63 AMG
Thanks for the insight. The closeup of the screw is on the side I really didn't muck around with so I don't think I stripped it yet. I started out on the other one w/ a Torx driver w/c didn't work. This is a torx head and doesn't look like my pic above
I completely believe you but the Torx route is not working for me!
I completely believe you but the Torx route is not working for me!
MBWorld Fanatic!
Joined: Apr 2008
Posts: 3,809
Likes: 4
From: Chino Hills, CA
Mercedes C300 Sport, BMW 745Li, VW Mk6 Golf TDI
It should be the same exact screw as the ones in the middle, so just measure and figure out from that one as it's easier to get to and see, then blindly feel out the sides.
Thread Starter
Member
Joined: Jul 2009
Posts: 155
Likes: 1
From: NoVA
'09 C63 AMG
Got this info from another member via pm, this is the info I was looking for. Thanks Azn_C300 also!
"Screw on the side is a torx (T-20 I think) but like mine, the middle is not a screw, but a rivet. I had to dril those out and use a pop rivet tool to attach the brackets tot he Euroteck diffuser. There were two rivets for each of the brackets in the middle area of the diffuser. The install was a real PITA."
"Screw on the side is a torx (T-20 I think) but like mine, the middle is not a screw, but a rivet. I had to dril those out and use a pop rivet tool to attach the brackets tot he Euroteck diffuser. There were two rivets for each of the brackets in the middle area of the diffuser. The install was a real PITA."
Former Vendor of MBWorld
Joined: Feb 2002
Posts: 12,403
Likes: 21
From: South Florida
Fast Cars!
The way to the side torx screws is to bend the bumper out. And it is a Torx, I just forgot what size. The rivets, you do not touch those until it is off the car, you need to first take the screw off with the hex head i think it is. Once the diffuser is then off the car, then to get the clips off, you can pry the rivet out with a flat head screw driver and plyers.
Thread Starter
Member
Joined: Jul 2009
Posts: 155
Likes: 1
From: NoVA
'09 C63 AMG
The way to the side torx screws is to bend the bumper out. And it is a Torx, I just forgot what size. The rivets, you do not touch those until it is off the car, you need to first take the screw off with the hex head i think it is. Once the diffuser is then off the car, then to get the clips off, you can pry the rivet out with a flat head screw driver and plyers.
Neal, are you saying that once the two side torx screws are removed, yank out the diffuser from it's tabs, leaving the middle screws (?rivets) in? And, then prying the rivets apart?
I've also been talking w/ another member who said the middle hardware were Triwing screws (and not rivots) and he was able to remove them w/ the appropriate screwdriver (evidently a popular head for Wii enthusiasts)...
Last edited by dockt; Oct 28, 2009 at 07:56 PM.
Trending Topics
Super Member
Joined: Nov 2008
Posts: 684
Likes: 2
From: Dallas TX area
M5, C63, 335Ci
The center brackets are secured to the car with some bolts. I think they were maybe 11mm, but am not 100% on that. They are easily removed from below with a socket or nutdriver. As far as the rivets / tri screws, I have a bit set that has pretty much every type of fastener fitting made, including all kinds of security screws and the only way I got this off the stock diffuser was to drill them out and replace them with rivets. (I did try to use a tri wing srewdriver bit and the entire assembly just turned and would not come out.) You could also replce with a bolt and nut combo if desired.
MB World Stories
The Best of Mercedes & AMG

8 Oddball Mercedes Ideas That Actually Made it to Production
Verdad Gallardo
Dubai Tuner Gives the Mercedes G-Class An Entirely New Look
Verdad Gallardo
Six Gift Ideas Your AMG Loving Dad or Grad Will Cherish

7 Craziest Things AMG Gas Ever Built
Verdad Gallardo
New Electric Mercedes-AMG GT 4-Door Coupe Unveiled: 10 Things You Need to Know
Verdad Gallardo
6 Mercedes Models That Did NOT Age Well (But Are Somehow Still Cool)
Verdad Gallardo
Manual Mercedes? 6 Times Sindelfingen Let Drivers Have All The Fun
Verdad Gallardo
Mercedes SLR McLaren 722 S Is Extremely Rare Example Modified by McLaren
Verdad Gallardo
8 Classic Boxy Mercedes Designs That Have Aged Like Fine Wine
Verdad GallardoFormer Vendor of MBWorld
Joined: Feb 2002
Posts: 12,403
Likes: 21
From: South Florida
Fast Cars!
The side screws are torx T-20. Managed to used a mini bit/ratchet and actually (painfully) got it off by holding and turning just the ratchet head from below. If this is a successful un/install, I'll try to post up useful pics of everything.
Neal, are you saying that once the two side torx screws are removed, yank out the diffuser from it's tabs, leaving the middle screws (?rivets) in? And, then prying the rivets apart?
I've also been talking w/ another member who said the middle hardware were Triwing screws (and not rivots) and he was able to remove them w/ the appropriate screwdriver (evidently a popular head for Wii enthusiasts)...
Thread Starter
Member
Joined: Jul 2009
Posts: 155
Likes: 1
From: NoVA
'09 C63 AMG
lol, thanks for the concern, I think I've figured out some more complex things before ... I was having a mental block about the bracket above the diffuser medial to the exhaust tip. Once I looked up there I figured it all out and did the removal. I also did the install in about 15 minutes, thanks to everyone's responses here. Will post up a proper DIY just for fun tonight. But you are right, it ends up being really easy.
... I was having a mental block about the bracket above the diffuser medial to the exhaust tip. Once I looked up there I figured it all out and did the removal. I also did the install in about 15 minutes, thanks to everyone's responses here. Will post up a proper DIY just for fun tonight. But you are right, it ends up being really easy.
Former Vendor of MBWorld
Joined: Feb 2002
Posts: 12,403
Likes: 21
From: South Florida
Fast Cars!
lol, thanks for the concern, I think I've figured out some more complex things before... I was having a mental block about the bracket above the diffuser medial to the exhaust tip. Once I looked up there I figured it all out and did the removal. I also did the install in about 15 minutes, thanks to everyone's responses here. Will post up a proper DIY just for fun tonight. But you are right, it ends up being really easy.
... I was having a mental block about the bracket above the diffuser medial to the exhaust tip. Once I looked up there I figured it all out and did the removal. I also did the install in about 15 minutes, thanks to everyone's responses here. Will post up a proper DIY just for fun tonight. But you are right, it ends up being really easy.


