


DIY 6.3 amg badge color change.....

Thread Starter
Super Member


Joined: Nov 2013
Posts: 825
Likes: 114
From: Eufaula, Al/Georgetown, GA
W213 E63S Wagon, W204 C63 P30(RIP), WK1 Grand Cherokee SRT8(RIP)
DIY 6.3 amg badge color change.....
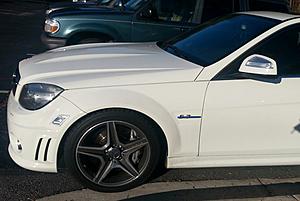
Ok ...who wants for their 6.3 amg fender badge to match their beautifully painted calipers, or want to color match the body color for a coordinated look? Yeah, I though so....well you can buy the badges (very limited color selection) but you ALREADY have the badges, why buy new ones that either wont match or cant find in the color you want? DO IT YOURSELF! !!! Its not hard, takes very little time and you can ensure that your color match is perfect!!!! Here's how....
1st and VERY IMPORTANT. ...you want to make sure you reinstall the badge EXACTLY where it was so now is the time to mark it....using masking tape run a piece across the top of the 6 and 3 so that the tape crosses over to door and extends up onto the wheel arch....now cut the tape in the door jamb and pull the tape fwd until youre about 1" from the arch and tear it off....so now you have tape on wheel arch plus 1" and tape on the door....done
Remove the badge....
Heat gun or hair dryer are your friend here...use heat to soften the tape and then SLOWLY remove the badge-some say fishing line but ive never liked that method...use a plastic panel tool or plastic spatula wrapped with a cloth and work it off from one end to the other being careful not to break it by rushing.
Prep the badge....
Remove ALL of the old tape...dont use any goo gone or solvents here...a straight razor works best, especially if you heat it up a little....you can actually "filet" most all of it off in one piece usually....also go ahead and apply the new adhesive tape to the back....you can use that razor blade to trim the edges to a perfect fit. ....
With a Qtip clean the entire black surface of the emblem to remove any form of residue.
Place a piece of plastic down on your work surface, place 4 quarters about 1.5" apart on the plastic, place badge centered on the quarters ( you need the ends of the badge to NOT be touching the plastic)
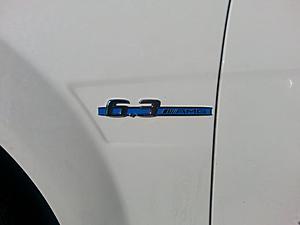
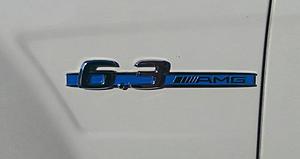
Paint!!!!
Place whatever paint you are using in a small container, I use shampoo caps and such. Nowuse a GOOD eyedropper to pick up a little paint. Now go to the center of each black area and from about 1/4" above get a drop built on the end of the dropper....now slowly lower tthe drop till it touches and watch as it spreads to fill the area perfectly...if it needs more just add half a drop so as not to overfill....when it comes to the ends you DO want for the paint to run over the end, that way you get full paint coverage. ...when it comes to the amg end you will have to touch the a and m and g in order to fill in between them but DONT worry!!!! Once the paint has dried for about 20min pick up the badge and grab a piece of plain white copy paper. Use the copy paper like sandpaper running side to side across the amg letters...the side rails and letters will keep the paper from touching the paint in between and will polish the paint off the letters and will NOT damage the chrome....I promise
At this point go ahead and remove the leftover adhesive from the fenders taking CARE not to disturb the 2 pieces of tape from before....
LET THEM DRY OVERNIGHT!!!!!!
Install....
Take your masking tape and run a line between the remaining pieces from before, this gives you the EXACT line for the 6 and 3 to butt up to....peel off the tape backing and apply.....DONE!!!! Now stand back and admire your matching badge, or realize you havent done the calipers yet and now have another job to do!
1st and VERY IMPORTANT. ...you want to make sure you reinstall the badge EXACTLY where it was so now is the time to mark it....using masking tape run a piece across the top of the 6 and 3 so that the tape crosses over to door and extends up onto the wheel arch....now cut the tape in the door jamb and pull the tape fwd until youre about 1" from the arch and tear it off....so now you have tape on wheel arch plus 1" and tape on the door....done
Remove the badge....
Heat gun or hair dryer are your friend here...use heat to soften the tape and then SLOWLY remove the badge-some say fishing line but ive never liked that method...use a plastic panel tool or plastic spatula wrapped with a cloth and work it off from one end to the other being careful not to break it by rushing.
Prep the badge....
Remove ALL of the old tape...dont use any goo gone or solvents here...a straight razor works best, especially if you heat it up a little....you can actually "filet" most all of it off in one piece usually....also go ahead and apply the new adhesive tape to the back....you can use that razor blade to trim the edges to a perfect fit. ....
With a Qtip clean the entire black surface of the emblem to remove any form of residue.
Place a piece of plastic down on your work surface, place 4 quarters about 1.5" apart on the plastic, place badge centered on the quarters ( you need the ends of the badge to NOT be touching the plastic)
Paint!!!!
Place whatever paint you are using in a small container, I use shampoo caps and such. Nowuse a GOOD eyedropper to pick up a little paint. Now go to the center of each black area and from about 1/4" above get a drop built on the end of the dropper....now slowly lower tthe drop till it touches and watch as it spreads to fill the area perfectly...if it needs more just add half a drop so as not to overfill....when it comes to the ends you DO want for the paint to run over the end, that way you get full paint coverage. ...when it comes to the amg end you will have to touch the a and m and g in order to fill in between them but DONT worry!!!! Once the paint has dried for about 20min pick up the badge and grab a piece of plain white copy paper. Use the copy paper like sandpaper running side to side across the amg letters...the side rails and letters will keep the paper from touching the paint in between and will polish the paint off the letters and will NOT damage the chrome....I promise
At this point go ahead and remove the leftover adhesive from the fenders taking CARE not to disturb the 2 pieces of tape from before....
LET THEM DRY OVERNIGHT!!!!!!
Install....
Take your masking tape and run a line between the remaining pieces from before, this gives you the EXACT line for the 6 and 3 to butt up to....peel off the tape backing and apply.....DONE!!!! Now stand back and admire your matching badge, or realize you havent done the calipers yet and now have another job to do!
Thread Starter
Super Member
Joined: Nov 2013
Posts: 825
Likes: 114
From: Eufaula, Al/Georgetown, GA
W213 E63S Wagon, W204 C63 P30(RIP), WK1 Grand Cherokee SRT8(RIP)
Trending Topics
MB World Stories
The Best of Mercedes & AMG

6 Mercedes Models That Did NOT Age Well (But Are Somehow Still Cool)
Verdad Gallardo
Manual Mercedes? 6 Times Sindelfingen Let Drivers Have All The Fun
Verdad Gallardo
Mercedes SLR McLaren 722 S Is Extremely Rare Example Modified by McLaren
Verdad Gallardo
8 Classic Boxy Mercedes Designs That Have Aged Like Fine Wine
Verdad Gallardo
Flawlessly Restored Mercedes 190E Evo II Heads to Auction
Verdad Gallardo
Electric Mercedes C-Class Unveiled: 11 Things You Need to Know
Verdad Gallardo
Mercedes EQS Gets A Major Update: Everything You Need to Know
Verdad Gallardo
5 Underrated Mercedes-Benz Models That Don't Get the Love They Deserve
Verdad Gallardo
Mercedes 300D Has Pushed Well Past 1 Million Miles and It Ain't Stopping
Verdad Gallardo
Thread Starter
Super Member
Joined: Nov 2013
Posts: 825
Likes: 114
From: Eufaula, Al/Georgetown, GA
W213 E63S Wagon, W204 C63 P30(RIP), WK1 Grand Cherokee SRT8(RIP)
MBWorld Fanatic!
Joined: Sep 2013
Posts: 1,673
Likes: 4
From: Pittsburgh
C63 AMG
Not my color choice as others have said, but the end result looks stellar!!! Nicely done.
Kriston, you ever think about getting the flagship HRE center caps that have red and blue incorporated...? Would go nicely with your badges bro!
Kriston, you ever think about getting the flagship HRE center caps that have red and blue incorporated...? Would go nicely with your badges bro!
MBWorld Fanatic!


Joined: Jan 2010
Posts: 2,276
Likes: 409
C63 AMG
Hey Shane, I knew these wheels weren't going to stay on the car. So I never decided to change the caps. I had thought about it, but figured why spend 200 bucks on a set of original caps.
I have a few ideas of how to carry the red accents into other areas of the car without over doing it. That's for this winters round of mods.
I have a few ideas of how to carry the red accents into other areas of the car without over doing it. That's for this winters round of mods.
Thread Starter
Super Member
Joined: Nov 2013
Posts: 825
Likes: 114
From: Eufaula, Al/Georgetown, GA
W213 E63S Wagon, W204 C63 P30(RIP), WK1 Grand Cherokee SRT8(RIP)
MBWorld Fanatic!
Joined: Mar 2012
Posts: 1,395
Likes: 26
From: Alberta
This and that.
Bump from the dead.
What kind of paint to use? And after you remove the badges, I assume the sticky is gone from behind them. Do you use just regular double sided tape then or what?
Also, Kriston what other areas did you end up doing this at? Please share pics!
What kind of paint to use? And after you remove the badges, I assume the sticky is gone from behind them. Do you use just regular double sided tape then or what?
Also, Kriston what other areas did you end up doing this at? Please share pics!
Last edited by papashango; Apr 22, 2015 at 06:12 PM.


