


 , I've decided to create this thread for the sake of those who just want to simply see some clean C63's. Clay bar/wax done to my car today. Show off your clean rides, gentlemen. I'll start...
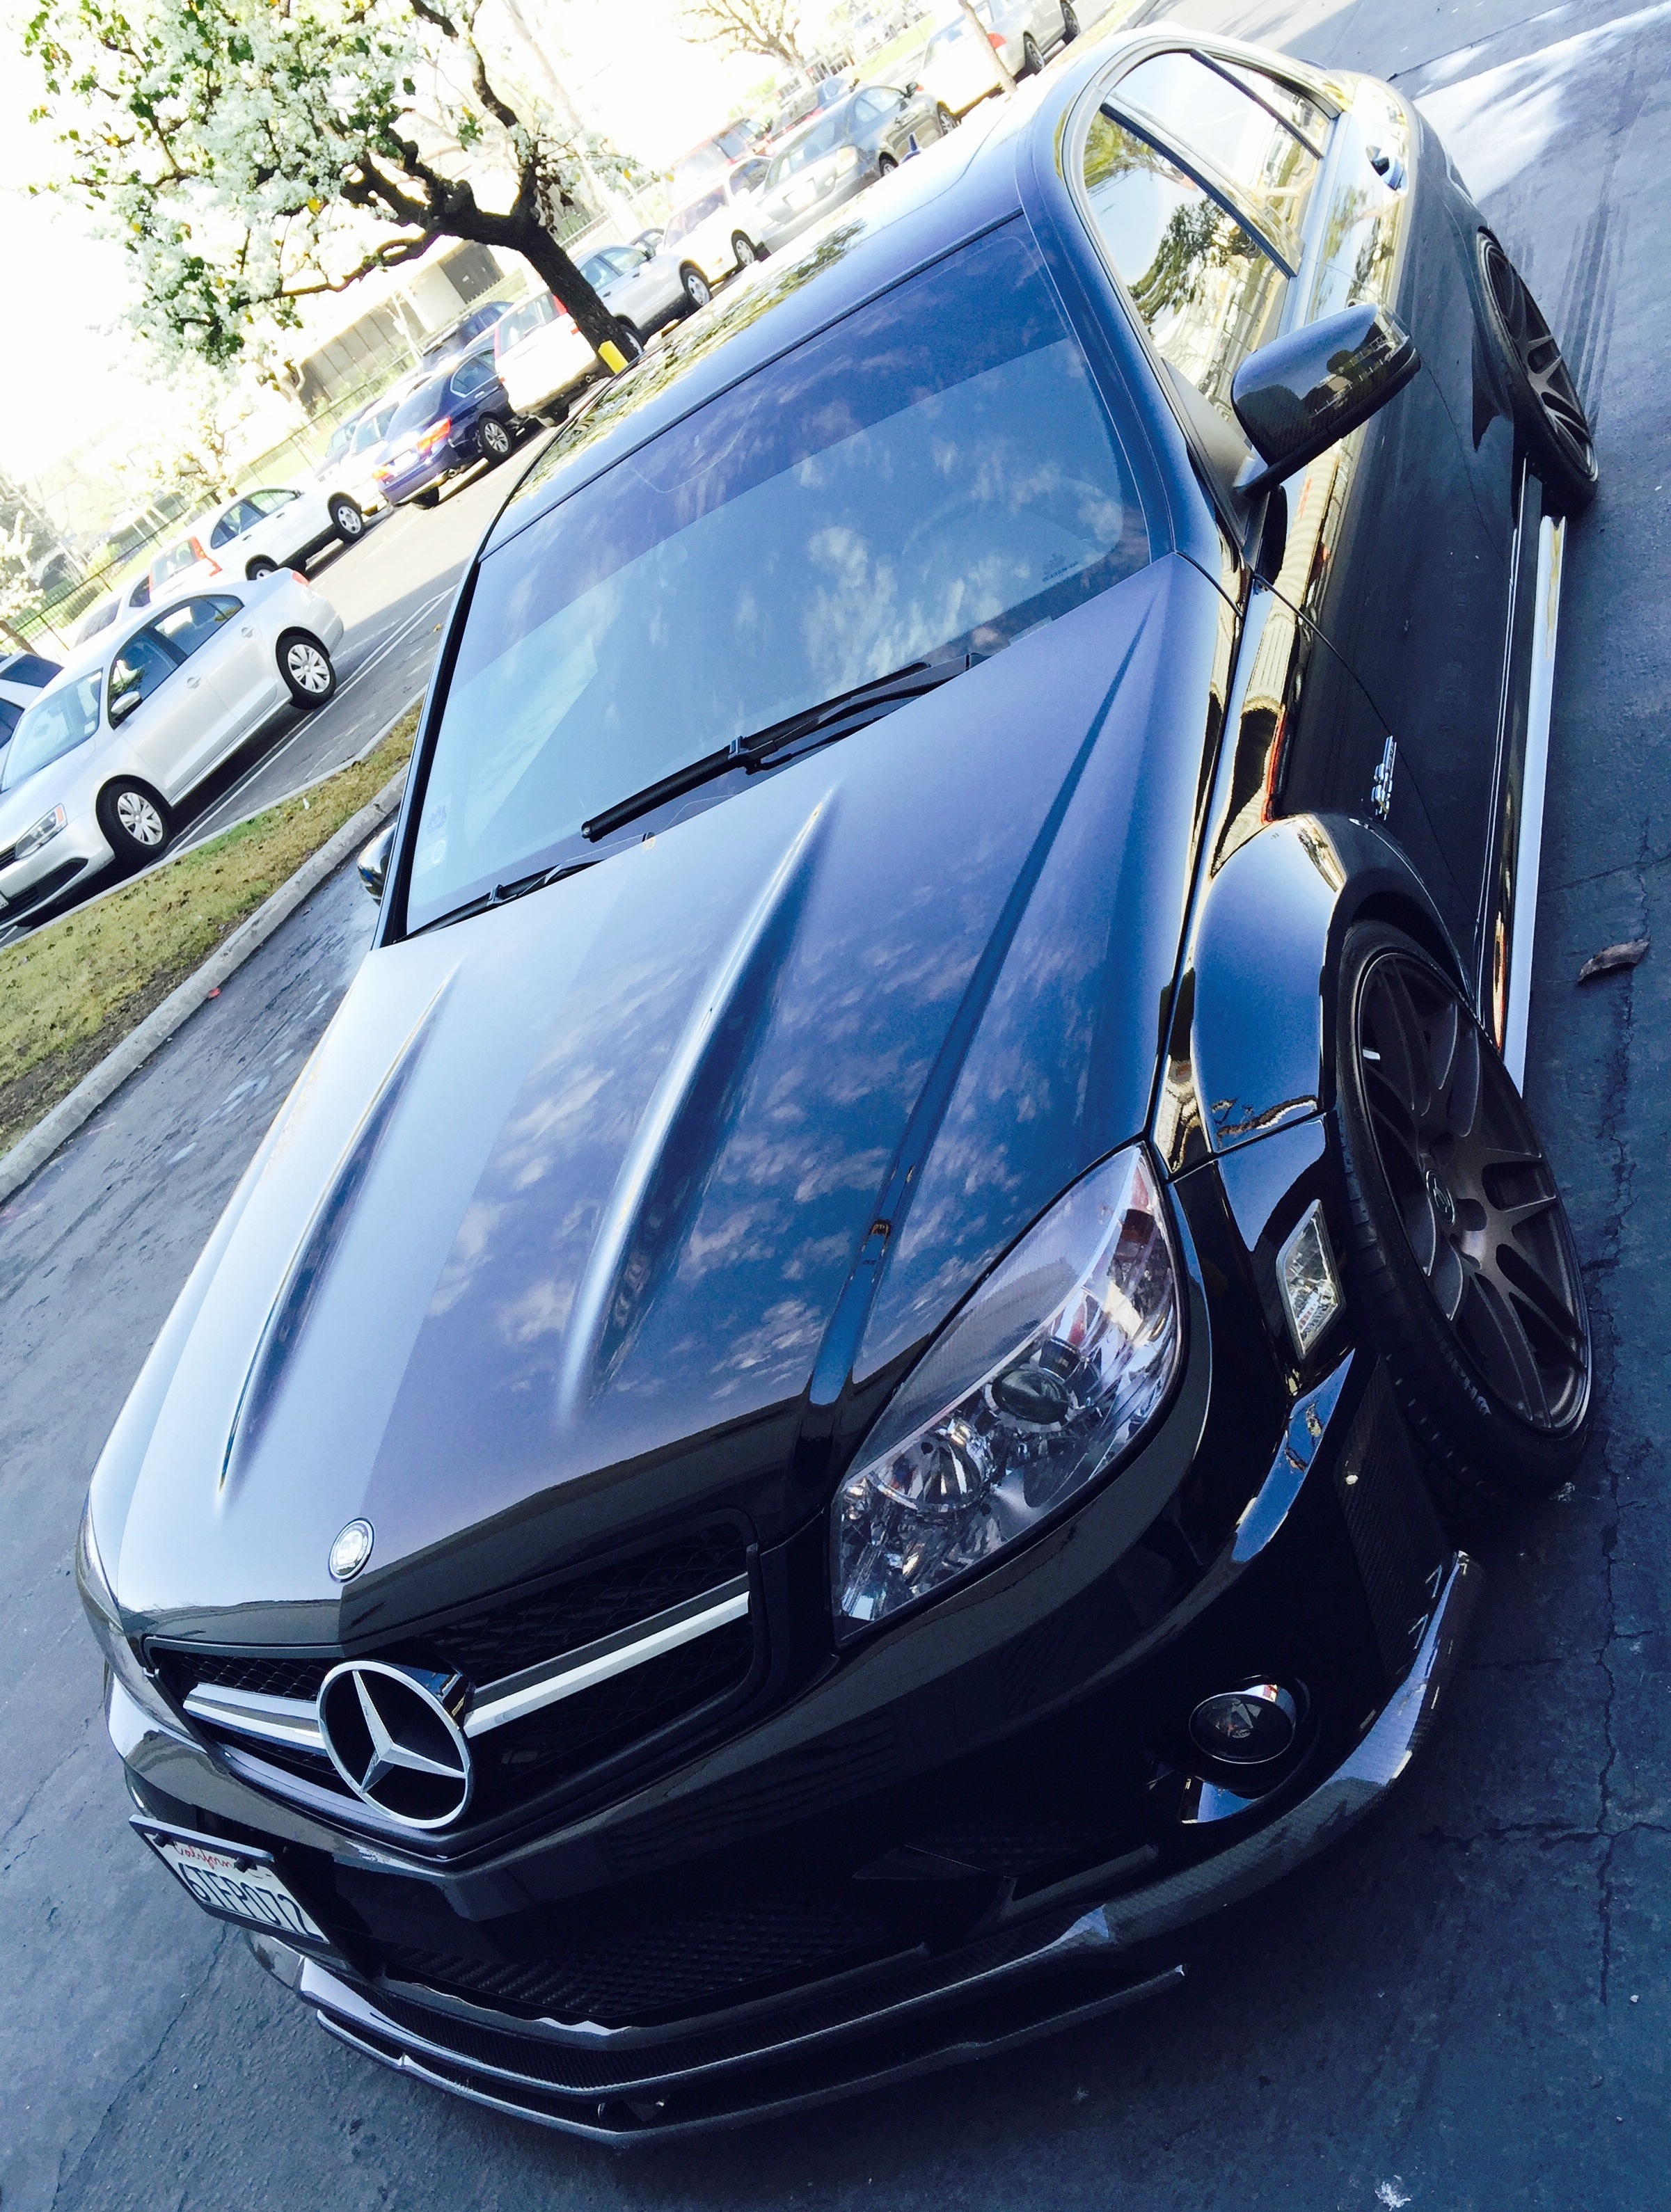


CAR WASH/DETAIL PICTURE(S) THREAD
Thread Starter
Senior Member
Joined: Sep 2011
Posts: 363
Likes: 0
From: Los Angeles, CA
C63

MBWorld Fanatic!


Joined: Dec 2012
Posts: 6,775
Likes: 1,152
From: NY
E63S | X5
And swirl up your paint with a brush used previously to remove mud from trucks etc. etc. etc.
Someone should put together a detailing thread / products. Or come spring when I can finally drive the C I will.
Someone should put together a detailing thread / products. Or come spring when I can finally drive the C I will.

MBWorld Fanatic!
Joined: Jul 2014
Posts: 1,142
Likes: 3
2010 C63 P30
Wheels I'm still working on a routine for, wheel woollies are great but on 18" wheels it's impossible to get the back. Was using full effect not sure what I'll switch to
Probably going to do a 2 step menzerna Polish for the spring and Polish the exhaust tips with optimum metal polish
Super Member
Joined: Feb 2012
Posts: 620
Likes: 7
From: Sacramento, CA
'09 C63


MBWorld Fanatic!
Joined: Sep 2009
Posts: 1,162
Likes: 9
A V8
if anyone has dirty rubber, this works excellent.
http://www.griotsgarage.com/product/...r+35+ounces.do
http://www.griotsgarage.com/product/...r+35+ounces.do
Trending Topics
MBWorld Fanatic!
Joined: Dec 2012
Posts: 6,775
Likes: 1,152
From: NY
E63S | X5
Mostly just getting at the fact the title is CAR WASH/DETAIL PICTURE(S) THREAD (obviously all caps) and is just a stab at making another picture thread.
Maybe I need to take a little break from MBworld. I've been rather critical lately but the OP complains about too many ads and then creates a new thread that already exists.
MB World Stories
The Best of Mercedes & AMG

6 Mercedes Models That Did NOT Age Well (But Are Somehow Still Cool)
Verdad Gallardo
Manual Mercedes? 6 Times Sindelfingen Let Drivers Have All The Fun
Verdad Gallardo
Mercedes SLR McLaren 722 S Is Extremely Rare Example Modified by McLaren
Verdad Gallardo
8 Classic Boxy Mercedes Designs That Have Aged Like Fine Wine
Verdad Gallardo
Flawlessly Restored Mercedes 190E Evo II Heads to Auction
Verdad Gallardo
Electric Mercedes C-Class Unveiled: 11 Things You Need to Know
Verdad Gallardo
Mercedes EQS Gets A Major Update: Everything You Need to Know
Verdad Gallardo
5 Underrated Mercedes-Benz Models That Don't Get the Love They Deserve
Verdad Gallardo
Mercedes 300D Has Pushed Well Past 1 Million Miles and It Ain't Stopping
Verdad GallardoSuper Member
Joined: Jan 2003
Posts: 675
Likes: 3
From: Dallas, TX
2018 GLS 550

Believe me, if it was paint, I wouldn't dare do this. I spent years detailing and still do on the side, which is why I got sick of doing my own car!
MBWorld Fanatic!
Joined: Jul 2014
Posts: 1,142
Likes: 3
2010 C63 P30
Man, I could never do it for someone else even for money it takes too much time!
Super Member
Joined: Jan 2003
Posts: 675
Likes: 3
From: Dallas, TX
2018 GLS 550

MBWorld Fanatic!
Joined: Feb 2008
Posts: 2,829
Likes: 95
'20 GLC300 SUV
My wash method:
Equipment/Items/Products Needed:
1) 2 buckets holding 3-4 gallons of water;
2) 1-2 microfiber wash mitt(s);
3) Several high-quality microfiber towels;
4) Gas-powered leaf blower (optional; makes drying infinitely easier);
5) Optimum No-Rinse Solution (http://www.autogeek.net/optimum-no-rinse.html);
6) Optimum Metal Polish (http://www.autogeek.net/auto-metal-polish.html);
7) Optimum Car Wax/Sealant (http://www.autogeek.net/optimum-spray-wax.html)
8) Hose or portable air pump water sprayer (http://www.pestgoaway.com/index.php?...xNEaAoFx8P8HAQ)
9) 1-2 terry cloth towels (these will be used to apply metal polish to the exhaust tips)
Process:
1) Fill one bucket with warm water and add the appropriate amount of ONR solution (directions/dilution instructions on bottle)
2) Fill the second bucket with warm water only
3) Use the air pump water sprayer (this is what I use in the winter when I'm washing in my garage) or hose to thoroughly rinse off the car
3) Soak your microfiber wash mitt in the ONR/water solution
4) Start cleaning the least dirty portions of the car first (so as to contaminate the mitt as little as possible); I start at the roof of the car and work my way down to the driver's side door handle (including the driver's side window and sideview mirror)
5) Clean one "panel" at a time; Make sure you saturate the panel you're working on with the ONR/water solution (this will facilitate spotless drying with the leaf blower or microfiber towel, if you do not have access to a blower)
6) After cleaning a panel, rinse off the wash mitt in the water-only bucket
7) After exposing a panel to ONR, dry that panel off with either the leaf blower or a microfiber drying towel
7) Save the rocker panels, rear diffuser, fenders, and areas around the exhaust for last
8) After you've finished cleaning the car body, thoroughly rinse off/clean the wash mitt, empty the buckets and fill them up again (one with ONR/water and the other with water only)
9) Begin cleaning the wheels, brake calipers, rotors, and wheel wells (again, go one at a time; dry each wheel off before proceeding to the next one)
10) You're almost done with the wash! Take a microfiber towel and dip an edge into some fresh ONR/water solution; use this to "touch up" any spots you may have missed; Dry off the "touch up" spots with the microfiber towel you are using
11) Apply some Optimum Metal Polish to the corner of a terry cloth towel; scrub any soot/carbon-covered portions of the exhaust
12) Use a wet (water only) terry cloth towel to remove any metal polish/carbon residue from your sparkling-clean exhaust tips
So you still have some energy? Want to seal up the paint?
(Optional step: Before applying the Optimum Car Wax, use a fresh piece of clay bar and an ONR/Optimum Car Wax solution to remove any remaining contaminants that were not eliminated during the wash)
1) Working one panel at a time, apply Optimum Car Wax to the car and blend it in with a microfiber towel
If you are new to this method (or hand-washing in general), this process might initially take over an hour. Once you are familiar with the procedure, you can knock out a top quality wash in 30-45 minutes, easily.
Last edited by zibby43; Feb 6, 2015 at 08:37 PM.


MBWorld Fanatic!
Joined: Nov 2012
Posts: 2,768
Likes: 419
'10 C63
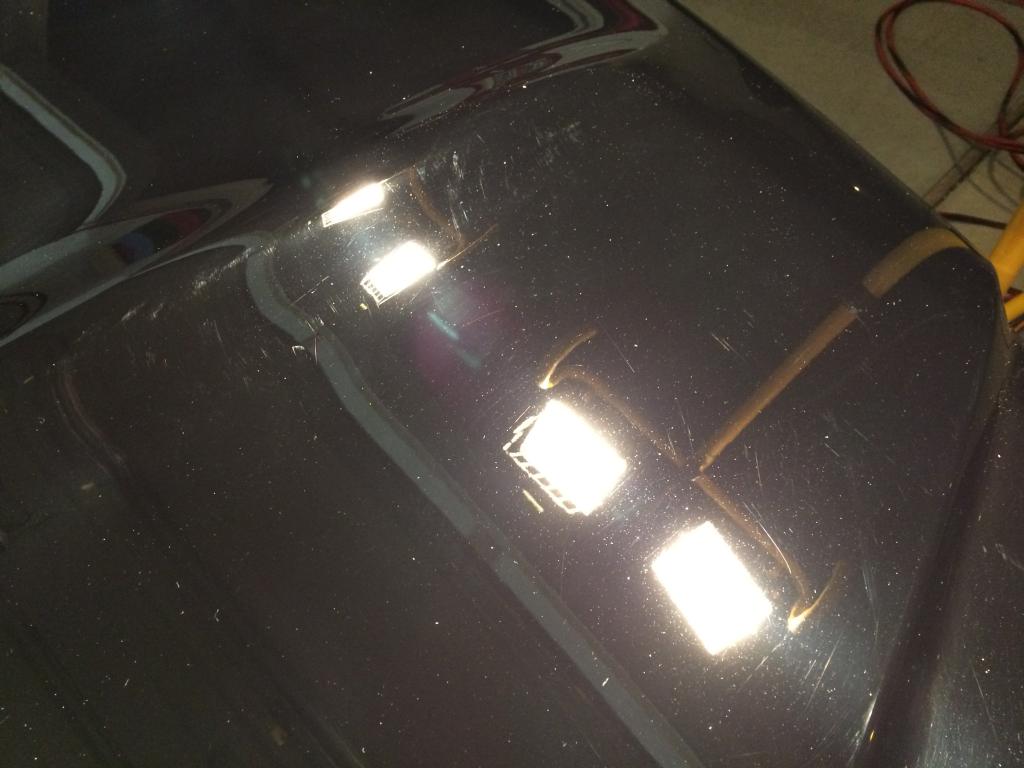
I am in the early stages of a full correction on my car. I'll add my pictures here when I am done. 6 hours in and all I have done is clay bar, IPA wipedown and compound the top of the trunk, half the roof, and a rear quarter. It's coming out really well though.
MBWorld Fanatic!
Joined: Jul 2014
Posts: 1,142
Likes: 3
2010 C63 P30
What product are you using? I researched about polish on these ceramic coated cars and it sounds like it can be a pita
MBWorld Fanatic!
Joined: Sep 2009
Posts: 1,162
Likes: 9
A V8
chris, under what kind of light are you checking your work to see correction?
what wax do you guys like using? I like dodo juice, last very long with once a week washes, and smells great. application and removal is very easy also.
swissvax is overpriced, in case anyone is wondering.
what wax do you guys like using? I like dodo juice, last very long with once a week washes, and smells great. application and removal is very easy also.
swissvax is overpriced, in case anyone is wondering.
MBWorld Fanatic!
Joined: Nov 2012
Posts: 2,768
Likes: 419
'10 C63
chris, under what kind of light are you checking your work to see correction?
what wax do you guys like using? I like dodo juice, last very long with once a week washes, and smells great. application and removal is very easy also.
swissvax is overpriced, in case anyone is wondering.
what wax do you guys like using? I like dodo juice, last very long with once a week washes, and smells great. application and removal is very easy also.
swissvax is overpriced, in case anyone is wondering.
Last edited by chrisridebike8; Feb 7, 2015 at 12:15 PM.
MBWorld Fanatic!
Joined: Jul 2014
Posts: 1,142
Likes: 3
2010 C63 P30
I did a clay and IPA wipedown. Using the Griots 6 and 3 inch DAs. Stage 1: Menzerna FG400 on a Meguiars Microfiber cutting pad. Stage 2: Menzerna 1500 on a Lake Country orange pad. Stage 3: Menzerna 4000 on a black Lake Country pad. The first stage gets all the big stuff out and leave a slight haze. I usually use Menzerna power lock sealant, wait 24 hours and then put Dodo Juice Hard Candy on top of that. My buddy is a detailer and said he's going to help me opticoat the car once the correction is done. I've never used OC. I'll have some tips and tricks later once I'm all done. As far as wax, Dodo Juice is amazing. Looks great and is very tough. Someone leaned down in a parking lot to look at my wheels/brakes and their jacket zipper ran across my front fender. I freaked out. I came home and it all buffed out with some quick detailer and a microfiber towel.
I have a set of $35 work lights I got from lowes. They are halogen, not LED. They show everything just fine.
I have a set of $35 work lights I got from lowes. They are halogen, not LED. They show everything just fine.
you got the same stuff i'm going to use 400 1500 4000
i usually top off with colinite 845 thats such a great sealing wax, but i got a big ole bottle of power lock to go with the polishes
MBWorld Fanatic!
Joined: Nov 2012
Posts: 2,768
Likes: 419
'10 C63
MBWorld Fanatic!
Joined: Sep 2009
Posts: 1,162
Likes: 9
A V8
i had purple haze, and now i have a green one. not sure what the scent it, but it's fruity.


MBWorld Fanatic!
Joined: Nov 2012
Posts: 2,768
Likes: 419
'10 C63
The paint is so damn hard that FG400 is what you really need to cut with a DA. Rupes or maybe a Flex 3401 could get away with something less, but definitely not a DA. As it is, it takes me about 1.5-2 hrs per panel (door sized) to get all the big swirls and scratches out and leave a slight haze that the 1500 should take care of. The 400 and the MF pad would destroy the paint on my lexus. 1500 with an orange pad cuts really quickly on that car. MB paint is just so hard. I think I'm either going to borrow a Rupes 15 or buy a Flex 3401 to finish this job. It's taking so long with my DA.


