When you click on links to various merchants on this site and make a purchase, this can result in this site earning a commission. Affiliate programs and affiliations include, but are not limited to, the eBay Partner Network.
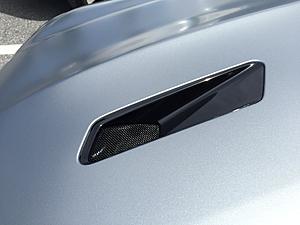
I noticed today that one of the hood vents was about to unclip from the hood and after pushing it up it's back to normal when I took delivery of the car. However, I question the actual way it's currently installed:
Driver:
Passenger:
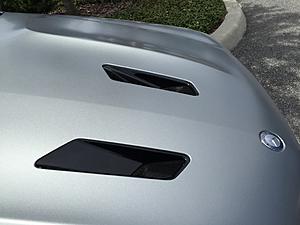
Overall:
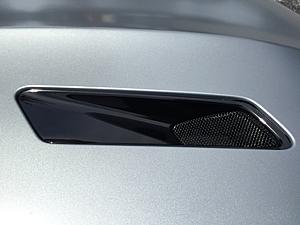
See the gap between the hood and vent? Should it be sitting flush? I guess I can try unsnapping them and re-inserting but wanted to get your thoughts.
after checking out a couple of pics online, it looks as if most of the oem vents look like yours but the carbon pieces seem to fit snug against the hood.
after checking out a couple of pics online, it looks as if most of the oem vents look like yours but the carbon pieces seem to fit snug against the hood.
Hmm, the pics I saw looked like the front part of the vents was slightly higher. I'll keep checking.
It seems that it just depends. I have seen it both ways, where it sits flush and where one side is slightly lower. Is there a way to adjust the clip at all?
The red car above is mine and when they installed the mode carbon after market vents They used the 3m-tape to get it flush But factory on the black series was flush
Well I decided to tackle this tonight since they started dropping again.
Took them off the hood.
Basically there's a 3m double sided strip on each side that attach to the hood. Looks like it wasn't thick enough to affix to the hood. All I did was remove and install two strips on each side as I didn't have one roll of the thicker one and voila...I'm pleased.
Removal: remove the covers from under the hood and press on the sides from underneath while pushing up.
To reinstall them, just peel off the red adhesive cover and align vent on hood. Gently press down until you hear the clips click and should be fairly flushed with the hood (maybe 1-2mm deeper) and just press on the sides from underneath.
Reinstall covers from under hood.
See pics.
Sagging and dropped.
Old adhesive strip
New...
Cleaned area folding down on hood where adhesive will affix.
Other side
Boom!
Boom!
Boom!!!
Last edited by latinskllz; 11-23-2015 at 07:31 PM.
I noticed today that one of the hood vents was about to unclip from the hood and after pushing it up it's back to normal when I took delivery of the car. However, I question the actual way it's currently installed:
Mine drop out of the slot every time the car wash guy washes my car. I've reinstalled them 3 times already. Maybe some new tape is in order.
2012 C63;1971 280SE 3.5(Sold);2023 EQS 450 SUV 4 Matic (Wife's)
Looks like 3M trim tape with the red peel off strip in post #8. The tape used is also a bit wider than the OEM tape from the look of it. Not sure if that will help or not. Depends on the area the tape will bond to. No report to date saying how the 3M tape has stood up to the high engine temps in our C63s.
Looks like 3M trim tape with the red peel off strip in post #8. The tape used is also a bit wider than the OEM tape from the look of it. Not sure if that will help or not. Depends on the area the tape will bond to. No report to date saying how the 3M tape has stood up to the high engine temps in our C63s.
This is a great thread! Mine are sagging/a bit loose too. Will try re-taping. Thanks
Looks like 3M trim tape with the red peel off strip in post #8. The tape used is also a bit wider than the OEM tape from the look of it. Not sure if that will help or not. Depends on the area the tape will bond to. No report to date saying how the 3M tape has stood up to the high engine temps in our C63s.
8k miles later, vents are still held in place with 3M adhesive. I used 3M tape 1/2" wide Part No. 03614.
8k miles later, vents are still held in place with 3M adhesive. I used 3M tape 1/2" wide Part No. 03614.
Nice work, OP
Wanted to add another tape alternative for those who are in a similar boat, or who will be seeing very high temperatures in general, and at the track:
3M� VHB� Tape GPH-160GF appears has the highest temp rating (Peak 450F, sustained 300F) and performance characteristics of their VHB series of tapes, in addition to it being 1.6mm thick - see attached PDF for data sheet.
Also attached the data sheet for the 3M 03614 tape that OP had used.


 08-14-2015 | 12:49 PM