
CL(w215) L.E.D. License Plate Mod HOW-To
 02-20-2008, 07:37 PM
#1
MBWorld Fanatic!
Thread Starter
Join Date: Aug 2007
Location: Cleveland, Ohio
Posts: 1,311
Likes: 0
Received 0 Likes
on
0 Posts
2003 Cl 500
CL(w215) L.E.D. License Plate Mod HOW-To
First I'd like to thank Yacht Master for the assistance and know how to complete this mod. And by far the SEXIEST thing I have ever seen done to a car, a MUST DO no matter WHAT the cost.
Tools needed:
Phillips screw driver
Crimper's
Small Flat head screw driver
Soldering Iron and Solder*
Supplies Needed:
LED Bulbs from http://spectrumled.com/festoon.htm(39mm Festoon Bulbs) - 2
Load resistors
Splice crimper's
Some BEER and a pack o smokes lol
These steps are to be followed after completing either one of the following, Either Purchasing the Load resistors from Radio shack OR just buy it from That same link as the bulbs. In This Link they come READY to go and I would highly recommend you go that rout, that way its safe and well made.

OR you can go the rout Yacht and Me have gone and do it your self for a cheaper price. Your call.
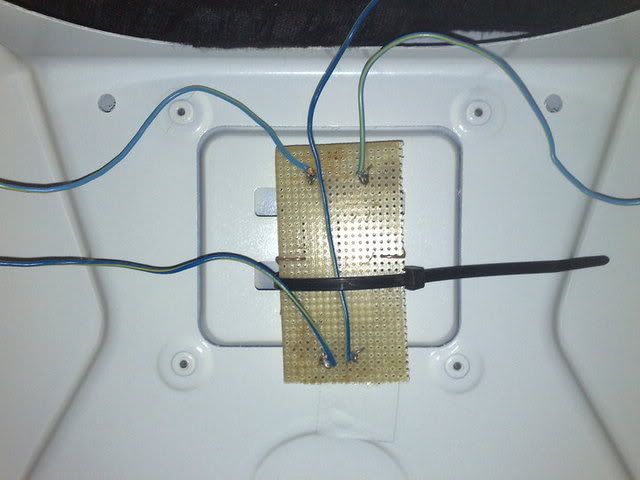
For those who choose to do it Your self, This is what you'll need the soldering iron for. Solder Both resistors on a small board, Nothing Crazy. You can use Epoxy as Yacht Master has done in the picture below to heat shield it, but I did not feel it necessary to do so.(Thanks to Yacht Master for the following 2 pictures)
Have the 2 resistors mounted on some form of Grid or Soldering board.

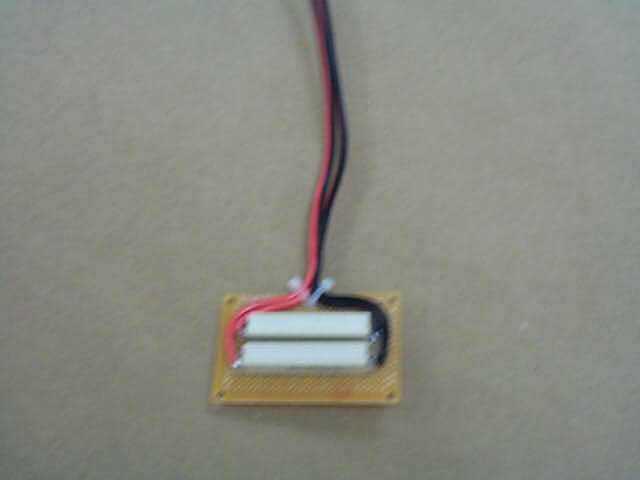
Make sure their is enough wire hanging of each resistor to reach what you need.
Thats the ONLY prep work you will need to do before the Install. Now the nitty Gritty.
Step One - Unscrew The following Screws And pull off this plastic Plate
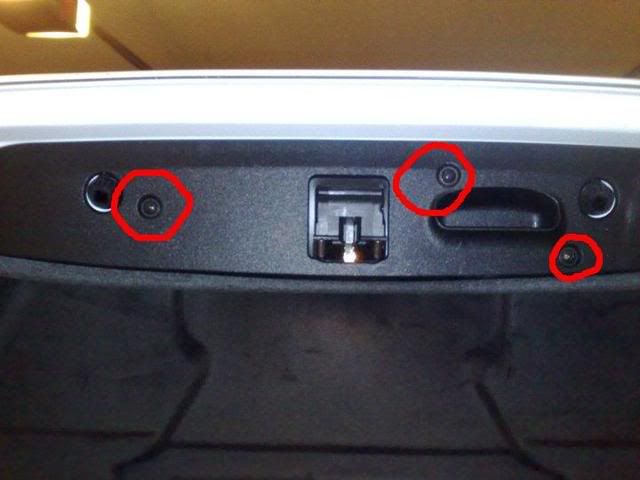
Once Removed, you will need to Pop off the Trunk cover. It is held on by little Plastic tabs, THAT WILL BREAK, so be careful. Their is one difficult one down on the bottom left where the Power is run, Pop the plastic cap off first and then the rest.
Step Two - Un-Clip the following two clips for the Light and Trunk release button. You will need to open the clip attached for the light and pull hard to get it off.
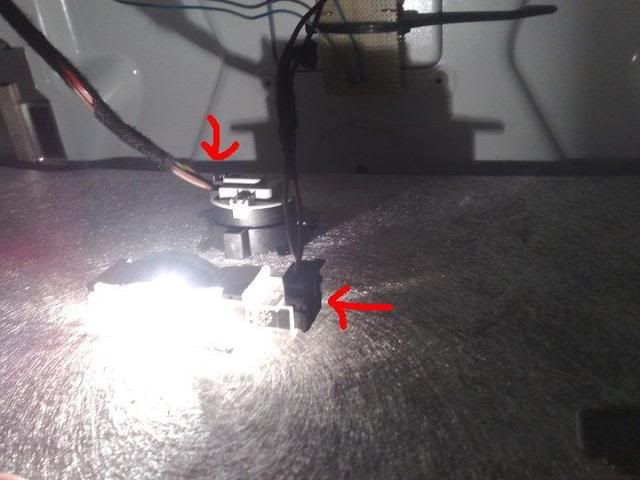
Once done, let it drop down and you now have a Bare trunk lid.
Step Three - Un-clip the following two clips for the License plate light. It will take Basic motor skills to figure out which ones are the correct clips, so good luck lol.
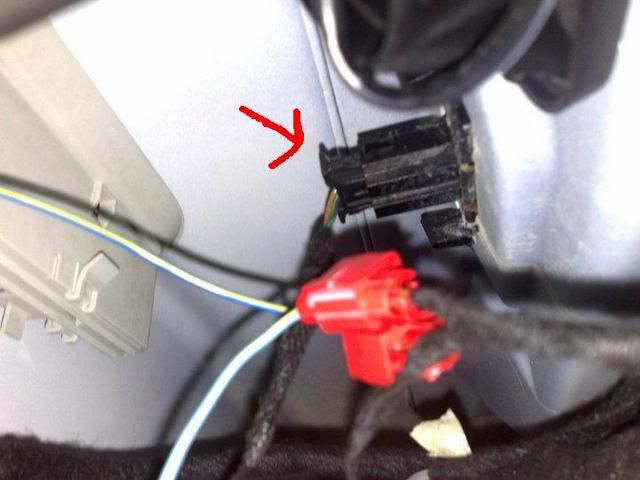
Step Four - While Unclipped, strip back the protective wrap for the License plate wires and splice one end of the resistor to the Ground wire, and do the same for the Power wire. It wont matter which end of the resistor goes where. Just make sure each Bulb gets its Own resistor.
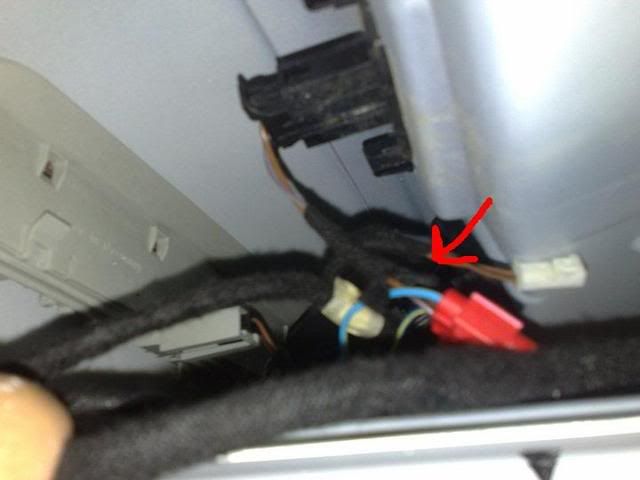
Step Five - Mount the resistors some where secure, and away from danger. i chose a small plate on the top of the lid, and mounted it with Sip ties. you can choose anywhere you see fit, just make sure their out of harms way.
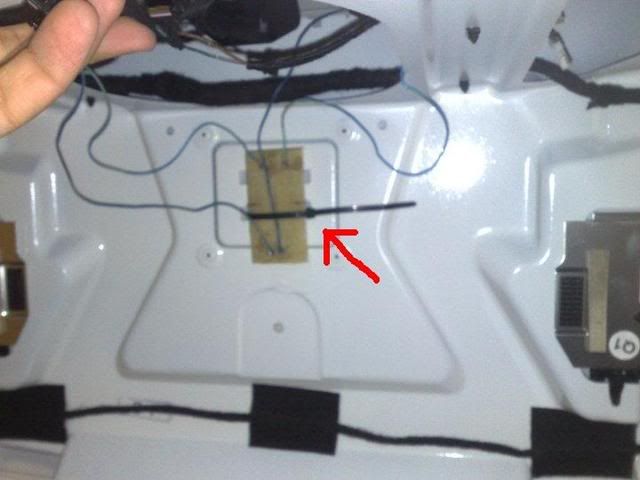
Step Six - Re-attach the clips for the Bulbs, and then begin re-attaching the Trunk Release/Light clips and mounting the Lid Liner back on. Be careful with those clips, I broke one already. Then gently clip on the cover from Step One and screw it back on. Now you will need to do one last step.
Put these in.
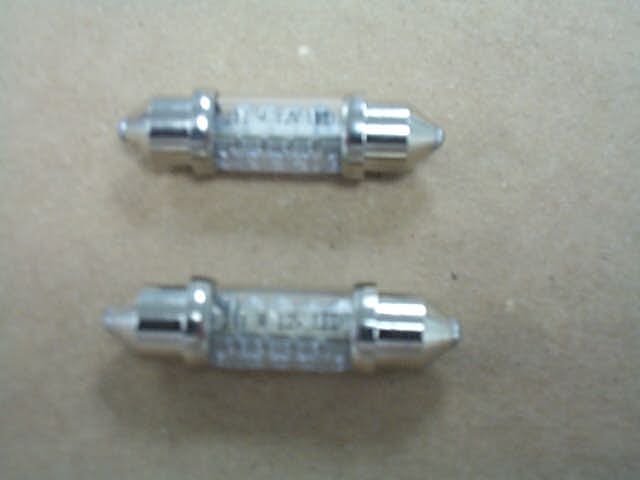
I will warn you, they are slightly bigger then the stock ones. And if your Stock Lenses are Burnt like mine are, you will need new covers(22 bucks from dealership, whole housing and a PAINT IN THE ARS to install).
now, ENJOY!!!!!!!!!11
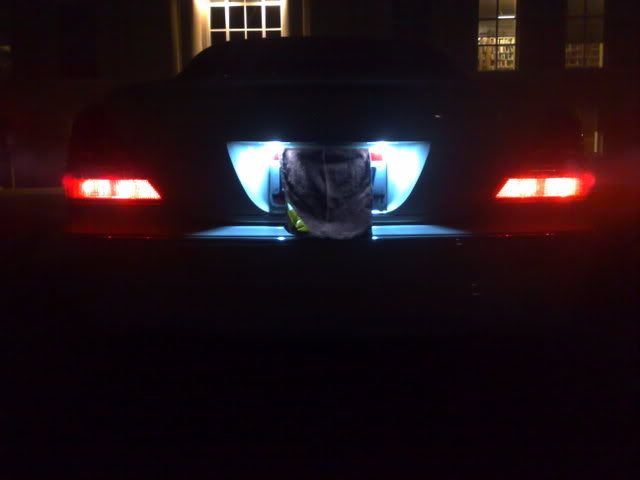

Its got like, A BRIGHT LINE on the ground looool
ALi
Tools needed:
Phillips screw driver
Crimper's
Small Flat head screw driver
Soldering Iron and Solder*
Supplies Needed:
LED Bulbs from http://spectrumled.com/festoon.htm(39mm Festoon Bulbs) - 2
Load resistors
Splice crimper's
Some BEER and a pack o smokes lol
These steps are to be followed after completing either one of the following, Either Purchasing the Load resistors from Radio shack OR just buy it from That same link as the bulbs. In This Link they come READY to go and I would highly recommend you go that rout, that way its safe and well made.
OR you can go the rout Yacht and Me have gone and do it your self for a cheaper price. Your call.
For those who choose to do it Your self, This is what you'll need the soldering iron for. Solder Both resistors on a small board, Nothing Crazy. You can use Epoxy as Yacht Master has done in the picture below to heat shield it, but I did not feel it necessary to do so.(Thanks to Yacht Master for the following 2 pictures)
Have the 2 resistors mounted on some form of Grid or Soldering board.
Make sure their is enough wire hanging of each resistor to reach what you need.
Thats the ONLY prep work you will need to do before the Install. Now the nitty Gritty.
Step One - Unscrew The following Screws And pull off this plastic Plate
Once Removed, you will need to Pop off the Trunk cover. It is held on by little Plastic tabs, THAT WILL BREAK, so be careful. Their is one difficult one down on the bottom left where the Power is run, Pop the plastic cap off first and then the rest.
Step Two - Un-Clip the following two clips for the Light and Trunk release button. You will need to open the clip attached for the light and pull hard to get it off.
Once done, let it drop down and you now have a Bare trunk lid.
Step Three - Un-clip the following two clips for the License plate light. It will take Basic motor skills to figure out which ones are the correct clips, so good luck lol.
Step Four - While Unclipped, strip back the protective wrap for the License plate wires and splice one end of the resistor to the Ground wire, and do the same for the Power wire. It wont matter which end of the resistor goes where. Just make sure each Bulb gets its Own resistor.
Step Five - Mount the resistors some where secure, and away from danger. i chose a small plate on the top of the lid, and mounted it with Sip ties. you can choose anywhere you see fit, just make sure their out of harms way.
Step Six - Re-attach the clips for the Bulbs, and then begin re-attaching the Trunk Release/Light clips and mounting the Lid Liner back on. Be careful with those clips, I broke one already. Then gently clip on the cover from Step One and screw it back on. Now you will need to do one last step.
Put these in.
I will warn you, they are slightly bigger then the stock ones. And if your Stock Lenses are Burnt like mine are, you will need new covers(22 bucks from dealership, whole housing and a PAINT IN THE ARS to install).
now, ENJOY!!!!!!!!!11
Its got like, A BRIGHT LINE on the ground looool
ALi


 02-20-2008, 08:01 PM
#3
MBWorld Fanatic!
Thread Starter
Join Date: Aug 2007
Location: Cleveland, Ohio
Posts: 1,311
Likes: 0
Received 0 Likes
on
0 Posts
2003 Cl 500
Thanks B - RennTECH exhaust, but the Tips are KILLING me lol, in the market for a new set.
YOU reeeeealy need to do this mod, for ANY CAR, i find my self hitting the unlock button just so the auto lights come one. LOVE looking at it lol.
ALi
YOU reeeeealy need to do this mod, for ANY CAR, i find my self hitting the unlock button just so the auto lights come one. LOVE looking at it lol.
ALi
 02-21-2008, 09:01 AM
#6
Super Member
 02-21-2008, 09:38 AM
#7
MBWorld Fanatic!
Thread Starter
Join Date: Aug 2007
Location: Cleveland, Ohio
Posts: 1,311
Likes: 0
Received 0 Likes
on
0 Posts
2003 Cl 500
LOL the AMG is only their until i get my new Decals, Thought it would be slick to change the MG to Li, creating \\\ALi!!!!!!!!!!!!!!!! FTMFW
And that V8Kompressor was their before i bought it and is no longer their, Just dont have any good side shots other then that.
SO BACK OFF
ALi
And that V8Kompressor was their before i bought it and is no longer their, Just dont have any good side shots other then that.
SO BACK OFF
ALi
Trending Topics
 02-28-2008, 02:37 AM
#9
Member

Join Date: Dec 2002
Location: Bay Area, CA
Posts: 89
Likes: 0
Received 0 Likes
on
0 Posts
'03 CL600
Great write-up...
I purchased the LED bulbs for the license plate light few days ago without knowing there's a write-up here.. and just installed it to my car. Damn it tripped. bulb blinks once in awhile
Now I just realized that I need the load resistor. Checked the website, do you know which watt or ohm I need to buy? There are 4 choices in the web. Also, do I need one for each bulb?
Last edited by Z3RO; 02-28-2008 at 02:40 AM.
02-28-2008, 02:01 PM
#10
MBWorld Fanatic!
Thread Starter
Join Date: Aug 2007
Location: Cleveland, Ohio
Posts: 1,311
Likes: 0
Received 0 Likes
on
0 Posts
2003 Cl 500
Great write-up...
I purchased the LED bulbs for the license plate light few days ago without knowing there's a write-up here.. and just installed it to my car. Damn it tripped. bulb blinks once in awhile
Now I just realized that I need the load resistor. Checked the website, do you know which watt or ohm I need to buy? There are 4 choices in the web. Also, do I need one for each bulb?
I purchased the LED bulbs for the license plate light few days ago without knowing there's a write-up here.. and just installed it to my car. Damn it tripped. bulb blinks once in awhile
Now I just realized that I need the load resistor. Checked the website, do you know which watt or ohm I need to buy? There are 4 choices in the web. Also, do I need one for each bulb?
100ohm 10w resisters. one resistor for each bulb. You can save the money and do it your self or if you prefer doing it the easy and clean way, buy it online.
I'd say just buy it online, looks like they dropped the price. http://spectrumled.com/equalizers.htm
How do the Lense covers look on your car?
ALi
03-04-2008, 12:35 AM
#11
Newbie

Join Date: Feb 2008
Posts: 4
Likes: 0
Received 0 Likes
on
0 Posts
CL 500
100ohm 10w resisters. one resistor for each bulb. You can save the money and do it your self or if you prefer doing it the easy and clean way, buy it online.
I'd say just buy it online, looks like they dropped the price. http://spectrumled.com/equalizers.htm
How do the Lense covers look on your car?
ALi
I'd say just buy it online, looks like they dropped the price. http://spectrumled.com/equalizers.htm
How do the Lense covers look on your car?
ALi
Thanks for the tutorial - looks great!
Now they only offer 100Ohm / 5Watt - do you think that's allright, too?
How many LEDs did you put on each side?
Cheers
03-04-2008, 01:04 AM
#12
MBWorld Fanatic!
Thread Starter
Join Date: Aug 2007
Location: Cleveland, Ohio
Posts: 1,311
Likes: 0
Received 0 Likes
on
0 Posts
2003 Cl 500
Enjoy.
ALi
03-10-2008, 11:21 PM
#13
Member
Join Date: Dec 2002
Location: Bay Area, CA
Posts: 89
Likes: 0
Received 0 Likes
on
0 Posts
'03 CL600
100ohm 10w resisters. one resistor for each bulb. You can save the money and do it your self or if you prefer doing it the easy and clean way, buy it online.
I'd say just buy it online, looks like they dropped the price. http://spectrumled.com/equalizers.htm
How do the Lense covers look on your car?
ALi
I'd say just buy it online, looks like they dropped the price. http://spectrumled.com/equalizers.htm
How do the Lense covers look on your car?
ALi
the lens cover? I don't even want to describe it... nasty as hell. actually glad that I have to switched the bulb. had to brushed the lens real hard...


