
Replacing Radiator Fan and Radiator Fan Control Module on CL500 W215


Thread Starter
Newbie
Joined: Jul 2012
Posts: 4
Likes: 1
From: UK and Belgium
2000 CL 500 W215
Replacing Radiator Fan and Radiator Fan Control Module on CL500 W215
I've been taking lots of invaluable tips from MBWorld for years, and feel guilty about never contributing anything back. So here it is - a writeup, with pictures, on how to change a radiator fan and a radiator fan control module on a 2000 CL500 W215. It's the same engine as the S500, and apparently the radiator fan fits about 300 different variants of Merc, so I hope at least a few peope find this useful!
As a bonus, this method does not require the coolant to be drained.
I would describe my mechanical ability as 'amateur' but was able to do this all myself with basic hand tools, and saved myself easily �500 through doing so.
***BACKGROUND ON THE PROBLEM***
I recently moved from the country to the city, and the fan and cooling system are getting their first hard workout in years. After just a few days of crawling around in city traffic, I heard a weird grinding noise. I could feel vibrations coming up through the accelerator pedal. I left the engine running, popped the hood, and felt around. I could feel vibrations coming from the radiator shroud. My trusted indie Merc garage (Star Motors, Reading, UK) had warned me that the fan was unusually noisy last year, so I reasoned that it was grinding its last.
On the way home, I got an error message appeared on the display "COOLANT SYSTEM - VISIT WORKSHOP" or something similar. Seemed like the Merc electrical system had detected a problem with the fan. As long as the car was moving at 20 - 30 mph it could keep cool, which I took to be a good sign: the water pump and circulation were still working, just not the rush of air needed through the radiator. I popped the hood and sure enough, the radiator fan had stopped spinning.
I didn't know for sure if it was the radiator fan or the control module, but given that I could hear and feel grinding, that didn't sound like an electrical problem to me - it was highly likely to be mechanical. I tried to turn the radiator fan by hand and it had a lot of resistance - far more than the new fan when it arrived, which further confirmed to me that it was the fan motor at fault.
I ordered a new radiator fan, OE part no. A2205000093, for about �315 ($400.) The part is sold as a complete fan, shroud, pulley and motor, a.k.a the "Radiator Fan Assembley", though strictly speaking only the motor needed replacing. There are people online who have managed to source just the motor, but I reasoned that the pulley would probably need replacing one day too, so I might as well replace the whole lot now.
***REPLACING THE RADIATOR FAN***
rs11
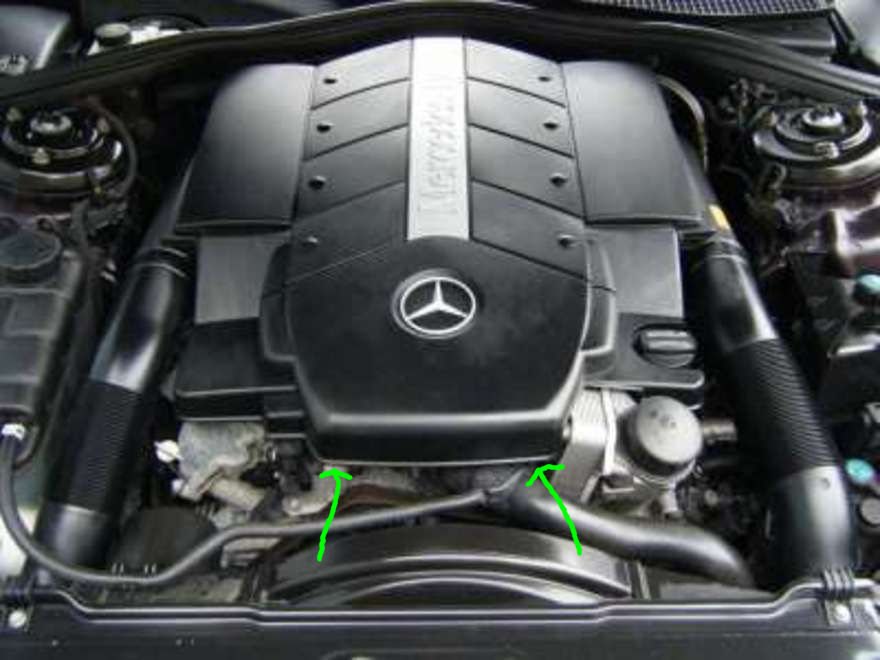
1) Remove the front engine cover. Slide your fingers under where the arrows on the picture above indicate, then pull it towards you whilst angling it slightly upwards. There are four slots that hold it in place. Keep wiggling and it will come.
rs10

2) Take off both 'snorkels' that direct air from the grille to the air filters. They're just big, hollow, flexible plastic tubes. No tools are needed, just massage them a bit and work them off.
rs4
3) Your water hoses will probably be clipped or cable-tied onto the top of the radiator fan shroud - see the red arrow above. Cut any cable ties that are holding water hoses. You will need replacement cable ties when refitting.
4) The radiator fan assembley is held in place by two bolts at the top. At the bottom, it has two tangs that slide into grooves, and just lifts right out. Remove the two top bolts. One is indicated by the green arrow above.
rs8 and rs9


5) You will have to disconnect either the transmission fluid line on the right hand side of the car, as indicated by the green arrow in the first pic, or the coolant hose on the left hand side of the car, as indicated by the green arrow in the second pic. My coolant hose was slightly weird in that it didn't have a screw to loosen it off - it seemed to be permanently sealed in place by a solid metal band. So I went for the transmission fluid line. Getting to the bolt holding the transmission fluid line is a major pain, as there is virtually no room down there to rotate a wrench. I improvised a technique - see following pic.
rs5

6) My technique for disconnecting the transmission fluid line. Pull the radiator fan assembley out of its groove at the bottom by a few inches, wiggle it around the various lines and cables, and rest it on the sturdiest part of the lower coolant line - the part where it connects to the radiator itself. Angle it backward as far as it will go, and wedge it in place with something. Now, work a wrench between the fan and radiator, and you should be able to loosen the nut. A very small amount of transmission fluid will leak out - don't worry about it.
rs2

7) Disconnect the power plug. I found this plug to be very difficult to unclip by hand, so ended up sliding a small screwdriver into the clip to unlatch it.
rs3

8) There are two prongs on the plug. If you forget which way round it goes, the prongs are labelled 1 and 2 on both the plug and lead - look closely at the pic above. Merc really threw us a bone here.
rs6 and rs7

9) It may not be the same on your engine, but on mine, there was one more bolt holding a transmission fluid line in place at the bottom of the radiator fan shroud. On the first pic above, the third arrow from the left indicates where this bolt is (radiator fan assembley has been removed at this point.) The other arrows are, from left to right, the transmssion fluid line, power cable, and coolant hose.
On the second pic above, the arrow indicates the hole that the bolt screws into on the fan shroud. Getting to this bolt is tough, but you can do it. Try lifting the fan a little or angling it back or forward.
10) That should be the last of the parts holding the fan assembley in place. You should be able to lift it out now. The tricky bit is the two tangs that rest in the notches at the bottom of the assembley - they stick out about an inch, and will need to be carefully angled around the coolant hoses. I did it by a combination of lifting and rotating the assembley a full 90 degrees clockwise.
11) Fitting the new fan assembley is simply the reverse of removing the old one. I was not able to reconnect the bolt holding the transmission line in step 9, but seeing as the line seemed to hold itself in place just fine, I let this slide.
Now, it's time to test your new fan. Examine the fan carefully one last time, making sure nothing is protruding into the blades. Start the car, and turn on the AC. This will make the radiator fan come on instantly - no need to wait until the car gets up to temperature. If it spins, congratulations - job done.
However, for me, it required one more step: replacing the radiator fan control module. When I started the new fan for the first time, I was alarmed to see smoke coming from somewhere near the fan. I stopped the car instantly - so quickly, I never even had time to check if the fan was spinning or not!
Starting the car again, I noticed that the radiator fan was not spinning. Every time that the radiator fan needed to come on, the warning message "COOLANT SYSTEM - VISIT WORKSHOP" would come up on the dash. My suspicions turned to the radiator fan control module. I theorised that when the old fan had ground to a halt, a power surge had damaged the control module. (It's possible that it was the fan control module that was at fault the whole time, frying the old fan as well.)
At this point, I didn't know if the control module had just fried my new fan - �315 up in smoke, literally. I couldn't be sure if the smoke had come from the module or the fan. So, I decided to test the new fan.
*** TESTING THE RADIATOR FAN ***
Here is my method, with pics, on how to test that your radiator fan is working.
If you put 12 volts into the fan, it should spin up. I had a portable jump starter that can do the trick. A trickle charger might work as well, if you have one. I guess if you're desperate, you could use your car's battery.

I read online that all you have to do is clamp both red and black connectors of the jump starter onto a screwdriver each, and then touch the screwdrivers onto one prong each of the radiator fan. The prongs are indicated by red arrows on the pic above - sorry I couldn't get the prongs themselves into the shot. However, when I tried this, I just got big sparks jumping from prong to prong and no electricity going through the fan motor itself. So I reasoned that I would have to reconnect the plug, and put some power into the wires themselves. I rigged up the below device:
rs13

As you can see, I clamped the terminals of the jump starter onto a pair of small screwdrivers. Difficult, huh?

I plugged the fan power cable back into the socket, then cut some of the black electrical tape away to give me better access to the red and blue power cables. I made a small incision in the red plastic sheath, then pushed one screwdriver into the wire cable beneath. (I actually ended up pushing the screwdriver all the way through the cable, for a better connection.) I then did the same to the blue wire, at a position a few inches back along the wire, to avoid sparks jumping from screwdriver to screwdriver. Use the picture above as a guide. I pushed the red connector in pretty much where the top green arrow is, and the black connector into the blue wire a few inches down the cable of where the second green arrow is.
I then turned on the jump starter. The fan instantly started spinning. I was delighted, as this proved that the control module hadn't just fried my new fan. The smoke I saw must have been coming from the control module.
(As an odd footnote, even when I turned off and removed the jump starter, the fan kept spinning. I guess the control module was so damaged at this point that it couldn't turn power on or off reliably. I ended up having to disconnect the fan power cable to stop it spinning.)
This proved to me beyond a doubt that the fan control module needed replacing. So it's on to part 3: replacing a fan control module.
*** REPLACING THE FAN CONTROL MODULE ***
I ordered a second-hand fan control module, EAN number 4040074437674, Merc part number 0275456432. This thing has half a dozen different names, so go by the part numbers.
Oddly, when the part came, it came with a cut-off connector still in place. This gave me an opporunity for a good pic of it, see below.
rs15
To get to the module, you have to come up from under the car. If you have ramps, then great. Personally I don't, so I raised the ABC to its highest setting, then secured it further by putting the jack in place. I then crawled under the car.
Just below the right hand side (driver's side to UK, passenger side to the rest of the world) fog light, there is a small access panel. Untwist the two black latches with a coin. You should have an aperture to work through about the size of an A4 piece of paper. It's tricky to work through, but I did it and so can you. If for some reason you can't get to the module at all, you could always remove the entire lower engine cover.
The fan control module is located slightly above the horn. The first time you see it, you'll think "No way can I get a socket wrench in there," but persevere and you will get a feel for it. I did it in the end by using a 3" extension bar.
Luckily for me, only the left hand side bolt, indicated by the green arrow in the pic above, was done up. The right hand side has a bolt hole, but was just sitting in the groove. A bit of wiggling, and the module came out.
You will then have to disconnect the plug. As you can see in the pic above, you will need to press the two clips down and it should just pull right off. As clips go, this wasn't the most difficult one, especially not compared to the radiator fan power plug.
Fitting the new one is the reverse of removing the old one. Make sure you seal the access panel up well, as this is the only thing that stops water splashing into your electrics from underneath.
Now, for a test. As mentioned above, all you need to do is start the car and turn on the A/C. Your radiator fan should start spinning. If you still get the "COOLANT SYSTEM - VISIT WORKSHOP" at the moment you turn on the A/C, something else has gone wrong. Try replacing the fan control relays.
As a bonus, this method does not require the coolant to be drained.
I would describe my mechanical ability as 'amateur' but was able to do this all myself with basic hand tools, and saved myself easily �500 through doing so.
***BACKGROUND ON THE PROBLEM***
I recently moved from the country to the city, and the fan and cooling system are getting their first hard workout in years. After just a few days of crawling around in city traffic, I heard a weird grinding noise. I could feel vibrations coming up through the accelerator pedal. I left the engine running, popped the hood, and felt around. I could feel vibrations coming from the radiator shroud. My trusted indie Merc garage (Star Motors, Reading, UK) had warned me that the fan was unusually noisy last year, so I reasoned that it was grinding its last.
On the way home, I got an error message appeared on the display "COOLANT SYSTEM - VISIT WORKSHOP" or something similar. Seemed like the Merc electrical system had detected a problem with the fan. As long as the car was moving at 20 - 30 mph it could keep cool, which I took to be a good sign: the water pump and circulation were still working, just not the rush of air needed through the radiator. I popped the hood and sure enough, the radiator fan had stopped spinning.
I didn't know for sure if it was the radiator fan or the control module, but given that I could hear and feel grinding, that didn't sound like an electrical problem to me - it was highly likely to be mechanical. I tried to turn the radiator fan by hand and it had a lot of resistance - far more than the new fan when it arrived, which further confirmed to me that it was the fan motor at fault.
I ordered a new radiator fan, OE part no. A2205000093, for about �315 ($400.) The part is sold as a complete fan, shroud, pulley and motor, a.k.a the "Radiator Fan Assembley", though strictly speaking only the motor needed replacing. There are people online who have managed to source just the motor, but I reasoned that the pulley would probably need replacing one day too, so I might as well replace the whole lot now.
***REPLACING THE RADIATOR FAN***
rs11
1) Remove the front engine cover. Slide your fingers under where the arrows on the picture above indicate, then pull it towards you whilst angling it slightly upwards. There are four slots that hold it in place. Keep wiggling and it will come.
rs10
2) Take off both 'snorkels' that direct air from the grille to the air filters. They're just big, hollow, flexible plastic tubes. No tools are needed, just massage them a bit and work them off.
rs4
3) Your water hoses will probably be clipped or cable-tied onto the top of the radiator fan shroud - see the red arrow above. Cut any cable ties that are holding water hoses. You will need replacement cable ties when refitting.
4) The radiator fan assembley is held in place by two bolts at the top. At the bottom, it has two tangs that slide into grooves, and just lifts right out. Remove the two top bolts. One is indicated by the green arrow above.
rs8 and rs9
5) You will have to disconnect either the transmission fluid line on the right hand side of the car, as indicated by the green arrow in the first pic, or the coolant hose on the left hand side of the car, as indicated by the green arrow in the second pic. My coolant hose was slightly weird in that it didn't have a screw to loosen it off - it seemed to be permanently sealed in place by a solid metal band. So I went for the transmission fluid line. Getting to the bolt holding the transmission fluid line is a major pain, as there is virtually no room down there to rotate a wrench. I improvised a technique - see following pic.
rs5
6) My technique for disconnecting the transmission fluid line. Pull the radiator fan assembley out of its groove at the bottom by a few inches, wiggle it around the various lines and cables, and rest it on the sturdiest part of the lower coolant line - the part where it connects to the radiator itself. Angle it backward as far as it will go, and wedge it in place with something. Now, work a wrench between the fan and radiator, and you should be able to loosen the nut. A very small amount of transmission fluid will leak out - don't worry about it.
rs2
7) Disconnect the power plug. I found this plug to be very difficult to unclip by hand, so ended up sliding a small screwdriver into the clip to unlatch it.
rs3
8) There are two prongs on the plug. If you forget which way round it goes, the prongs are labelled 1 and 2 on both the plug and lead - look closely at the pic above. Merc really threw us a bone here.
rs6 and rs7
9) It may not be the same on your engine, but on mine, there was one more bolt holding a transmission fluid line in place at the bottom of the radiator fan shroud. On the first pic above, the third arrow from the left indicates where this bolt is (radiator fan assembley has been removed at this point.) The other arrows are, from left to right, the transmssion fluid line, power cable, and coolant hose.
On the second pic above, the arrow indicates the hole that the bolt screws into on the fan shroud. Getting to this bolt is tough, but you can do it. Try lifting the fan a little or angling it back or forward.
10) That should be the last of the parts holding the fan assembley in place. You should be able to lift it out now. The tricky bit is the two tangs that rest in the notches at the bottom of the assembley - they stick out about an inch, and will need to be carefully angled around the coolant hoses. I did it by a combination of lifting and rotating the assembley a full 90 degrees clockwise.
11) Fitting the new fan assembley is simply the reverse of removing the old one. I was not able to reconnect the bolt holding the transmission line in step 9, but seeing as the line seemed to hold itself in place just fine, I let this slide.
Now, it's time to test your new fan. Examine the fan carefully one last time, making sure nothing is protruding into the blades. Start the car, and turn on the AC. This will make the radiator fan come on instantly - no need to wait until the car gets up to temperature. If it spins, congratulations - job done.
However, for me, it required one more step: replacing the radiator fan control module. When I started the new fan for the first time, I was alarmed to see smoke coming from somewhere near the fan. I stopped the car instantly - so quickly, I never even had time to check if the fan was spinning or not!
Starting the car again, I noticed that the radiator fan was not spinning. Every time that the radiator fan needed to come on, the warning message "COOLANT SYSTEM - VISIT WORKSHOP" would come up on the dash. My suspicions turned to the radiator fan control module. I theorised that when the old fan had ground to a halt, a power surge had damaged the control module. (It's possible that it was the fan control module that was at fault the whole time, frying the old fan as well.)
At this point, I didn't know if the control module had just fried my new fan - �315 up in smoke, literally. I couldn't be sure if the smoke had come from the module or the fan. So, I decided to test the new fan.
*** TESTING THE RADIATOR FAN ***
Here is my method, with pics, on how to test that your radiator fan is working.
If you put 12 volts into the fan, it should spin up. I had a portable jump starter that can do the trick. A trickle charger might work as well, if you have one. I guess if you're desperate, you could use your car's battery.
I read online that all you have to do is clamp both red and black connectors of the jump starter onto a screwdriver each, and then touch the screwdrivers onto one prong each of the radiator fan. The prongs are indicated by red arrows on the pic above - sorry I couldn't get the prongs themselves into the shot. However, when I tried this, I just got big sparks jumping from prong to prong and no electricity going through the fan motor itself. So I reasoned that I would have to reconnect the plug, and put some power into the wires themselves. I rigged up the below device:
rs13
As you can see, I clamped the terminals of the jump starter onto a pair of small screwdrivers. Difficult, huh?
I plugged the fan power cable back into the socket, then cut some of the black electrical tape away to give me better access to the red and blue power cables. I made a small incision in the red plastic sheath, then pushed one screwdriver into the wire cable beneath. (I actually ended up pushing the screwdriver all the way through the cable, for a better connection.) I then did the same to the blue wire, at a position a few inches back along the wire, to avoid sparks jumping from screwdriver to screwdriver. Use the picture above as a guide. I pushed the red connector in pretty much where the top green arrow is, and the black connector into the blue wire a few inches down the cable of where the second green arrow is.
I then turned on the jump starter. The fan instantly started spinning. I was delighted, as this proved that the control module hadn't just fried my new fan. The smoke I saw must have been coming from the control module.
(As an odd footnote, even when I turned off and removed the jump starter, the fan kept spinning. I guess the control module was so damaged at this point that it couldn't turn power on or off reliably. I ended up having to disconnect the fan power cable to stop it spinning.)
This proved to me beyond a doubt that the fan control module needed replacing. So it's on to part 3: replacing a fan control module.
*** REPLACING THE FAN CONTROL MODULE ***
I ordered a second-hand fan control module, EAN number 4040074437674, Merc part number 0275456432. This thing has half a dozen different names, so go by the part numbers.
Oddly, when the part came, it came with a cut-off connector still in place. This gave me an opporunity for a good pic of it, see below.
rs15
To get to the module, you have to come up from under the car. If you have ramps, then great. Personally I don't, so I raised the ABC to its highest setting, then secured it further by putting the jack in place. I then crawled under the car.
Just below the right hand side (driver's side to UK, passenger side to the rest of the world) fog light, there is a small access panel. Untwist the two black latches with a coin. You should have an aperture to work through about the size of an A4 piece of paper. It's tricky to work through, but I did it and so can you. If for some reason you can't get to the module at all, you could always remove the entire lower engine cover.
The fan control module is located slightly above the horn. The first time you see it, you'll think "No way can I get a socket wrench in there," but persevere and you will get a feel for it. I did it in the end by using a 3" extension bar.
Luckily for me, only the left hand side bolt, indicated by the green arrow in the pic above, was done up. The right hand side has a bolt hole, but was just sitting in the groove. A bit of wiggling, and the module came out.
You will then have to disconnect the plug. As you can see in the pic above, you will need to press the two clips down and it should just pull right off. As clips go, this wasn't the most difficult one, especially not compared to the radiator fan power plug.
Fitting the new one is the reverse of removing the old one. Make sure you seal the access panel up well, as this is the only thing that stops water splashing into your electrics from underneath.
Now, for a test. As mentioned above, all you need to do is start the car and turn on the A/C. Your radiator fan should start spinning. If you still get the "COOLANT SYSTEM - VISIT WORKSHOP" at the moment you turn on the A/C, something else has gone wrong. Try replacing the fan control relays.
Last edited by cerberaspeed12; Jul 28, 2012 at 06:38 PM. Reason: Inserted bigger pics


MBWorld Fanatic!


Joined: Jul 2012
Posts: 1,254
Likes: 171
2002 CL500 to CL55 conversion
hi im having similar issues to the OP now that i've completed my engine swap. i had the "smoke" coming from around the radiator and i thought it was because of my dry abc pump but it very well could have been the fan control module as my radiator fan does not function at all
tonight i am taking the fan out of the car so i can apply 12v and a ground to see if it will spin. if it spins then im assuming my fan is good and i need a new controller module. i've checked all the fuses i could to no avail(besides the fuse on the positive battery terminal that everyone talks about)
tonight i am taking the fan out of the car so i can apply 12v and a ground to see if it will spin. if it spins then im assuming my fan is good and i need a new controller module. i've checked all the fuses i could to no avail(besides the fuse on the positive battery terminal that everyone talks about)

Newbie
Joined: Apr 2013
Posts: 4
Likes: 0
cl 500
Dude it's a cl 500 YM 2000. It makes theprecise sound that TS described, only difference being that my fan is still spinning.up question is should I procure the entire assembly or will the fan motor suffice? And by the way regarding the practicals about replacing I understand is could easily be executed without ripping half the car apart like TS DESCRIBES. any xperince travis? Much obliges
Cheers
Cheers
Trending Topics
MBWorld Fanatic!
Joined: Jul 2012
Posts: 1,254
Likes: 171
2002 CL500 to CL55 conversion
Dude it's a cl 500 YM 2000. It makes theprecise sound that TS described, only difference being that my fan is still spinning.up question is should I procure the entire assembly or will the fan motor suffice? And by the way regarding the practicals about replacing I understand is could easily be executed without ripping half the car apart like TS DESCRIBES. any xperince travis? Much obliges
Cheers
Cheers
Newbie
Joined: Apr 2013
Posts: 4
Likes: 0
cl 500
let me ask you something,im starting to suspect that it is indeed the control module. at what temperature should the fan run? oddly enough my starts running almost 2-3 minuts after startup. the engine temperature is roughly around 40-50 c when it starts running. is it possible its a thermostat?
my question basically is at what point should the fan run? shouldnt it be activated when it reaches operating temp which is roughly 80 c?
my question basically is at what point should the fan run? shouldnt it be activated when it reaches operating temp which is roughly 80 c?
Newbie
Joined: Apr 2013
Posts: 4
Likes: 0
cl 500
Right. When the AC IS Off, AT WHAT POINT SHOULD THE FAN START RUNNING? My is RUNNING continously even at relatively low temperatures. As soon as it reaches 45-50 degrees the fan starts running... Is this normal? Cheers
Member
Joined: Feb 2013
Posts: 77
Likes: 2
From: Houston Texas
2002 CL 500

Newbie
Joined: May 2015
Posts: 1
Likes: 0
Mercedes Benz s430
I replaced a new electric fan but did a bypass because I was still waiting for module
I noticed my fAn went bad I replaced it and bought a aftermarket and when I installed it it didn't work so I figured I need a fan module while I was waiting to buy the fan module I did a Buy pAss so my faN could be on everything work good 2-3 weeks later I turn my air conditioner on then I noticed that my temperature gauge was overheating when the fan is on high what could be the problem now can it be something more than just a fan module now none of this happened to I turn the air conditioner On now my car temperature gauge is going up and started to overheat with fan On please help I need to know why it is overheating with my fan on I took it to the dealer and they won't give me no answers unless I put a Mercedes Benz Fan in in a Mercedes fan module before they tell me why the temperature is going up and it cost 2 grand please somebody out there help me out What should I do
Last edited by daddyt0772@gmai; May 21, 2015 at 03:19 AM.


