CL65 Carbon Fiber Rear Diffuser
 06-28-2011, 12:14 PM
#576
Senior Member
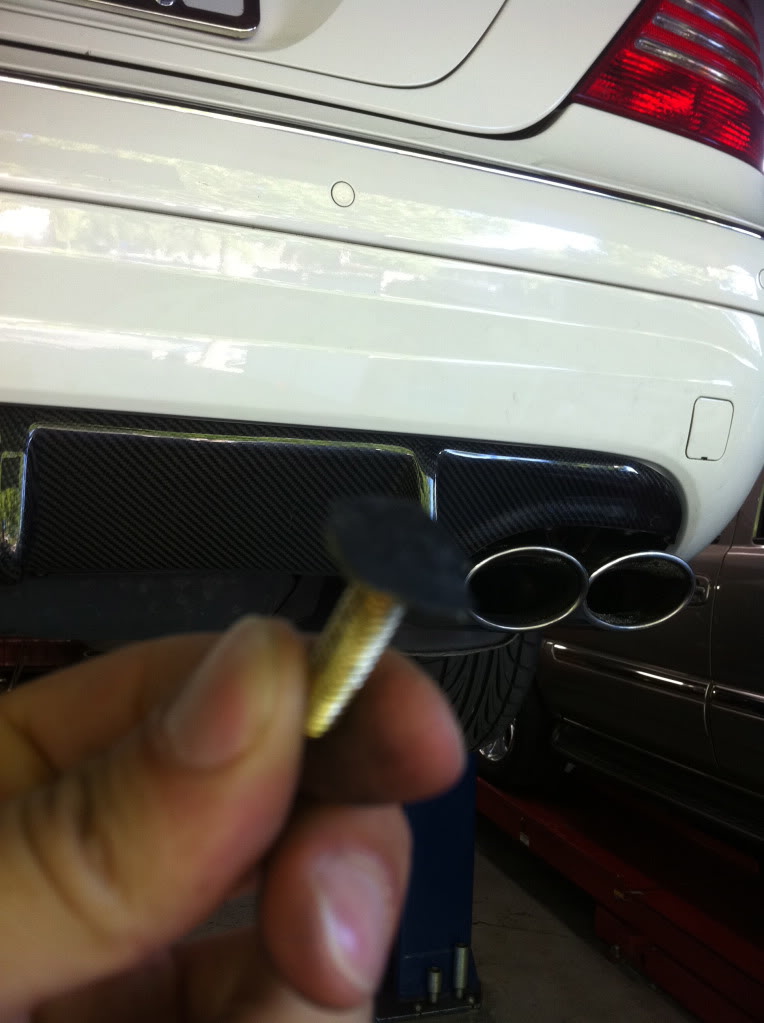
You mean like the ends are not getting flush with the bumper? tighten the nut on the back until it is snug to tight and does not want to turn anymore, just be very careful. If not, post up a pic of what you mean, and I will try to help. Or maybe others can, since i never got to actually install it. You may to to if anything, drill a hole at the bottom and put a screw up from the exhaust area to close the gap.
About the 3M tape, Napa, Advance Autoparts, Auto Zone and most auto part stores have the 3M tape. Make sure its 3M though.
About the 3M tape, Napa, Advance Autoparts, Auto Zone and most auto part stores have the 3M tape. Make sure its 3M though.
I'll check with those stores for that tape if I reapply the diffuser again.
So the gap I'm wondering is on the upper part of the diffuser, just need a current opinion as to how much gap to give it between it and the bumper.
Right now, it's so flush with the bumper, I think it's slightly rubbing in upper center border of the diffuser. With it locked down now, it's not moving at all. Would most people give it 2 to 5mm?

The following users liked this post:
Anan Wahidy (10-15-2019)
06-28-2011, 03:19 PM
#578
Senior Member
Thanks,
I'll check with those stores for that tape if I reapply the diffuser again.
So the gap I'm wondering is on the upper part of the diffuser, just need a current opinion as to how much gap to give it between it and the bumper.
Right now, it's so flush with the bumper, I think it's slightly rubbing in upper center border of the diffuser. With it locked down now, it's not moving at all. Would most people give it 2 to 5mm?
When you guys dropped the muffler bolt, wasn't it two bolts holding it up?
Any issues dropping it a bit? Do I need something below to brace the mufflers with the exhaust tip?
06-28-2011, 10:00 PM
#579
Member

Join Date: Dec 2009
Location: Smithville, Missouri
Posts: 130
Likes: 0
Received 0 Likes
on
0 Posts
2003 CL55
No, it will stay up just fine. In fact, you'll probably want to pull it down some to give you more room. My bolts broke off and I need to add the bolt and nut to each side under the exhaust tip.
 06-29-2011, 04:21 PM
#582
MBWorld Fanatic!

Join Date: Feb 2010
Location: Los Angeles
Posts: 1,477
Likes: 0
Received 5 Likes
on
5 Posts
04 CL55 (sold), 2012 CLS550 (sold), 2014 S550 (sold), 2015 ES300H (DAILY)
where are you drilling this hole under the exhaust tip? can you post some pictures?
the right side popped out, and I'm scared to rip the diffuser off because of the 3m tape.
any suggestions on how to fix this?
Last edited by danlnyc; 06-29-2011 at 07:36 PM.
06-29-2011, 04:54 PM
#583
Former Vendor of MBWorld
yesterday after the installation, one of the bolts broke off inside my drilled hole and the right side popped out...
where are you drilling this whole under the exhaust tip? can you post some pictures?
the right side popped out, and I'm scared to rip the diffuser off because of the 3m tape.
any suggestions on how to fix this?
where are you drilling this whole under the exhaust tip? can you post some pictures?
the right side popped out, and I'm scared to rip the diffuser off because of the 3m tape.
any suggestions on how to fix this?
 06-29-2011, 07:56 PM
#584
Senior Member
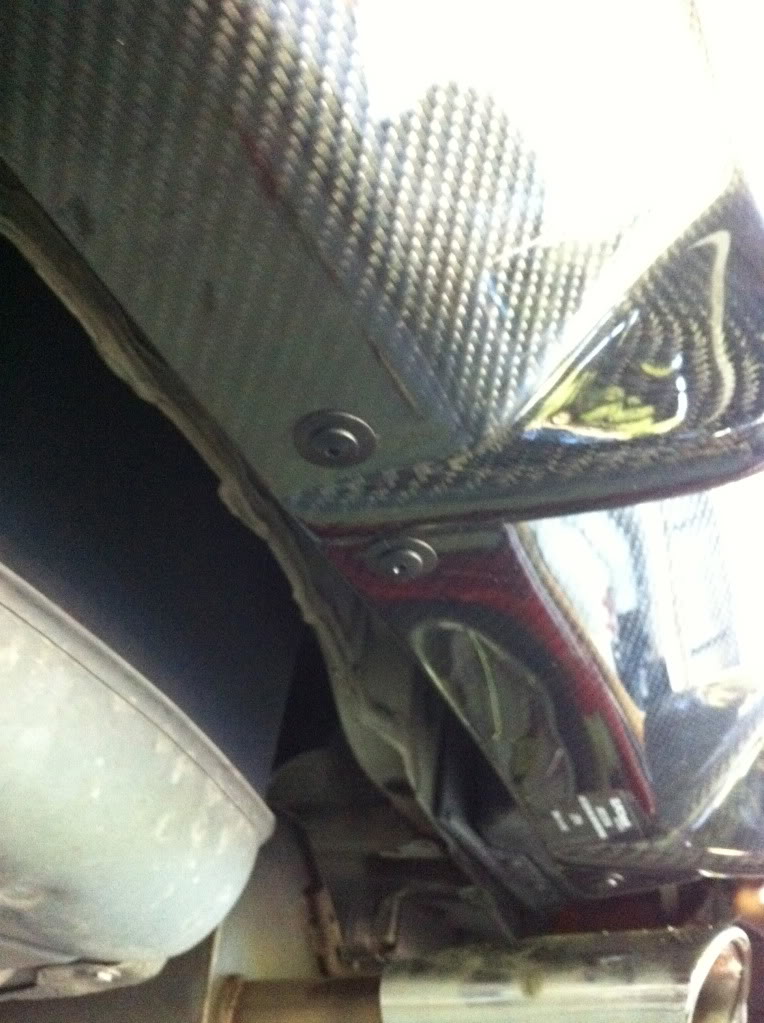
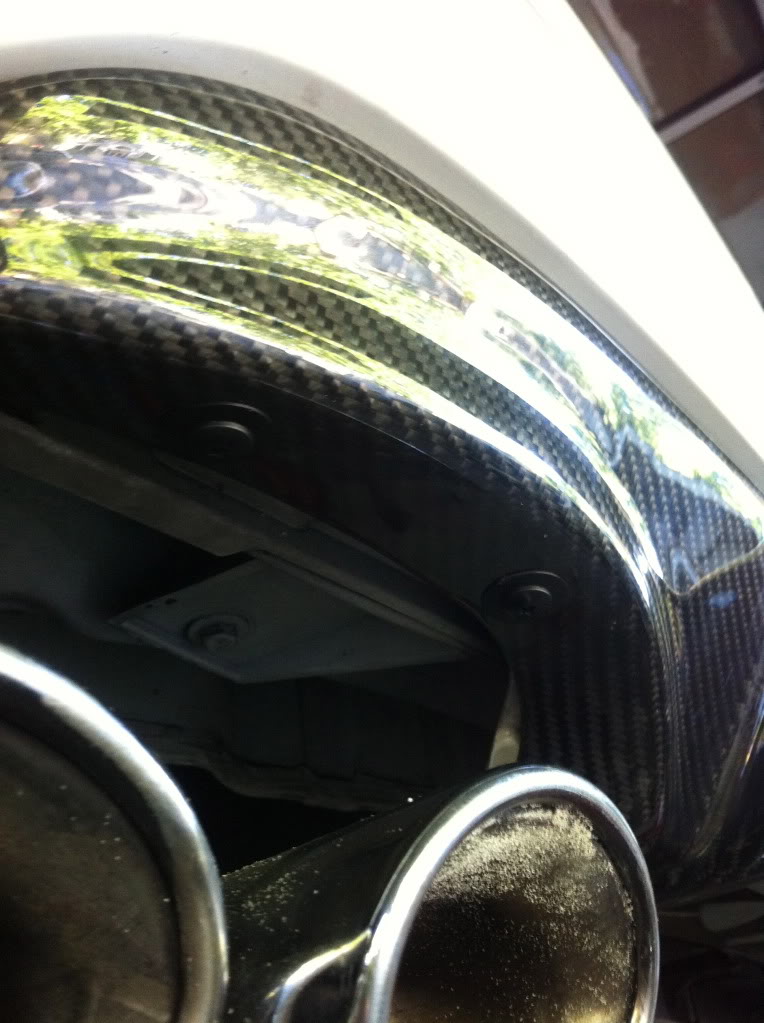
Yes, no need to take the diffuser off. Just put the screw, I would use 2. Right above the exhaust tips. Like Kens installer did. However, he only put 1 there. But I would use 2. Just press the diffuser flush, then drill the hole and put a self tapping screw in, or a nut and bolt. Droping the exhaust may be required to do this.
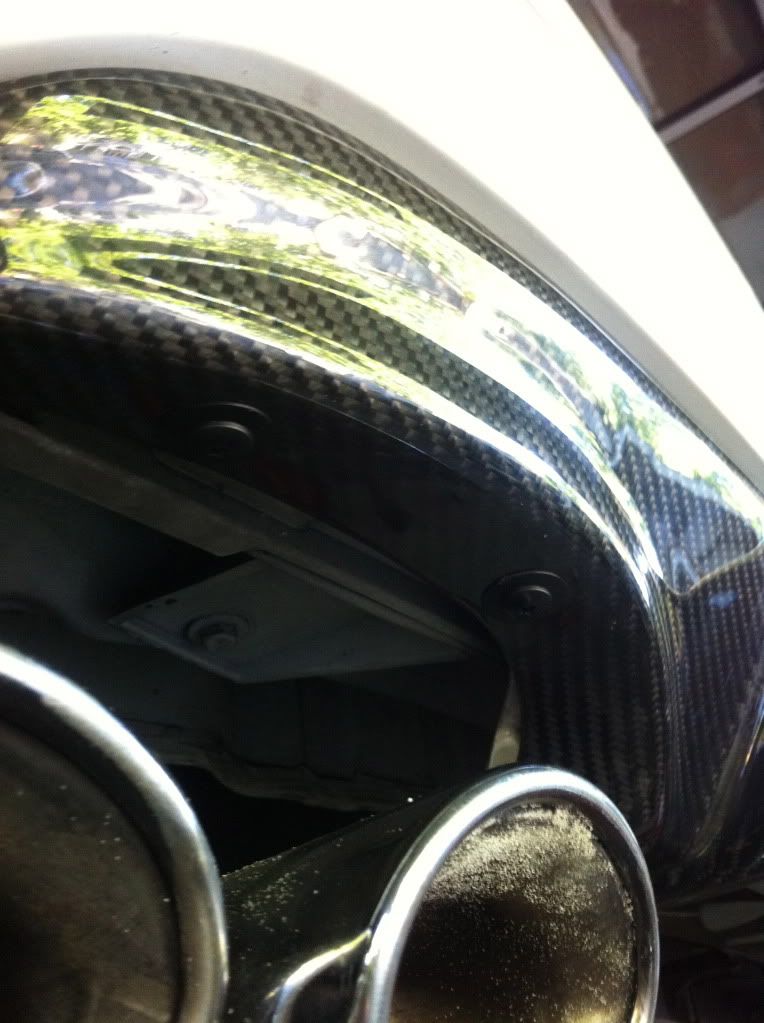
Looks either like a .5mm-1mm gap or flush on..
I might have stuck on mine too close.
Just in case, what I mean about the gap is look at the diffuser, the top border part from left, to middle, to right where it touches the bumper, so when you look at it from car height, it looks like a perfect fit.
06-30-2011, 02:28 AM
#585
Member

Join Date: Dec 2009
Location: Bay area
Posts: 189
Likes: 0
Received 0 Likes
on
0 Posts
CL55
That's also probably the best pic showing the gap between the diffuser and bumper, so far.
Looks either like a .5mm-1mm gap or flush on..
I might have stuck on mine too close.
Just in case, what I mean about the gap is look at the diffuser, the top border part from left, to middle, to right where it touches the bumper, so when you look at it from car height, it looks like a perfect fit.
Looks either like a .5mm-1mm gap or flush on..
I might have stuck on mine too close.
Just in case, what I mean about the gap is look at the diffuser, the top border part from left, to middle, to right where it touches the bumper, so when you look at it from car height, it looks like a perfect fit.

 06-30-2011, 12:28 PM
#590
Senior Member
That's also probably the best pic showing the gap between the diffuser and bumper, so far.
Looks either like a .5mm-1mm gap or flush on..
I might have stuck on mine too close.
Just in case, what I mean about the gap is look at the diffuser, the top border part from left, to middle, to right where it touches the bumper, so when you look at it from car height, it looks like a perfect fit.
Looks either like a .5mm-1mm gap or flush on..
I might have stuck on mine too close.
Just in case, what I mean about the gap is look at the diffuser, the top border part from left, to middle, to right where it touches the bumper, so when you look at it from car height, it looks like a perfect fit.
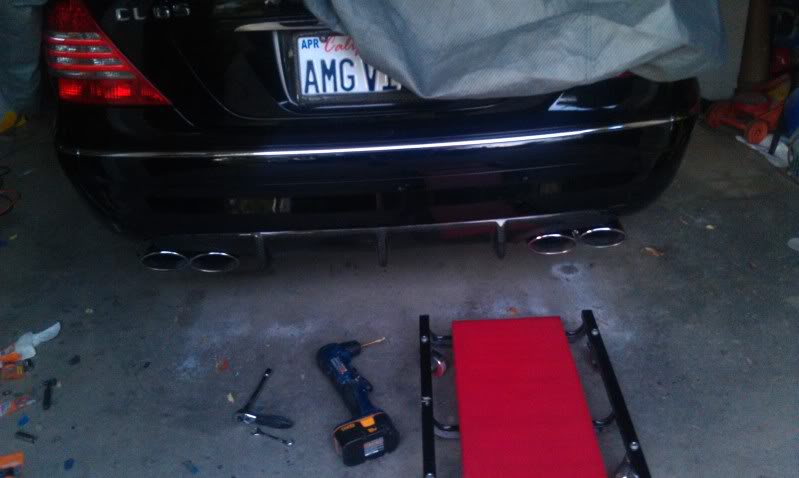
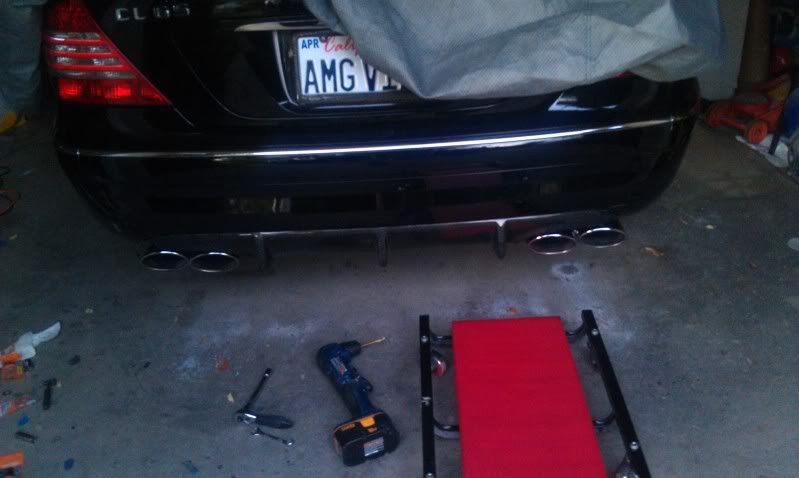
Nice job on the improvise for the extra bolts underneath! It looks very secured. Might do it myself. Any issues with drilling the extra holes underneath? What size bolt/nut you using?
Well, got mine done after work yesterday; I'm a 8-5er. I'll probably continue to mess with it till it's perfect.
Removing the two bolts on each side holding the muffler did help. You almost have to do it to be able to tighten the side bolts on the diffuser.
With it tighten as much as I dare fearing that it might pop off the diffuser, the left side still doesn't seem to want to stick flush..
It's 13mm for the muffler bolts, 2 on each side.
I can't seem to get any extension to work with the diffuser bolts though, the plastic frame thingy blocks my sockets/extensions.
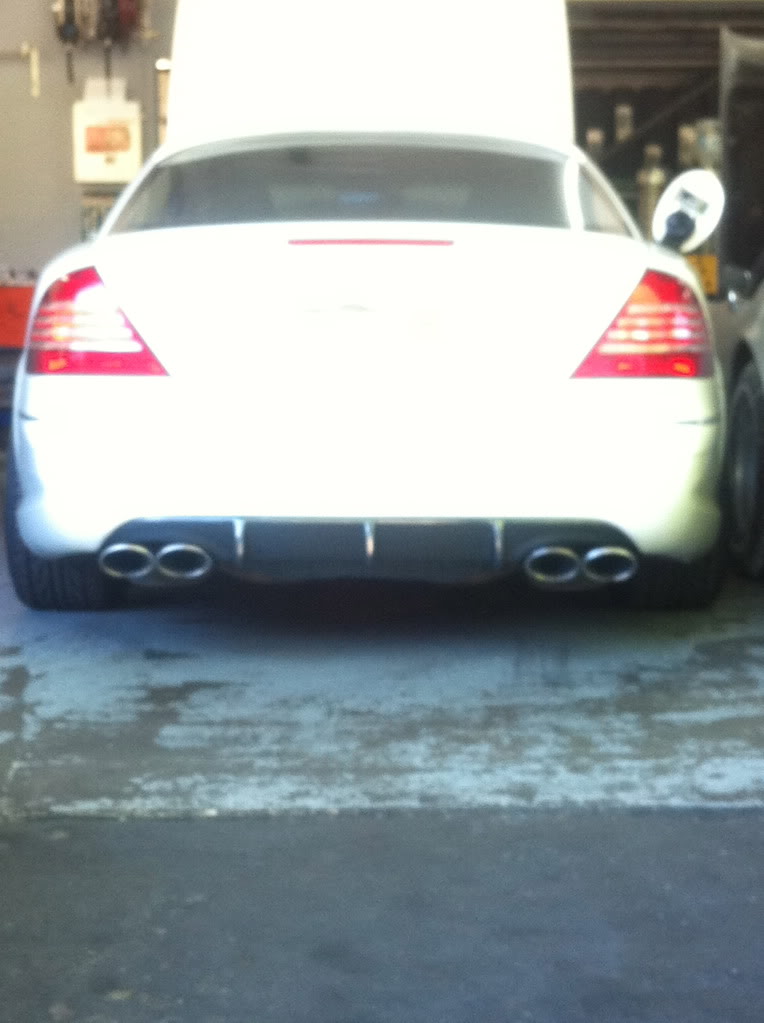
The diffuser really matches the Carbon Fiber license plate frame I picked off Ebay also. Can't wait for the CF spoiler next..
Here is a "just finished" pic for now:
Last edited by NRL; 06-30-2011 at 12:31 PM.
06-30-2011, 03:23 PM
#591
MBWorld Fanatic!
Join Date: Feb 2010
Location: Los Angeles
Posts: 1,477
Likes: 0
Received 5 Likes
on
5 Posts
04 CL55 (sold), 2012 CLS550 (sold), 2014 S550 (sold), 2015 ES300H (DAILY)
Nice job on the improvise for the extra bolts underneath! It looks very secured. Might do it myself. Any issues with drilling the extra holes underneath? What size bolt/nut you using?
Well, got mine done after work yesterday; I'm a 8-5er. I'll probably continue to mess with it till it's perfect.
Removing the two bolts on each side holding the muffler did help. You almost have to do it to be able to tighten the side bolts on the diffuser.
With it tighten as much as I dare fearing that it might pop off the diffuser, the left side still doesn't seem to want to stick flush..
It's 13mm for the muffler bolts, 2 on each side.
I can't seem to get any extension to work with the diffuser bolts though, the plastic frame thingy blocks my sockets/extensions.
The diffuser really matches the Carbon Fiber license plate frame I picked off Ebay also. Can't wait for the CF spoiler next..
Here is a "just finished" pic for now:

for me, the right side won't sit flush but the left side does.
I haven't been able to find the time to drop the exhaust and screw it in but I will by tomorrow.
 It looks factory.
 06-30-2011, 04:47 PM
#593
Former Vendor of MBWorld
For those who have a side not fitting flush, there is a possibility that is because the resin holding the screw on is either to big, and your hole is to small. What i would do is either make the hole larger, or just rip the bolt off completely and use the screw method over the tips.
06-30-2011, 05:15 PM
#594
MBWorld Fanatic!
Join Date: Feb 2010
Location: Los Angeles
Posts: 1,477
Likes: 0
Received 5 Likes
on
5 Posts
04 CL55 (sold), 2012 CLS550 (sold), 2014 S550 (sold), 2015 ES300H (DAILY)
for the hell of it, what # diffuser did you guys recieve?
I got #6...but I was hoping for #8 cause thats my favorite number LOL.
I got #6...but I was hoping for #8 cause thats my favorite number LOL.
 06-30-2011, 06:51 PM
#596
Super Member
Thread Starter
For those who have a side not fitting flush, there is a possibility that is because the resin holding the screw on is either to big, and your hole is to small. What i would do is either make the hole larger, or just rip the bolt off completely and use the screw method over the tips.
07-01-2011, 02:50 PM
#598
MBWorld Fanatic!
Join Date: Feb 2010
Location: Los Angeles
Posts: 1,477
Likes: 0
Received 5 Likes
on
5 Posts
04 CL55 (sold), 2012 CLS550 (sold), 2014 S550 (sold), 2015 ES300H (DAILY)
Can you post more pictures with the diffuser and CF license plate together? I bought a chrome frame from ebay a couple months back but I'm not really liking it. I was considering buying a CF one.
07-01-2011, 04:40 PM
#599
Former Vendor of MBWorld


