
not your usual tinting question...
 06-27-2004 | 07:09 PM
#1
Thread Starter
MBWorld Fanatic!
Joined: Apr 2002
Posts: 6,328
Likes: 1
From: NYC
CL500
not your usual tinting question...
i was curious as to how many of you when you got your car tinted, when they did the back windshield, did they leave a cutout for the brake light or did they tint in front of it. when i had my w202 they tinted in front of it no problem. but this time around (i got mine done on sat) the guy told me that with the w208 in order to tint in front of the brake light he would have to remove the rear inside deck with the sunshade and that would mean more time and more money. i asked the guy what the majority of w208 owners chose and he said that most opted for the cutout. thats the way i went and im not sure if i like it or not. im thinking i should have gone for extra money for no cut out.
so, what did you choose?
so, what did you choose?
06-28-2004 | 07:56 AM
#3

Banned
Joined: May 2004
Posts: 1,194
Likes: 1
From: Australia
Originally Posted by BklynBenz
i was curious as to how many of you when you got your car tinted, when they did the back windshield, did they leave a cutout for the brake light or did they tint in front of it. when i had my w202 they tinted in front of it no problem. but this time around (i got mine done on sat) the guy told me that with the w208 in order to tint in front of the brake light he would have to remove the rear inside deck with the sunshade and that would mean more time and more money. i asked the guy what the majority of w208 owners chose and he said that most opted for the cutout. thats the way i went and im not sure if i like it or not. im thinking i should have gone for extra money for no cut out.
so, what did you choose?
so, what did you choose?
06-28-2004 | 08:30 AM
#4
Thread Starter
MBWorld Fanatic!
Joined: Apr 2002
Posts: 6,328
Likes: 1
From: NYC
CL500
How much can he possibly charge for taking out two pieces of trim and lifting out the parcel shelf. Some people make things sound so damn hard its annoying.


Trending Topics
06-28-2004 | 03:04 PM
#8
MBWorld Fanatic!
Joined: Mar 2002
Posts: 2,781
Likes: 12
From: The Heights, CA
Tesla Model S
Originally Posted by BklynBenz
thats what i was thinking after i saw the cutout. i think im gonna have the tint removed and redone with no cutout.
06-28-2004 | 03:40 PM
#9

Out Of Control!!
Joined: Jun 2003
Posts: 14,362
Likes: 1
From: Staples Center
w211 & w124
When I took mine in they told me the exact same thing. Gave me this big speal about how hard it would be and all the work that was involved so I gave in and told him to just cut it out. Once they finished the shop owner saw it and told the guy who did the tint that it looked like **** and to take it off and redo it the "right" way.
Long story short, they redid it without the cutouts and didn't have to remove the rear decklid or anything. The owner of the shop did it himself and got back there with a thin putty knife looking tool and worked it into place.
Long story short, they redid it without the cutouts and didn't have to remove the rear decklid or anything. The owner of the shop did it himself and got back there with a thin putty knife looking tool and worked it into place.

 06-30-2004 | 01:08 PM
#13
MBWorld Fanatic!
Joined: Jul 2002
Posts: 5,289
Likes: 9
From: So Cal
W213 '17 E43 ///AMG - W211, W208 no more
I tinted mine with no cutout... and they didn't have to remove anything in order to do it.
If you do a search, I posted the way they did it on my car... perhaps, you can share the information to the installer after reading it...
If you do a search, I posted the way they did it on my car... perhaps, you can share the information to the installer after reading it...
06-30-2004 | 01:18 PM
#14
MBWorld Fanatic!
Joined: Jul 2002
Posts: 5,289
Likes: 9
From: So Cal
W213 '17 E43 ///AMG - W211, W208 no more
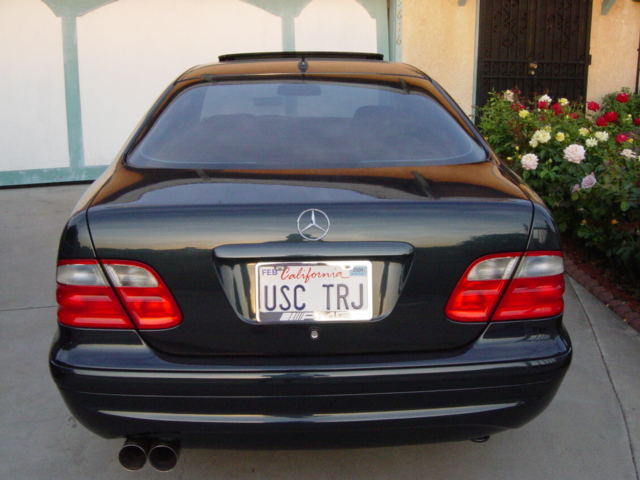
Here is a pic of my tint job from the back... the 2nd picture is of a modifiend tint band i put on the front windshield... helps hide the V1 from the public, and it creates a more balanced look

Here is the original thread about my tint experience:
https://mbworld.org/forums/clk-class-w208/46099-tinted-windows-before-n-after.html
Here is the original thread about my tint experience:
https://mbworld.org/forums/clk-class-w208/46099-tinted-windows-before-n-after.html
07-01-2004 | 08:40 AM
#15
Thread Starter
MBWorld Fanatic!
Joined: Apr 2002
Posts: 6,328
Likes: 1
From: NYC
CL500
hey mmgrad, i did a search for your old post and i found it. thanks for the info, i emailed my tinter and hes going to redo it.
i also read on your post the following:
those are very common... do you have them around ur back quarter windows, and on your rear window too? The rear window should be the most noticeable if the tint is dark....
they are like that because those black dots are raised, so when they attach the tint, there is a small air gap between the raise dot & the glass...
i know of 3 ways to get rid of those "air pockets"...
1.) sand down those black dots before tinting... then you'll have no air pockets since the surface will be flat. just don't mess up the glass. you can try scraping them off too, but don't know how hard it is.
2.) when the tint is freshly applied, use a high heat gun to heat the area where the black bumps are, and use a 3M squeegie covered in a towel and press firmly to remove the air pockets. the heat gun will remove the moisture and make the tint stick better. Best heat sources in order: Torch, Heat Gun, Hair Dryer
3.) Let the tint dry & cure, then, cut out the area where it bubbles. Next, get some thin vinyl like material, and affix that to the window. That will create a solid black bar. This looks better in the back windshield as it is less noticeable.
hope this helps???
i have 20% in the back and you have 13%, and i think the darker the tint the more noticeable those things are. which way did you go about to remove them?
thanks
07-01-2004 | 11:22 AM
#16
MBWorld Fanatic!
Joined: Jul 2002
Posts: 5,289
Likes: 9
From: So Cal
W213 '17 E43 ///AMG - W211, W208 no more
depending on the experience on your installer, and how often they work on high end cars, you can simply have them sand it down, but, you run the risk of scratching the glass if the installer is inexperienced.
I went with method #2:
2.) when the tint is freshly applied, use a high heat gun to heat the area where the black bumps are, and use a 3M squeegie covered in a towel and press firmly to remove the air pockets. the heat gun will remove the moisture and make the tint stick better. Best heat sources in order: Torch, Heat Gun, Hair Dryer
The torch would work best, but, you can't use that too long. I know its ok to use on the side windows, but the front windshield is a NO-NO! The back is ok, but not too long
Heat guns are great too... but, a hair dryer works, just takes a little longer.
It took me about 2 hrs to work all the windows & the rear, and i'd say, Ithe visibility of the 'bubbles' have been reduced about 80%... i'm happy with it.
07-01-2004 | 04:32 PM
#17
Thread Starter
MBWorld Fanatic!
Joined: Apr 2002
Posts: 6,328
Likes: 1
From: NYC
CL500
thanks mmgrad! i went out to my car and took some pics of the air bubbles and emailed them to my tinter. i told him it was unacceptable and i also told him that its bs what he was saying about having to remove the seats and rear deck lid in order to be able to tint the rear with no cutout. hes willing to make good, so we will have to see what happens. heres the pics i sent him:
07-02-2004 | 09:33 AM
#18
MBWorld Fanatic!
Joined: Jul 2002
Posts: 5,289
Likes: 9
From: So Cal
W213 '17 E43 ///AMG - W211, W208 no more
Originally Posted by BklynBenz
thanks mmgrad! i went out to my car and took some pics of the air bubbles and emailed them to my tinter. i told him it was unacceptable and i also told him that its bs what he was saying about having to remove the seats and rear deck lid in order to be able to tint the rear with no cutout. hes willing to make good, so we will have to see what happens. heres the pics i sent him:
those bubbles aren't too bad, I'll have to take a pic of my tint in the back so you can compare for yourself.
 07-04-2004 | 02:50 PM
#21
Thread Starter
MBWorld Fanatic!
Joined: Apr 2002
Posts: 6,328
Likes: 1
From: NYC
CL500
thanks for everybodys input. i think you can notice the bubbles more on a darker tint like 5% or 20% versus 35% or 50%. Petie i see you have 5% tint, do you have these bubbles were talking about? my friends 04 e500 that was tinted with 35% at the same place mine was has bubbles but they are less noticeable.
07-06-2004 | 08:10 AM
#22
Member
Joined: May 2003
Posts: 98
Likes: 0
From: USA
CLK
AAAHHH!!!!
I thought my tint was all dried up so I rolled down my window and when I brought it up I saw tons of bubbles. Some of them are hudge~!!
I took it back to the tint guy and he says they will disappear in few days but it already has been 3 days. I might wait for about a week or two and call back for them to do it again it the bubbles are still there. I'll post some picture when I get the chance..
07-06-2004 | 08:20 AM
#23
MBWorld Fanatic!
Joined: Jul 2002
Posts: 9,731
Likes: 63
From: Hotlanta
AMG
Originally Posted by tokomo
AAAHHH!!!!
I thought my tint was all dried up so I rolled down my window and when I brought it up I saw tons of bubbles. Some of them are hudge~!!
I took it back to the tint guy and he says they will disappear in few days but it already has been 3 days. I might wait for about a week or two and call back for them to do it again it the bubbles are still there. I'll post some picture when I get the chance..
I thought my tint was all dried up so I rolled down my window and when I brought it up I saw tons of bubbles. Some of them are hudge~!!
I took it back to the tint guy and he says they will disappear in few days but it already has been 3 days. I might wait for about a week or two and call back for them to do it again it the bubbles are still there. I'll post some picture when I get the chance..
07-06-2004 | 08:31 AM
#24
Thread Starter
MBWorld Fanatic!
Joined: Apr 2002
Posts: 6,328
Likes: 1
From: NYC
CL500
my shop told me to wait 3-5 days before putting the windows down and even put these stickers over my window switches that said "dont roll down for 3-5 days, new tint applied". i waited like 7 days just to be safe.
07-06-2004 | 10:57 AM
#25
MBWorld Fanatic!
Joined: Jul 2002
Posts: 5,289
Likes: 9
From: So Cal
W213 '17 E43 ///AMG - W211, W208 no more
Originally Posted by BklynBenz
my shop told me to wait 3-5 days before putting the windows down and even put these stickers over my window switches that said "dont roll down for 3-5 days, new tint applied". i waited like 7 days just to be safe.


