



Any tips for changing the brakelines/bleeding fluid
Thread Starter
MBWorld Fanatic!


Joined: Aug 2011
Posts: 3,428
Likes: 288
From: New Zealand
Any tips for changing the brakelines/bleeding fluid
Like a lot of our cars around 10 years old my brake lines are a bit cracked. I bought some new stoptech stainless lines 950.35001 and 950.35500 from ebay. I have installed brake lines on my old celica gt4 in the past and done brake fluid bleeding/flushes on japanese cars before but not mercedes. I have some probably dumb questions, any advice appreciated.
1) Is there a particular order to change/bleed them? Back ones first? Then front passenger followed by front driver?
2) Is there a particular way to bleed them? ABS considerations? In the past I have used a transparent one man bleeder hose with a one way valve. Change each one and bleed as you go or change all of them and bleed them individually afterwards?
3) There are small black rubber bungs in the kit, are these for plugging the hardline to keep most of the fluid in the system after you have undone the old line?
4) Any DOT 4 fluid? I saw some DOT 5.1 at the local parts store, it was just their generic brand so not sure if it is worth it over castrol DOT 4 etc. Or just get some from the dealer? I have never seen the ATE brand in my country as it seems popular in the US.
1) Is there a particular order to change/bleed them? Back ones first? Then front passenger followed by front driver?
2) Is there a particular way to bleed them? ABS considerations? In the past I have used a transparent one man bleeder hose with a one way valve. Change each one and bleed as you go or change all of them and bleed them individually afterwards?
3) There are small black rubber bungs in the kit, are these for plugging the hardline to keep most of the fluid in the system after you have undone the old line?
4) Any DOT 4 fluid? I saw some DOT 5.1 at the local parts store, it was just their generic brand so not sure if it is worth it over castrol DOT 4 etc. Or just get some from the dealer? I have never seen the ATE brand in my country as it seems popular in the US.
MBWorld Fanatic!
Joined: Nov 2012
Posts: 1,319
Likes: 14
From: SoCal
None for now
I wanna get Stoptech SS brake lines too, as well as Stoptech slotted rotors and brake pads w/Motul RBF600 fluid, but I'm holding off until I do my suspension and wheels in a month and a half or so.

MBworld Guru
Joined: Dec 2009
Posts: 10,782
Likes: 1,011
NO LONGER ACTIVE
This is no different than any other car. Using a "one-man bleeder" suction tool can be done, but it's awfully hard. A better method is to use a friend to press the brake pedal for you. Go with the furthest wheel first - rear passenger, then rear driver, then front passenger, then front driver. As for fluid you MUST use approved DOT 4+ - not DOT 5 or DOT 4. ATE is good as it exceeds the requirements for DOT 4+ and is the correct chemical makeup. If you can't get that, then you'll probaby end up at the dealer.
Thread Starter
MBWorld Fanatic!
Joined: Aug 2011
Posts: 3,428
Likes: 288
From: New Zealand
Thanks guys. Is the Motul RBF600 fine to use on our cars? I can get that locally but ATE does not seem to exist here. Or would the dealer fluid be better? I don't track the car but I am sure the dealer will charge a boat load considering transmission fluid was $52 per liter.
Is 2 liters enough?
Is 2 liters enough?
MBworld Guru
Joined: Dec 2009
Posts: 10,782
Likes: 1,011
NO LONGER ACTIVE
I would use that. The MB "DOT 4+" spec is something they invented. It's just DOT 4 with a higher boiling point. The main issue is that you don't want to use DOT 3 as that's not good enough. And you don't want to use DOT 5, as that is silicon based, which is not compatible with the MBZ ABS system.
You want glycol-based DOT4 with a dry boiling point above 260C (500F) and a wet boiling point above 180C (356F). Motul RBF 600 is 312C/216C.
You want glycol-based DOT4 with a dry boiling point above 260C (500F) and a wet boiling point above 180C (356F). Motul RBF 600 is 312C/216C.
Thread Starter
MBWorld Fanatic!
Joined: Aug 2011
Posts: 3,428
Likes: 288
From: New Zealand
The RBF600 seems to be a good fluid and it is polyglycol based according to the fact sheet.
I will buy whichever is cheaper between that and MB as they both seem to be easily available but it is nicer to have an alternative if the dealer wants to charge excessively.
Sorry to ask again would 2L be enough fluid? WIS says the capacity is 0.45-0.6L but I cannot tell if that is the whole system or just the reservoir?
I will buy whichever is cheaper between that and MB as they both seem to be easily available but it is nicer to have an alternative if the dealer wants to charge excessively.
Sorry to ask again would 2L be enough fluid? WIS says the capacity is 0.45-0.6L but I cannot tell if that is the whole system or just the reservoir?
Trending Topics
MB World Stories
The Best of Mercedes & AMG

6 Mercedes Models That Did NOT Age Well (But Are Somehow Still Cool)
Verdad Gallardo
Manual Mercedes? 6 Times Sindelfingen Let Drivers Have All The Fun
Verdad Gallardo
Mercedes SLR McLaren 722 S Is Extremely Rare Example Modified by McLaren
Verdad Gallardo
8 Classic Boxy Mercedes Designs That Have Aged Like Fine Wine
Verdad Gallardo
Flawlessly Restored Mercedes 190E Evo II Heads to Auction
Verdad Gallardo
Electric Mercedes C-Class Unveiled: 11 Things You Need to Know
Verdad Gallardo
Mercedes EQS Gets A Major Update: Everything You Need to Know
Verdad Gallardo
5 Underrated Mercedes-Benz Models That Don't Get the Love They Deserve
Verdad Gallardo
Mercedes 300D Has Pushed Well Past 1 Million Miles and It Ain't Stopping
Verdad Gallardo
Senior Member
Joined: Jul 2013
Posts: 264
Likes: 2
From: Northern VA
2003 Chevy Tahoe
Been off forum for a couple of months doing a major reno to the second floor of our home. Rodney has the correct sequence for bleeding. My brake set up is in my signature block. Noticed significant improvement in stopping. Can't stress too much - do the full bed in process with new pads & rotors.
MBworld Guru
Joined: Dec 2009
Posts: 10,782
Likes: 1,011
NO LONGER ACTIVE
My favorite brake bedding method is this:
1. Find a place where you can safely drive around without having to come to a complete stop. you will need to do some very slow driving as doing some 0mph-60mph-0mph runs. Large empty parking lots are good candidates, but it needs to be someplace close to where you are when you replace the brakes so you don't need to stop. You want to avoid stopping because that can "imprint" the new pads on the rotors.
2. Start by heating up the system. Drive slowly around lots of gentle braking, even riding the brakes, but avoiding coming to a complete stop.
3. Once you start smelling a bit of "new brake burn", now you need to perform the bedding process. Accelerate to 60-70mph, then stop hard, just short of activating ABS. Make sure not to come to a complete stop - release the pedal around 5mph.
4. Repeat these 0-6-60 runs five or six times.
5. Return to the garage without having to come to a complete stop - holding the pads against the hot rotors can cause an imprint which will result in vibrations and poor performance when stopping.
1. Find a place where you can safely drive around without having to come to a complete stop. you will need to do some very slow driving as doing some 0mph-60mph-0mph runs. Large empty parking lots are good candidates, but it needs to be someplace close to where you are when you replace the brakes so you don't need to stop. You want to avoid stopping because that can "imprint" the new pads on the rotors.
2. Start by heating up the system. Drive slowly around lots of gentle braking, even riding the brakes, but avoiding coming to a complete stop.
3. Once you start smelling a bit of "new brake burn", now you need to perform the bedding process. Accelerate to 60-70mph, then stop hard, just short of activating ABS. Make sure not to come to a complete stop - release the pedal around 5mph.
4. Repeat these 0-6-60 runs five or six times.
5. Return to the garage without having to come to a complete stop - holding the pads against the hot rotors can cause an imprint which will result in vibrations and poor performance when stopping.
Senior Member
Joined: Jul 2013
Posts: 264
Likes: 2
From: Northern VA
2003 Chevy Tahoe
Rodney - My bed in process is much the same, just slightly different. I do a series of 25 mph to 5 mph decelerations without stopping. Then a series of 45 to 5s with a quarter mile in between runs for cool down. Followed by 50 mph and 60 mph runs. Park the car for a couple of hours and repeat. I've got a stretch of road nearby that's exactly a mile long, flat and straight. Makes it easy. And when doing the daily drive, whenever I come to an extended stop I always put it in park to keep from imprinting hot pads on rotors. FWIW
MBworld Guru
Joined: Dec 2009
Posts: 10,782
Likes: 1,011
NO LONGER ACTIVE
Sounds like you are more patient than me - I do mine all at once. Just a mile down the road, there is a limestone quarry and the road leading into it is long, flat and nicely paved. On the weekends, it's closed so there are no worries of encountering any oncoming dump trucks.
Thread Starter
MBWorld Fanatic!
Joined: Aug 2011
Posts: 3,428
Likes: 288
From: New Zealand
Thanks for the help guys. Luckily for my bank balance I don't need new rotors and pads just yet so just changing the lines only.
The garage said the lines were mildly cracking in places and should be replaced by the next yearly warrant (mandatory car safety check over here). Also I have no idea when the last brake fluid change would have been done. I have had the car 18 months and have not done it so most likely very overdue. I don't think the last owner did a single piece of maintenance, pretty sure they lied about the service B just being done. They only owned it a short while thankfully.
The garage said the lines were mildly cracking in places and should be replaced by the next yearly warrant (mandatory car safety check over here). Also I have no idea when the last brake fluid change would have been done. I have had the car 18 months and have not done it so most likely very overdue. I don't think the last owner did a single piece of maintenance, pretty sure they lied about the service B just being done. They only owned it a short while thankfully.
Senior Member
Joined: Jul 2013
Posts: 264
Likes: 2
From: Northern VA
2003 Chevy Tahoe
So if you're only going to change brake lines I'd find a good set of SS, and a good fluid. ATE 200 has a dry boiling point around 536 degrees - second highest only to Motul. Unlike some aftermarket stainless brake lines, Goodridge Phantoms are DOT certified. Those two were my go-to choices. Both come highly recommended by the racing community - satisfied customer.
Thread Starter
MBWorld Fanatic!
Joined: Aug 2011
Posts: 3,428
Likes: 288
From: New Zealand
Sure thing. I went to mercedes to get some coolant. They don't sell the brake fluid, it just comes in a massive drum. The parts guy said just find some fluid from a local auto shop. I will order the Motul RBF600 and report back.
Thread Starter
MBWorld Fanatic!
Joined: Aug 2011
Posts: 3,428
Likes: 288
From: New Zealand
Ok so small update and some tips now that I have got into this job. So after the family thing and receiving my brake fluid at Christmas (coincidence it arrived at the same time) I got excited and did the passenger rear before going to bed, Girlfriend was ecstatic about helping me with the bleeding procedure (sarcasm).
Stoptech brake lines- front is 950.35001, rear is 950.35500. So far the rear one fit perfectly, a very good quality line.
Tools that I would consider a must so far
- 9mm spanner for the bleeder, yes 9mm! I never thought I would use that size and no a shallow 9mm socket will not be long enough to reach. I didn't need this but experience from other cars- if the valve is corroded vice grips work wonders, just replace the valve afterwards.
- 15mm standard open end spanner for the old brake line at the top
- 14mm brake line spanner (hex shape with a small amount removed on one side for the old line bottom end and the new line.
- 11mm brake line spanner
No matter what you do, you will drip brake fluid. I used an oil drain pan underneath. I took the top of the old line off first and put the black rubber cap on the line. Two caps come with the stoptech kit. Due to how it comes apart (slowly) you will drip a bit of fluid before you can cap it. Now you can easily remove the bottom end without more fluid coming out.
You have to install the bottom of the new line first because the whole line needs to rotate around to tighten. The top one the line stays stationary so its not a problem.
Bleeding- as above this is just a normal car in this regard. Passenger rear, drivers rear, passenger front, drivers front. A one way bleeder valve works perfectly. Two people makes it a lot easier. I bought 2x 500mL bottles of TRD (toyota racing development) brake fluid. This is Motul RBF600 with a toyota sticker on it, exact same fluid, same factory everything just 60% of the price.
I put 500mL through to the passenger rear only. I figured this would flush all the old fluid from the reservoir and also because it is the longest length of line for the fluid to travel. I think about 1/4 of the remaining bottle for the other 3 corners will be sufficient with a bit left over to be on the safe side. Everything was looser than I expected to undo. Nothing required more than a decent tweak with the spanner to undo. Already the pedal feel is improved.
I think wheel bolt torque is 115Nm. Bleeder valve torque is 14Nm.
Stoptech brake lines- front is 950.35001, rear is 950.35500. So far the rear one fit perfectly, a very good quality line.
Tools that I would consider a must so far
- 9mm spanner for the bleeder, yes 9mm! I never thought I would use that size and no a shallow 9mm socket will not be long enough to reach. I didn't need this but experience from other cars- if the valve is corroded vice grips work wonders, just replace the valve afterwards.
- 15mm standard open end spanner for the old brake line at the top
- 14mm brake line spanner (hex shape with a small amount removed on one side for the old line bottom end and the new line.
- 11mm brake line spanner
No matter what you do, you will drip brake fluid. I used an oil drain pan underneath. I took the top of the old line off first and put the black rubber cap on the line. Two caps come with the stoptech kit. Due to how it comes apart (slowly) you will drip a bit of fluid before you can cap it. Now you can easily remove the bottom end without more fluid coming out.
You have to install the bottom of the new line first because the whole line needs to rotate around to tighten. The top one the line stays stationary so its not a problem.
Bleeding- as above this is just a normal car in this regard. Passenger rear, drivers rear, passenger front, drivers front. A one way bleeder valve works perfectly. Two people makes it a lot easier. I bought 2x 500mL bottles of TRD (toyota racing development) brake fluid. This is Motul RBF600 with a toyota sticker on it, exact same fluid, same factory everything just 60% of the price.
I put 500mL through to the passenger rear only. I figured this would flush all the old fluid from the reservoir and also because it is the longest length of line for the fluid to travel. I think about 1/4 of the remaining bottle for the other 3 corners will be sufficient with a bit left over to be on the safe side. Everything was looser than I expected to undo. Nothing required more than a decent tweak with the spanner to undo. Already the pedal feel is improved.
I think wheel bolt torque is 115Nm. Bleeder valve torque is 14Nm.

MBWorld Fanatic!
Joined: Dec 2010
Posts: 2,109
Likes: 112
2008 CLK550 Cab
I bled mine the old fashioned way - press the brake pedal - and have a question if you did yours that way. No matter how far I opened the valve on the rear wheels I needed lumber jack legs to press the pedal down. Couldn't help but think I was doing something wrong, but have no idea what.
Thread Starter
MBWorld Fanatic!
Joined: Aug 2011
Posts: 3,428
Likes: 288
From: New Zealand
I bled mine the old fashioned way - press the brake pedal - and have a question if you did yours that way. No matter how far I opened the valve on the rear wheels I needed lumber jack legs to press the pedal down. Couldn't help but think I was doing something wrong, but have no idea what.
I can't think of what you could have been doing wrong- opening the bleeder valve is the only procedure to perform before pushing the pedal. Unless you have some sort of bleeder hose attached with a lot of resistance? Otherwise I can only assume it was normal.
Thread Starter
MBWorld Fanatic!
Joined: Aug 2011
Posts: 3,428
Likes: 288
From: New Zealand
I will have to post up the performance later on when I go for a drive. Still looking at the back lines. Here is the right rear side by side comparison.
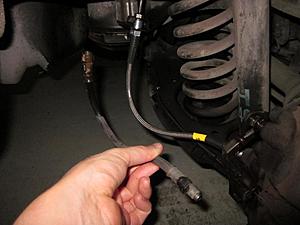
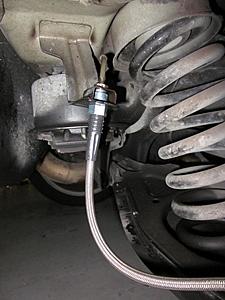
The top join of the new line. The U shaped bracket holds the line into the mount. Trying to undo this quickly to put a bung on the end of the line is not going to happen. Put a rag underneath.
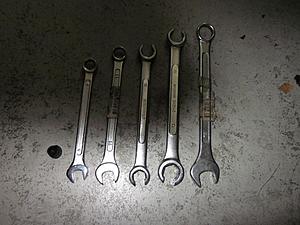
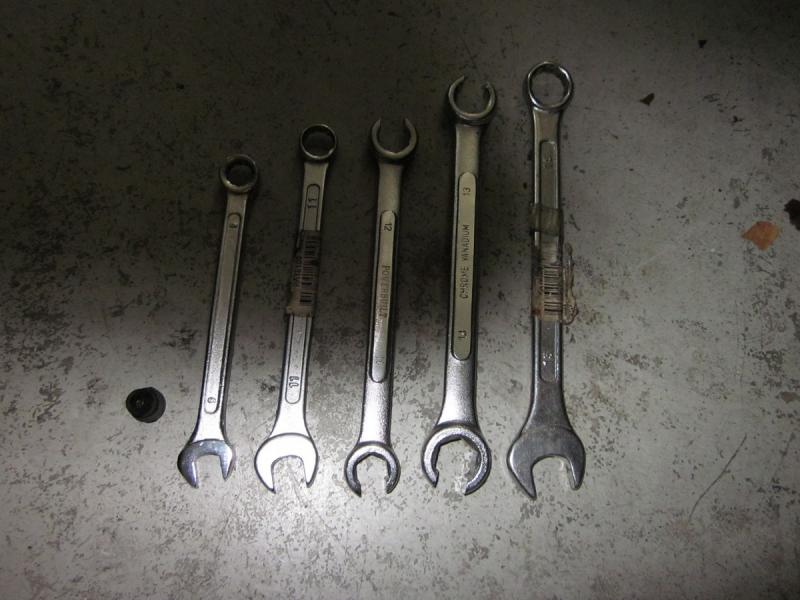
These are the tools you will need. You don't technically need an open end 11mm but it is a lot easier to undo the nuts once you have broken them loose with the 11mm brake spanner. The front bleed valves use 11mm not 9mm as per the rear. There is only one bleed valve per caliper at the front, I think the 6 pot calipers have two bleed valves.
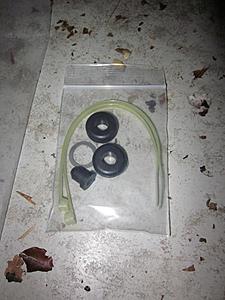
This stuff comes with each bag of brake lines but I think it is generic as I could not see a use for any of it.
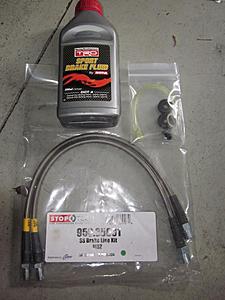
Front lines and fluid.
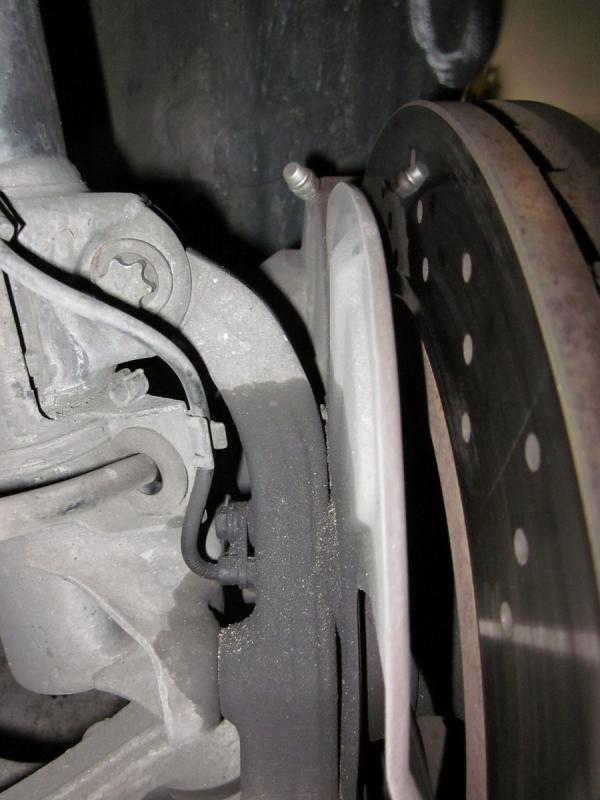
While the rear lines were very easy, the front lines are only easy. They come out horizontally and head down.
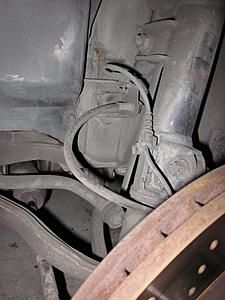
Through this rubber bung which is inserted into a plastic mount and on into the caliper.
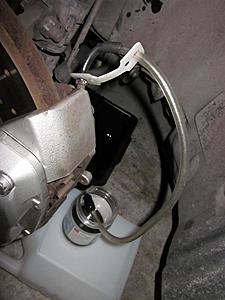
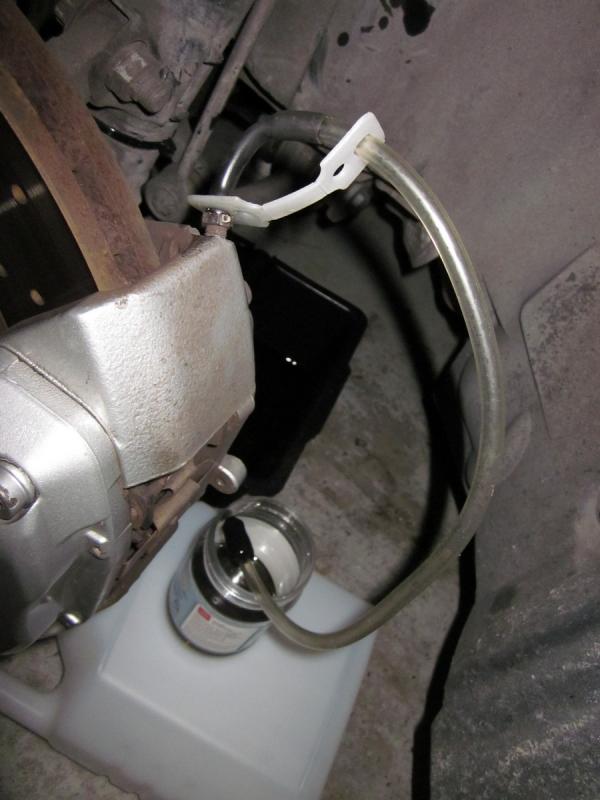
This is my one-man bleed tool. I used it alone for the drivers side since I could see it. I got help to do the passenger side.
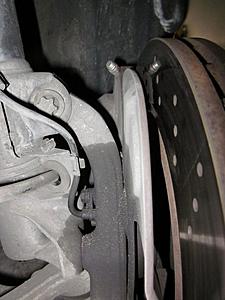
The line is very difficult to screw into the caliper with that rubber bung/mount still there. I was worried I would cross thread it. I highly recommend taking it off. It has two plastic prongs that clip behind a steel mount on the strut. It also has a thick cable tie type thing holding it underneath. Cut the cable tie and gently pry the prongs out. I promise it is worth it (unless you break it of course). Screw the line into the caliper and then push the mount over the line before putting it back and applying a new cable tie.
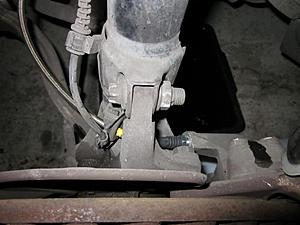
You can see the plastic prongs here where they come out. They push towards the strut to unclip while prying at the other end.
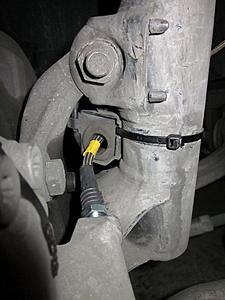
Be careful of what I assume are the abs lines when you take the plastic mount off.
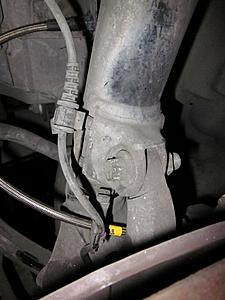
Yes brake fluid continues to drip out until you have the hardline secured 100% inside.
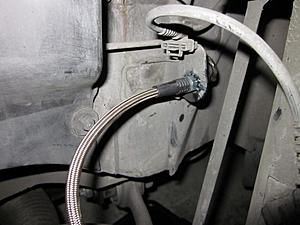
Done. Just treat brake fluid like a deadly virus, wash your hand constantly so there is no chance of spreading it around. Was it off everything with degreaser and water so prevent paint bubbling and corroding everything in sight.
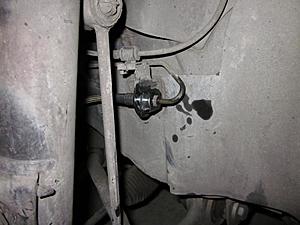
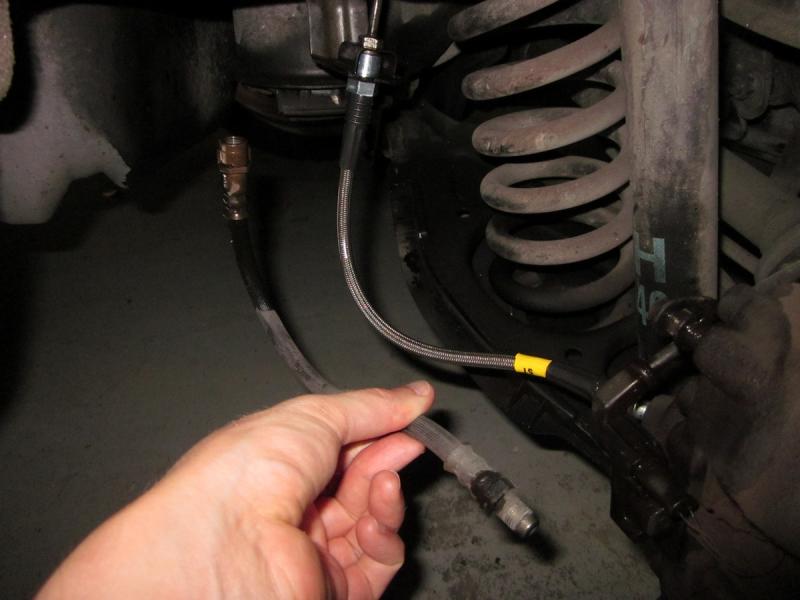
The top join of the new line. The U shaped bracket holds the line into the mount. Trying to undo this quickly to put a bung on the end of the line is not going to happen. Put a rag underneath.

These are the tools you will need. You don't technically need an open end 11mm but it is a lot easier to undo the nuts once you have broken them loose with the 11mm brake spanner. The front bleed valves use 11mm not 9mm as per the rear. There is only one bleed valve per caliper at the front, I think the 6 pot calipers have two bleed valves.
This stuff comes with each bag of brake lines but I think it is generic as I could not see a use for any of it.

Front lines and fluid.

While the rear lines were very easy, the front lines are only easy. They come out horizontally and head down.

Through this rubber bung which is inserted into a plastic mount and on into the caliper.
This is my one-man bleed tool. I used it alone for the drivers side since I could see it. I got help to do the passenger side.
The line is very difficult to screw into the caliper with that rubber bung/mount still there. I was worried I would cross thread it. I highly recommend taking it off. It has two plastic prongs that clip behind a steel mount on the strut. It also has a thick cable tie type thing holding it underneath. Cut the cable tie and gently pry the prongs out. I promise it is worth it (unless you break it of course). Screw the line into the caliper and then push the mount over the line before putting it back and applying a new cable tie.

You can see the plastic prongs here where they come out. They push towards the strut to unclip while prying at the other end.
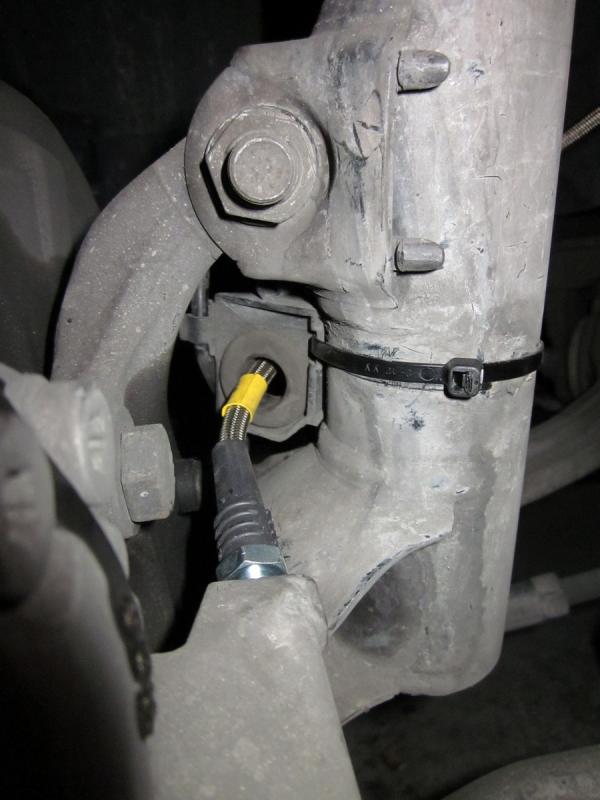
Be careful of what I assume are the abs lines when you take the plastic mount off.
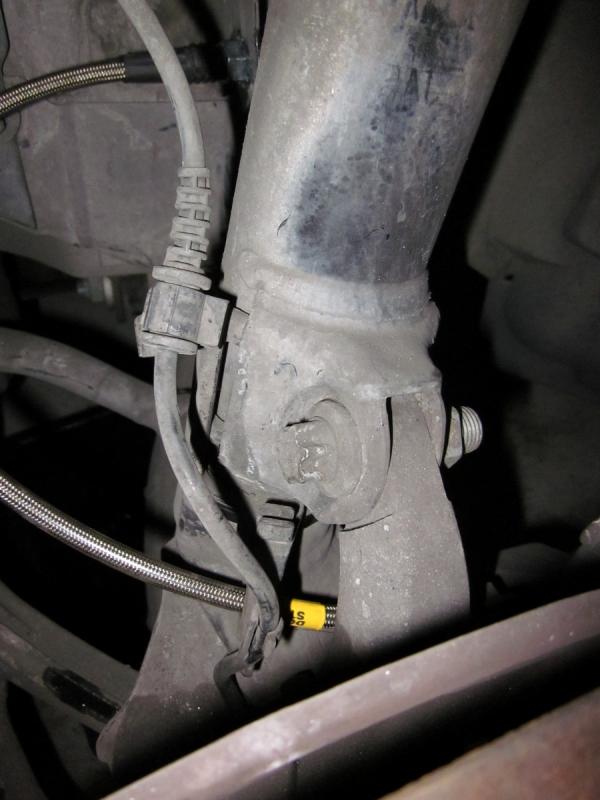
Yes brake fluid continues to drip out until you have the hardline secured 100% inside.
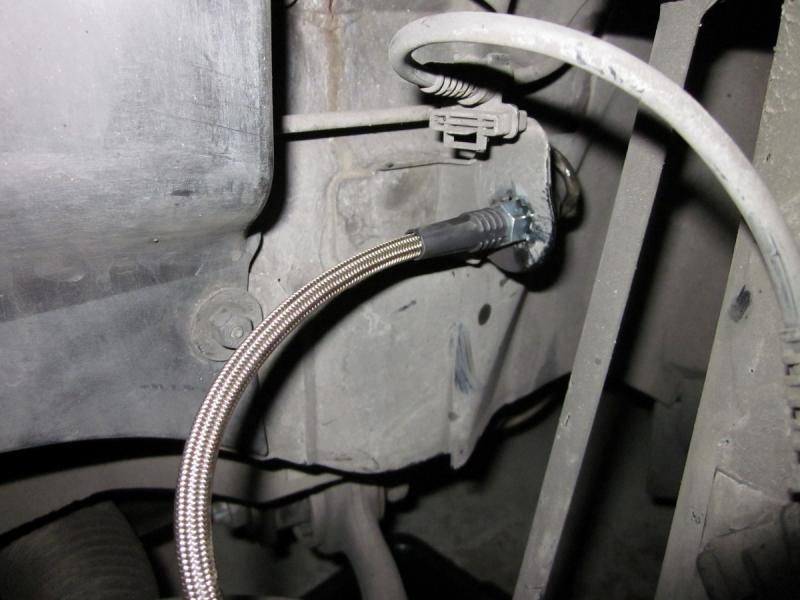
Done. Just treat brake fluid like a deadly virus, wash your hand constantly so there is no chance of spreading it around. Was it off everything with degreaser and water so prevent paint bubbling and corroding everything in sight.
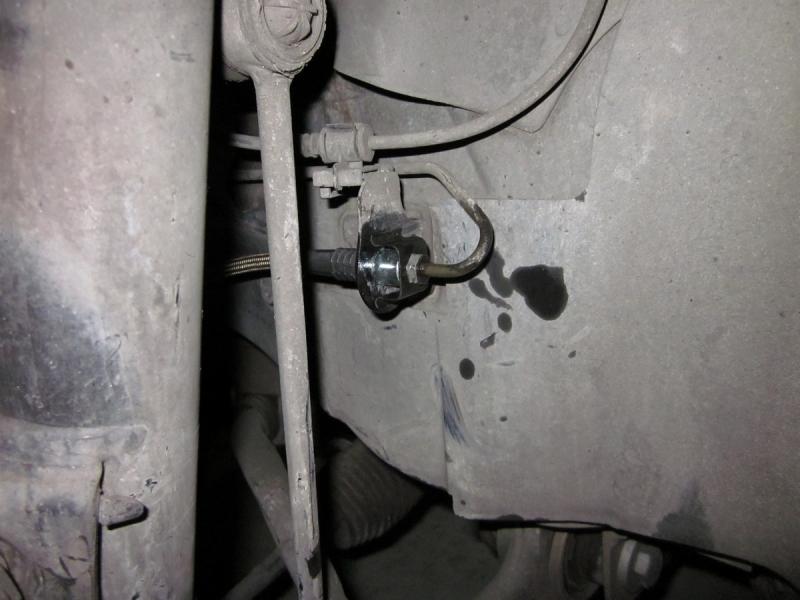
Thread Starter
MBWorld Fanatic!
Joined: Aug 2011
Posts: 3,428
Likes: 288
From: New Zealand
So after driving a few days, there is no real improvement in braking which is expected since the pads/rotors are unchanged. The pedal is slightly firmer but I am sure the fluid needed changing badly anyway. Other accounts I read, people said stainless lines didn't make much difference so I wasn't expecting much. Still it was a fun project and beats buying new OEM lines.


