


140,000mi maintenance - shocks, struts, engine mounts, belt, gaskets, filters etc

Thread Starter
Super Member

Joined: Feb 2008
Posts: 699
Likes: 44
From: PA
09 CLK550
140,000mi maintenance - shocks, struts, engine mounts, belt, gaskets, filters etc
I've put 100,000 miles on this car since I bought it in 2011. She's never let me down, so I've finally addressed some long over due repairs this weekend.
This is going to be a multi part write up of the work done (and something for me to reference later if I ever need it)
Rear Shocks - this post
Engine Mounts and Alternator
Engine mounts, continued and belt
Valve Cover Gaskets
Filters
Front struts and Control Arms
Casualties
The Breakdown
Tranny Work
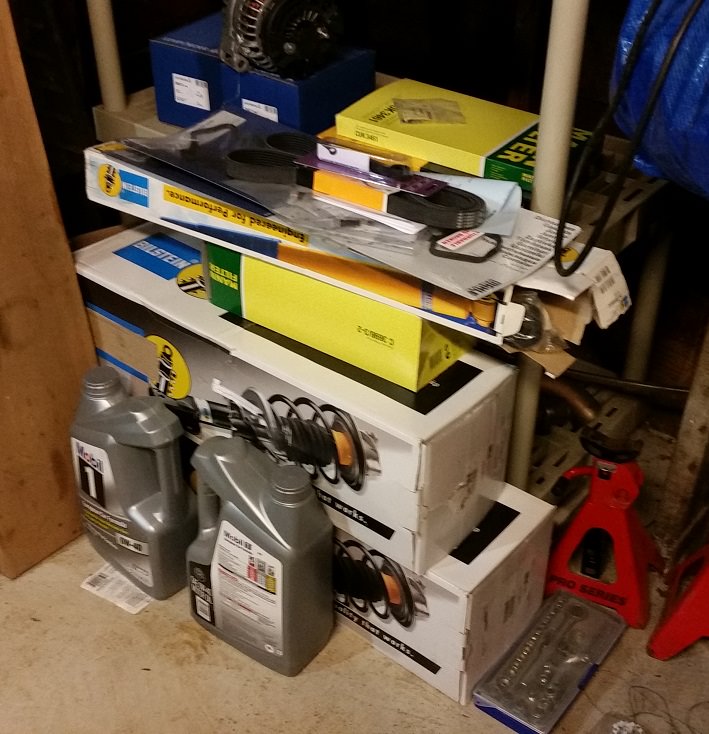
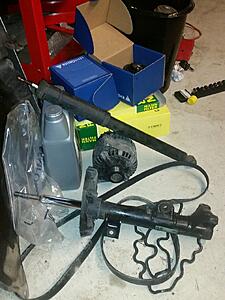
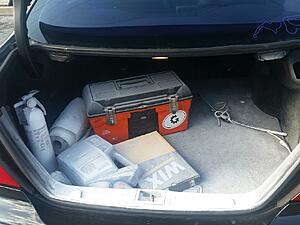
Up first: The goods
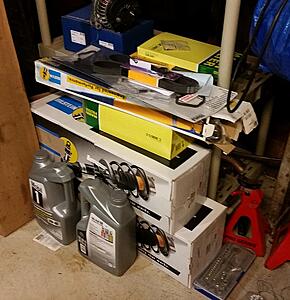
Everything ordered from partsgeek.com
Cabin Air Filter (engine bay)
Mann CUK3461
Cabin Air Filter (pass foot well)
WIX 24686
Engine Air Filter Set
Mann W0133-1915361
Brake Pad Sensor (I broke this awhile ago)
Centric 116.35011
Shock Absorber
Bilstein W0133-1910746 x2
Valve Cover Gasket
VR Gaskets VS50442SL - Left
VR Gaskets VS50442SR - Right
Alternator
Bosch AL0819X
Multi Rib Belt
ContiTech W0133-1717304
Engine Mount
Lemfoerder W0133-1791080 X2
Strut Assembly
Bilstein W0133-1941358 x2
Seat Belt Fastener Kit - my brother broke the passenger side awhile ago some how.
Genuine 129-860-31-69
Strut Mount x2
Lemfoerder W0133-1716736
Crankcase Breather Hose Kit
Rein 22 9810 008
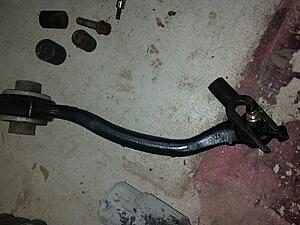
Control Arm - Front Left Upper
Lemfoerder 18459-08025734
Control Arm - Front Right Upper
Lemfoerder 18459-08025735
Rear Shocks:
Remove all the carpeting from the trunk, pull the black clips off the sides and pull them down
You might need to hold the top of the shock with something while turning the nut.
under the car there are 2 small bolts holding a plastic cover on the rear lower control arm. Remove them and you should be able to get to the bolt at the bottom of the shock. Once the bolt is removed I was able to use some muscle and compress the shock & remove it with without undoing anything else.
This is going to be a multi part write up of the work done (and something for me to reference later if I ever need it)
Rear Shocks - this post
Engine Mounts and Alternator
Engine mounts, continued and belt
Valve Cover Gaskets
Filters
Front struts and Control Arms
Casualties
The Breakdown
Tranny Work
Up first: The goods
Everything ordered from partsgeek.com
Cabin Air Filter (engine bay)
Mann CUK3461
Cabin Air Filter (pass foot well)
WIX 24686
Engine Air Filter Set
Mann W0133-1915361
Brake Pad Sensor (I broke this awhile ago)
Centric 116.35011
Shock Absorber
Bilstein W0133-1910746 x2
Valve Cover Gasket
VR Gaskets VS50442SL - Left
VR Gaskets VS50442SR - Right
Alternator
Bosch AL0819X
Multi Rib Belt
ContiTech W0133-1717304
Engine Mount
Lemfoerder W0133-1791080 X2
Strut Assembly
Bilstein W0133-1941358 x2
Seat Belt Fastener Kit - my brother broke the passenger side awhile ago some how.
Genuine 129-860-31-69
Strut Mount x2
Lemfoerder W0133-1716736
Crankcase Breather Hose Kit
Rein 22 9810 008
Control Arm - Front Left Upper
Lemfoerder 18459-08025734
Control Arm - Front Right Upper
Lemfoerder 18459-08025735
Rear Shocks:

Remove all the carpeting from the trunk, pull the black clips off the sides and pull them down
You might need to hold the top of the shock with something while turning the nut.

under the car there are 2 small bolts holding a plastic cover on the rear lower control arm. Remove them and you should be able to get to the bolt at the bottom of the shock. Once the bolt is removed I was able to use some muscle and compress the shock & remove it with without undoing anything else.
Last edited by ambit; Mar 27, 2018 at 09:49 PM.
Thread Starter
Super Member
Joined: Feb 2008
Posts: 699
Likes: 44
From: PA
09 CLK550
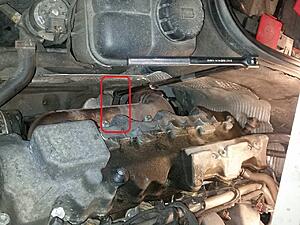
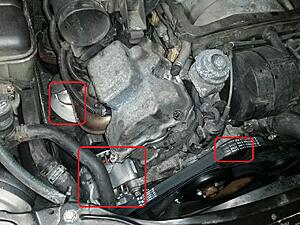
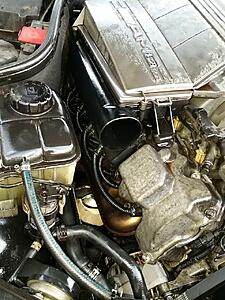
Engine Mounts & Alternator
These were probably the worst work I've ever done on a car.
I purchased a $20 16mm offset wrench to remove the bolt under the exhaust manifold, It helped.
I removed the coil packs and spark plug boots because I was doing the valve cover gaskets next anyway. That helped a lot.
Pass side
Driver Side
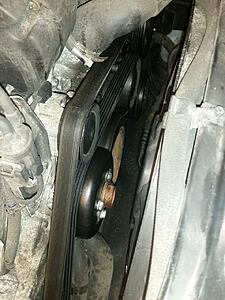
I planned on replacing the alternator while I was in there (this turned out to be a terrible idea). To do this you need to remove the belt. Might as well replace that too?
The belt idler pulley has a 17mm (?) nut on the bottom, spin that counter clockwise to take the tension off the belt and remove.
MAKE SURE YOU DISCONNECT THE BATTERY
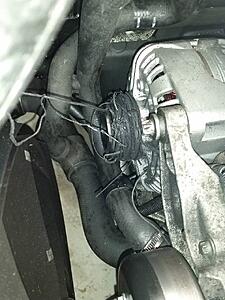
Remove the single bolt on the back of the alternator and the plug.
Remove the 2 inverted torx screws on the front, they're like 6" long
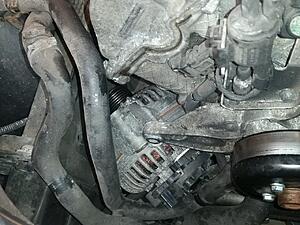
Realize now you're ****ed and this is never coming out.
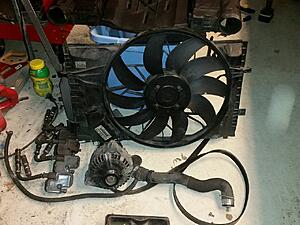
Remove most of the coolant hoses, cooling fan and loosed most of the front end to get the goddamn thing out.
These were probably the worst work I've ever done on a car.
I purchased a $20 16mm offset wrench to remove the bolt under the exhaust manifold, It helped.
I removed the coil packs and spark plug boots because I was doing the valve cover gaskets next anyway. That helped a lot.
Pass side

Driver Side

I planned on replacing the alternator while I was in there (this turned out to be a terrible idea). To do this you need to remove the belt. Might as well replace that too?
The belt idler pulley has a 17mm (?) nut on the bottom, spin that counter clockwise to take the tension off the belt and remove.


MAKE SURE YOU DISCONNECT THE BATTERY
Remove the single bolt on the back of the alternator and the plug.
Remove the 2 inverted torx screws on the front, they're like 6" long

Realize now you're ****ed and this is never coming out.
Remove most of the coolant hoses, cooling fan and loosed most of the front end to get the goddamn thing out.

Thread Starter
Super Member
Joined: Feb 2008
Posts: 699
Likes: 44
From: PA
09 CLK550
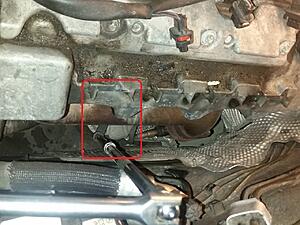
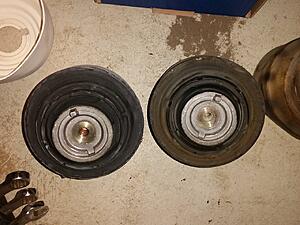
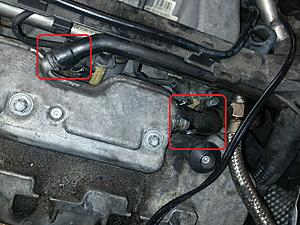
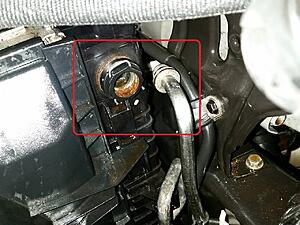
Engine mounts, continued.
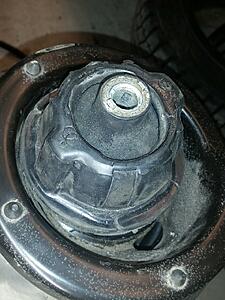
With the alternator out the passenger side motor mount wasn't too bad.
Loosen the top 16mm bolt, remove the 14mm bolt under the car and start jacking it up. I used a board across the oil pan.
Motor mount came out the front were the alternator used to me.

You can't see here, but the new one is about 1/2" taller than the old. The pass side wasn't too bad
But the drivers side was destroyed, a wreck leaking gross oil everywhere.
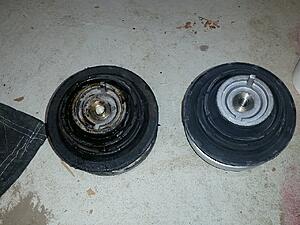
Driver side was a nightmare to remove. I ended up taking it out the bottom of the car my loosing a bunch of power steering lines and jacking the engine up WAY past what I thought was safe.
Installation is the same nightmare in reverse. If not worse because you need to line up the "tab" on the top of the mount and thread a 4" bolt through a 2" gap BLINDLY while holding the heat shield in place and getting the **** cut out of your forearms.
Things were bad
However everything was complete. New parts all installed:
With the alternator out the passenger side motor mount wasn't too bad.
Loosen the top 16mm bolt, remove the 14mm bolt under the car and start jacking it up. I used a board across the oil pan.
Motor mount came out the front were the alternator used to me.

You can't see here, but the new one is about 1/2" taller than the old. The pass side wasn't too bad

But the drivers side was destroyed, a wreck leaking gross oil everywhere.

Driver side was a nightmare to remove. I ended up taking it out the bottom of the car my loosing a bunch of power steering lines and jacking the engine up WAY past what I thought was safe.
Installation is the same nightmare in reverse. If not worse because you need to line up the "tab" on the top of the mount and thread a 4" bolt through a 2" gap BLINDLY while holding the heat shield in place and getting the **** cut out of your forearms.
Things were bad

However everything was complete. New parts all installed:

Last edited by ambit; Mar 18, 2018 at 07:39 PM.
Thread Starter
Super Member
Joined: Feb 2008
Posts: 699
Likes: 44
From: PA
09 CLK550
Valve Cover Gaskets
I replaced these in Aug 2011 and they've been leaking again.
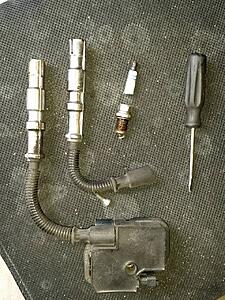
Coil packs previously removed. Torx screws off and wiggled till it pops off
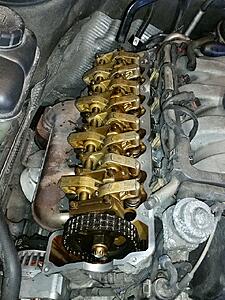
Clean the **** out of the valve head
A bunch of the old gasket material fell into the valves so i'll be changing the oil in the next 50 miles or so.
On the driver side I cracked these PCV hoses during removal. I have a whole kit of hoses coming to replace them.
I also discovered I broke one of the 16 spark plugs the previous day and didn't notice, lol
I replaced these in Aug 2011 and they've been leaking again.
Coil packs previously removed. Torx screws off and wiggled till it pops off

Clean the **** out of the valve head
A bunch of the old gasket material fell into the valves so i'll be changing the oil in the next 50 miles or so.
On the driver side I cracked these PCV hoses during removal. I have a whole kit of hoses coming to replace them.

I also discovered I broke one of the 16 spark plugs the previous day and didn't notice, lol

Last edited by ambit; Mar 18, 2018 at 08:19 PM.
Thread Starter
Super Member
Joined: Feb 2008
Posts: 699
Likes: 44
From: PA
09 CLK550
Filters
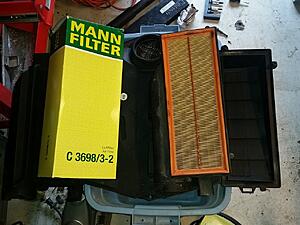
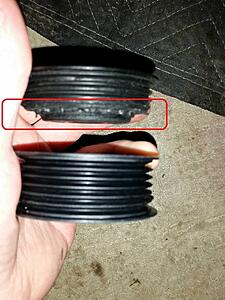
Engine Air filters, super easy.
4 torx screws on each side
new v. old. Gross
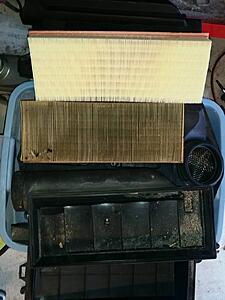
Also replaced the filter above the battery in the engine bay and the 2 filters in the cabin, pass footwell.
Engine Air filters, super easy.
4 torx screws on each side

new v. old. Gross

Also replaced the filter above the battery in the engine bay and the 2 filters in the cabin, pass footwell.
Thread Starter
Super Member
Joined: Feb 2008
Posts: 699
Likes: 44
From: PA
09 CLK550
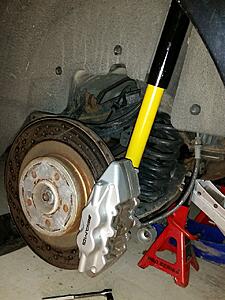
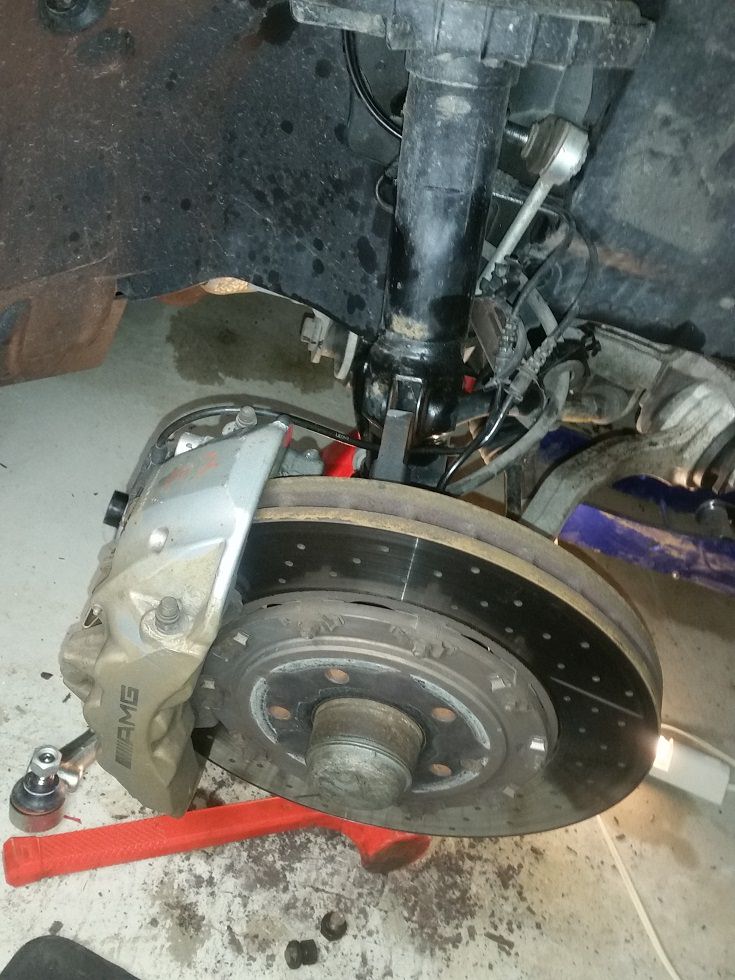
Front struts.
For being original 13 year old equipment I was very surprised at how well the suspension all around has held up.
Remove sway bar link
Remove torx bolt at middle of strut. Remove 2 x 21mm bolts on back of strut going into steering knuckle.
That's my orange impact mallet. it "gets **** done"
Remove the 21mm nut at top of strut in engine bay. You might need an allen key to hold the center shaft steady.
Assembly removed
Ran into an issue on the driver side.
This is where I realized the strut bearing caps were torn. I replaced them 3 years ago but they seem to have died again
So I'm sure i'll get some **** from someone here. My spring compressors don't get a good enough bite on these low profile springs so I assist them with some hose clamps. It works, its not safe but I've now done it 6 times without dying.
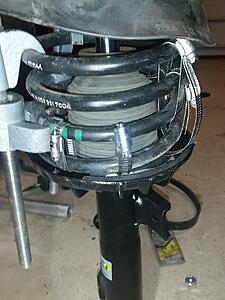
So the strut bearings got replaced too.
For being original 13 year old equipment I was very surprised at how well the suspension all around has held up.
Remove sway bar link
Remove torx bolt at middle of strut. Remove 2 x 21mm bolts on back of strut going into steering knuckle.
That's my orange impact mallet. it "gets **** done"
Remove the 21mm nut at top of strut in engine bay. You might need an allen key to hold the center shaft steady.
Assembly removed

Ran into an issue on the driver side.

This is where I realized the strut bearing caps were torn. I replaced them 3 years ago but they seem to have died again

So I'm sure i'll get some **** from someone here. My spring compressors don't get a good enough bite on these low profile springs so I assist them with some hose clamps. It works, its not safe but I've now done it 6 times without dying.

So the strut bearings got replaced too.
Thread Starter
Super Member
Joined: Feb 2008
Posts: 699
Likes: 44
From: PA
09 CLK550
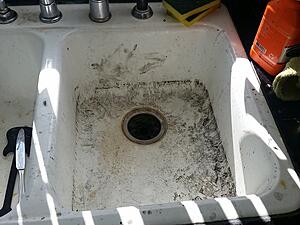
Casualties
None of my projects are complete without some fallen heroes:
3' Florescent tube fell victim to a tumbling 1/2" ratchet
Pickle fork has only ever been used in anger
The "extras"
None of my projects are complete without some fallen heroes:
3' Florescent tube fell victim to a tumbling 1/2" ratchet

Pickle fork has only ever been used in anger

The "extras"

Last edited by ambit; Mar 18, 2018 at 08:16 PM.
Trending Topics
MB World Stories
The Best of Mercedes & AMG

Manual Mercedes? 6 Times Sindelfingen Let Drivers Have All The Fun
Verdad Gallardo
Mercedes SLR McLaren 722 S Is Extremely Rare Example Modified by McLaren
Verdad Gallardo
8 Classic Boxy Mercedes Designs That Have Aged Like Fine Wine
Verdad Gallardo
Flawlessly Restored Mercedes 190E Evo II Heads to Auction
Verdad Gallardo
Electric Mercedes C-Class Unveiled: 11 Things You Need to Know
Verdad Gallardo
Mercedes EQS Gets A Major Update: Everything You Need to Know
Verdad Gallardo
5 Underrated Mercedes-Benz Models That Don't Get the Love They Deserve
Verdad Gallardo
Mercedes 300D Has Pushed Well Past 1 Million Miles and It Ain't Stopping
Verdad Gallardo
10 Most Reliable Mercedes-Benz Models You Can Buy Used
Verdad Gallardo
Thread Starter
Super Member
Joined: Feb 2008
Posts: 699
Likes: 44
From: PA
09 CLK550

Thread Starter
Super Member
Joined: Feb 2008
Posts: 699
Likes: 44
From: PA
09 CLK550
The breakdown
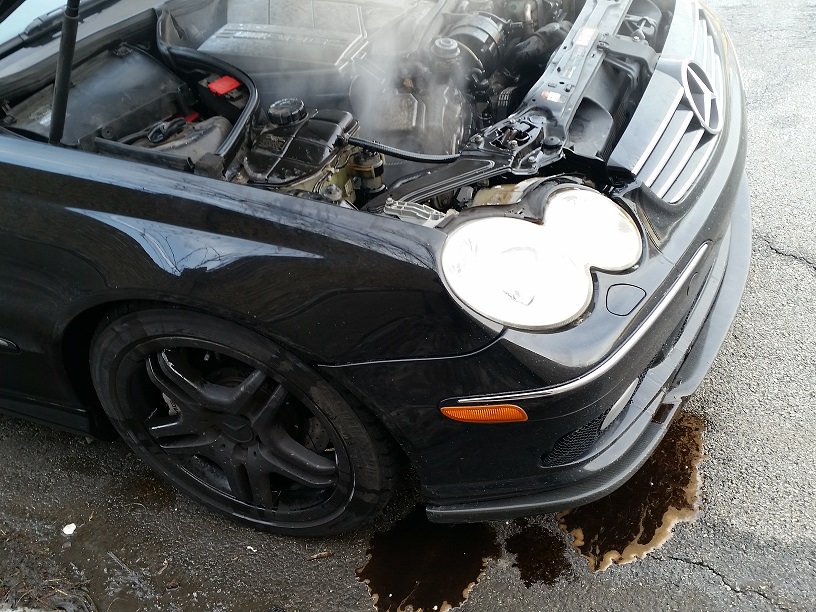
So this happened

Oil line leading to the radiator in the front popped out. I had to remove it when I pulled the alternator and I guess I didn't reinstall it correctly
Leading to A LOT OF SMOKE
For the first time in 7 years I had to get her towed
You can see oil actually sprayed out over the headlight, lol
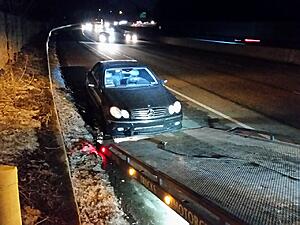
I think its all fixed now.
Oil line leading to the radiator in the front popped out. I had to remove it when I pulled the alternator and I guess I didn't reinstall it correctly

Leading to A LOT OF SMOKE

For the first time in 7 years I had to get her towed
You can see oil actually sprayed out over the headlight, lol

I think its all fixed now.
Last edited by ambit; Mar 27, 2018 at 09:45 PM.
Thread Starter
Super Member
Joined: Feb 2008
Posts: 699
Likes: 44
From: PA
09 CLK550
Tranny work
A whole bunch of oil got into my brand new air filters and the car threw some CEL:
P0104 Mass or Volume Air Flow A Circuit intermittent
Then the car wouldn't engage the transmission correctly
P0730 Incorrect Gear Ratio
P0715 Input / Turbine speed sensor A circuit
I had been planning to fix the 1->2 gear 'jerk' that had been occurring and this pushed to finally do it.
Ordered 2 x 5Qt Febi Bilstein ATF
and these 2 solenoids
240-270-16-00-MBZ Transmission Solenoid Valve $61.25
240-270-17-00-MBZ Transmission Solenoid Shift Valve $68.50
from pelicanparts.com
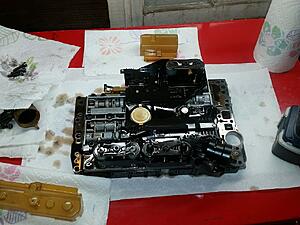
Drained the tranny pan, dropped it, removed the TCU connector (7mm bolt) and removed the valve assembly 10 x t20 torx bolts
P0104 Mass or Volume Air Flow A Circuit intermittent
Then the car wouldn't engage the transmission correctly
P0730 Incorrect Gear Ratio
P0715 Input / Turbine speed sensor A circuit
I had been planning to fix the 1->2 gear 'jerk' that had been occurring and this pushed to finally do it.
Ordered 2 x 5Qt Febi Bilstein ATF
and these 2 solenoids
240-270-16-00-MBZ Transmission Solenoid Valve $61.25
240-270-17-00-MBZ Transmission Solenoid Shift Valve $68.50
from pelicanparts.com
Drained the tranny pan, dropped it, removed the TCU connector (7mm bolt) and removed the valve assembly 10 x t20 torx bolts

Also ordered a Sonnax 68942-23K TCC Damper Valve Sleeve Kit 722.6 but the spring didn't fit, wrong tranny? Anyway..
I took apart and cleaned all the springs/valves around all 4 sides of the unit.
Replaced
A 140 277 04 33 with
A 240 277 01 00
and the solenoid next to it. The 2 by themselves, across from the TCU connector.

Also replaced the tranny filter and pan gasket. Added 5qt of ATF and drove around some, seems much better now.
I have a tranny dipstick, I need to check it again.


MBWorld Fanatic!


Joined: Feb 2011
Posts: 2,562
Likes: 197
From: Austin, TX
2006 E55, 2012 GLK350 & 1992 190e sportline
FYI the easiest way I have found to get the alternator out is to undo the exhaust. If you doing mounts at the same time it makes getting the mount on that side out way easier. I have done both on many MB and never pulled the radiator.
Thread Starter
Super Member
Joined: Feb 2008
Posts: 699
Likes: 44
From: PA
09 CLK550
I didn't want to mess with the exhaust, I've stripped out the header studs on a C230 before.
I didn't have to remove the whole front radiator, just the fan/hoses.
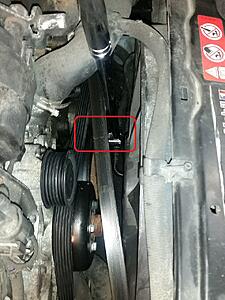
In other news, the idler pulley broke in half last week and destroyed the new accessory belt. So I replaced the pulley and belt. I'll post pics later tonight.
The car is currently at MB for a PA yearly inspection, they're saying I need brakes all around. So I'll be writing that up too. Sigh.
I didn't have to remove the whole front radiator, just the fan/hoses.
In other news, the idler pulley broke in half last week and destroyed the new accessory belt. So I replaced the pulley and belt. I'll post pics later tonight.
The car is currently at MB for a PA yearly inspection, they're saying I need brakes all around. So I'll be writing that up too. Sigh.
MBWorld Fanatic!
Joined: Feb 2011
Posts: 2,562
Likes: 197
From: Austin, TX
2006 E55, 2012 GLK350 & 1992 190e sportline
I didn't want to mess with the exhaust, I've stripped out the header studs on a C230 before.
I didn't have to remove the whole front radiator, just the fan/hoses.
In other news, the idler pulley broke in half last week and destroyed the new accessory belt. So I replaced the pulley and belt. I'll post pics later tonight.
The car is currently at MB for a PA yearly inspection, they're saying I need brakes all around. So I'll be writing that up too. Sigh.

MBWorld Fanatic!
Joined: Sep 2007
Posts: 4,566
Likes: 421
05 c55 silver, 98 Imperial Red C43
I didn't want to mess with the exhaust, I've stripped out the header studs on a C230 before.
I didn't have to remove the whole front radiator, just the fan/hoses.
In other news, the idler pulley broke in half last week and destroyed the new accessory belt. So I replaced the pulley and belt. I'll post pics later tonight.
The car is currently at MB for a PA yearly inspection, they're saying I need brakes all around. So I'll be writing that up too. Sigh.
I didn't have to remove the whole front radiator, just the fan/hoses.
In other news, the idler pulley broke in half last week and destroyed the new accessory belt. So I replaced the pulley and belt. I'll post pics later tonight.
The car is currently at MB for a PA yearly inspection, they're saying I need brakes all around. So I'll be writing that up too. Sigh.
Based on the information you are providing, you seem like a person who doesn't have a lot of patience lol.....jk
Anyway, these kinds of threads are my favorite especially when there is a twist in the plot(unfortunately for you). Keep the pics coming
Thread Starter
Super Member
Joined: Feb 2008
Posts: 699
Likes: 44
From: PA
09 CLK550
Idler Pulley and Second belt replacement
So on April 3rd I was driving home and all of a sudden the LCD flashed red with a strange 'Check Battery' symbol I had never seen before. As I thought "huh that's weird" I noticed the steering was suddenly much heavier and knew the accessory belt was gone.
Knowing the water pump was no longer spinning I cranked the cabin heat up to max and drove the 1 mile home.
Turns out the idler pulley betrayed me at 142,000 miles, breaking at the back and tossing the brand new belt into the alternator.
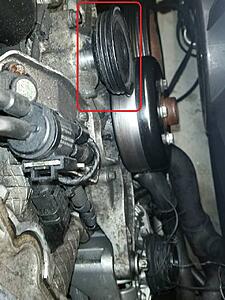
I was immediately worried that my brand new alternator might have been injured as I spent 10 minutes unwinding the belt.
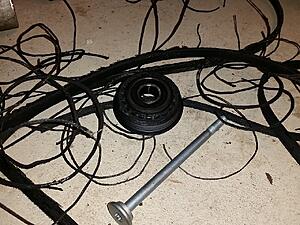
One quick trip to AutoZone and I was back in business with a idler pulley and belt
I dropped the car at MB today.
I needed 1.5Qt of tranny fluid
Failed the PA safety inspection, I need new rear pads/rotors so I ordered them this evening.
Knowing the water pump was no longer spinning I cranked the cabin heat up to max and drove the 1 mile home.
Turns out the idler pulley betrayed me at 142,000 miles, breaking at the back and tossing the brand new belt into the alternator.

I was immediately worried that my brand new alternator might have been injured as I spent 10 minutes unwinding the belt.


One quick trip to AutoZone and I was back in business with a idler pulley and belt

I dropped the car at MB today.
I needed 1.5Qt of tranny fluid
Failed the PA safety inspection, I need new rear pads/rotors so I ordered them this evening.
Thread Starter
Super Member
Joined: Feb 2008
Posts: 699
Likes: 44
From: PA
09 CLK550
Ahh lord its a fire
On a funnier note, the fire extinguisher I was keeping in my trunk (after the oil spray incident) somehow popped the pin and discharged in my trunk today while I was driving.
I thought something was on fire as odorless 'smoke' filled the cabin so I pulled over and jumped out.
Sigh.
I thought something was on fire as odorless 'smoke' filled the cabin so I pulled over and jumped out.
Sigh.


MBWorld Fanatic!


Joined: May 2008
Posts: 1,250
Likes: 21
From: Los Angeles, CA
Supercharged CLK500,ML500,S580
Amazing DIY thread, bonus points for presentation and details (esp. the part numbers)!
I plan on tackling some of these maintenance items myself soon and your posts have given me a good idea of what I'm in for. I have a few questions:
I plan on tackling some of these maintenance items myself soon and your posts have given me a good idea of what I'm in for. I have a few questions:
- After driving for a few weeks, hows the car? Did the transmission shifting fix work out? How does it ride?
- Was all the work done using stands/ramps (esp. transmission service)?
- Did you replace the transmission conductor plate too? If you did, was there any coding required or was it a straight swap?
- Were the new solenoids upgrades or did the part number change? Did you have to reset the transmission adaptations via STAR?
Thread Starter
Super Member
Joined: Feb 2008
Posts: 699
Likes: 44
From: PA
09 CLK550
Final thoughts, with ambit.
Yeah the part numbers are so I remember what I did 
Car is GREAT. Transmission shifts as smooth as I can ever remember.
I had replaced the conductor plate back in Feb 2017, see pics here:
https://mbworld.org/forums/cl55-amg-...ml#post7063434
It was a direct swap (didn't replace any solenoids back then) and did not require any coding.
I'm guessing the new solenoids are just a part number change. I had read other threads about upgrading to the "blue tops" but I went with what I thought was a direct swap. I've put about 400miles on the car since finishing the tranny work and it's been great. No STAR reseting.
Honestly, ALL the suspension work seems to have been a waste. The car handles/absorbs bumps NO different than before. I'm very disappointed in that after spending almost $600 for everything I did. I had expected the 13 year old OEM AMG equipment to have worn out but I guess it was still going strong, Ohh well.
90% of the work was done with the front up on ramps. The transmission service is a bit of a ***** because of how messy it is, and the assembly you drop out is maybe 15lbs? Its not fun to hold with one slippery hand while being dripped on by cold thick fluid and trying to unscrew the torx bolts. But I would do it all day everyday over EVER CHANGING THE ENGINE MOUNTS AGAIN. I'd rather sell the goddamn car.
I'm doing the rear pads & rotors maybe tomorrow night, and the fronts next week.
MBWorld Fanatic!
Joined: Sep 2007
Posts: 4,566
Likes: 421
05 c55 silver, 98 Imperial Red C43
I think your car is trying to kill you bro. No joke
Btw if your belt came off, pull over and shut the car off and pull the remains of the belt out lol. Otherwise ^^^^ that happens.
Btw if your belt came off, pull over and shut the car off and pull the remains of the belt out lol. Otherwise ^^^^ that happens.
MBWorld Fanatic!
Joined: Sep 2007
Posts: 4,566
Likes: 421
05 c55 silver, 98 Imperial Red C43
Yeah the part numbers are so I remember what I did
Car is GREAT. Transmission shifts as smooth as I can ever remember.
I had replaced the conductor plate back in Feb 2017, see pics here:
https://mbworld.org/forums/cl55-amg-...ml#post7063434
It was a direct swap (didn't replace any solenoids back then) and did not require any coding.
I'm guessing the new solenoids are just a part number change. I had read other threads about upgrading to the "blue tops" but I went with what I thought was a direct swap. I've put about 400miles on the car since finishing the tranny work and it's been great. No STAR reseting.
Honestly, ALL the suspension work seems to have been a waste. The car handles/absorbs bumps NO different than before. I'm very disappointed in that after spending almost $600 for everything I did. I had expected the 13 year old OEM AMG equipment to have worn out but I guess it was still going strong, Ohh well.
90% of the work was done with the front up on ramps. The transmission service is a bit of a ***** because of how messy it is, and the assembly you drop out is maybe 15lbs? Its not fun to hold with one slippery hand while being dripped on by cold thick fluid and trying to unscrew the torx bolts. But I would do it all day everyday over EVER CHANGING THE ENGINE MOUNTS AGAIN. I'd rather sell the goddamn car.
I'm doing the rear pads & rotors maybe tomorrow night, and the fronts next week.
The engine mounts were a ***** on my m112 motor in my c280. Had to drop the alternator.
I think they were easier on my m113 in my c43. Havent touched the w203 yet.
Thread Starter
Super Member
Joined: Feb 2008
Posts: 699
Likes: 44
From: PA
09 CLK550
them's the brakes
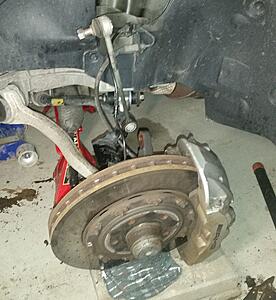
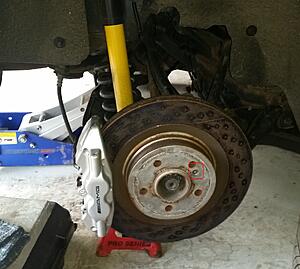
OK, so MB failed my PA state inspection for rear pads/rotors being low and helpfully offered to replace them all around for $3100. As you might imagine from this thread, I'm ok going some light maintainence on my own
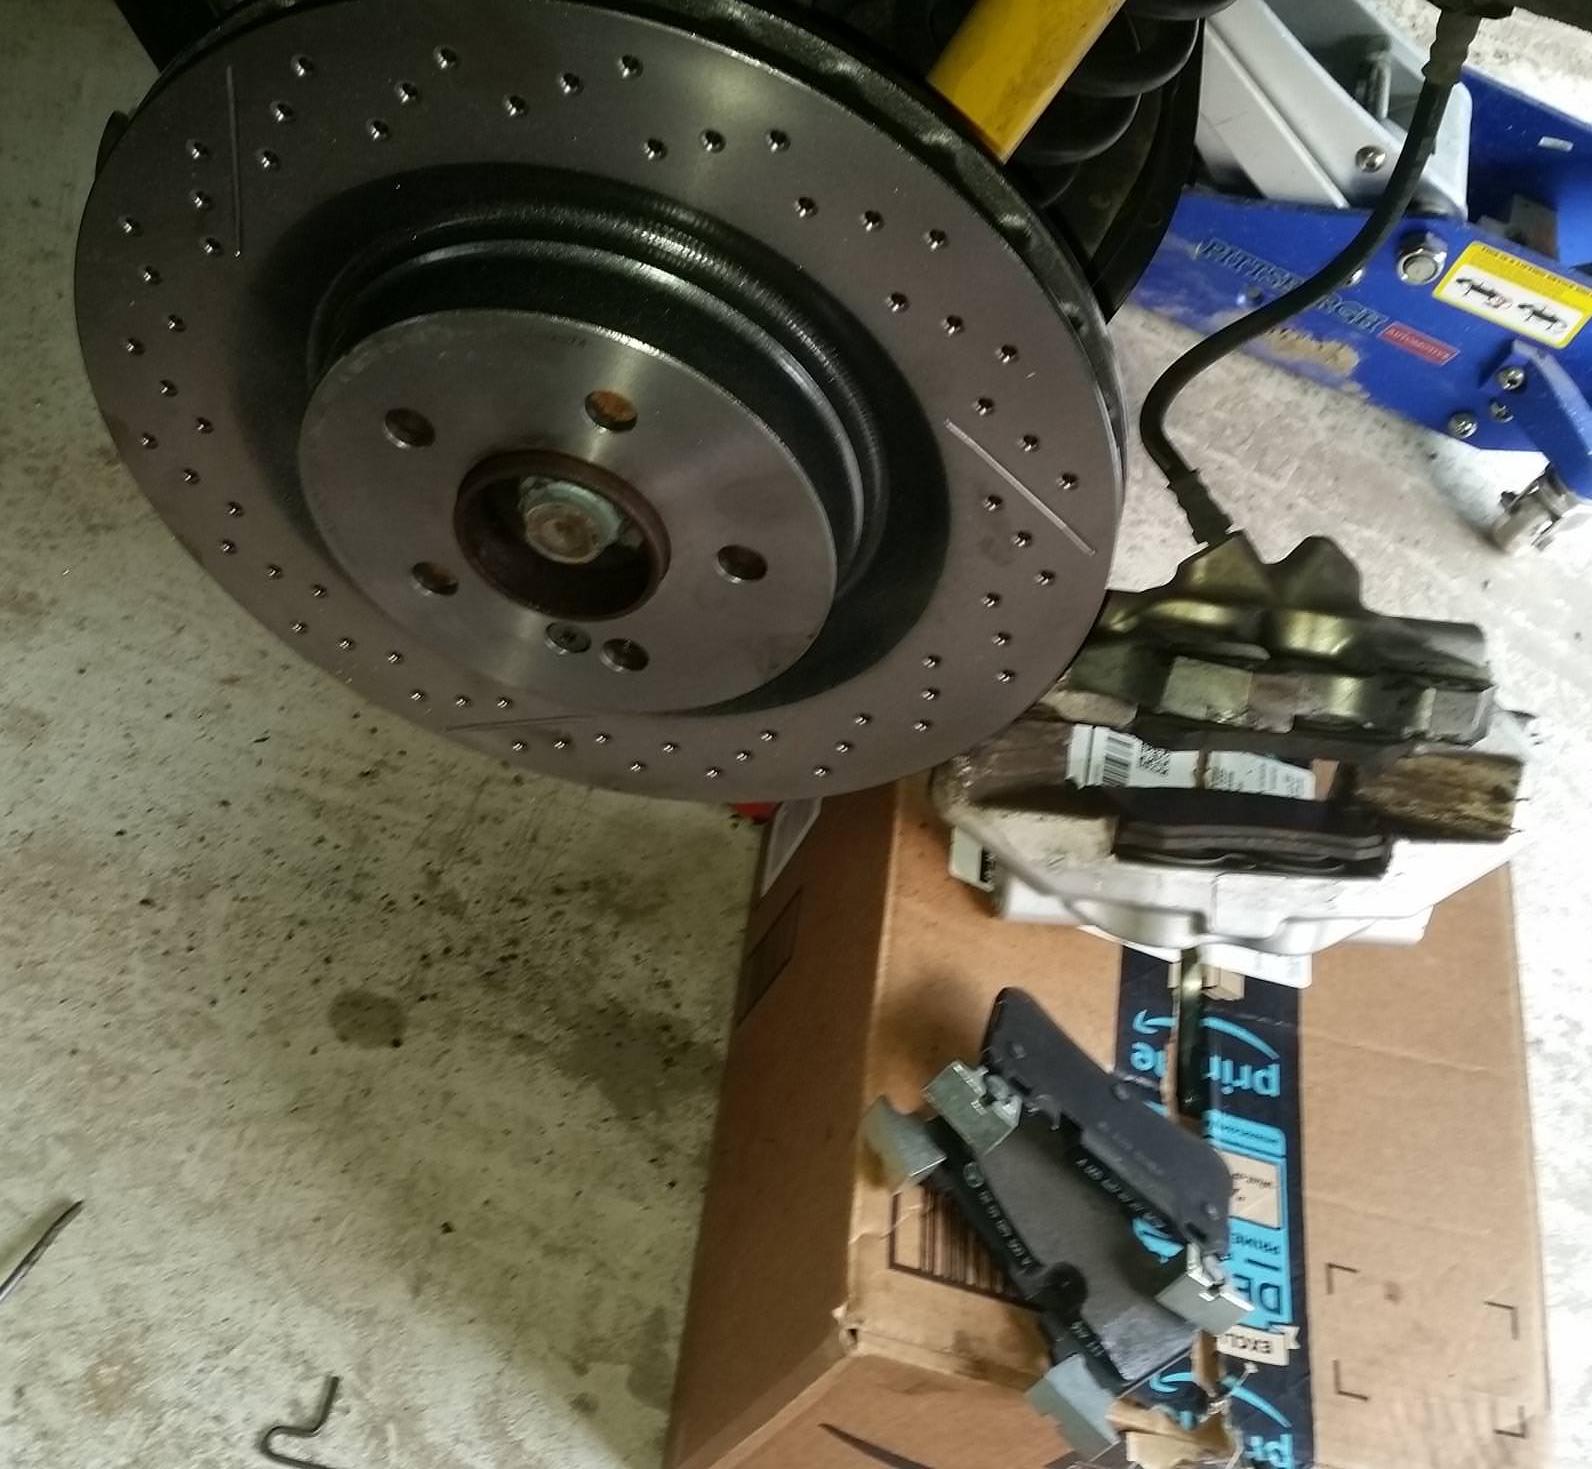
Pads and rotors from ebay.
Pads are OEM MB $150
Box says: 005 420 41 20 41
4 x A 005 420 40 20
(See note below for slight fitment issue)
Rotors are Brembo 2 x 09925741 $141 for both
Open the brake fluid reservoir so you're not fighting it retracting the pistons.
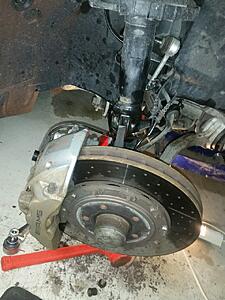
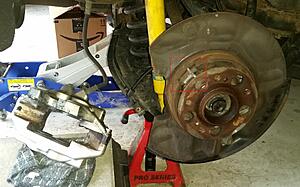
Tires off, little torx bolt holding the rotor down came off easy. I thought this was going to be a quick job
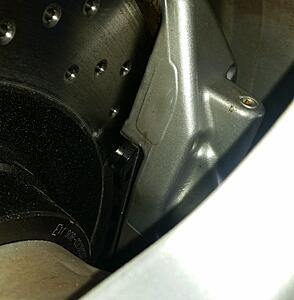
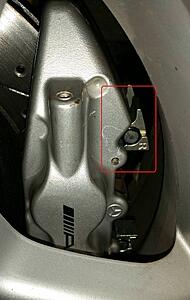
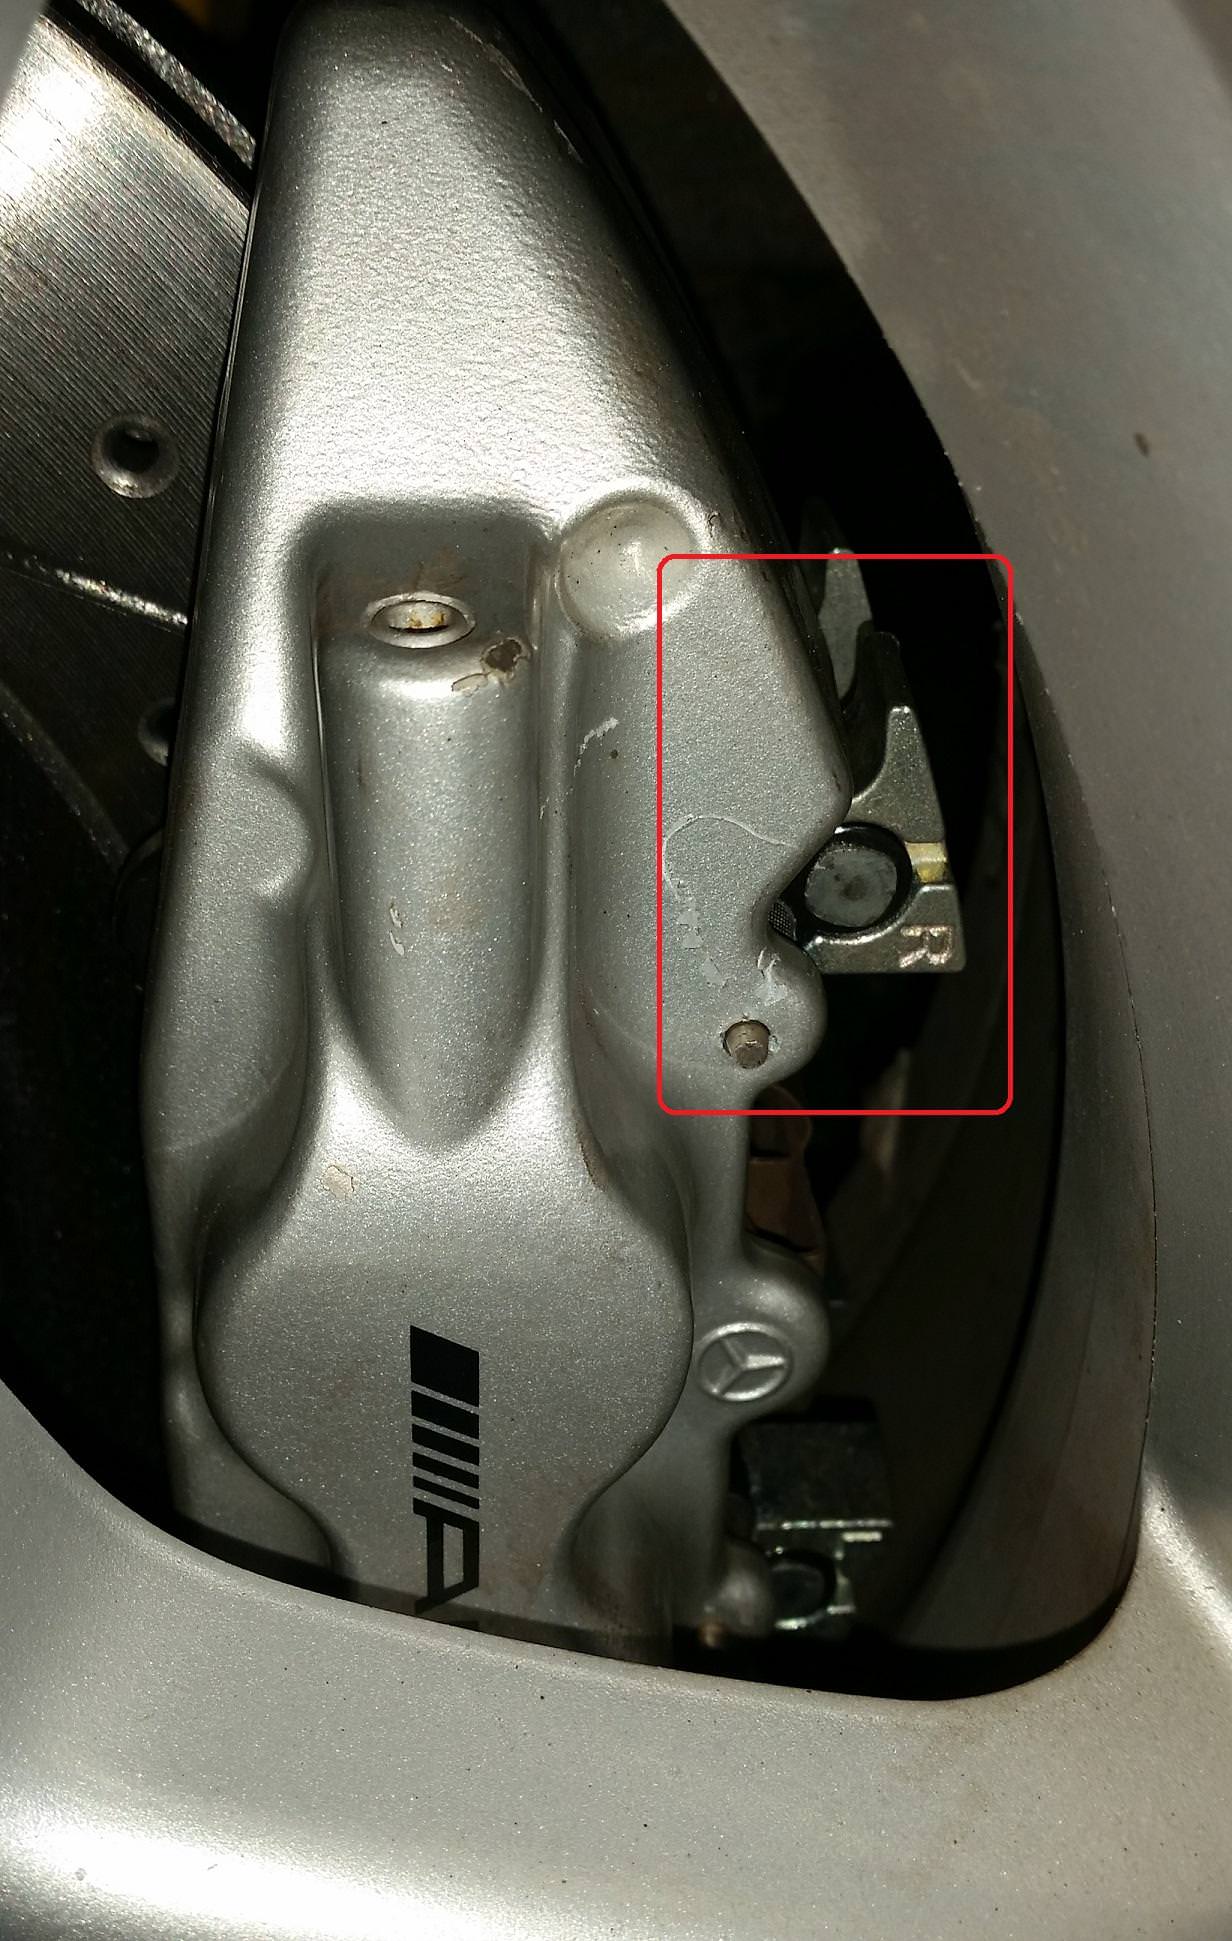
I had to remove the rear brake pad wear sensor out of the way to get the pins out.
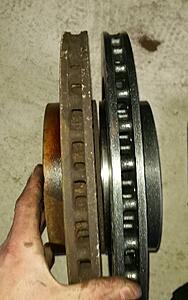
Old vs. New.
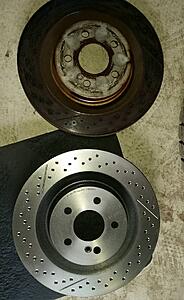
I'm pretty sure these are original rear rotors with 140,000 miles on them
I encountered an issue with parking brake shoes on both sides. The old rotor would come off about 3mm then get 'stuck'. You can feel it getting caught on the parking brake pad springs.
You have to line the rotor + hub up so you can see this little 'wheel' with teeth. Use a flat head screw driver to spin it which will pull the parking brake shoes closer. I think it spun 'up' on the driver-side and 'down' on the pass side to let me get the old rotors clear.
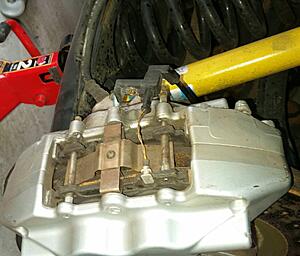
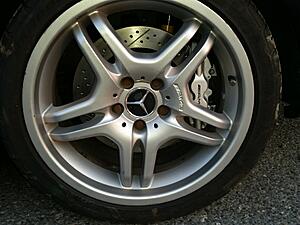
Calipers are held on with 2 x T40 inverted torx bolts, was not expecting torx.
New rotor on.
I pushed the pistons back by hand.
HNNNGGGG MEATY
So here's the odd thing. I ordered these pads from ebay. Confirmed with the seller they were correct and mentioned by existing pads don't have those silver 'tabs'. Seller said no problem they come right off.
They do not.
But, they still fit just fine and seem to be working as expected. Pads themselves where *almost* identical. Except I could not reuse my pad wear sensor, the new pad material did not have a small hole for it to slide in. I think I need a 'newer' style wear sensor.
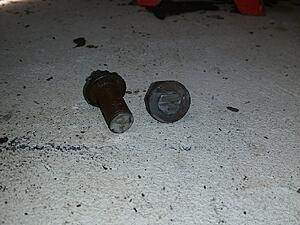
Summer tires back on. I need new lugs, they look terrible.
Retighten lugs after test drive.
Pads and rotors from ebay.
Pads are OEM MB $150
Box says: 005 420 41 20 41
4 x A 005 420 40 20
(See note below for slight fitment issue)
Rotors are Brembo 2 x 09925741 $141 for both
Open the brake fluid reservoir so you're not fighting it retracting the pistons.
Tires off, little torx bolt holding the rotor down came off easy. I thought this was going to be a quick job

I had to remove the rear brake pad wear sensor out of the way to get the pins out.

Old vs. New.
I'm pretty sure these are original rear rotors with 140,000 miles on them


I encountered an issue with parking brake shoes on both sides. The old rotor would come off about 3mm then get 'stuck'. You can feel it getting caught on the parking brake pad springs.
You have to line the rotor + hub up so you can see this little 'wheel' with teeth. Use a flat head screw driver to spin it which will pull the parking brake shoes closer. I think it spun 'up' on the driver-side and 'down' on the pass side to let me get the old rotors clear.
Calipers are held on with 2 x T40 inverted torx bolts, was not expecting torx.

New rotor on.
I pushed the pistons back by hand.
HNNNGGGG MEATY

So here's the odd thing. I ordered these pads from ebay. Confirmed with the seller they were correct and mentioned by existing pads don't have those silver 'tabs'. Seller said no problem they come right off.
They do not.
But, they still fit just fine and seem to be working as expected. Pads themselves where *almost* identical. Except I could not reuse my pad wear sensor, the new pad material did not have a small hole for it to slide in. I think I need a 'newer' style wear sensor.
Summer tires back on. I need new lugs, they look terrible.

Retighten lugs after test drive.
Last edited by ambit; Apr 14, 2018 at 08:52 PM.


