When you click on links to various merchants on this site and make a purchase, this can result in this site earning a commission. Affiliate programs and affiliations include, but are not limited to, the eBay Partner Network.
So I followed this thread and got my chain replaced on my 2011, ML350 Bkuetec. Everything seemed to go just fine. But now when I start the engine has hard time starting and when it does it shakes quite violently when it runs.
any ideas what could be the problem?
Upstream exhaust gas temperature sensor not connected? Sensor located on the bottom of turbo on the passagers side. Plug is on the rear corner of the valve cover. Check that as it may not give you a code for a while.
Hey guys. I tried to follow this instruction but failed miserably.. I am at a point where I pulled both valve covers, finished feeding the chain in, and aligning all the marks. One thing I totally didn't consider is the timing of the balance shaft. I thought hat it is just a pulley there so I was not worried about it while I was pulling the sprockets off and adjusting the new chain. I was going to see if I can remove the sprockets again and try to adjust the balance shaft to close enough position so that it is drivable, then get to the timing cover later and properly fix it. But now I think may have majorly screwed up. As I rotate crankshaft I feel pressure buildup approaching TDC. I wasn't honking when I was pulling the chain through initially, but now it occured to me that with all injectors and camshafts removed, there shouldn't be any pressure. Is that correct? Did I bend one of my valves while doing this? We did work through resistance while pulling the chain after a couple teeth skipped. Is there something else that could be causing resistance with everything removed? I noticed that crankshaft has another chain on it, to oil pump? Could that be causing resistance?
Hey guys. I tried to follow this instruction but failed miserably.. I am at a point where I pulled both valve covers, finished feeding the chain in, and aligning all the marks. One thing I totally didn't consider is the timing of the balance shaft. I thought hat it is just a pulley there so I was not worried about it while I was pulling the sprockets off and adjusting the new chain. I was going to see if I can remove the sprockets again and try to adjust the balance shaft to close enough position so that it is drivable, then get to the timing cover later and properly fix it. But now I think may have majorly screwed up. As I rotate crankshaft I feel pressure buildup approaching TDC. I wasn't honking when I was pulling the chain through initially, but now it occured to me that with all injectors and camshafts removed, there shouldn't be any pressure. Is that correct? Did I bend one of my valves while doing this? We did work through resistance while pulling the chain after a couple teeth skipped. Is there something else that could be causing resistance with everything removed? I noticed that crankshaft has another chain on it, to oil pump? Could that be causing resistance?
Do compression tests to see if there's damage ... if not re-time everything again - Sorry man doesnt sound good though...
My Benz Friends - I did oil cooler seals and I'm not gonna do another big job on the car again Its just a PITA and since I dont have a helper/ brother / cousin or neighbor that works on cars I'm usually the only one in the garage .... Quick question: Can I just remove some links from the chain and be done ? I know easier said than done but has anyone thought about that ? Is it worth a shot ?
thanks - 2010 GL350 - 75k miles - OCI 3500 miles since 44k
P.S: Any shops in Denver area ? I just moved here and dont know much about the city
I have not done the chain on OM642 specifically BUT I would not be shortening the chain under any circumstances.
in your case, I would be taking the front cover off and feeding the chain with proper timing marks in place.
Place an add in your local facebook market place or Craigslist that you're looking for help with this job if you feel its too much. I would certainly help if was near you!
Do compression tests to see if there's damage ... if not re-time everything again - Sorry man doesnt sound good though...
Thanks for your response. I have created a separate thread about crankshaft resistance and posted my findings and solution. I suppose I should update here too. Short of it is that gunk from the air intake fell into the cylinder and was preventing #5 piston from coming all the way up. This was because I failed to make sure valves were closed prior to cleaning. If you find yourself in a situation where you have intake manifold off and want to clean intake ports, check out my other thread. I have taken note of at which angle from TDC on flywheel each piston is at TDC, so that you can avoid my mistake without taking valve covers off.
Now you need to re-install the intake camshaft again and match up your timing marks. When I reinstalled mine, I coated the bearing surfaces with Red Line assembly lube, but if you don’t have that handy, then at least get some motor oil on there so you don’t have it dry fit. Once the camshaft is back in, install as many bolts as you can to reattach the sprocket to the camshaft, and torque the bolts to 160 Inch Pounds. Before you start rotating the engine to check timing, install your NEW tensioner into the side of the cylinder head. Torque it to 60 pound-feet. Now, using your breaker bar, rotate the engine around by hand and verify that your dots are linking up at TDC, and that the timing mark on the crank pulley is lined up at 0 degrees. Don’t just do this once, rotate the engine through several cycles and check the timing marks each time. When you are convinced it is right, you can start to button everything up again.
If you didn’t clean up the cylinder head and valve cover when you removed it, now is the time to do so. You need to get all that old sealant off of there and get a clean surface so that you can glue it down again. MB cites a special cleaner for doing this, but I just used carb cleaner and a rag. I stuffed rags down into all the crevices of the cylinder head so that none of the bits would fall down there. And when I was done cleaning I used a shop vac to try and clean them all up. You need to have an oil free surface to get a good seal and prevent any leaks.
Once you have the surfaces suitably clean, you need to get a tube of Loctite 5970 and put a 1.5mm bead all around. MB specifies a path to lay it down, and I found that the tube that I bought fit into a small caulk gun, which made it easier to dispense. You’re supposed to get the entire thing done within 10 minutes so that it doesn’t start to cure. You can see how to lay down the bead here:
Place the valve cover on the cylinder head and screw in all your bolts finger tight. Then, starting in the middle and working your way out (just like when you removed them), you torque the bolts in 3 stages:
1. 35 inch pounds
2. 53 inch pounds
3. 80 inch pounds
There are something like 30 bolts, so this takes a while and it’s easy to miss a bolt, so take your time and check every one. Torque on these is critical because it’s what holds the camshafts in place.
After you get the valve cover back on, reassembly is, as they say, the reverse of disassembly.
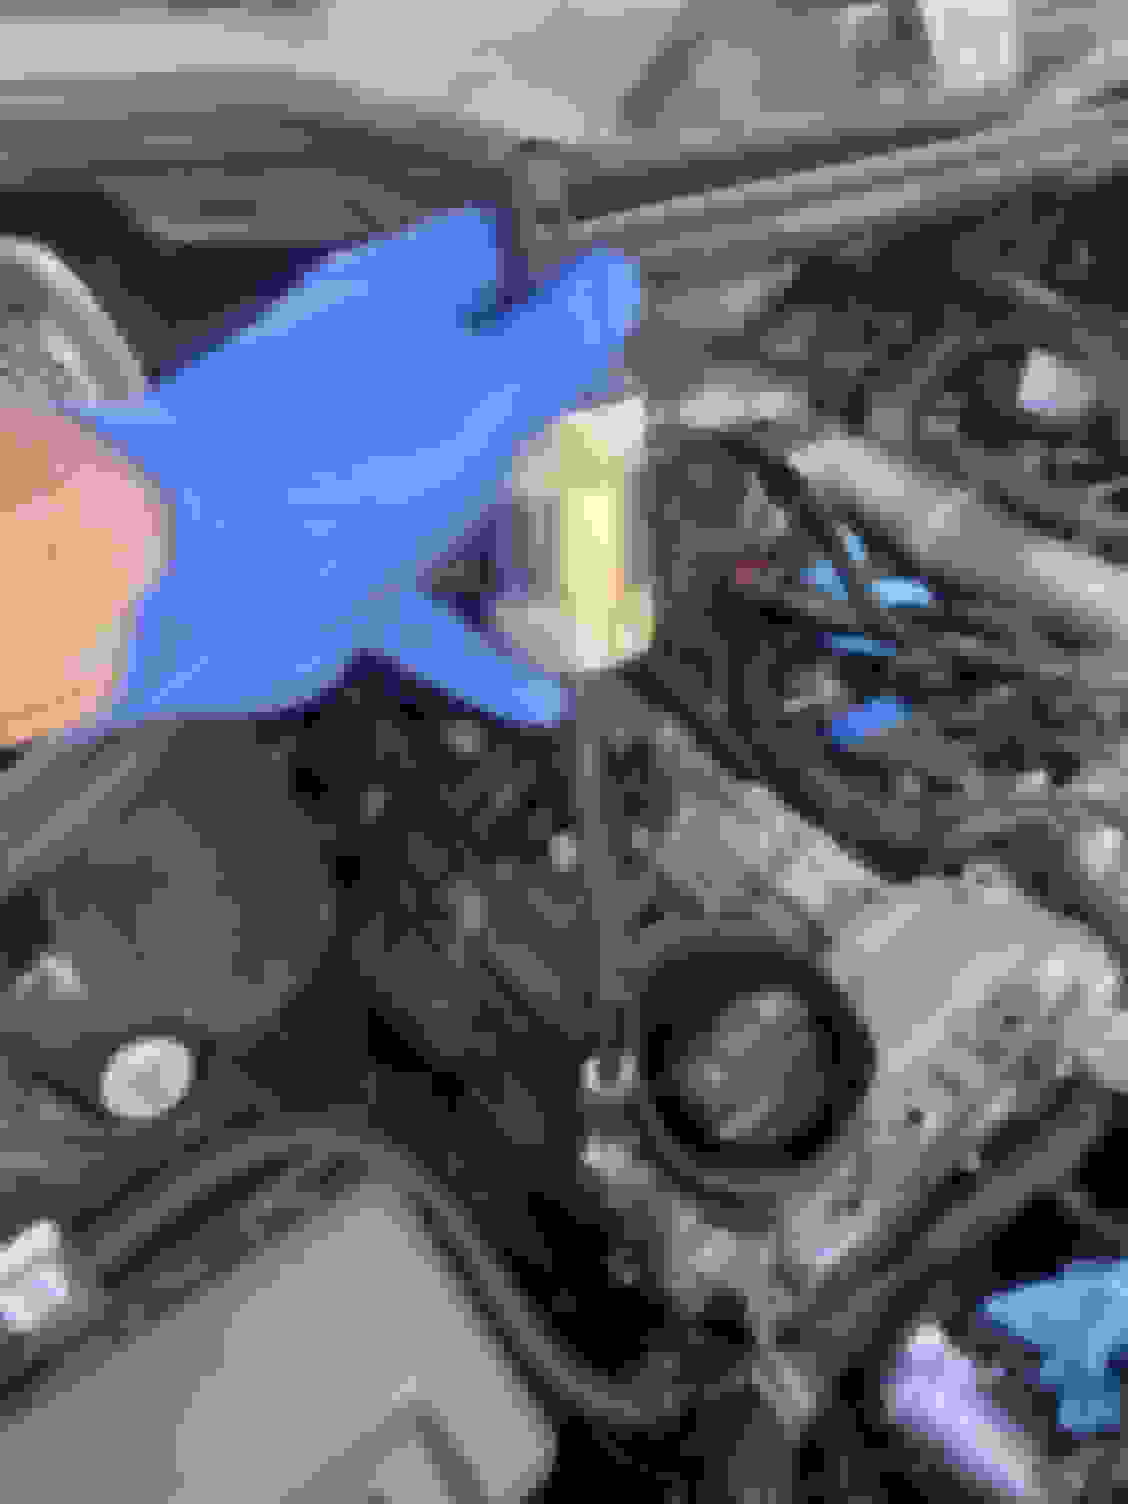
When reinstalling the injectors I again used the slide hammer to seat them properly. I installed new copper washers and o-rings on the fuel return line. The long bolts that hold the injectors in place are, I believe, one time use, but I re-used them and just put a small bead of blue Loctite about an inch from the bottom. These are torque to yield bolts, so you start by applying 62 inch-pounds, then turn it 90 degrees, then another 90 degrees.
The hard lines for the fuel system are torqued to 20 and 24 foot pounds, but since I didn’t have the crows foot socket, I just did it by feel using flare nut wrenches. You have to pay particular attention to how everything goes back together. Between the fuel lines, the fuel return line, and all the injector wiring, if you don’t get it all back in the right spot, you can find it difficult to get the air cleaner back in place, especially that foam rubber spacer. It helps if you take photos when you are taking it apart and reference them during reassembly.
Once you have it all together, check every connection again to ensure you have it buttoned up, and now it’s time to start it up. Because you’ve drained the fuel from the lines, it takes a few tries to get the engine to start. In my case, because I had taken off the left side as well and all those lines, it meant 5 tries, but it started up fine and settled into a normal idle.
How long did it take? Good question. I have two small kids and I travel a lot, so I was working an hour or two here and there, along with some marathon sessions when I could get the change. I’m going to guess it took me 30 hours, plus another 3 hours of a helper. If I had not removed the left side cylinder head cover too, I bet I would have saved 10 hours; that was a real bear, especially the EGR valve which is up under the cowl and in a terrible spot. I bet if I did this job again, I could get it down to 15 hours; there is one steep learning curve after another.
1. OEM tool for holding chain cost around 100$. Holding chain with pry bar - extremely risky.
2. Can use any sealant from Autozone, instead of expensive Loctite.
3. No need to remove left engine cover at all.
4. Tensioner Must be replaced AFTER new chain is installed.
My video of this job on a Sprinter Van.
P.S. Finishing video doing same job on a single row chain Mercedes GL350
Thanks @sak335 for the writeup. I just finished this job, it didn't go perfect but I managed to recover. A couple of suggestions to add based on my experience
1) make sure you are at tdc of the compression stroke, double check timing marks as there are inner and outer marks on the cam gears. In other words the center marks can line up but the mark should be on a gear tooth on the exhaust cam gear and recessed on the intake gear.
2) no chain feeding tool is needed, you can use zip ties and while the process is a little slow it only takes one person and it's fairly fool proof. https://youtube.com/watch?v=s6rsgLBXofY
3) for insurance mark the exhaust cam, crank balancer and intake cam
4) I did not remove the tensioner before installing the new chain out of fear of the slack chain skipping. Installing the new tensioner was no picnic, I ended up pulling the passenger wheel and liner because the new tensioner kept cross threading. If you bend the metal wire holder out of the way you can use a 10 inch extension and make certain it threads straight. It should not be difficult to thread the tensioner, if you feel extra resistance stop and back it out, make sure it's threading true.
if I had to do this all over I would create a cam holder because when I pulled the intake cam (the second time to rivet the chain) the exhaust cam was under tension and it moved and could not be safely turned back to my marks. I ended up pulling the exhaust cam and rotating the engine back to tdc to re-time the cams. This surprise caused a bunch of stress and I ended up watching hours of video to feel comfortable I had the timing correct.
I marked my crank before replacing the chain and found the timing was way off, with the new chain everything is timed perfect.
One other thing I forgot to mention. I purchased the same chain tool as the OP and while it got the job done I really hated the process of riveting the chain. The fact that you need to remove the cam to break and rivet the chain introduces significant risk. If I were to do this again I would explore the possibility of a chain breaker that doesn't require cam removal, I believe there are compact chain tools made for motorcycle chains that might work. A riveting tool that does not require cam removal could be made with relative ease from a small but heavy duty C clamp.
FIY the just started emission recalls in USA for some model can extend timing chain warranty. Worth checking before spending money on it.
Got a letters from MB Bluetec Settlements Legal Administration and it does list timing chain for extended warranty.
The list has 23 points and it also covers cylinder head assembly components, camshaft, valves, springs, manifolds
So looks like beside lower engine parts (who are bulletproof on MB anyway) almost everything on top of the engine will have 4 years warranty.
This is informing letter, not actuall warranty, so I hope it will stay this way.
I have 4 affected Bluetecs in my stable and scheduled appointment on Monday to start the recalls.
Thanks @sak335 for the writeup. I just finished this job, it didn't go perfect but I managed to recover. A couple of suggestions to add based on my experience
1) make sure you are at tdc of the compression stroke, double check timing marks as there are inner and outer marks on the cam gears. In other words the center marks can line up but the mark should be on a gear tooth on the exhaust cam gear and recessed on the intake gear.
2) no chain feeding tool is needed, you can use zip ties and while the process is a little slow it only takes one person and it's fairly fool proof. https://youtube.com/watch?v=s6rsgLBXofY
3) for insurance mark the exhaust cam, crank balancer and intake cam
4) I did not remove the tensioner before installing the new chain out of fear of the slack chain skipping. Installing the new tensioner was no picnic, I ended up pulling the passenger wheel and liner because the new tensioner kept cross threading. If you bend the metal wire holder out of the way you can use a 10 inch extension and make certain it threads straight. It should not be difficult to thread the tensioner, if you feel extra resistance stop and back it out, make sure it's threading true.
if I had to do this all over I would create a cam holder because when I pulled the intake cam (the second time to rivet the chain) the exhaust cam was under tension and it moved and could not be safely turned back to my marks. I ended up pulling the exhaust cam and rotating the engine back to tdc to re-time the cams. This surprise caused a bunch of stress and I ended up watching hours of video to feel comfortable I had the timing correct.
I marked my crank before replacing the chain and found the timing was way off, with the new chain everything is timed perfect.
Thanks for the heads up on this. I’m getting ready to jump into this. I’m a novice mechanic, but will be assisted by a master mechanic. I’m just gonna go REAL slow. I like the zip tie method you use for feeding the timing chain.
Question regarding the cam holder, have you thought about how you would make this? I’ve seen some comments on ”cam balance” that have me a little freaked out.
“Now, leading up to this point you’ll want to start pulling the bolts that hold the sprocket that holds the chain, because you need to remove it. There are three bolts, but you can only access 1 or 2 of them at a time. There is also a pin that helps you locate the sprocket as well. If you forget to do this ahead of time, then you have to rotate the engine around a full cycle to get it back again.”
Question: Do you start removing the sprocket bolts prior to setting the engine at TDC since it seems you have to rotate the engine to get to all the bolts that hold the sprocket in place?
NapaGL320; yes, I don't see any reason why not, but you have to ensure that you don't pull them too soon, because otherwise you'll get the engine out of time if you pull all three but still need to rotate the engine.
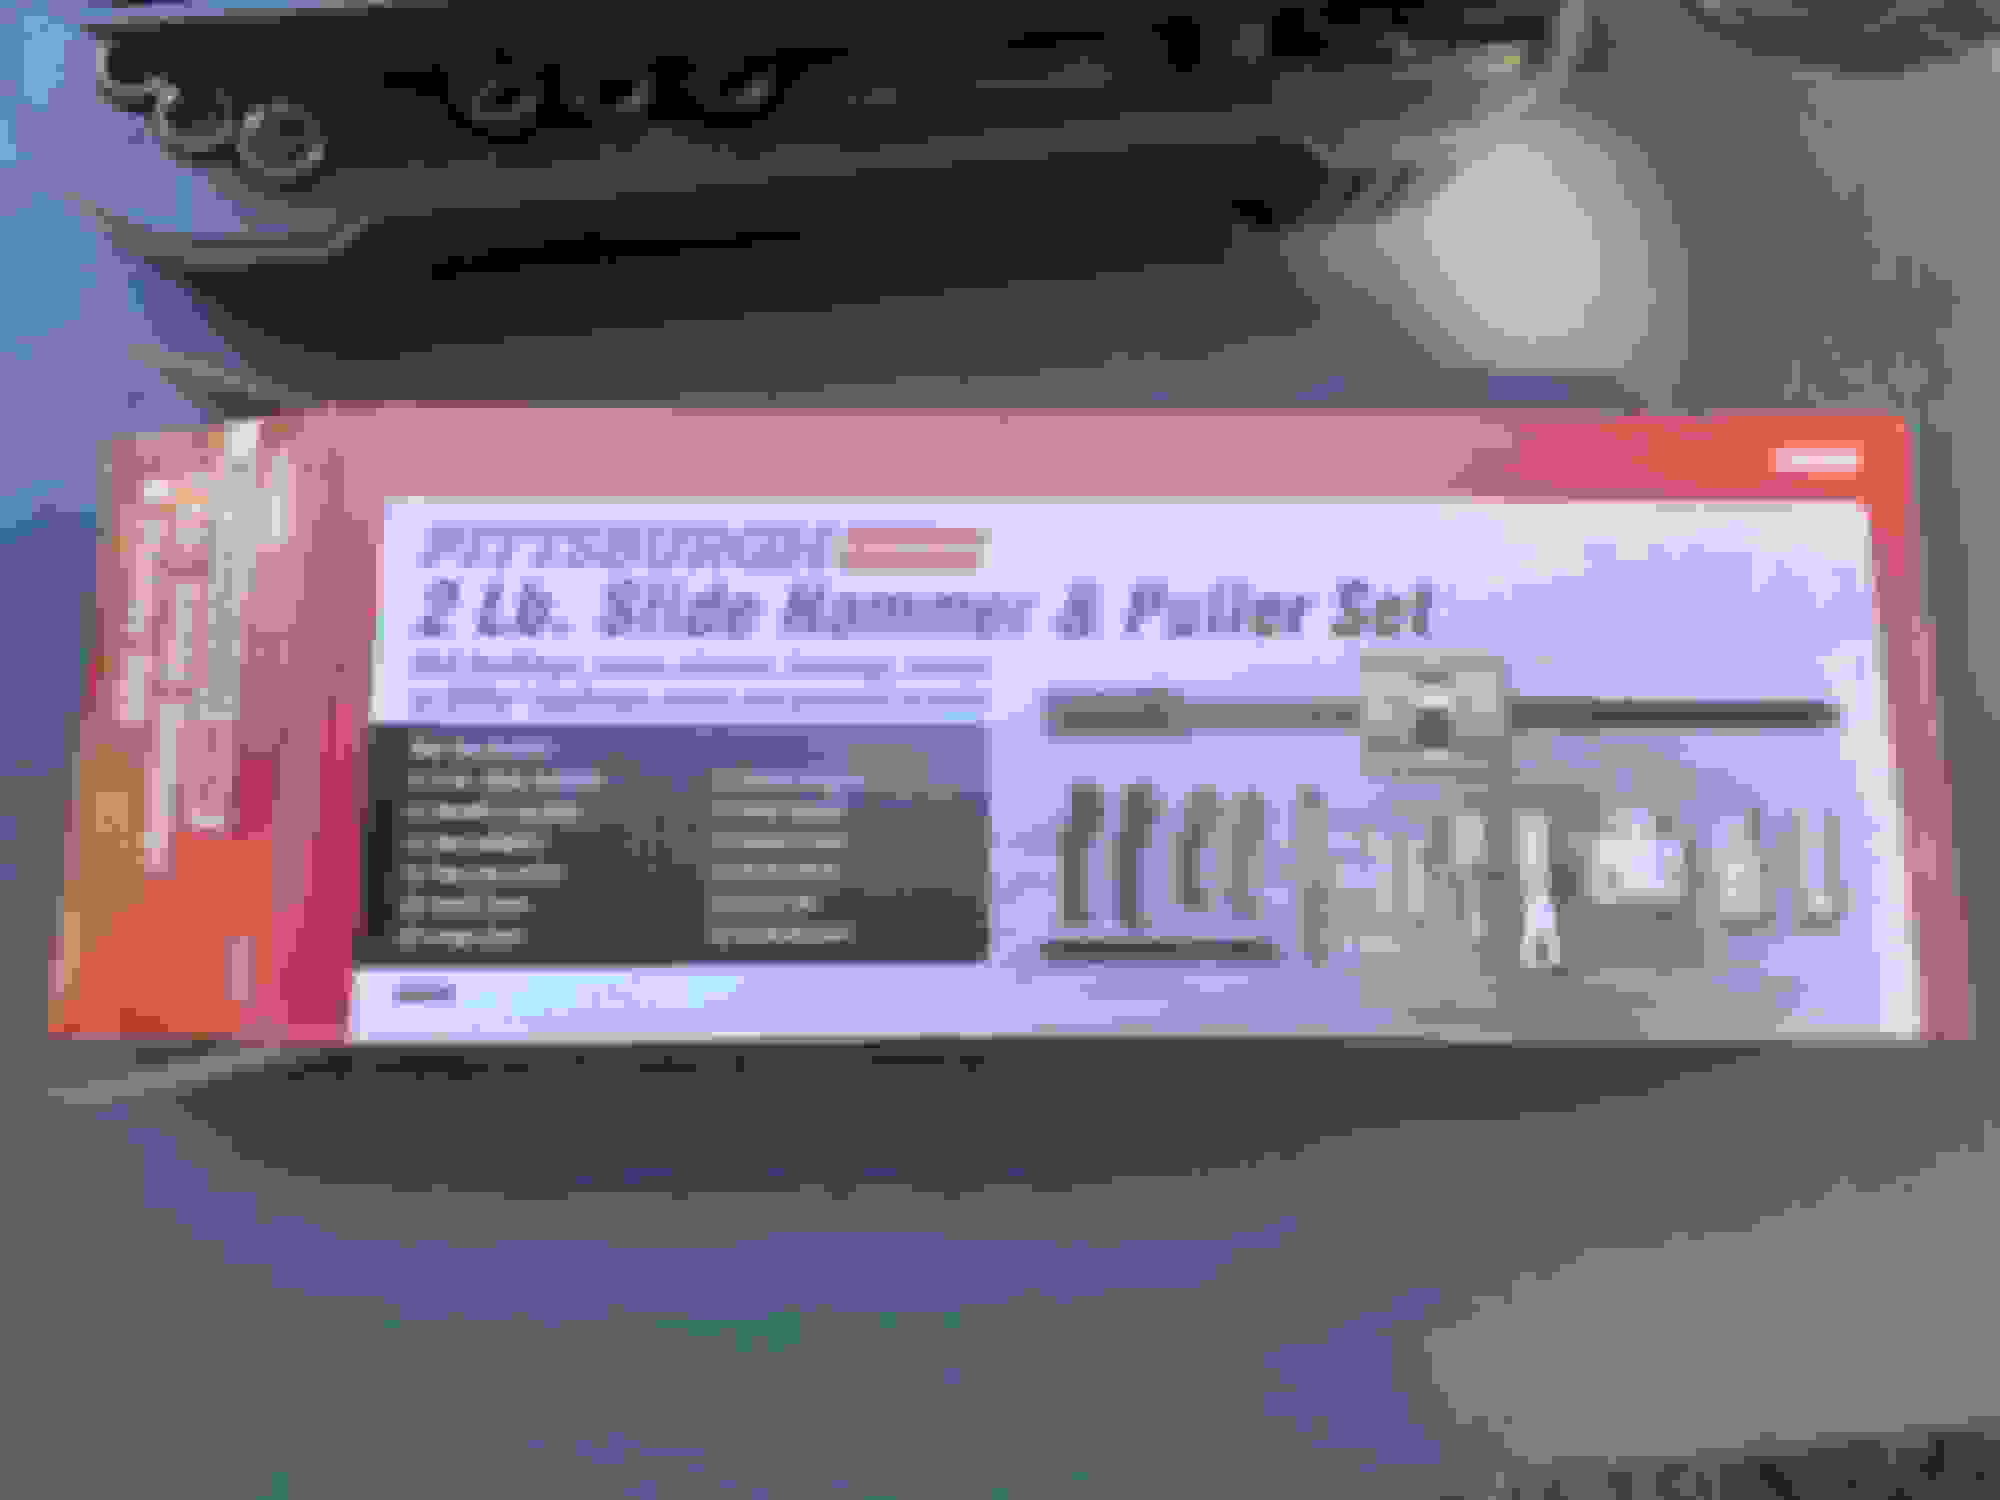
Followed @sak335’s instructions on the camshaft cover removal and it went swimmingly. Connected the slide hammer at the same spot, 10-12 solid strikes and it separated so well I finished separating in by hand. Used a 2lb slide hammer from harbor freight, about $27.00. It came with an attachment that worked perfectly so I didn’t have to make a special attachment.


 02-11-2020, 03:43 PM