

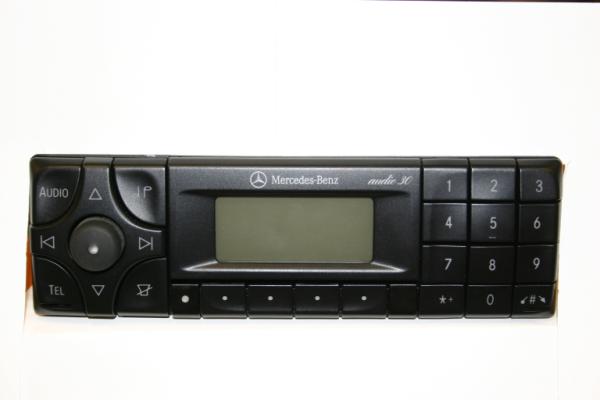
The goal is to eliminate the FM modulator, the cd changer and the 3 in 1 cigarette lighter adapter. 1st thing is that I have the Becker Audio 30 radio. I will be replacing it with the Alpine Audio 10 CD-R which will eliminate the audio cassette on the old radio and replace it with a cd player that reads all different types of cds (cd-r, cd-rw).
1. Remove the radio with radio keys. They slide into slots on the left and right bottom edge. They click in and just slide the radio out. Disconnect the wiring harness which consists of 2 electrical connects (A and B are joined together to form one connector and C is the other connector). Remove the antenna connector and the the fober optic connector. To remove the keys from the radio just push on the metal tabs on the side of the radio and the keys can be pulled out.
2. Remove the cubby above the ashtray by reaching into the empty radio slot and finding a plastic tab on the top back of the cubby and pushing it down. This will release the cubby.
3. Remove the ashtray compartment by 1st removing the ashtray itself. Then pop up the panel around the gearshift and move it to the side. You will see 2 screws holding the ashtray compartment. Just remove them and pull out the compartment. Undo the cigarette lighter connector (try not to break the bulb).
4. I removed the cd changer from the car by lifting up the mat in the trunk and removing the 2 screws that holds the changer in place. Next disconnect the power connector and then the fiber optic cable. I left the connector in the trunk for future use for the next car owner.
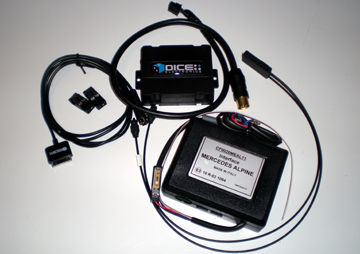
5. Next is to wire the box the says "Interface Mercedes Alpine". I chose to use the power from the cigarette lighter by splicing in the fused red to power and the black to ground. I also spliced the brown wire to ground per the install instructions. This is for the AUX function and when I turned on the Sirius radio it had hissing over the speakers until I grounded it. Now there is a blue wire left which is the "Abilitation wire" which is for the fiber optics loop wakeup. On the "C" connector of the radio wiring harness there is a blue and black wire which is for the now removed cd changer. I removed that pin from the connector and replaced it with the blue wire which has a new pin which snaps into the connector. Please remember which hole you removed the pin from or if you can't remove the pin just splice the blue to the blue and black.
6. Now connect the Interface Mercedes Alpine to the box that reads "Dice" with a short cable that has a DIN connector on one end that plugs into the Interface and a 12 pin Molex connector that plugs into the Dice box. I had to open up the Interface box by unscrewing 2 screws in order for the DIN plug to fit and then it locked it in place when I closed the box.
7. Now to connect the provided fiber optic cables 1st attach the RX (receive) cable to the connector just right of the DIN plug on the Interface. Then connect the TX (Transmit) to the other connector. Now plug the other end of the fiber connector into fiber optic port on the radio. Don't worry, it will only go in one way.
8. Now for my install I chose to drill 4 holes into the plastic cubby for the different cables. Hole 1 is for the Ipod cable. Hole 2 is for the AUX cable. Hole 3 is for the power cable for the Sirius Satellite Radio. Hole 4 is for the Sirius Antenna cable.
9. To eliminate the cigarette lighter adapter for the Sirius radio I chose to open up the adapter and remove the circuit board which converts 12 vdc to 5 vdc and wired it to fused power and ground. I just wrapped the circuit board in black electrical tape and pushed the power connector end thru the cubby hole.
10. Connect the Ipod cable to the Dice box by pushing the 8 pin DIN end thru cubby hole 1 and leave the Ipod connector end in the cubby. Connect the AUX cable to the AUX jack on the Dice box and push the other end thru hole 2.
11. On the Dice box are two sets of dip switches. The set on the left is the "car config switch" and the one on the right is the "Ipod config switch". The default settings are all switches set ot "off" which is the up position. I switched the "Ipod config switch" to the "on" positions. This allows you to use the Ipod as you would normally do. In the "off" position the Ipod like an MP3 player will no Ipod functions which is ok for people who do not use ITunes and download their music via Windows Media Player or other methods.
12. Now I placed the two boxes (Interface and Dice) thru the empty radio slot and tie wrapped them in place and out of the way of the radio and cubby. DO NOT BEND THE FIBER OPTIC CABLES, you can curl them only and not alot. Remember that the fiber cable is glass and light will not pass thru bends in the cable. Now reconnected the radio wiring harness and antenna. Reinsert the radio into it's slot.
13. Now I insert the Sirius power cable into cubby hole 3 and the pre-installed Sirius antenna cable in hole 4. I connected all 4 cables to the Ipod and the Sirius radio. I did not reinstall the cubby until I tested everything. I powered up the radio and reentered the code. I then selected the CD function of the radio. I got the Ipod to work playing a song as usual and then by selecting CD 5 track 1 on the radio by pressing the #5 on the radio keypad and then hitting the up arrow on the radio. Music to my ears...Now for the Sirius radio I selected track 2 of CD #5 and again pressed the up arrow.....Again music to my ears.
14. Reinserted the cubby into it's slot. Reinstalled the ashtray compartment and the gearshift panel.
15. As for mounting the items I chose to mount the Sirius radio to the cubby door when it is open by using the provided vent clips that attach to the radio dock. That way I can disconnect it quickly and tuck the cables back into the cubby out of sight. As for the Ipod I chose to just connect it up and pick and play my playlists and then place it into the cubby and close the door.
Special thanxs to OhLord and bs00clk for their assistance with this install.
1. Remove the radio with radio keys. They slide into slots on the left and right bottom edge. They click in and just slide the radio out. Disconnect the wiring harness which consists of 2 electrical connects (A and B are joined together to form one connector and C is the other connector). Remove the antenna connector and the the fober optic connector. To remove the keys from the radio just push on the metal tabs on the side of the radio and the keys can be pulled out.
2. Remove the cubby above the ashtray by reaching into the empty radio slot and finding a plastic tab on the top back of the cubby and pushing it down. This will release the cubby.
3. Remove the ashtray compartment by 1st removing the ashtray itself. Then pop up the panel around the gearshift and move it to the side. You will see 2 screws holding the ashtray compartment. Just remove them and pull out the compartment. Undo the cigarette lighter connector (try not to break the bulb).
4. I removed the cd changer from the car by lifting up the mat in the trunk and removing the 2 screws that holds the changer in place. Next disconnect the power connector and then the fiber optic cable. I left the connector in the trunk for future use for the next car owner.
5. Next is to wire the box the says "Interface Mercedes Alpine". I chose to use the power from the cigarette lighter by splicing in the fused red to power and the black to ground. I also spliced the brown wire to ground per the install instructions. This is for the AUX function and when I turned on the Sirius radio it had hissing over the speakers until I grounded it. Now there is a blue wire left which is the "Abilitation wire" which is for the fiber optics loop wakeup. On the "C" connector of the radio wiring harness there is a blue and black wire which is for the now removed cd changer. I removed that pin from the connector and replaced it with the blue wire which has a new pin which snaps into the connector. Please remember which hole you removed the pin from or if you can't remove the pin just splice the blue to the blue and black.
6. Now connect the Interface Mercedes Alpine to the box that reads "Dice" with a short cable that has a DIN connector on one end that plugs into the Interface and a 12 pin Molex connector that plugs into the Dice box. I had to open up the Interface box by unscrewing 2 screws in order for the DIN plug to fit and then it locked it in place when I closed the box.
7. Now to connect the provided fiber optic cables 1st attach the RX (receive) cable to the connector just right of the DIN plug on the Interface. Then connect the TX (Transmit) to the other connector. Now plug the other end of the fiber connector into fiber optic port on the radio. Don't worry, it will only go in one way.
8. Now for my install I chose to drill 4 holes into the plastic cubby for the different cables. Hole 1 is for the Ipod cable. Hole 2 is for the AUX cable. Hole 3 is for the power cable for the Sirius Satellite Radio. Hole 4 is for the Sirius Antenna cable.
9. To eliminate the cigarette lighter adapter for the Sirius radio I chose to open up the adapter and remove the circuit board which converts 12 vdc to 5 vdc and wired it to fused power and ground. I just wrapped the circuit board in black electrical tape and pushed the power connector end thru the cubby hole.
10. Connect the Ipod cable to the Dice box by pushing the 8 pin DIN end thru cubby hole 1 and leave the Ipod connector end in the cubby. Connect the AUX cable to the AUX jack on the Dice box and push the other end thru hole 2.
11. On the Dice box are two sets of dip switches. The set on the left is the "car config switch" and the one on the right is the "Ipod config switch". The default settings are all switches set ot "off" which is the up position. I switched the "Ipod config switch" to the "on" positions. This allows you to use the Ipod as you would normally do. In the "off" position the Ipod like an MP3 player will no Ipod functions which is ok for people who do not use ITunes and download their music via Windows Media Player or other methods.
12. Now I placed the two boxes (Interface and Dice) thru the empty radio slot and tie wrapped them in place and out of the way of the radio and cubby. DO NOT BEND THE FIBER OPTIC CABLES, you can curl them only and not alot. Remember that the fiber cable is glass and light will not pass thru bends in the cable. Now reconnected the radio wiring harness and antenna. Reinsert the radio into it's slot.
13. Now I insert the Sirius power cable into cubby hole 3 and the pre-installed Sirius antenna cable in hole 4. I connected all 4 cables to the Ipod and the Sirius radio. I did not reinstall the cubby until I tested everything. I powered up the radio and reentered the code. I then selected the CD function of the radio. I got the Ipod to work playing a song as usual and then by selecting CD 5 track 1 on the radio by pressing the #5 on the radio keypad and then hitting the up arrow on the radio. Music to my ears...Now for the Sirius radio I selected track 2 of CD #5 and again pressed the up arrow.....Again music to my ears.
14. Reinserted the cubby into it's slot. Reinstalled the ashtray compartment and the gearshift panel.
15. As for mounting the items I chose to mount the Sirius radio to the cubby door when it is open by using the provided vent clips that attach to the radio dock. That way I can disconnect it quickly and tuck the cables back into the cubby out of sight. As for the Ipod I chose to just connect it up and pick and play my playlists and then place it into the cubby and close the door.
Special thanxs to OhLord and bs00clk for their assistance with this install.

raymond g-
MBWorld Fanatic!
close


May 12, 2026
- Join DateJan 2004
- LocationSeattle WA
- Posts:5,939
-
iTrader Positive Feedback0
-
iTrader Feedback Score(0)
- Vehicle(s) I drive99 E320
-
Likes:145
-
Liked:178 Times in 161 Posts
nice write up, z. good to see the alternatives. i was too chea....poh to
afford the DICE so I opted for the Kenwood KOS-A200 which ran me about
$125. just recv it earlier in the week, so I'll see how my installation goes
and how well it shoehorns into the system. Like you, I'm using Audio 10.
afford the DICE so I opted for the Kenwood KOS-A200 which ran me about
$125. just recv it earlier in the week, so I'll see how my installation goes
and how well it shoehorns into the system. Like you, I'm using Audio 10.
I looked for options for a very long time. I almost went with the Dension ice>Link Gateway 500 - Mercedes D2B fiber optic. But I got discouraged when they talked me into buying it and then after I ordered it they told me it is on back order with no time of delivery 4 days later. I only purchased the Dice one after I saw bs00clk's post.
I read through the write up, and unless I missed something, it looks like you were able to connect the Alpine to the existing Fiber Optic system. Correct?
Yes, I have the D2B fiber optics loop in my car. Why do you ask?
Quote:
Sorry, I corrected the message.Originally Posted by zx11blade
Yes, I have the D2B fiber optics loop in my car. Why do you ask?
Yes, the Box labelled "Interface Mercedes Alpine" is the optical interface that uses the same fiber optic port on the back of the radio where the cd changer was originally. The kit comes with a fiber optic cable.
What was the cost of materials for the job? I would have to pay for installation, since I am to electronics what water is to fire.
MB World Stories
The Best of Mercedes & AMG
Explore

Manual Mercedes? 6 Times Sindelfingen Let Drivers Have All The Fun
Verdad Gallardo
Mercedes SLR McLaren 722 S Is Extremely Rare Example Modified by McLaren
Verdad Gallardo
8 Classic Boxy Mercedes Designs That Have Aged Like Fine Wine
Verdad Gallardo
Flawlessly Restored Mercedes 190E Evo II Heads to Auction
Verdad Gallardo
Electric Mercedes C-Class Unveiled: 11 Things You Need to Know
Verdad Gallardo
Mercedes EQS Gets A Major Update: Everything You Need to Know
Verdad Gallardo
5 Underrated Mercedes-Benz Models That Don't Get the Love They Deserve
Verdad Gallardo
Mercedes 300D Has Pushed Well Past 1 Million Miles and It Ain't Stopping
Verdad Gallardo
10 Most Reliable Mercedes-Benz Models You Can Buy Used
Verdad GallardoI called a couple of shop to do the install and they wanted just as much as the equipment costs.
The price of the equipment is listed on this site.
http://www.mp3carpros.com/product_in...products_id=82
The price of the equipment is listed on this site.
http://www.mp3carpros.com/product_in...products_id=82
So it is just the cost of the adapter and the cost of whatever hu you choose. You are using the Alpine Audio 10 CD-R, but I could get whatever I want, right? Provided it fits, of course.
I believe that as long as you use a Mercedes compatible radio you will be fine. I am swapping out my Becker Audio 30 for the Alpine Audio 10 CD-R. I also had the choice of purchasing an Audio 30 APS which will also work.
Sorry to be so dense, but can you clarify what you mean by "Mercedes compatible"?
For example, could I use something like this?
http://www.crutchfield.com/App/Produ...DA9884&tp=5684
For example, could I use something like this?
http://www.crutchfield.com/App/Produ...DA9884&tp=5684
I don't know what you have in your car, but if you do the compatibility chart on that website for your car it will tell you if it's a match.
This is very good information. I have the factory stereo with the Bose system and CD changer in the trunk. I don't know if I can link from another forum, but I'll try.
Thanks for all the info. Now all I need is to find a reputable installer in my area that can do the work. It also looks like I could do the original idea of a Nav unit if I the installer can make the necessary modification(s) to fit the double din.


Not very good pics because I wasn't aiming for the stereo, but should give an idea.
Thanks for all the info. Now all I need is to find a reputable installer in my area that can do the work. It also looks like I could do the original idea of a Nav unit if I the installer can make the necessary modification(s) to fit the double din.
Not very good pics because I wasn't aiming for the stereo, but should give an idea.
It pays to be persistent 
Here is what I got from Crutchfield:
1- The Pioneer HU (I think you can go with any other, but not sure).($289.99)
http://www.crutchfield.com/S-B4fGLZb...00BT&s=0&cc=01
2- Wiring harness (adapter for the Fiber Optic) (Free).
http://www.crutchfield.com/S-B4fGLZb...1784&s=0&cc=01
3- MB stereo removal tool. (Free)
http://www.crutchfield.com/S-B4fGLZb...9001&s=0&cc=01
4- Antenna connection adapter. (Free)
http://www.crutchfield.com/S-B4fGLZb...VW12&s=0&cc=01
5- Mastersheet instructions. (Free)
http://www.crutchfield.com/popups/wh...tersheets.html
Total cost: $289.99 + install.
Let me know how you make out with this.

What sources are there for the Alpine stereo? I couldn't even find it listed at the Alpine website and Crutchfield lists Alpines available, none which are your model. Would like to buy from a USA source, not overseas...
Quote:
I tried a search on eBay but came up empty... even Google only brings up one source and it is in the UK...Originally Posted by zx11blade
I have seen them on EBay.
I decided on the setup I described above and passed on the Nav. So I'm getting CD, CD-R, CD-RW, etc, etc. Bluetooth and iPod control built in, and so on.
The wiring harness for the Fiber Optic is vehicle-specific, so no matter what stereo you choose the harness is the same. I'm getting it free with the purchase but it only costs something like 12.99. Like I said before, I'm no electronics engineer, but I think that in itself has a lot of potential for those on the know.
They also have pre-paid installation ($59.99). They have indies, two of them very close to me, who install their product for the agreed amount.
Total cost so far: $349.99

Newbie
Has anyone found a bluetooth stereo unit that will allow use of the steering wheel controls (voulme up/down, call answer, call end)?
I have the stock stereo unit only at this time. Ultimately, I would like a stereo unit that provides a single CD player, aux. input (for my ipod) and Bluetooth feature to enable connection/control of mobile phone. Of course, still retain the use of the steering wheel controls mentioned above.
Thanks for your input.
Woohoo!!!
I just had my setup installed today and it works as advertised. I only had to pay the installer an additional $10 for routing the bluetooth mic wire. I lost the steering wheel audio controls, but I knew that would happen.
Toal cost: $359.99
I just had my setup installed today and it works as advertised. I only had to pay the installer an additional $10 for routing the bluetooth mic wire. I lost the steering wheel audio controls, but I knew that would happen.
Toal cost: $359.99
Yes I am. A few other Benz owners I know have installed this setup. Are you interested in installing this setup?

Newbie
Yes, I'm planning on buying it soon and possibly installing it myself.


