


Depo headlight help & instruction
Thread Starter
MBWorld Fanatic!
Joined: Apr 2003
Posts: 1,464
Likes: 9
From: SoCal OC
S, GL, Escalade ESV, my shoes
Depo headlight help & instruction
I receive lot of email, almost on weekly basic, asking about help with aftermarket headlight, most have to do with the DEPO one.
Usually, when I ship the modified Depo headlight to my customer, I send along the detailed instruction. However, lot of people buy the light from elsewhere, or perform the modification on their own. I figure sharing the instruction and question & answer with our forum fellows would benefit all.
I will try to summarize the questions that I have helped to answer here. I use pictures from the headlight set that I just modified as example here. It looks a bit different to the one you buy, however, in term of functionality & installation & aiming, it's all should be the same.
I would not comment about the light output and pattern. It's up to the user to decide whether they're happy with the light output of the original Depo light and H7 bulb (or even w/ Xenon ballast & bulb). However, regardless of light source, I am sure everyone want the best fit and aim for the aftermarket headlight.
How do you know if the headlight unit is a Depo or not
You should see the Depo logo on the back of the headlight. Also, I put a pix of the headlight from front so you know how it look like


Does Depo provide auto-level feature
Nope
How do you install the Depo light ? Which model require bumper to be removed ?
On the 96-99, you don't have to remove the bumper, the installation process is very simple. On the 2000 on, you will have to remove the bumper to install the headlight. Remove of bumper is quite simply, provide that you have a jack to lift the front up a bit ( DO NOT USE THE MERCEDES JACK TO LIFT THE CAR FOR BUMPER REMOVAL !!!). I'll add instruction for 96-99 installation, if there're request.
Here's the pix of location of screws you will need to remove to take out the bumper. It also show location of screws to attach the headlight to car body

After I've installed the headlight, the fit is not that good. Lot of gap here and there, and the light does not stay flush with the car fender/hood/front-panel
As the matter of fact, the Depo is made from the same mold as the OEM. They have some cool feature just as the OEM: you can align them to make them fit well into the car (this is separate from aiming). There are two metal lug, and one big plastic lug-ring. You adjust them during the installation process to make them fit nicely onto the car body. The upper metal lug to adjust the up/down location (of the whole headlight), the other metal lug for left/right, and the plastic big ring is for in/out. Once you play around with them, the light will sit nicely. The OEM headlight have to go through this same alignment process at the manufacture & bodyshop.

After I have installed the light, how do I aim them
First of all, if your car is 2000-later model, prior to putting back the bumper, turn on the light and test everything. It's still a PITA to remove the bumper again in case some thing don't work out.
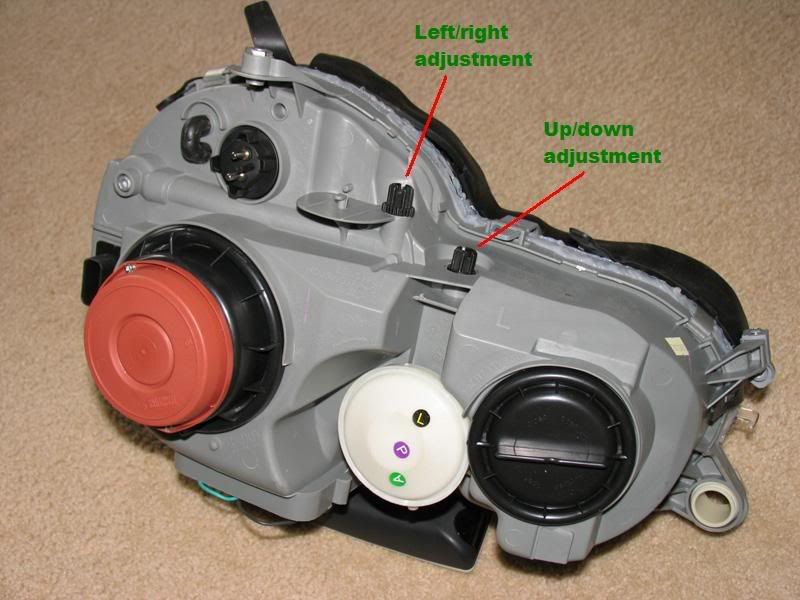
There are two knobs on top of the headlight, the upper one to adjust the light beam left/right, the lower one to adjust up/down.
Wait til it's dark, find a flat ground place that have a wall/fence (usually on back of warehouse/supermarket). Park your car so that the driver side is paralell to the wall, the driver side about 3 ft front the wall, and turn on the light. Adjust the up/down knob on the driver side so that the beam is parallel to the ground.
Next, move your car, park it so that it face the wall, about 1 1/2 car lenght from the wall, adjust the up/down knob on the passenger side so that it's same height as the driver side.
Then adjust the left/right knob on both the driver and passenger side, so that the little grove on top of the light beam cut-off is right in front of the light.
Then you are done, happy driving.


Usually, when I ship the modified Depo headlight to my customer, I send along the detailed instruction. However, lot of people buy the light from elsewhere, or perform the modification on their own. I figure sharing the instruction and question & answer with our forum fellows would benefit all.
I will try to summarize the questions that I have helped to answer here. I use pictures from the headlight set that I just modified as example here. It looks a bit different to the one you buy, however, in term of functionality & installation & aiming, it's all should be the same.
I would not comment about the light output and pattern. It's up to the user to decide whether they're happy with the light output of the original Depo light and H7 bulb (or even w/ Xenon ballast & bulb). However, regardless of light source, I am sure everyone want the best fit and aim for the aftermarket headlight.
How do you know if the headlight unit is a Depo or not
You should see the Depo logo on the back of the headlight. Also, I put a pix of the headlight from front so you know how it look like
Does Depo provide auto-level feature
Nope
How do you install the Depo light ? Which model require bumper to be removed ?
On the 96-99, you don't have to remove the bumper, the installation process is very simple. On the 2000 on, you will have to remove the bumper to install the headlight. Remove of bumper is quite simply, provide that you have a jack to lift the front up a bit ( DO NOT USE THE MERCEDES JACK TO LIFT THE CAR FOR BUMPER REMOVAL !!!). I'll add instruction for 96-99 installation, if there're request.
Here's the pix of location of screws you will need to remove to take out the bumper. It also show location of screws to attach the headlight to car body
After I've installed the headlight, the fit is not that good. Lot of gap here and there, and the light does not stay flush with the car fender/hood/front-panel
As the matter of fact, the Depo is made from the same mold as the OEM. They have some cool feature just as the OEM: you can align them to make them fit well into the car (this is separate from aiming). There are two metal lug, and one big plastic lug-ring. You adjust them during the installation process to make them fit nicely onto the car body. The upper metal lug to adjust the up/down location (of the whole headlight), the other metal lug for left/right, and the plastic big ring is for in/out. Once you play around with them, the light will sit nicely. The OEM headlight have to go through this same alignment process at the manufacture & bodyshop.
After I have installed the light, how do I aim them
First of all, if your car is 2000-later model, prior to putting back the bumper, turn on the light and test everything. It's still a PITA to remove the bumper again in case some thing don't work out.
There are two knobs on top of the headlight, the upper one to adjust the light beam left/right, the lower one to adjust up/down.
Wait til it's dark, find a flat ground place that have a wall/fence (usually on back of warehouse/supermarket). Park your car so that the driver side is paralell to the wall, the driver side about 3 ft front the wall, and turn on the light. Adjust the up/down knob on the driver side so that the beam is parallel to the ground.
Next, move your car, park it so that it face the wall, about 1 1/2 car lenght from the wall, adjust the up/down knob on the passenger side so that it's same height as the driver side.
Then adjust the left/right knob on both the driver and passenger side, so that the little grove on top of the light beam cut-off is right in front of the light.
Then you are done, happy driving.
Last edited by zam2000; Jun 3, 2007 at 01:15 AM.
MBWorld Fanatic!
Joined: Mar 2007
Posts: 2,493
Likes: 0
From: Santa Clarita, CA
1987 E300 TD
Nice writeup Zam! Glad you posted one of these up so we can get a better understanding of adjusting and installing. I'm going to make sure my lights are aligned perfectly!
Last edited by lxl_Jeffro_lxl; Jun 3, 2007 at 02:27 PM.
Super Member
Joined: Jun 2006
Posts: 525
Likes: 0
From: the Netherlands
'01 W210 E320 CDI
Another pictorial thanx! I'm saving all this stuff for that one day it'll come in handy maybe. You say the Depo doesn't have auto leveling, but does the OEM ride hight adjustment (vacuum) still work with them?
Thread Starter
MBWorld Fanatic!
Joined: Apr 2003
Posts: 1,464
Likes: 9
From: SoCal OC
S, GL, Escalade ESV, my shoes
Couple more pix
For adjustment up/down, and for installation process on the 96-99


Notice that if your car have headlight washer (OEM XENON), then you have to be careful in remove the front tab, then release the headlight washer from the front panel before you can pull it out. Not detatch the washer from this front panel will make installation of the new headlight be PITA


For adjustment up/down, and for installation process on the 96-99
Notice that if your car have headlight washer (OEM XENON), then you have to be careful in remove the front tab, then release the headlight washer from the front panel before you can pull it out. Not detatch the washer from this front panel will make installation of the new headlight be PITA
Trending Topics
MB World Stories
The Best of Mercedes & AMG

7 Craziest Things AMG Gas Ever Built
Verdad Gallardo
New Electric Mercedes-AMG GT 4-Door Coupe Unveiled: 10 Things You Need to Know
Verdad Gallardo
6 Mercedes Models That Did NOT Age Well (But Are Somehow Still Cool)
Verdad Gallardo
Manual Mercedes? 6 Times Sindelfingen Let Drivers Have All The Fun
Verdad Gallardo
Mercedes SLR McLaren 722 S Is Extremely Rare Example Modified by McLaren
Verdad Gallardo
8 Classic Boxy Mercedes Designs That Have Aged Like Fine Wine
Verdad Gallardo
Flawlessly Restored Mercedes 190E Evo II Heads to Auction
Verdad Gallardo
Electric Mercedes C-Class Unveiled: 11 Things You Need to Know
Verdad Gallardo
Mercedes EQS Gets A Major Update: Everything You Need to Know
Verdad Gallardo
Super Member


Joined: Mar 2005
Posts: 531
Likes: 17
'08 CL600 with 152k km; '01 E430 4Matic with 433k km; '17 Porsche Cayenne with 130k km
ZAM, where did you get those rubber caps?
I have been looking for those. I remember you mentioning that you got those rubber caps at home depot, but where specifically. people in there looked at me like I was stupid, as they didn't know what I was talking about. what are they called specifically, and do you have the SKU or package? Can it be found at Lowe's?

1998, adjust, adjustment, aligning, c280, dep, depo, front, headlight, headlights, installation, instructions, light, mercedes, w210
Currently Active Users Viewing This Thread: 1 (0 members and 1 guests)


