
DIY: Installing a new Changeover/Heater Control Valve


Newbie
Joined: Mar 2006
Posts: 4
Likes: 1
From: San Francisco, California
2004 MB E500
Heater Changeover valve - 2004 E500 - THANK YOU :-).
THANK YOU - THANK YOU - THANK YOU....
I really do appreciate you taking the pain to click & download 26+ pictures with clear instructions. I have a 2004 MB E500 that had the exact same symptoms (No heat). Just to ensure, I took it to the dealer & they verified that the changeover valve needed to be replaced ($100 for diagnostics). Their quote was $600 +taxes to replace it!!! So I simply bought the part (~$60 with taxes), came home, followed your instructions & after 3.5 hours, it all works!!! I took my time & worked slow, but getting to some of the components - especially to the hose clips was a challenge. Thank you for your tips on using the hanger. That really worked well. That's about $130/hour.
The biggest item (besides saving a bunch of money), was the sweet smell of self-reliance!!! Thank you, again.
- Mandrek
Super Member
Joined: Mar 2006
Posts: 606
Likes: 4
From: Bellevue, WA
.... nothing to brag about, it is a previous model....
THANKS TO W211RYDA!!!!!!!!!!!! I just changed it myself also. Save myself 2.3hr of $340 before tax labor quoted by dealer.
And seriously, the annoying part is the panel screws! ( thankfully, I bought 4 before I start this project. * I did break 2 of them. )
Also big thanks to Chiro's suggestion: ( once remove the assembly, you got all the space you need and only took me 15 min to replace the valve part!!!! )
Part:
Valve: 211-832-05-84 $49.35
Rivet: 123-990-05-92 $2.13 ( rediculous price for a little plastic screw, isn't it? )
And seriously, the annoying part is the panel screws! ( thankfully, I bought 4 before I start this project. * I did break 2 of them. )
Also big thanks to Chiro's suggestion: ( once remove the assembly, you got all the space you need and only took me 15 min to replace the valve part!!!! )
6.Remove not only the winshield wipers but the whole wiper assembly as previously mentioned . It is only an additional 3 bolts ...simple ..no alignment issues on replacing ,very straight forward.
Valve: 211-832-05-84 $49.35
Rivet: 123-990-05-92 $2.13 ( rediculous price for a little plastic screw, isn't it? )
Last edited by no_clue; Nov 17, 2009 at 04:28 PM.

Newbie
Joined: Nov 2009
Posts: 1
Likes: 0
From: London UK
E200K 1.8 Avantgarde
heater control UK
27 Nov 2009 UKW211 E200K 1.8K Avantgarde 24th March 2003
heater not working and having found and digested RYDA's article, I went out and bought the part �24.50 inc taxes
Got to the stage of taking out foam padding and realised the valve was not there, found it under the master cylinder
toyed with the idea of taking out the fuse box to get to it, not a good idea.
having only taken off the 2 hoses going into the bulkhead, I managed to wiggle the bugger up onto the top
of the master cylinder, where the change over was simple, then squeezed it back to where it came from.
opened the old part, and yes it had let in fluid and corroded, after 6 1/2 years.
It took 1 hour to strip parts out
2 minutes to find the valve, and 45 frustrating mins to get it out
then only another 35 mins to put everything back.
Last edited by peter_the_hat; Nov 28, 2009 at 06:34 AM. Reason: add a picture


Member
Joined: Nov 2007
Posts: 75
Likes: 1
2003 E320
Thanks to W211Ryda for the very detailed write-up! It's also very helpful to see the feedback from everyone else that's performed this DIY; particularly Yuzuk's tip to remove the whole wiper assembly.
My 2003 E320 just started intermittently exhibiting these symptoms (only cold air, no heat regardless of settings), so I'm going to try and get this repair job done in the next few days. I plan on ordering the following parts (prices from the local dealership):
HVAC - Heater - Heater control valve:
2118320584 - $48.40
Rivets:
1239900592 - $3.63 each x Qty 4
I will use W211Ryda's instructions with the modification to remove the entire wiper assembly so that I have more room to work with.
Are there any other tips or suggestions? I will also take pictures of my process to help document the DIY. If there are any special requests, please speak now before I commence the DIY!

Newbie
Joined: Mar 2009
Posts: 1
Likes: 0
e500
another thanks to RYDA for taking the time to post this DIY and to those that posted tips and such later. our local dealer wanted about $600 for this job, it took us less than 2 hours following the instructions.
besides the rivets we also had to order a handfull of the fasteners for the plastic trim panel. after the 4 plastic clips(rivets) were removed there were about 8 fasteners that hold down the plastic trim panel. maybe due to the cold or the age of the plastic 4 of them broke.
part number is 211-988-00-81.

Junior Member
Joined: Apr 2006
Posts: 53
Likes: 0
From: Simi Valley
2003 E320
Need help
I followed the directions and removed the 4 plastic clips, but I can get the big plastic off? I seemed like I was damaging the gasket and there seemed to be something else holding it down? I have a 2003 E-320
Member
Joined: Nov 2007
Posts: 75
Likes: 1
2003 E320
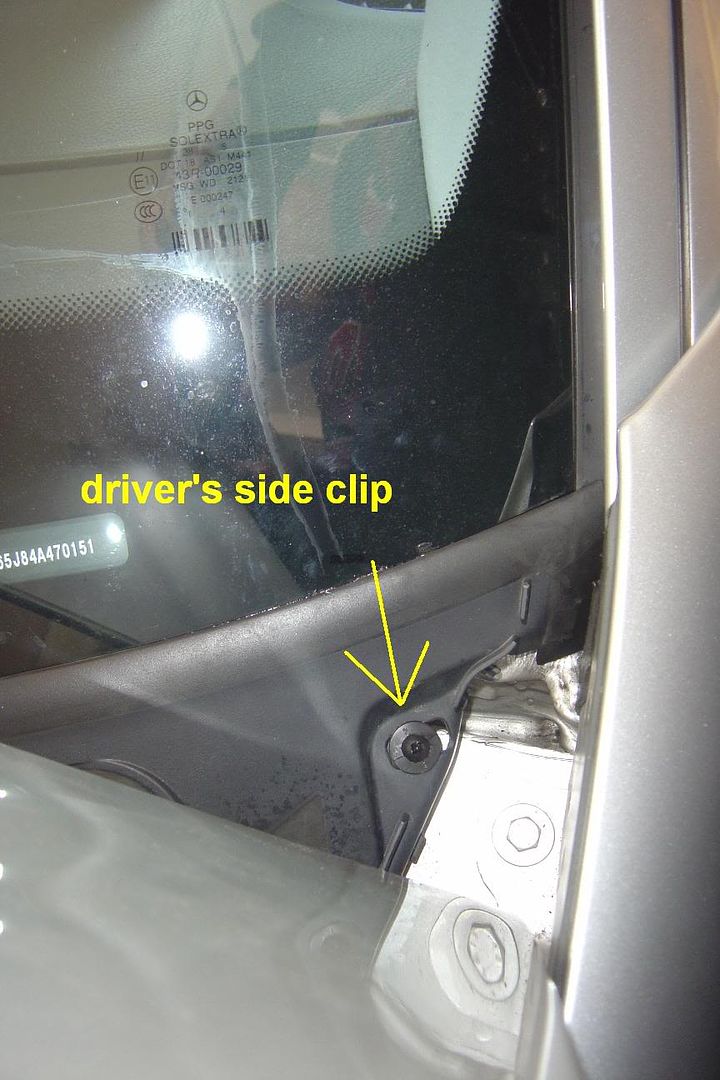
Use a pair of pliers to squeeze the sides of the posts and they should pop up through the metal hole. The second image shows where you need to squeeze to release them.
Hope this helps.
Member
Joined: Nov 2007
Posts: 75
Likes: 1
2003 E320
Also, I highly recommend removing the wiper blade assembly if you're going to try and do this DIY. It gives you a far more space to work with and only requires removing three nuts to get the wiper blade assembly out of the way. I don't know how people have been able to do it with the wiper blade assembly still in place, but it would have been hard for me to see what I was doing and it would have been a tight squeeze for my hand to get into that space.
My word of caution though is that you should make sure you tighten the nuts down firmly when you reinstall the wiper blade assembly. Otherwise, you may be surprised when your wipers don't work properly the next time you're driving in the rain.
My word of caution though is that you should make sure you tighten the nuts down firmly when you reinstall the wiper blade assembly. Otherwise, you may be surprised when your wipers don't work properly the next time you're driving in the rain.

Junior Member
Joined: May 2006
Posts: 64
Likes: 2
From: Aveiro - Portugal
E220 CDI (W211)
Okay, last weekend was frickin hot in So-Cali reaching 90+ and that�s when I first started to experience extremely hot air blowing out from the rear vents (B-pillar and from center console). My front a/c vents were working fine, but the hot air being blown to the rear passenger area was unbearable. I remember seeing several threads of people experiencing the same problem and since my car is no longer under warranty, I decided to tackle the job myself. Thanks to Konigstiger, found the culprit to be with the changeover valve. https://mbworld.org/forums/showpost....49&postcount=2
So here I go, on with another DIY.
Tools required:
Flatnose screwdriver
Needle nose pliers
An extended angle needle nose pliers
Ratchet
13MM socket
T25 Torx wrench or screwdriver
Wire coat hanger
Parts needed:
New changeover valve (part #A211 832 05 84). This is probably a revised valve w/ a new design since my faulty valve has the part #A211 832 00 84.
Here is what the changeover valve looks like. (old valve unit)


1st, remove the outer weather-stripping
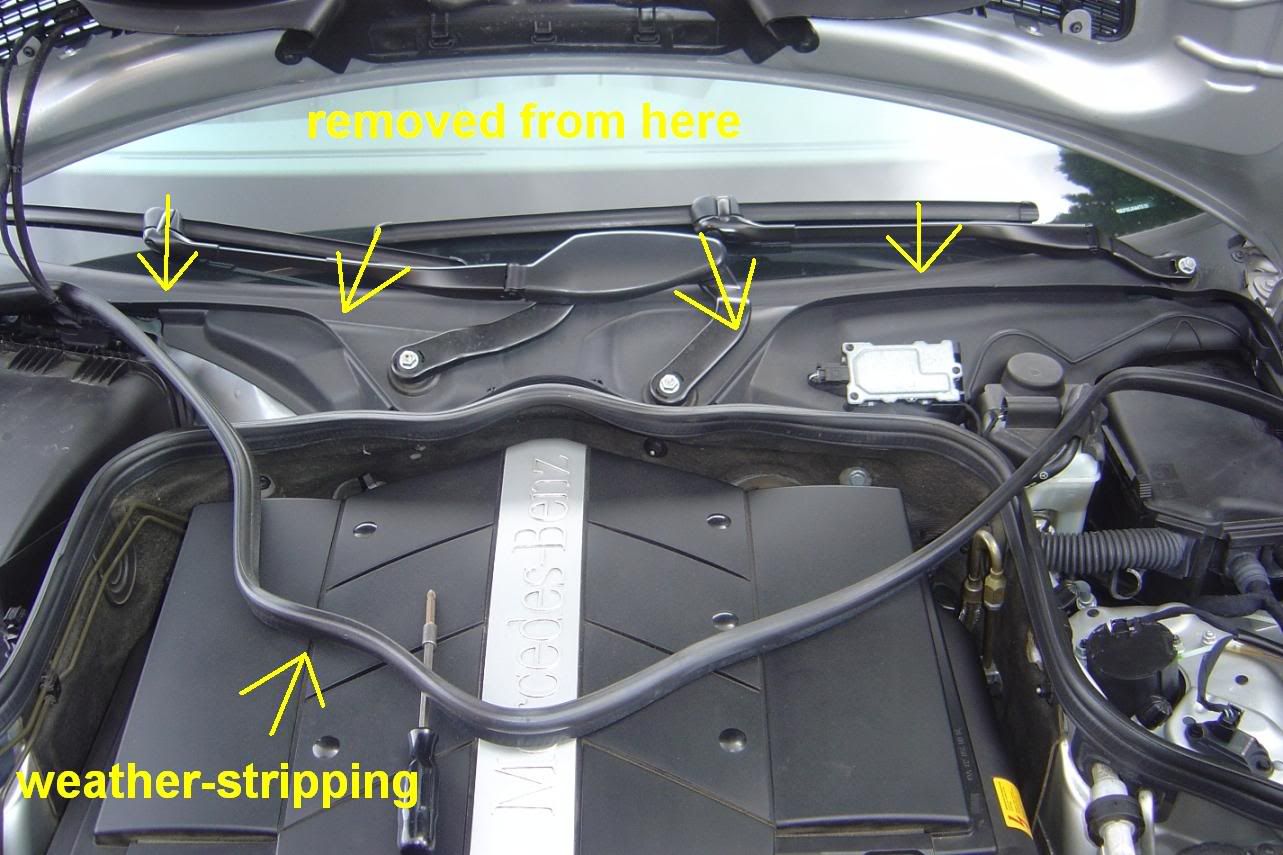
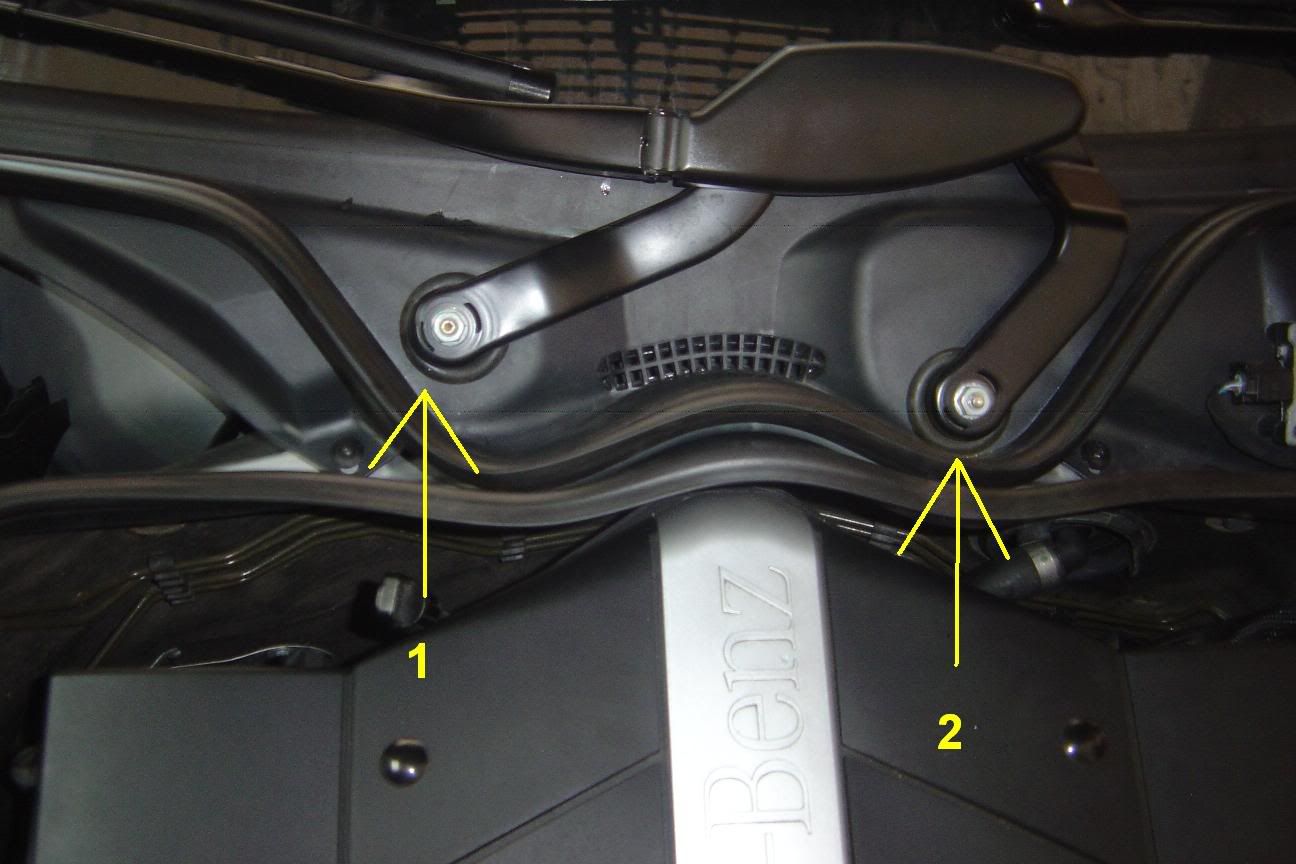
2nd, you�ll need to remove both wiper arm assembly with a ratchet and a 13mm socket. Here are the 3 nuts you�ll need to remove.
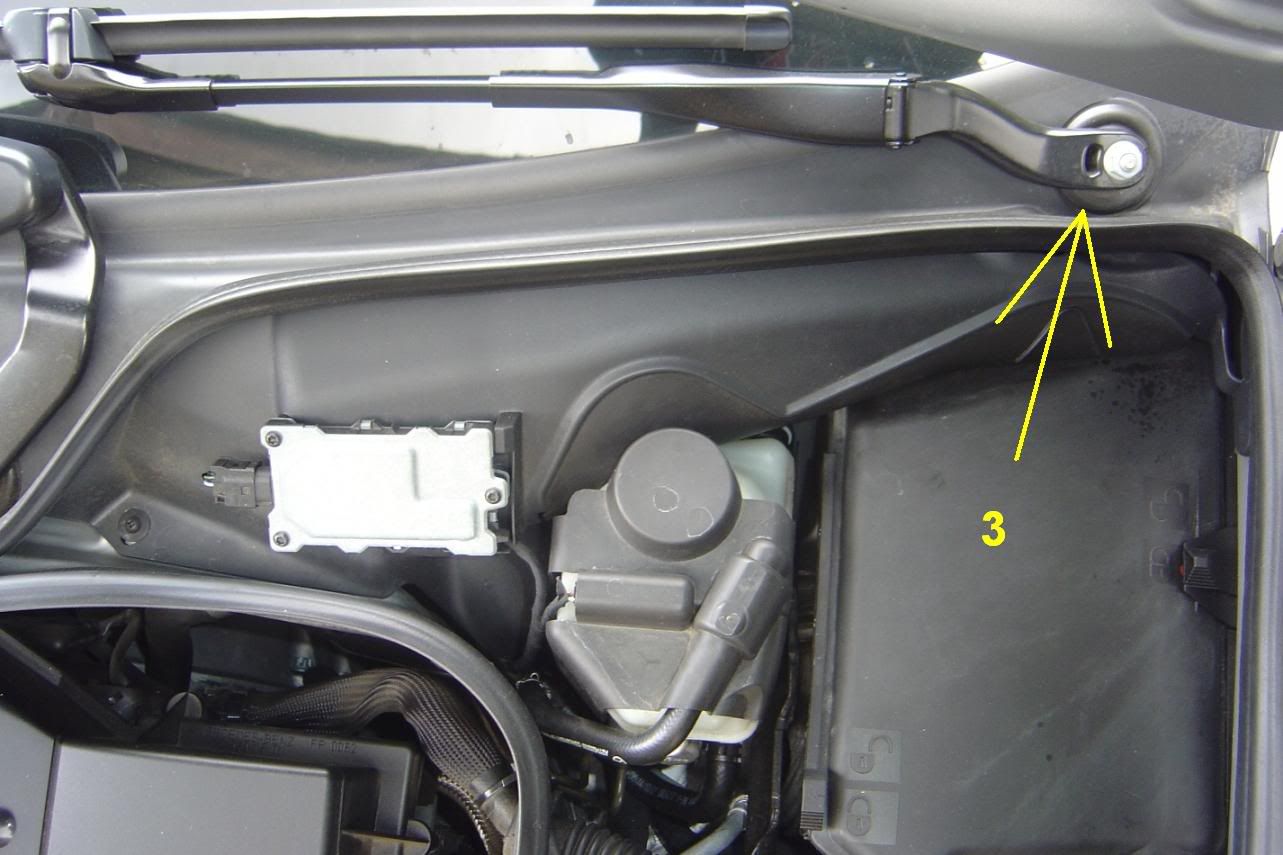
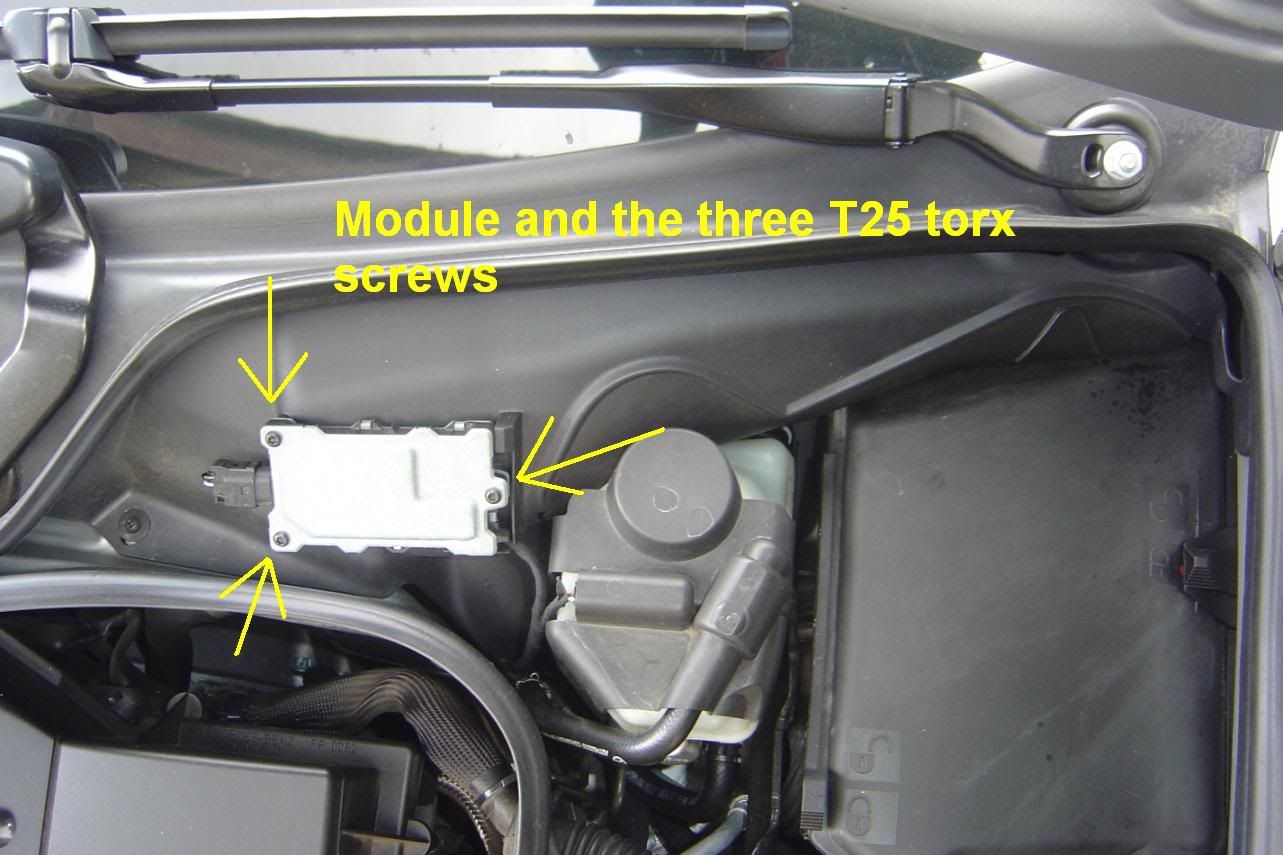
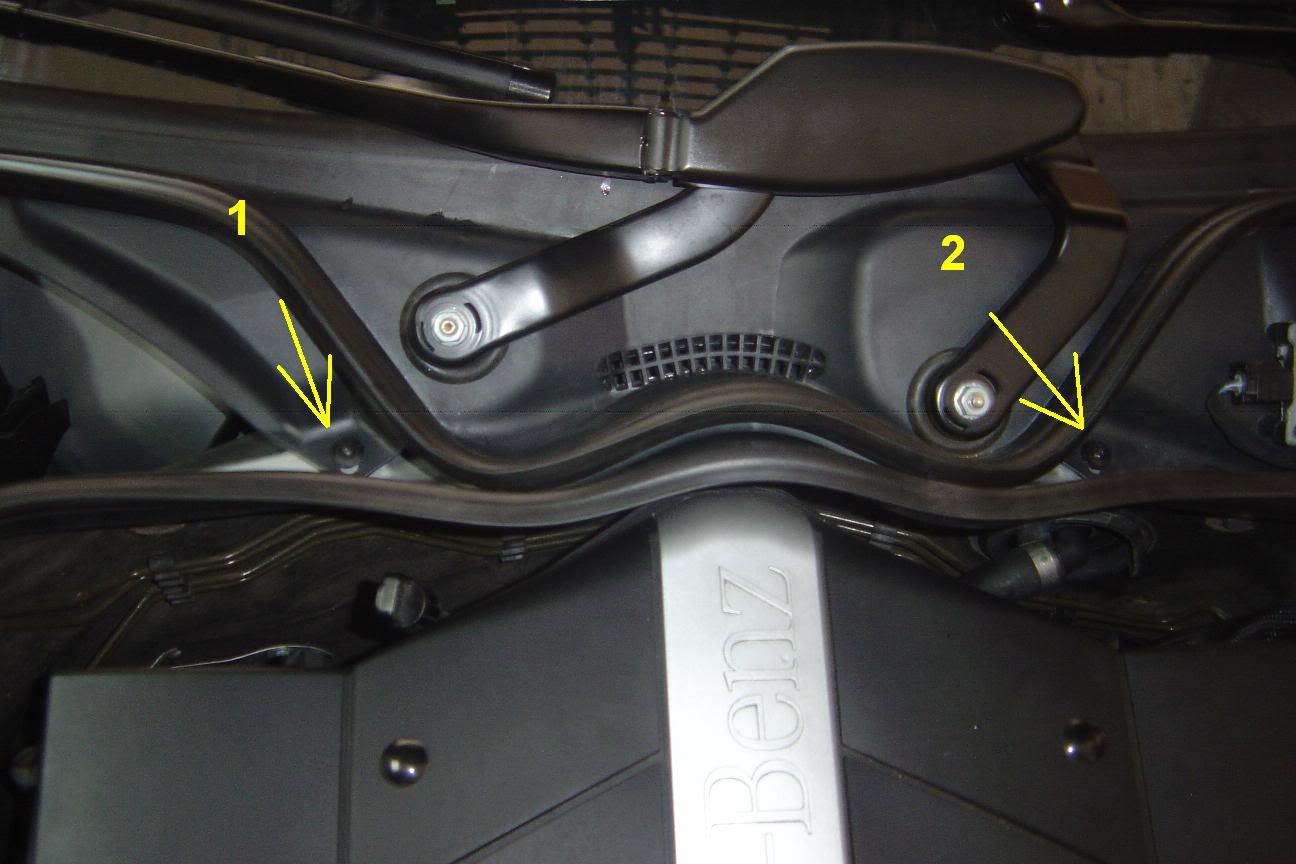
Next remove this module on the driver�s side. I�m not sure what it exactly does, but you�ll need to unscrew it from the plastic trim panel. Using the T25 Torx screwdriver or wrench, remove the 3 screws and set the module aside. You don�t even need to disconnect it.
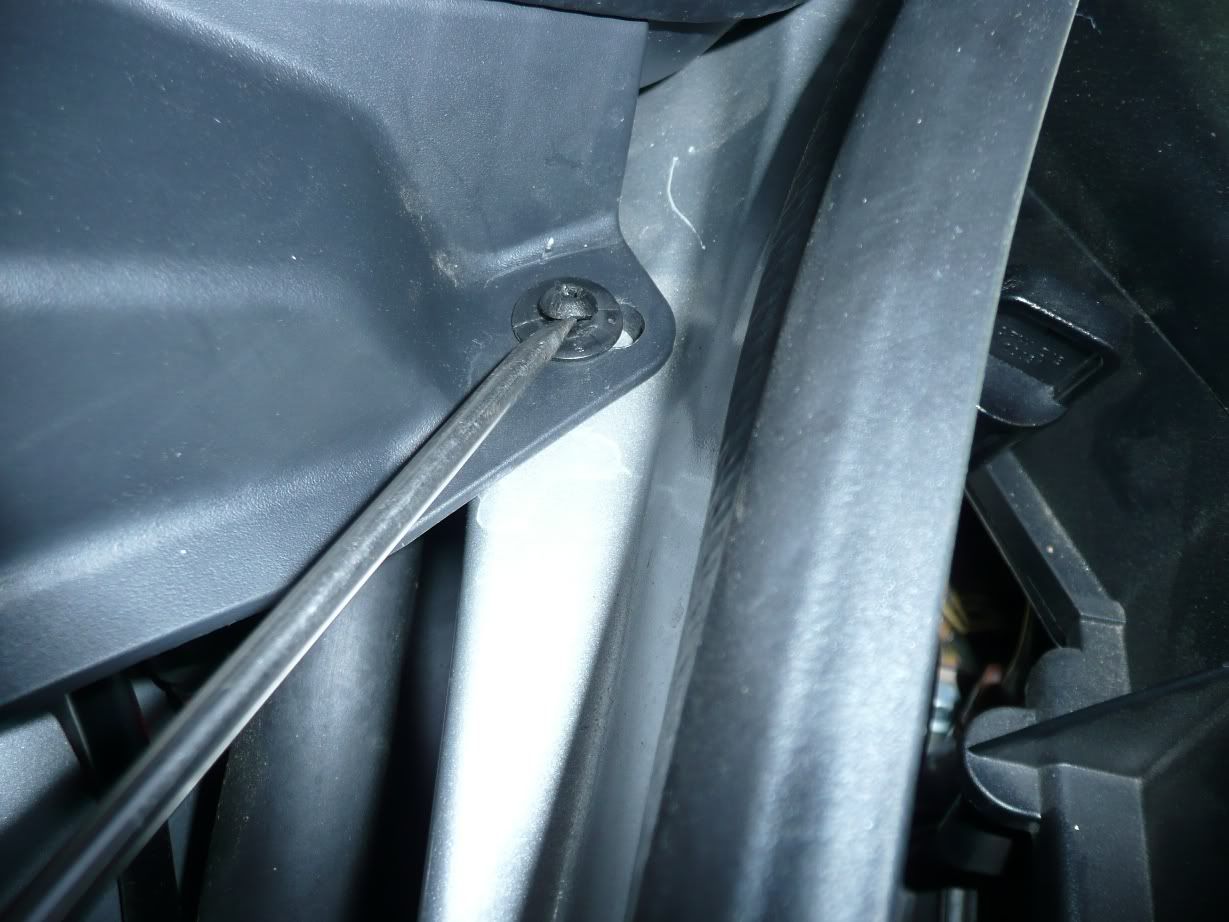
Now you�ll need to remove plastic trim panel that sits at the bottom of the windshield. It is secured down with 4 plastic clips. (they look like philip plastic screws). To remove these clips you gently slide a thin flathead screwdriver under the head of the clip and pry it up high enough so that you could use the needle nose pliers to pull on the shaft. Do not remove the shaft, just pull it out � of an inch or less then remove the clip.
Location of plastic clips

Prying the shaft
Shaft extended out
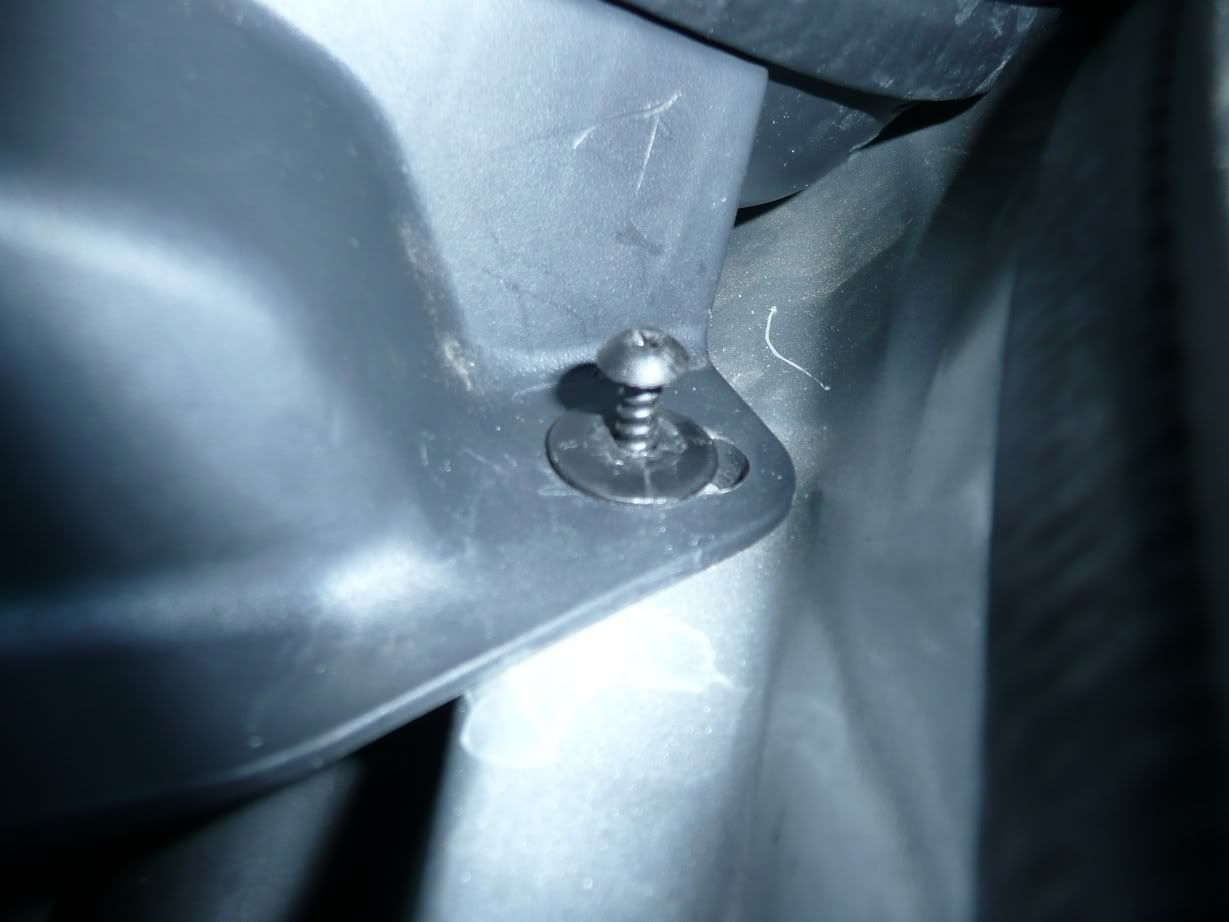
Clip finally removed

At the bottom of the plastic trim panel is a big rubber hose that you�ll need to disconnect. On the passenger side, you�ll need to unhook the 2 electrical wires from the hanger. Now you could remove the plastic trim panel.
When you remove the plastic trim, you�ll see more wiper arm linkages as seen in the pic.
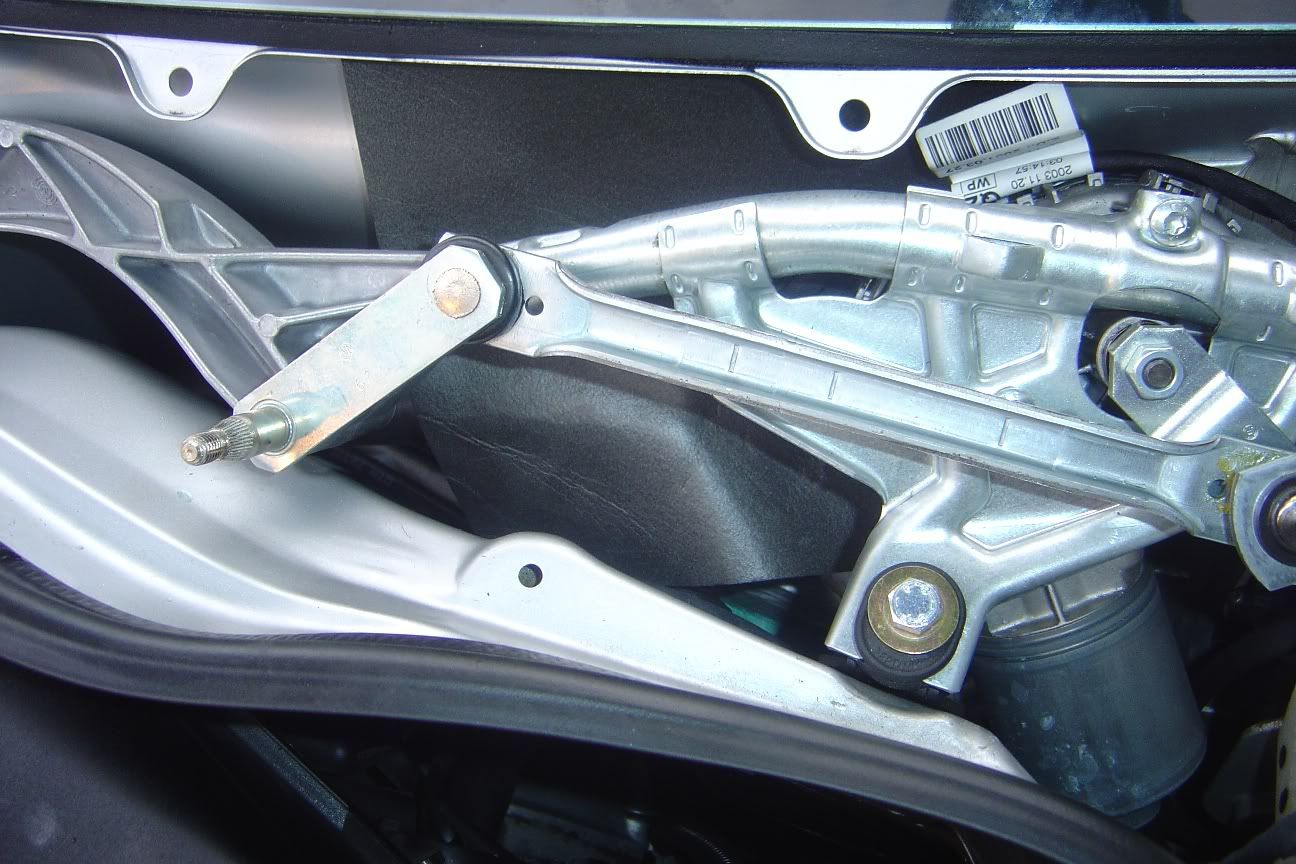
The changeover valve is covered with this thin foam padding. Just unfold it and tuck it under the wiper linkages. Next, you�ll need to reposition the linkages so you that you could access the valve. Gently push on the linkages until you have enough room. Now you�ll see the changover valve nested on the driver�s side firewall. If you have big hands like myself, you�ll be in a world of hate because it�s a tight squeeze!!
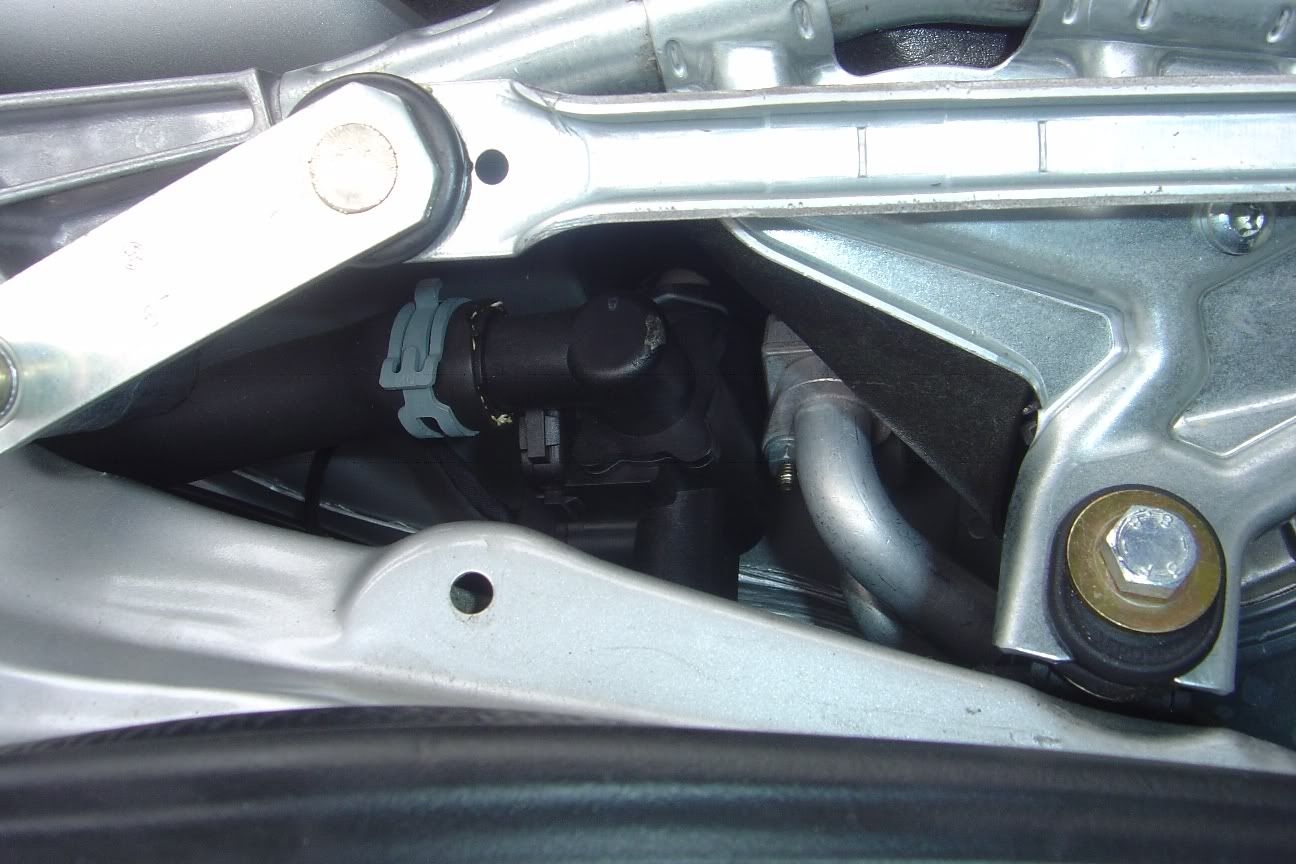
The valve has a total of 4 openings, 3 of which have a built in clip/lock and there is one socket for an electrical connector. In order to install or remove the tube/hose, you�ll need to unlock these locks by pulling on the clip outward.
Clips in locked position

Clips in unlocked position

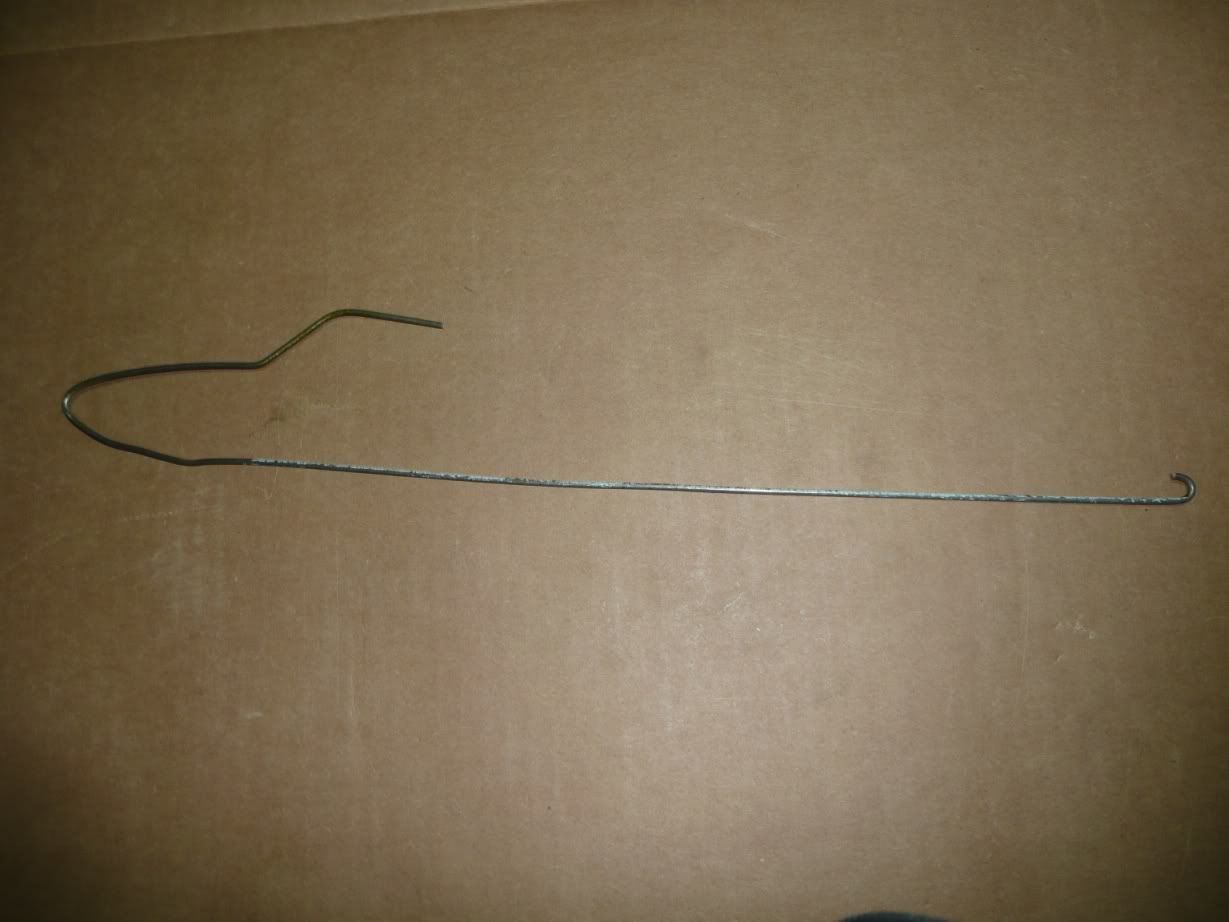
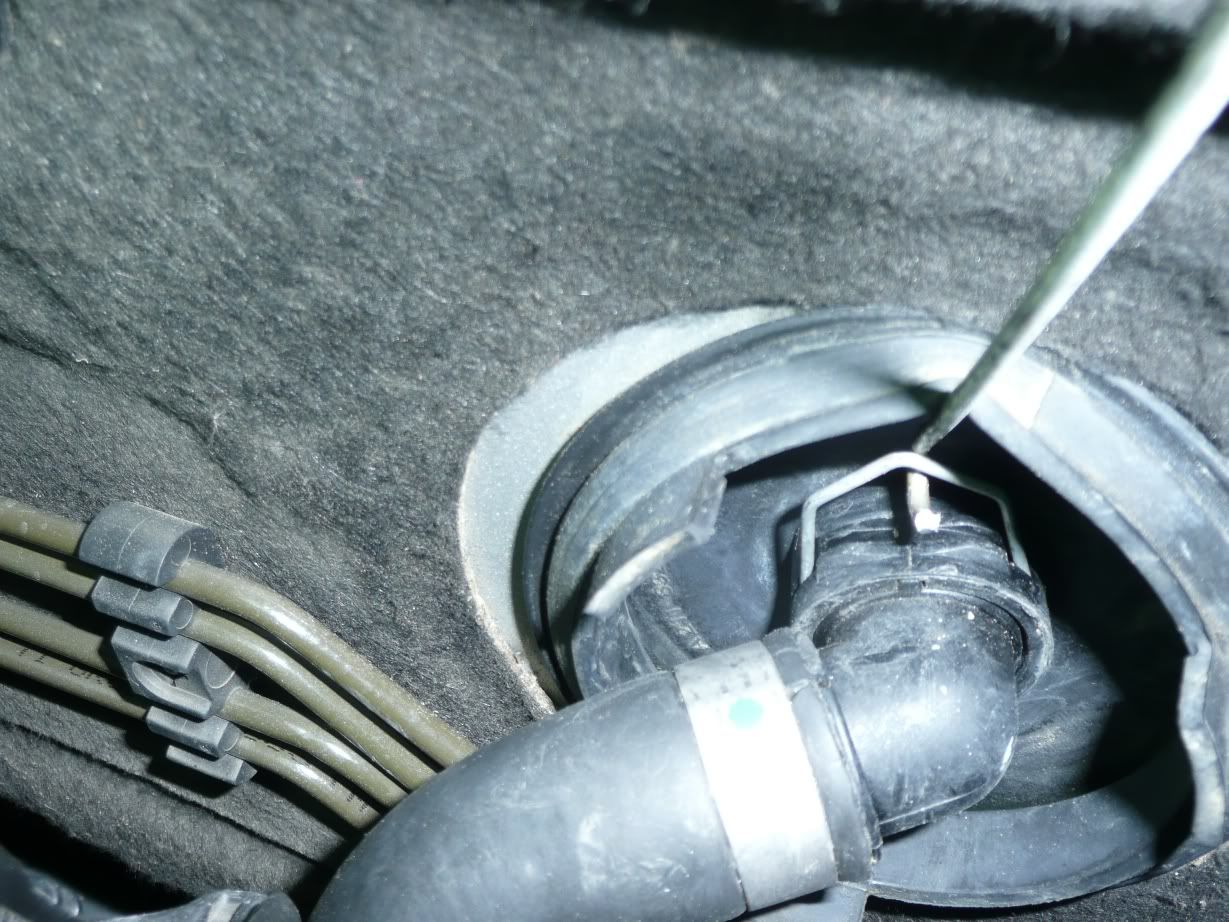
Since the valve is located in an extremely tight area, this is where a wire coat hanger will come in handy. Cut up a hanger then at the end, make a small hook. You�ll use this to unlock the clips. One of the locking clips is accessible between the engine and partition.
Coat hanger
Unlock clip with coat hanger
Hose removed: (small amount of coolant will leak out)

The 4th opening is connected to a hose that has a clamp. Use your angled needle nose pliers to remove this clamp and hose, then disconnect the electrical connector. The 2 locking clips are up against the firewall. From the driver�s side, use your coat hanger again to unlock the top clip. Now from the passenger�s side, use your coat hanger to unlock the bottom clip.

Now with everything disconnected, remove the valve body unit and install the new one in reverse order. Make sure you lock them clips! Reposition the wiper linkages back to their normal state and flip the foam padding back over the valve. Reinstall plastic trim, electronic module, weather-stripping and wiper arms. Now enjoy your a/c!
So here I go, on with another DIY.
Tools required:
Flatnose screwdriver
Needle nose pliers
An extended angle needle nose pliers
Ratchet
13MM socket
T25 Torx wrench or screwdriver
Wire coat hanger
Parts needed:
New changeover valve (part #A211 832 05 84). This is probably a revised valve w/ a new design since my faulty valve has the part #A211 832 00 84.
Here is what the changeover valve looks like. (old valve unit)
1st, remove the outer weather-stripping
2nd, you�ll need to remove both wiper arm assembly with a ratchet and a 13mm socket. Here are the 3 nuts you�ll need to remove.
Next remove this module on the driver�s side. I�m not sure what it exactly does, but you�ll need to unscrew it from the plastic trim panel. Using the T25 Torx screwdriver or wrench, remove the 3 screws and set the module aside. You don�t even need to disconnect it.
Now you�ll need to remove plastic trim panel that sits at the bottom of the windshield. It is secured down with 4 plastic clips. (they look like philip plastic screws). To remove these clips you gently slide a thin flathead screwdriver under the head of the clip and pry it up high enough so that you could use the needle nose pliers to pull on the shaft. Do not remove the shaft, just pull it out � of an inch or less then remove the clip.
Location of plastic clips
Prying the shaft
Shaft extended out
Clip finally removed
At the bottom of the plastic trim panel is a big rubber hose that you�ll need to disconnect. On the passenger side, you�ll need to unhook the 2 electrical wires from the hanger. Now you could remove the plastic trim panel.
When you remove the plastic trim, you�ll see more wiper arm linkages as seen in the pic.
The changeover valve is covered with this thin foam padding. Just unfold it and tuck it under the wiper linkages. Next, you�ll need to reposition the linkages so you that you could access the valve. Gently push on the linkages until you have enough room. Now you�ll see the changover valve nested on the driver�s side firewall. If you have big hands like myself, you�ll be in a world of hate because it�s a tight squeeze!!
The valve has a total of 4 openings, 3 of which have a built in clip/lock and there is one socket for an electrical connector. In order to install or remove the tube/hose, you�ll need to unlock these locks by pulling on the clip outward.
Clips in locked position
Clips in unlocked position
Since the valve is located in an extremely tight area, this is where a wire coat hanger will come in handy. Cut up a hanger then at the end, make a small hook. You�ll use this to unlock the clips. One of the locking clips is accessible between the engine and partition.
Coat hanger
Unlock clip with coat hanger
Hose removed: (small amount of coolant will leak out)
The 4th opening is connected to a hose that has a clamp. Use your angled needle nose pliers to remove this clamp and hose, then disconnect the electrical connector. The 2 locking clips are up against the firewall. From the driver�s side, use your coat hanger again to unlock the top clip. Now from the passenger�s side, use your coat hanger to unlock the bottom clip.
Now with everything disconnected, remove the valve body unit and install the new one in reverse order. Make sure you lock them clips! Reposition the wiper linkages back to their normal state and flip the foam padding back over the valve. Reinstall plastic trim, electronic module, weather-stripping and wiper arms. Now enjoy your a/c!
Hi,
I believe I have the same problem (No heat).
It seems that the pictures you posted have been removed.
Can you please re-post or send to miguel.angelo.conceicao@gmail.com
Thanks
Junior Member
Joined: May 2006
Posts: 64
Likes: 2
From: Aveiro - Portugal
E220 CDI (W211)
Hi,
I believe I have the same problem (No heat).
It seems that the pictures you posted have been removed.
Can you please re-post or send to miguel.angelo.conceicao@gmail.com
Thanks
I believe I have the same problem (No heat).
It seems that the pictures you posted have been removed.
Can you please re-post or send to miguel.angelo.conceicao@gmail.com
Thanks
I'm afraid that without the photos I won't be able to manage.


Newbie
Joined: Sep 2009
Posts: 10
Likes: 0
2003 E500
ok, i think i'm confused on what the changeover valve does. my problem with my 2003 e500 is i'll be driving with the air on and all of a sudden hot air starts blowing of the backseat vent. even though it is set for cold in the back. then i have to adjust the temp setting to hi and back to low to get it to cool off again. it does this back and forth probably every 20 or 30 minutes. the front air is never affected, only the back. Now my question is: is this the CHANGEOVER valve malfunctioning, because most of the complaints i see in this thread is talking about no heat..
thanksyou to anyone who can help!!!
thanksyou to anyone who can help!!!
Out Of Control!!
Joined: Jul 2003
Posts: 15,901
Likes: 4,633
From: North Scottsdale, AZ
'71 Pinto
ok, i think i'm confused on what the changeover valve does. my problem with my 2003 e500 is i'll be driving with the air on and all of a sudden hot air starts blowing of the backseat vent. even though it is set for cold in the back. then i have to adjust the temp setting to hi and back to low to get it to cool off again. it does this back and forth probably every 20 or 30 minutes. the front air is never affected, only the back. Now my question is: is this the CHANGEOVER valve malfunctioning, because most of the complaints i see in this thread is talking about no heat..
thanksyou to anyone who can help!!!
thanksyou to anyone who can help!!!
MBWorld Fanatic!
Joined: Oct 2009
Posts: 2,825
Likes: 17
From: Southern California
E55 w/ goods, Z32 Project underway
Great writeup, while driving today, the front a/c was blowing cold, but my son started to complain about the 'heat' in the rear. I t was HOT air blowing out of the rear vents. Will pick up one of these valves along with the misc components and tackle this next weekend.

Newbie
Joined: May 2010
Posts: 9
Likes: 0
From: Houston, TX
2004 E55, 2006 M45
This was an awesome write-up
I just did this. I did it with another person and it took about 2.5 hours. We worked slowly as we're still pretty new to DIY stuff and wanted to take our time.
The hardest part for us was removing the bottom clip on the side of the part with two clips. The thing was jammed in pretty good. Once we got the old part out we were on easy street.
I can't even begin to imagine doing this without removing the wiper assembly. That was key IMO.
THANKS!!!!
The hardest part for us was removing the bottom clip on the side of the part with two clips. The thing was jammed in pretty good. Once we got the old part out we were on easy street.
I can't even begin to imagine doing this without removing the wiper assembly. That was key IMO.
THANKS!!!!

Newbie
Joined: Feb 2010
Posts: 9
Likes: 0
From: Washington State
2005 E320 CDI
Here's what I found out from the old changeover valve that I replaced. I decided to open up that thing to see what made it failed. The motor that closes and opens the valve from the coolant burned up. Once I opened it I noticed the motor chamber is flooded with coolant, and that shorted out the motor and the valve is stuck open on one side.
I sent a reply earlier but was not logged in. I don't think the first reply went thru. Anyway, I was wondering if you ever heard more about the burned up motor you found? All the post above only address changing the changeover valve. Are there TWO issues - the changeover valve and the actuating motor? Just checking because I have an intermittent problem with my A/C coming on right away or not until I've waited and fiddled with it.
Look forward to hearing back from you in a post or by email.
H. Bolton.............2005 E320 CDI.............
17 July 2010
boltons1421@yahoo.com
Newbie
Joined: Feb 2010
Posts: 9
Likes: 0
From: Washington State
2005 E320 CDI
I was glad to see an owner of a E320 have success with the heater changeover valve DIY.
I'll be trying it later this Summer and am fearful of a change in the parts location.
I have my confidence meter turned up to semi-high.
I'll really be smiling when all is over and done with SUCCESS.
THANKS TO EVERYBODY FOR THE FEEDBACK AND RESULTS.
Hez of Vancouver, WA USA.............2005 E320 CDI

Newbie
Joined: Jul 2004
Posts: 10
Likes: 0
From: South Central Pennsylvania
2003 E500, vent seats, pano, solar, karmon hardon tunes
Thanks to W211 Ryda
Well, it took my valve while to fail, but I'm really thankful that you posted such a great step-by-step process to replace it. Bought the valve today at the stealership for $41.00, tax included.
Started promptly at 5:30 and finished to have dinner with my wife at 7:15. Frankly, I would have been done earlier, but I had trouble aligining the front hose with the unit--it's a tight fit.
Anyway, I did remove the wiper linkage and the mainfold cover - it really opens the access to the unit.
So, thank you, thank you, thank you!!!

Newbie
Joined: Jul 2010
Posts: 10
Likes: 0
Mercedes Benz S 430 (W220) 1999
Hi,
I have another problem (posted on another topic aswell), but i think it could be linked to this problem.
My problem is that i have a similar problem, but not between front and rear but between left and right.
On the left side i have a temp differance. The maximum differance is at the highest when you put both sides on "LO" and i think it's +/- 5 degrees celcius differance). It's not hot air comming out, but it feels like there is no airco comming out. The icey feeling like airco is missing on the left (drivers) side. Right side is fine. And the problem is on left side all vents, not only centre console.
I've checked the sun sensor and it seems to act weird, but after disconnecting it's doenst fix my problem, so that couldn't be it.
Someone adviced to change the 2 inside temp sensors, but i'm not sure how and if this is possible because i think it are 2 different types of sensors.
Can somebody please help me?


