
Cup Holder Malfunction
 02-06-2010, 08:29 PM
#1
Member
Thread Starter

Join Date: Oct 2009
Posts: 76
Likes: 0
Received 0 Likes
on
0 Posts
2004 E320
Cup Holder Malfunction
The cup holder in my 2004 E320 is stuck in the down position. Up until now it has worked perfectly. I don't use it that much but because it doesn't work is what bothers me. I don't want to be too aggressive and try and force it into the UP position. Has anyone had this problem and is it a DIY fix? It may just need a little lube in the right place. I have the mechanical skills with a little direction. Thanks
Tarheel
Tarheel
 02-07-2010, 10:20 AM
#2

First. pull it out of the socket. It takes some gentle tugging if you have never removed it before. There is a spring made out of a piece of tempered metal about 1/2 inch wide. This spring curls up like a party horn when it is released. It want to rest in the "up position"
On mine, the end is some what shaped like a spade on a deck of cards. This engages a slot at the back of the cup holder. The plastic slot is very flimsy and the spring can become disengaged (or more likely) the female portion on the plastic cup has broken. I used a tungsten drill and a steel nail (brad) to reattach it. This is delicate stuff. You have to drill the spring and the plastic receiver together, then cut off and brad (rivet) the small nail to hold the together. Clearance is pretty tight but if you are handy, you can fix it better than new. I hate wasting things plus I am cheap. Someone else figured out how to attach a different spring from Home Depot but I could never get the gist of how they did it. Search the forum, it is a common ($80) problem. Mine has worked flawlessly for about 4 months. Some people think it is a worthless feature. I think it is very clever, just poorly made
On mine, the end is some what shaped like a spade on a deck of cards. This engages a slot at the back of the cup holder. The plastic slot is very flimsy and the spring can become disengaged (or more likely) the female portion on the plastic cup has broken. I used a tungsten drill and a steel nail (brad) to reattach it. This is delicate stuff. You have to drill the spring and the plastic receiver together, then cut off and brad (rivet) the small nail to hold the together. Clearance is pretty tight but if you are handy, you can fix it better than new. I hate wasting things plus I am cheap. Someone else figured out how to attach a different spring from Home Depot but I could never get the gist of how they did it. Search the forum, it is a common ($80) problem. Mine has worked flawlessly for about 4 months. Some people think it is a worthless feature. I think it is very clever, just poorly made
02-07-2010, 02:12 PM
#4
Member
Thread Starter
Join Date: Oct 2009
Posts: 76
Likes: 0
Received 0 Likes
on
0 Posts
2004 E320
I have never removed it before because I had no reason to. What you are saying is that the entire assembly lifts out of the cavity/well that it folds into? OK, I'll try lifting it out and hopefully not damage anything. Does it take much force to pull the unit out? Pray for me.......
Tarheel
Tarheel
02-07-2010, 08:46 PM
#5
Senior Member
Join Date: Oct 2006
Location: McLean, VA
Posts: 470
Likes: 0
Received 3 Likes
on
3 Posts
2003 E500 Benz & 2015 BMW M235ix
I have never removed it before because I had no reason to. What you are saying is that the entire assembly lifts out of the cavity/well that it folds into? OK, I'll try lifting it out and hopefully not damage anything. Does it take much force to pull the unit out? Pray for me.......
Tarheel
Tarheel


 02-08-2010, 08:01 AM
#7
Member
Thread Starter
Join Date: Oct 2009
Posts: 76
Likes: 0
Received 0 Likes
on
0 Posts
2004 E320
These pictures are indeed worth more than a thousand words. My plan is to take two heavy gauge coat hangers and put a shallow hook on the ends. Last step is to slide the wires down on each side, hook the holder and hopefully remove it in that manner. These photos are greatly appreciated. I'll let you know if my plan works with out doing any damage.
Tarheel
Tarheel
Trending Topics
02-08-2010, 08:58 AM
#8
MBWorld Fanatic!
Join Date: Mar 2006
Location: Louisiana
Posts: 3,254
Likes: 0
Received 12 Likes
on
12 Posts
03 E500 and Corvette
Spilling any drink into the holder exclusive of water is almost a sure fire way to make the holder malfunction. IT MUST BE KEPT CLEAN. If you spill into it it can be totally removed and washed.
02-08-2010, 10:00 AM
#9
Member
Thread Starter
Join Date: Oct 2009
Posts: 76
Likes: 0
Received 0 Likes
on
0 Posts
2004 E320
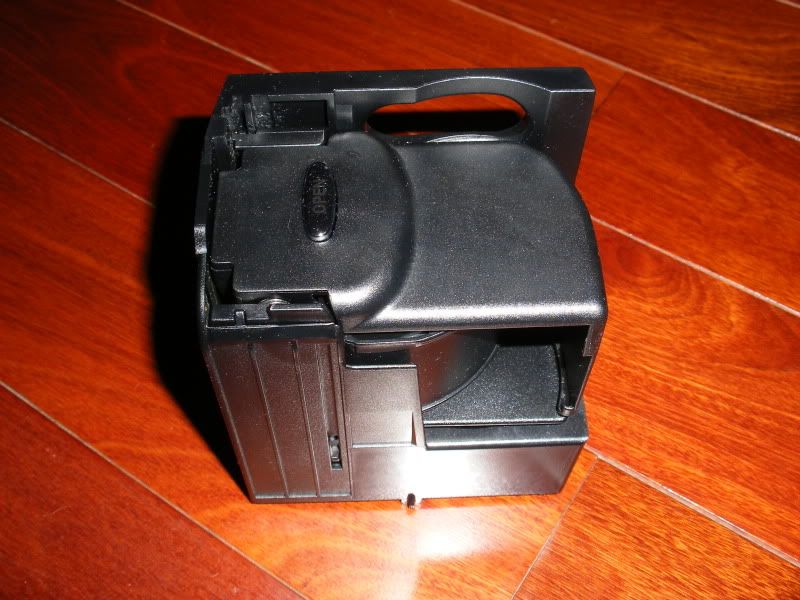
SHAZAAM... It came out with a gentle tug when I inserted the wire under it. The coiled spring and the spool that it pivots on were lying loose on the bottom where the assembly came out of. There were no other bits of broken pieces in there. I can't determine/see where the T end of the spring attaches. I know where the spool fits. Next, how do you reassemble it so that the spring's torsion causes the holder to raise up when the OPEN is depressed?? Thanks in advance.
Tarheel
Tarheel
02-08-2010, 09:19 PM
#10
Member
Thread Starter
Join Date: Oct 2009
Posts: 76
Likes: 0
Received 0 Likes
on
0 Posts
2004 E320
I give up..... I've been using a strong flash light to look inside the back of the cup holder for the slot where the spring attaches. Since I didn't find any fragments is there still the possibility that it is broken? However, because the spring and the roller were laying loose maybe the indicator that it is broken?
Tarheel
Tarheel
02-09-2010, 12:19 PM
#11
Member

Join Date: Jan 2007
Location: NW Chiburb
Posts: 75
Likes: 0
Received 0 Likes
on
0 Posts
04 E500
Evidently you haven't done a search for "cup holder," because if you did you would have found this reply sent back when mcleantmw originally had his cupholder problem. You don't need to look inside the cup holder for the slot, you need to look on the outside:
https://mbworld.org/forums/e-class-w...der-broke.html
If you find that the spring or the cupholder is broken such that you can't reattach the spring, there is an alternate solution:
https://mbworld.org/forums/e-class-w...up-holder.html
Unfortunately it's a little hard to follow because the pictures that were included are no longer there. Fortunately, however, I saved the pictures, so you should be able to figure it out:
02-10-2010, 11:40 AM
#12
Member
Thread Starter
Join Date: Oct 2009
Posts: 76
Likes: 0
Received 0 Likes
on
0 Posts
2004 E320
The spring on my cup holder in NO way resembles the spring in the pictures that you sent me. It's like comparing apples to oranges. MB made an engineering change somewhere along the line. Mine is a tightly coiled spring steel that is 5/8" in width and it pivots on a 1/2" plastic drum/cylinder. The end of the spring is T shaped. There has to be a slot or plastic ear where the end of the spring attaches to. I may give in and take to my local shop and have them look at it or call and order a new unit. I appreciate the pictures that you provided even though the springs don't match up.
Tarheel76
Tarheel76
02-11-2010, 02:46 PM
#13
Member
Join Date: Jan 2007
Location: NW Chiburb
Posts: 75
Likes: 0
Received 0 Likes
on
0 Posts
04 E500
In Post #11 above, "Cup Holder Broke" is a link. If you click on the link it will take you to an old thread by mcleantmw titled, "Console Cup Holder Broke." In that thread you will find information on where the slot for the spring is located, and a method that may work to reattach the spring in the slot.
In Post #5 above, however, mcleantmw mentioned that he was not able to repair his cup holder because the slot for the spring was broken. In Post #2 above, Clinton Horn mentioned a similar problem. Since you had not yet found the slot, the possibility that yours also might be broken could not be ruled out. Considering that in that case you might prefer a solution less expensive than buying a new cup holder, the link to another old thread by no clue ("Little $3 project ...................... Fix your cup holder.") was included as a possible ALTERNATE solution.
You are quite correct that the spring in the pictures does not resemble the spring in your cup holder. It is NOT the spring in your cup holder, and it is not an engineering change by MB; it is an "engineering" substitution by no clue (and a brilliant one, in my opinion). It works on an entirely different principle, and that is why it will work even if the slot on the cup holder is broken.
The pictures were included in the reply only because (1) if you click on the link you will find that the pictures that were in the "Little $3 project ...................... Fix your cup holder" thread are no longer there; (2) the thread is much easier to follow if you have the pictures; (3) I happened to have the pictures; and (4) rather than reopen the old thread and put them there, it was more convenient to simply put them in the reply.
I suggest that you click on the links and read the threads that were referenced. Since you are now familiar with Picture 1, if you will look at it again you will find the slot you are looking for on the near side of the cup holder, directly in line with the far end of the spring. If the slot is broken, you can skip the first link and go directly to the second. If the slot is not broken, you can go to the first link and try to reattach spring as suggested. If you find that you are unable to do so, you can go to the second link, find a spring like the one in the pictures, and install it as described. (I should probably note: the thread in the second link also includes a another method of reattaching the original spring in the slot. You may want to look at that method, as well.)
I hope this clarifies the situation.
02-11-2010, 08:25 PM
#14
Member
Thread Starter
Join Date: Oct 2009
Posts: 76
Likes: 0
Received 0 Likes
on
0 Posts
2004 E320
I've decided to go the route of Lowe's and check out their spring selection and do the $3.00 fix. I've tried the other method and keep breaking my fishing line. According to my best measurement I'll need a spring approximately 4 3/8" - 4 1/2" L and no more than 3/8" D and of a very lite gauge. As you mentioned it has to go the full length of the barrel when in the max UP position. Thanks for all of your advise.
Tarheel76
Tarheel76
02-12-2010, 02:57 PM
#15
Member
Thread Starter
Join Date: Oct 2009
Posts: 76
Likes: 0
Received 0 Likes
on
0 Posts
2004 E320
Patience, Perseverance & Yankee Ingenuity....... my local Lowe's did not have the coil spring that I needed. My two choices were to try and do a FIY as others did or order a new one. I had a small spool of thin wire cable left over from my IBM days. I was able snake the cable down into the proper channel and then attach it to the T end of the coil spring. After several attempts I fished the end of the spring out through that "infamous slot" on the side. I then proceeded to get out my Dremel set and fashioned an H shaped C clamp from a piece of thin metal. I slipped this over the T end of the spring and SHAZAAM it works slicker than snot. I firmly believe that this fix is better than the original design. I truly appreciate everyone's suggestions and pictures. I'm also cheap and wasn't going to give up after the first several failures.
Tarheel76
Tarheel76
02-12-2010, 03:50 PM
#16
Don't you feel better? I think my fix may be the most fragile of all but if it breaks, I will definitely try another. It is gratifying to see the board populated by people who enjoy using their skills and intelligence to overcome some of the minor defects that require attention from time to time. Is it cost effective? Probably not, but everyone needs some time away from a computer screen (or whatever puts food on your table). Now, excuse me while I figure out how to fab a spring perch to replace the plastic one that disappeared from the radiator bulkhead. Probably won't affect the hood dampening spring for about 20 years but I am going to give it a go. 
05-01-2010, 01:44 PM
#17
Junior Member

Join Date: Jun 2008
Location: Brooklyn
Posts: 15
Likes: 0
Received 0 Likes
on
0 Posts
2004 e500
 05-01-2010, 07:27 PM
#18

If someone has a broken one and wants to give it away for free I would be interested. I'm working on a CAD model of it and I'm planning of making some out of brushed metal for the crew here. I need a broken one just to make sure all measurements are right and don't wanna pull mine out constantly.
05-05-2010, 01:17 PM
#19

As for my experience, I was able to fix the spring issue with my original cupholder by using 5 minute epoxy in the parts of the spring that attaches to the upper end of the mechanism. This actually holds the spring just fine. Unfortunately, that wasn't my only issue. For some reason, no matter how much I cleaned my cupholder and greased and lubed it, the sliding action was never smooth again. It would sometimes stop on it's travel mid way or not go up at all when released.
So F it! If anyone wants my cupholder, make me a reasonable offer plus shipping and it's yours. It works, but I can't get the sliding action on it smoothed out.
Cheers!
06-02-2010, 12:06 AM
#20
Newbie

Join Date: Jun 2010
Posts: 3
Likes: 0
Received 0 Likes
on
0 Posts
2004 E320 4MATIC
Fixed cup holder!
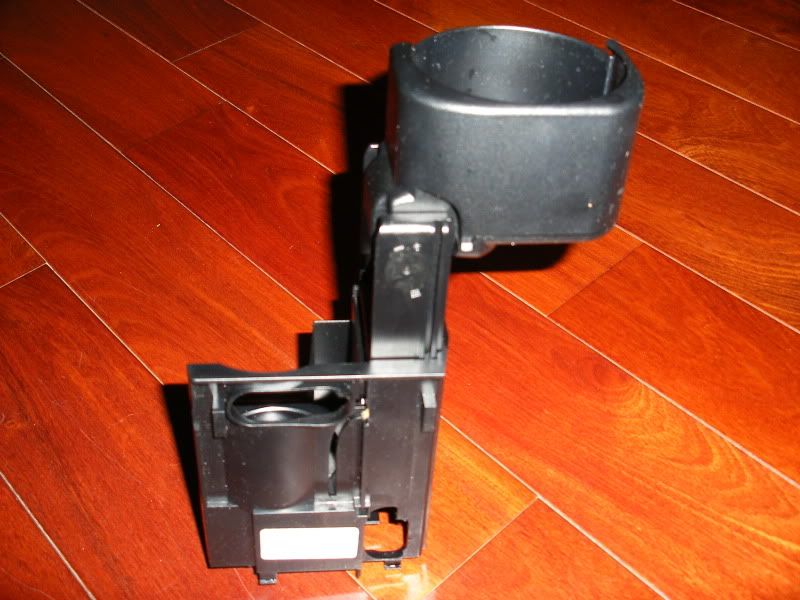
The hard part is reattaching the 1/2 inch wide rolled metal spring. First recoil the spring so the T is inside and the flat end is outside. You are going to feed the flat end through the slot in the exterior of the holder where there is the slot (side of cup holder not shown on pictures) (ultimately the T end will attach to the small plastic stop in the slot). Get a flat letter opener and a large tweezers. Once you feed the metal spring through the slot you must hold it flat and put the plastic roller in its proper position. Let go of the metal and it will wrap around the plastic roller and voila! you fixed it. The T end will catch on the plastic stop in the slot.
Put the holder back in car and push down so it snaps in. Hope this helps!
06-02-2010, 12:18 PM
#21
Member
Thread Starter
Join Date: Oct 2009
Posts: 76
Likes: 0
Received 0 Likes
on
0 Posts
2004 E320
Sally,
Last fall after much patience and Yankee ingenuity I fixed mine and it works like new again. With much patience I was able to pull the metal spring into it's proper place and then fashioned a "C" clip along with super glue to keep it in place. I added a small amount of silicone in the proper channels and it operates very smooth.
tarheel76
06-02-2010, 12:38 PM
#22
Newbie
Join Date: Jun 2010
Posts: 3
Likes: 0
Received 0 Likes
on
0 Posts
2004 E320 4MATIC
Cup holder saga
Sally,
Last fall after much patience and Yankee ingenuity I fixed mine and it works like new again. With much patience I was able to pull the metal spring into it's proper place and then fashioned a "C" clip along with super glue to keep it in place. I added a small amount of silicone in the proper channels and it operates very smooth.
tarheel76
Last fall after much patience and Yankee ingenuity I fixed mine and it works like new again. With much patience I was able to pull the metal spring into it's proper place and then fashioned a "C" clip along with super glue to keep it in place. I added a small amount of silicone in the proper channels and it operates very smooth.
tarheel76
I just reattached mine, but do not know how long it will last. What is a "C" clip? My cup holder slot, where the T attaches, has only one side with a small "catch" so I don't know how long the spring will stay attached. This is a terrible design, but I use it all the time. Thanks for the response!
06-02-2010, 01:20 PM
#23
Member
Thread Starter
Join Date: Oct 2009
Posts: 76
Likes: 0
Received 0 Likes
on
0 Posts
2004 E320
Sally,
I fashioned a "C" clip from a very thin washer. The inside diameter of the washer can't be any larger/wider than the width of the "T" end of the spring. I used my Dremel tool or sharp hack saw to cut the washer. I slid this clip under the "T" end of the spring to prevent it from sliding back down and the super glue under the clip keeps it from moving. If this doesn't help I can remove my cup holder and take a picture and email if you send me your address? Good luck....
tarheel76
06-25-2010, 03:19 PM
#24

Toward the back is an indentation, just pull back and up with a little jerk and up it comes.
The hard part is reattaching the 1/2 inch wide rolled metal spring. First recoil the spring so the T is inside and the flat end is outside. You are going to feed the flat end through the slot in the exterior of the holder where there is the slot (side of cup holder not shown on pictures) (ultimately the T end will attach to the small plastic stop in the slot). Get a flat letter opener and a large tweezers. Once you feed the metal spring through the slot you must hold it flat and put the plastic roller in its proper position. Let go of the metal and it will wrap around the plastic roller and voila! you fixed it. The T end will catch on the plastic stop in the slot.
Put the holder back in car and push down so it snaps in. Hope this helps!
 06-25-2010, 03:50 PM
#25
MBWorld Fanatic!
Join Date: Mar 2004
Location: Ft. Lauderdale Area, USA
Posts: 5,017
Likes: 0
Received 15 Likes
on
15 Posts
2015 ML 350
Yes. It will release with a snap because its designed to "clip into" the Trinket Box well. (That's what the Europeans call their holderless boxes.
Give it a firm jerk upwards. Look up at the pic of the cupholder sitting on the wood floor several posts up. That oval is for your 3 fingertips to go in & jerk the whole assembly upwards.
Give it a firm jerk upwards. Look up at the pic of the cupholder sitting on the wood floor several posts up. That oval is for your 3 fingertips to go in & jerk the whole assembly upwards.
Last edited by Barry45RPM; 06-25-2010 at 03:52 PM.


