When you click on links to various merchants on this site and make a purchase, this can result in this site earning a commission. Affiliate programs and affiliations include, but are not limited to, the eBay Partner Network.
Why does MB/DAG make things so hard? The cabin filter is another one. I have done DIY in past on Asian and American cars and never as complicated as MB.
It's weird because the older Mercedes, at least my old W203, the cabin filter could not have been easier. It was under the hood near the battery. Took 2 seconds to replace.
Now my W204 has it buried in the dash somewhere. PITA.
I wanted to thank everybody who posted, especially konigstiger and 6_Speed. It was greatly appreciated!
If i can just add my 2 cents, for what it is worth:
I drive a 2012 E350 W212 and just changed mine out. Its under driver side dash on very left. Took less than 10 minutes.
The battery is for the electronic shifter in the event your main battery dies and the car needs to be towed. It also serves for some other functions like the brake hold feature. Parts guy at MB dealer stated it did not need to be hooked up to drive. I did not verify this. lol
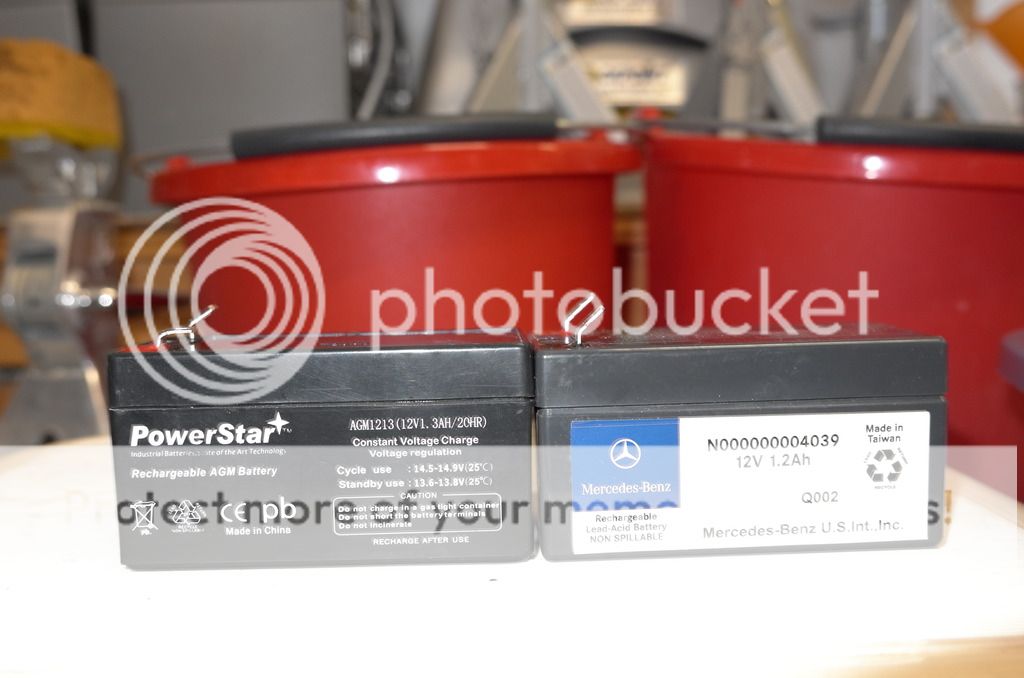
The battery itself is a little guy, measuring about 3 3/4" x 1 3/4" x 2". The part number (as several mentioned before and 6_Speed posted a picture of) is 000000004039. The local dealer in So Cal sells it for $70 plus $37 if no core. If you google 000000004039, you get a couple of Amazon links ranging from $13 (off-brand, slightly different size) to $58 (looks like MB battery).
For my car, I needed:
10mm socket
T25 Torx driver
Panel removal tool. Panel was easy to remove and can be done with some type of wedge. Six_Speed in post 46 had a good picture of the side panel.
First, read the PDF in post 8. Remove side panel. Remove 3 torx screws and lower bottom panel. I did not have to disconnect any of the wires on the bottom panel. Remove 10mm bolt on side panel while reaching under panel to hold battery. This can be more difficult if you have fat hands like me. You can eyeball through side panel. Once bolt is removed, cage holding battery will come lose, now only being held by battery connectors. Remove battery connectors and i used a screw driver to ease the battery out of the little cage.
Thanks for the posts; they provided good information that allowed me to change the Aux battery in my 2012 E350 in about 10 minutes. I ordered the PowerStar battery from New Egg for $12.99. The PowerStar battery is a bit taller and narrower, but seemed to fit fine in the bracket. Here are a few photos showing the access panels and the two batteries side by side. The garage door remote codes were unaffected after replacing the battery.jd
so I have the same car and it's acting up. Does not want to start. It's not dead but when I try to start the engine at first it'll start for 2 seconds then dies after. Some people were saying it can be my aux battery and some were saying it's my alternator? Help! Oh and I replaced my main battery for a new one so I don't think that's the issue...
IIRC Aux battery is just supposed to provide power to shift tranny in case car is dead. If car dies after starting then alternator would be suspected among other things like fuel pump. If alternator goes, then you'd expect your main battery to be drained which means you couldn't start it anyway.
IIRC Aux battery is just supposed to provide power to shift tranny in case car is dead. If car dies after starting then alternator would be suspected among other things like fuel pump. If alternator goes, then you'd expect your main battery to be drained which means you couldn't start it anyway.
hmm very interesting.. well when I diagnosed it. I got a code (P0356) stating it's a ignition coil Failure / secondary circuit..
First of all, thanks for all that posted photos and diagrams. I ended up buying the Mercedes-Benz N000000004039 Battery - Replacement UB1213 on Amazon for $10.99 to replace the OEM in my 2010 E350 4matic.
I don't usually do repairs myself, but this seemed like a fairly easy one. I had some issues getting my hand under the dash to hold the mount up. It's not very clear where it is until you have done it once. I had to pull the mount down to get the battery out and it wasn't very easy maneuvering around. Having a good light source under the dash helps.
I got the original battery out fairly easily and the replacement fit just fine. My hook up seems to be working, no more aux battery message. However, I failed to see the orientation of how the bracket lines up with the bolt for re-attachment now that I have pulled it down. There appears to be more than one place to line it up (there are what appear to be rubberized holes on the mount (I can barely see what I am working with) and a side piece of metal with additional holes). Does anyone have a clear picture of the mount itself and can tell me which hole aligns with the bolt in #53. The battery leads are not very long, so I feel like those are near the top. Any info would be greatly appreciated.
Replaced mine today as well. ~$12 at Batteries plus.
Quick question though, what else is near the mounting point? I got a couple of flashes of electrical arc when putting it back in. As well, the Battery Malfunction notice came up again. Checked the old battery and its pulling 12.7 volts sitting on the counter. Didn't think of checking voltage of the new one before putting it in.
My first thought is that it needs to be charged, similar to the security system in the house when I had that replaced. It took that almost a day to fully charge. Who knows how long it sat on the shelf in the store.
So, last week on Thursday morning I start my car and get the "Auxiliary Battery Malfunction" message. It was a cool morning likely close to freezing temperature over night. Car was made in May 2009 so I think it is time for this battery to go as it was the original.
But when I got on the freeway my Distronic did not work. I got "Distronic Plus Not Available" message. I thought this has to do something with the Aux battery malfunction so I stopped and re-started the car and all was good. No battery or Distronic messages. There seems to be an understanding that the Aux battery is for to be able to shift transmission but could it have something to do with some other functions like Distronic too?
Anyway, I got a MB replacement for $64 (tax included) and installed it today. The lower panel came off easy but had some trouble to get the dash end panel off. It was really tight but finally came off after I believed it had to be fastened only by the spring clips.
The bolt was easy but after that the biggest trouble. The darn thing hangs on the wires that should be about a foot longer. This would drop the battery with bracket down in the foot well where you can get two hands on it easily.
hey Arrie I agree I think does more than what’s been stated the couple of days before I changed mine my car wouldn’t lock when I was inside touching the interior lock button main done light wouldn’t go out
just wierd little things that had never happened before
so I was eager to get it replaced $15 bucks on Amazon
another Mercedes memory!!
Replaced mine today as well. ~$12 at Batteries plus.
Quick question though, what else is near the mounting point? I got a couple of flashes of electrical arc when putting it back in. As well, the Battery Malfunction notice came up again. Checked the old battery and its pulling 12.7 volts sitting on the counter. Didn't think of checking voltage of the new one before putting it in.
My first thought is that it needs to be charged, similar to the security system in the house when I had that replaced. It took that almost a day to fully charge. Who knows how long it sat on the shelf in the store.
Thoughts?
I've started to get the Auxiliary Battery Malfunction message on and off over the past few weeks. I may take it out and try and charge it. My ctek can handle 1.2ah batteries. Will record voltages and report back.
So I pulled the little battery out from behind the dash. It is kind of hard to find at first. Biggest pain is getting around the under dash panel when it is hanging down. Hard to see anything as you work. Will post more on that later.
At any rate, the battery voltage was 12.16v when I removed it. After a successful charging cycle on my ctek 4.3 (on small battery mode), it measured 13.2v with some clear excess charge. The next morning after the excess charge died down, it was steady at 12.9v so I reinstalled it. Will have to see how long it takes to get the malfunction warning again.
Boy this battery is tiny. Measures about 4" long, 2" tall and 2" wide.
Supposedly, the ctek charger will give an error message and not complete a cycle on a bad battery. I have found that features works with typical lead acid batteries, like in my Honda. However, that feature did not work on my old MB AGM battery - it kept completing cycles even though the battery ended up being bad.
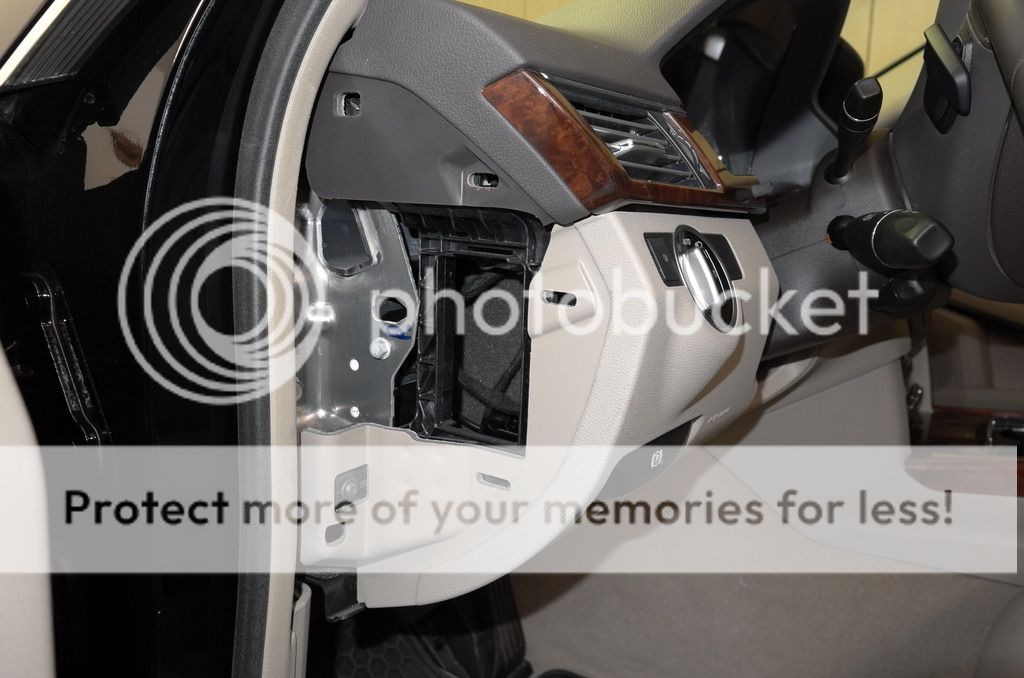
Even though the instructions are pretty clear, it was a little hard to see the battery at first. The rectangle opening to the right of the bolt makes you think it is there and you access the battery through that hole. But not really. All the work I did was from below after removing the panel under the dash. I took some photos with extra details that helped me as I followed the posted instructions and other tips.
This first photo is the view after the side panel is popped off. If you look closely in the green circle I added, you can see a black tab that is an alignment tab for the bracket that holds the battery. The 10mm bolt holds the edge of the bracket and the battery is behind and to the left of the screw. The alignment tabs help you know you've got it back in the correct position so be sure to note that on your car.
Here is the same view with the 10mm bolt and battery/bracket removed.
Below is a photo taken with wide angle just inside the rectangle opening before removal. You can see the bracket goes towards the front of the car, away from the camera. The threads of the end of the 10mm bolt are visible.
Here is the same view with the battery and bracket removed (bolt left in place for reference). At the bottom of the frame, you can see the red and black connectors dangling after I pulled them off the battery.
Here is a view from below looking up towards the battery while still installed. The black cable that runs across in front of the battery bracket is the parking brake release to give you some perspective.
Hopefully these photos help you get your bearings on the location of everything involved in this.
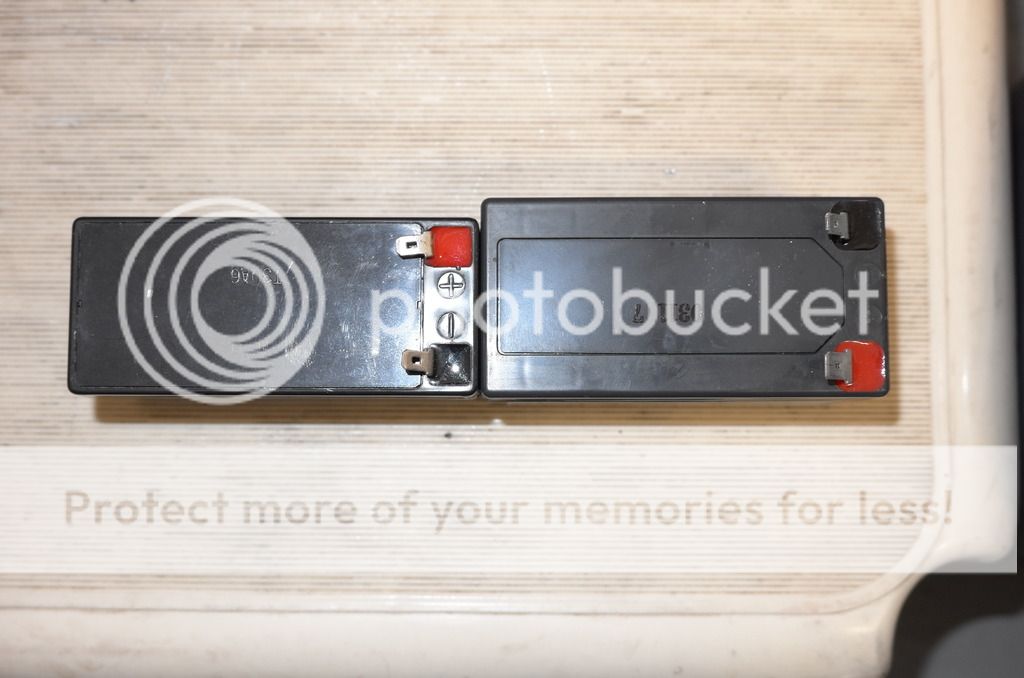
Here is a photo after the battery and bracket are removed and turned around. The battery slides out the side of the bracket that is open once removed. There is another connector mounted to the bracket with a 5amp fuse installed (not part of this procedure). There is not enough slack in the lines to lower the bracket and battery down below the dash to disconnect. So you have to disconnect by reaching up from below. The positive and negative tabs are different sizes so you can't connect the negative cable to the positive terminal.
Here is the bracket after the battery is removed. The 10mm bolt fits in the threaded hole on the bottom right, keeping the open side of the bracket against the silver metal side that the bolt passes through. One of the alignment tabs is just to the right of my thumb. This is the same alignment tab that I circled in green in an earlier picture, just below the 10mm bolt. This open side is what is held against the metal plate when the bolt is installed. If you were to rotate this picture 90 degrees to the left, then you would see the correct orientation when reinstalled.
Here is a view from below after the battery is disconnected and removed. The bracket will just hang down a little bit. I circled the location of the 10mm bolt for reference to show the bracket doesn't drop down too much. The red and black connectors are shorter than the wire connected to that fuse mounted on the bracket. So after you remove the connectors, the bracket can lower some more.
Here is the bracket show down where the dash panel opening is. That dash panel just pulls down after removing the 3 torx screws. But the hood release and OBDII connector are still attached so you have to lower and turn the panel to have enough room to work up under the dash, after you pull the panel over the brake and gas pedals.
Take your time and note the position of things before you remove them and you'll get it back in the right place.
At any rate, the battery voltage was 12.16v when I removed it. After a successful charging cycle on my ctek 4.3 (on small battery mode), it measured 13.2v with some clear excess charge. The next morning after the excess charge died down, it was steady at 12.9v so I reinstalled it. Will have to see how long it takes to get the malfunction warning again.
So about 5 months after pulling the original aux battery out and recharging it, I started to get the dash warning again intermittently. A few weeks later and the dash warning was coming on each time. Today I pulled the battery while doing some other stuff and recharged it again. It's too small to run a high voltage recondition on so if it continues to post warning every few months I'll probably replace it. At least I have some good practice at getting it out and back it.
So about 5 months after pulling the original aux battery out and recharging it, I started to get the dash warning again intermittently. A few weeks later and the dash warning was coming on each time. Today I pulled the battery while doing some other stuff and recharged it again. It's too small to run a high voltage recondition on so if it continues to post warning every few months I'll probably replace it. At least I have some good practice at getting it out and back it.
After about 4 weeks, the aux battery malfunction warning returned so apparently the old battery doesn't have the guts anymore. Pulled it out and it was showing 12.4v which is about 70% SOC. The first time I pulled it to recharge back in December it was down to 12.16v (about 50% SOC). Seems like MB's tolerance on voltage is low or perhaps the car puts a load on the aux battery during the startup system checks (which results in the warning message) and the battery fails under load. At any rate, with such cheap replacement options, I opted to replace it.
I ordered the mighty max for $13 off amazon as mentioned in this thread. Despite the smaller size it fits in the cradle just fine. The terminal tabs are reversed and bent at a lower angle than the MB OEM, but I didn't have any issue getting the contacts to slide on. Glad to see the warning message was gone. Let's see how long this one lasts - hopefully another 7 years like the original.
Thanks for great posting.
I replaced the aux battery today and it took me only 20 min since your posting helped me a lot.
I appreciate your detailed descriptions and photos.
You are awesome!!!!
So yea to rehash this subject. Not long after I replaced the battery I received the warning again. So I swapped replaced the old battery. Warning continued. A couple of days ago the main battery failed and so no gear change Time to replace the aux battery now. Pulled the existing battery and test it, 12.8 volts. New one is ~13.5 before going in, we'll see how long it lasts now. But I'm wondering if there are larger issues. Or if the main battery/aux battery combo replacement will resolve.
My sister has a 2017 G-wagen and is having the same issue with the aux battery now, I'll be curious to see what that outcome is as well.
Hi, I saw that you replied to a the E350 location of Auxiliary battery. I have a 2011 E350 4 door sedan gas type. Can you tell me the location of it since there is several locations regarding this. I am trying to replace this battery and no one could tell me what battery it is or part number either.
One other thing. The battery is held in place by a cradle. You will see a fuse attached to the cradle. Don't try and unhook or mess with the fuses. Simple pop the battery out of the cradle and pop the new one in. Also the cost at Battery's Plus was $25. Don't try and get it from an Auto Parts store as they will try and sell you a larger battery. This is a small battery.
Hi, I saw that you replied to a the E350 location of Auxiliary battery. I have a 2011 E350 4 door sedan gas type. Can you tell me the location of it since there is several locations regarding this. I am trying to replace this battery and no one could tell me what battery it is or part number either.
2011 models in USA don't have ECO stops, so they have the small 1.2 Ah batteries in the dashboard.
You choose not to disclose your location, so you can have different model.
Advised by service mgr, Scott, that the auxiliary battery is under the passenger seat and would be replaced, under the warrantee, if within, (48 months / 50,000 miles)
Sometimes these MB salespeople are complete numb nuts. SELL SELL SELL...And mislead people in the process.
I have not done it but it looks like its on the driver side panel. It seems like you need a 10mm socket to deal with it.
I should really do better research than I did, eh?
My 2010 definitely has the main battery in the trunk, and quite frankly I have no idea how they managed to fit it up front in later models. It is a monster!
Battery compartment for 2010 E550.
this is really interesting, actually. My 2011 e550 has the main battery under the hood
Regarding aux battery replacement on 2011 E350 - my husband just did this. Don't go under the dash. There is a small plastic bar holding the battery in place that you will see from the side panel. This has no purpose. Take a hacksaw and saw it off. The battery is right behind it and simple to change.
Last edited by ratfancy; 01-26-2021 at 08:00 PM.
Reason: add details


 06-04-2015, 08:14 PM


 Time to replace the aux battery now. Pulled the existing battery and test it, 12.8 volts. New one is ~13.5 before going in, we'll see how long it lasts now. But I'm wondering if there are larger issues. Or if the main battery/aux battery combo replacement will resolve.


