When you click on links to various merchants on this site and make a purchase, this can result in this site earning a commission. Affiliate programs and affiliations include, but are not limited to, the eBay Partner Network.
Arnott Air Spring Install Passenger Rear -- Jack Hacks...
2014 E350 Wagon Passenger rear air spring deflating overnight, rear suspension system sensors rebalancing, car sitting oh so Low... Now I know why I spent extra on that low profile floor jack.
Unlike a number of the 'professional' videos, I didn't remove any linkages or componentry. Went total cowboy on it and was glad I did -- it all worked out great. HUGE time saver reading this thread. Thank you all.
OE air spring removal
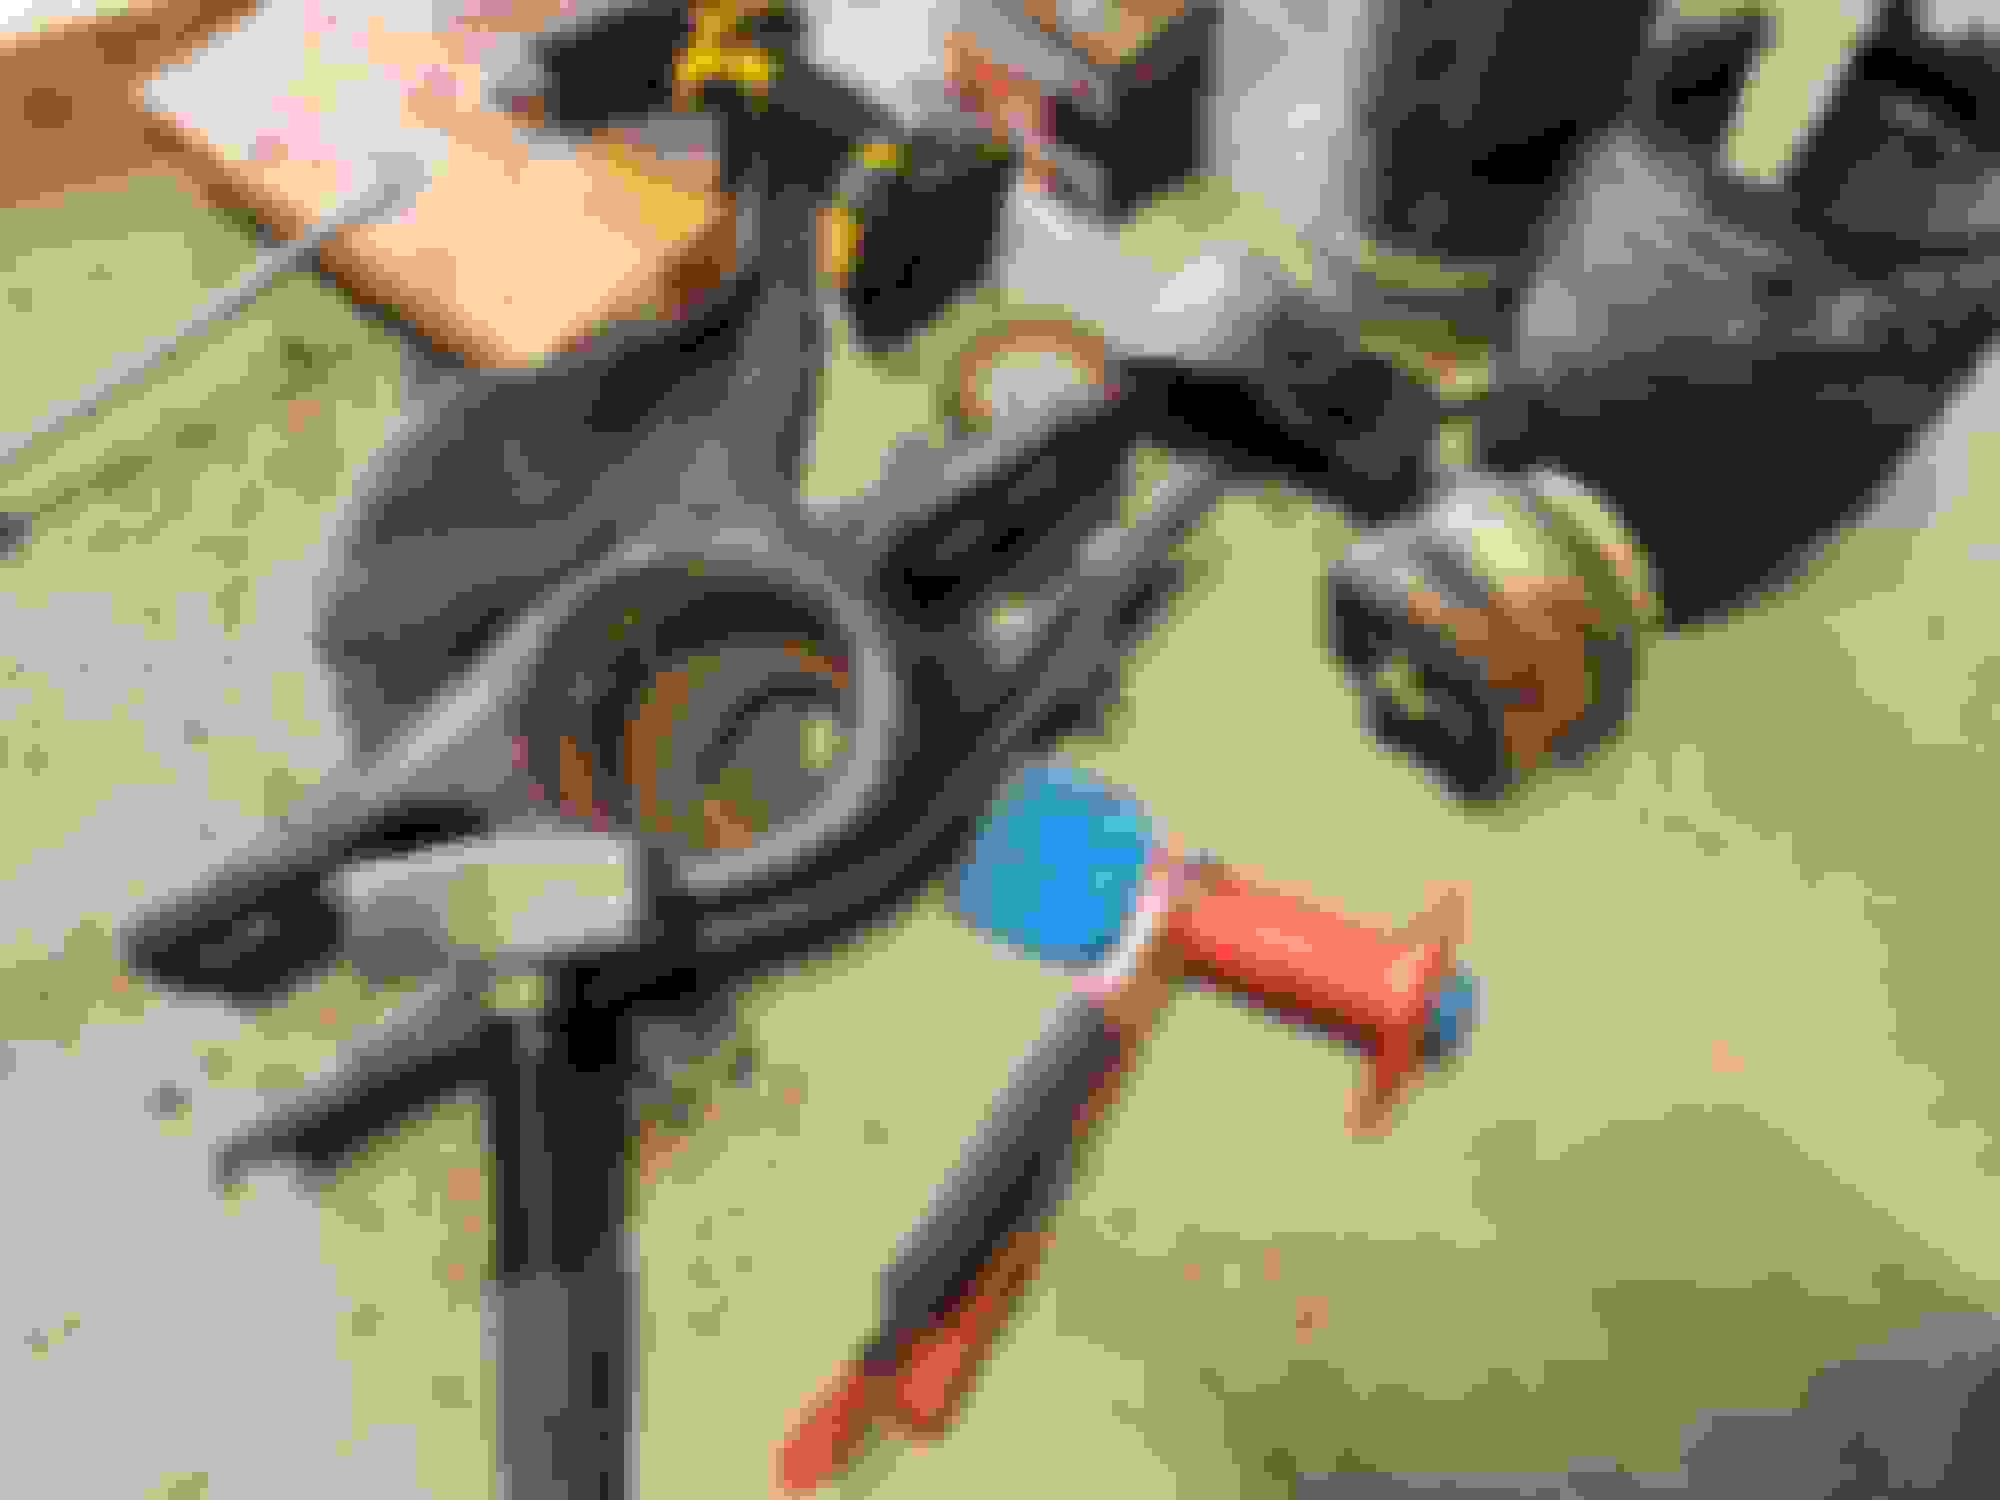
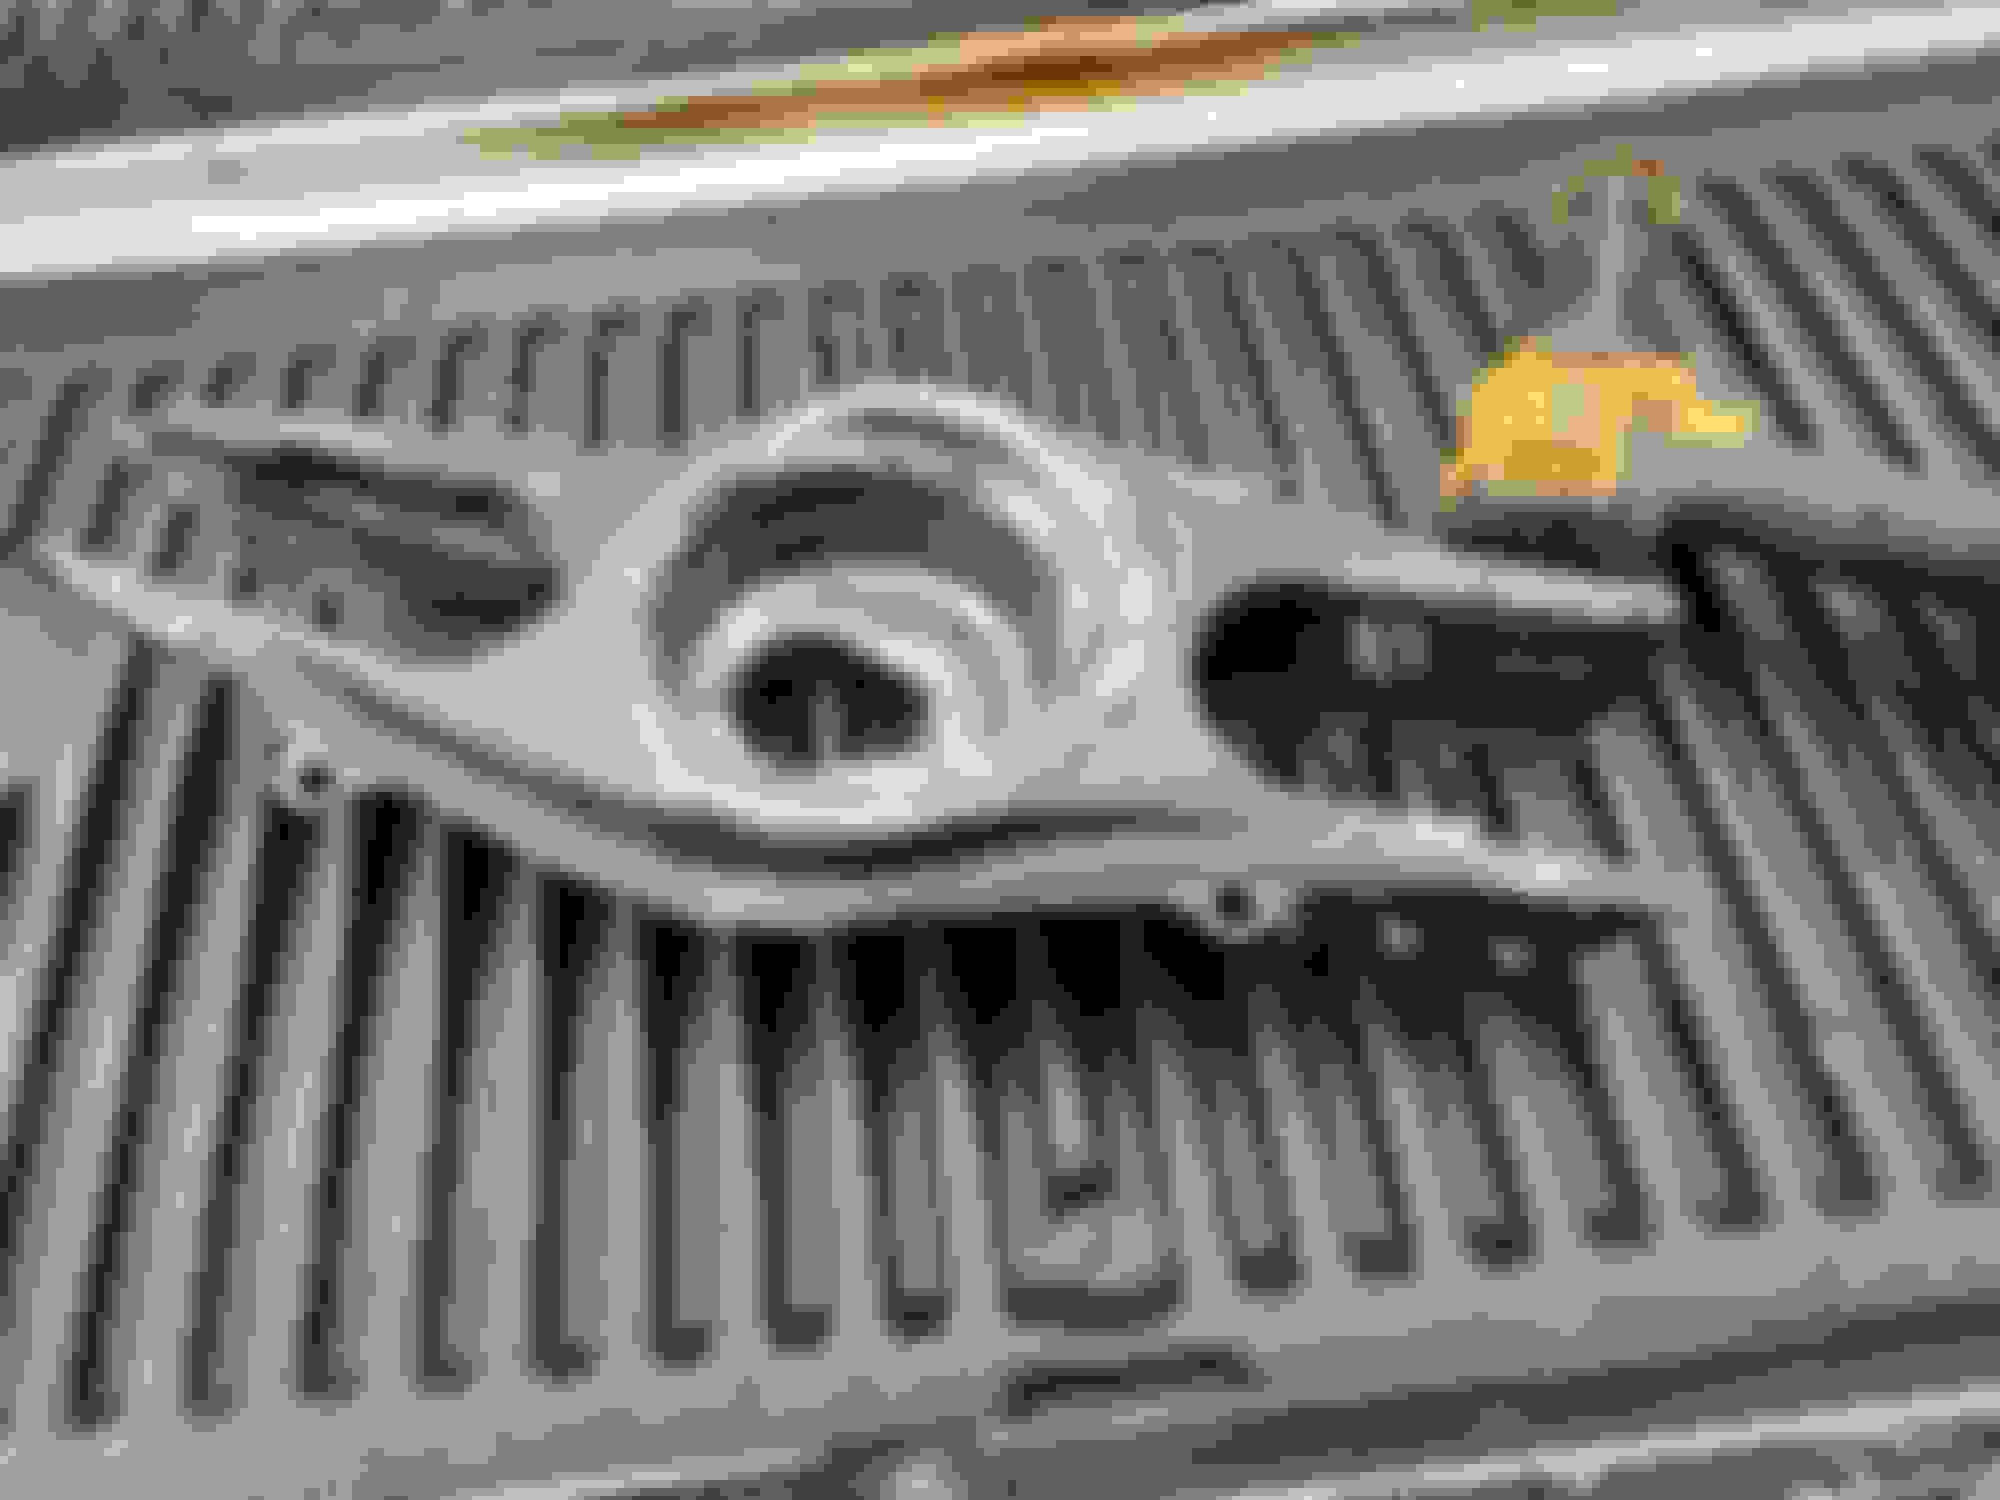
As many have said, the base of the OE unit is hopelessly stuck in place on the control arm. I used a bottle jack set on a wood block base to dislodge it as follows: To prevent the control arm from rising as the bottle jack extended, I fit a coat hanger wire around the wood block base and ran it through the control arm cover steel eyelet to the hold the entire suspension arm down as the jack piston rose. As I pumped away on the jack, the control arm rose about half way through its full travel, and being restrained by the now fully stretched coat hanger wire, the entire air spring suddenly broke loose from the control arm. It just popped out quickly once the pressure was high enough from the jack piston on its base. The dislodged OE unit compressed enough to come out easily with a hole drilled into its side as suggested to make sure the air could escape. I removed a lot of dirt and debris from the mounting cavity once the air spring was out, followed by brake cleaner and a coat of rust inhibiting paint.
Refit
I used Poster Putty to seal the Arnott factory default air spring fitting -- this helped it stay compressed (somewhat) as I guided it into place. Discarded it per Arnott and fitted the air hose directly to the unit after removing the MB OE air hose fittings. Easy, just be patient and careful to follow the directions exactly and you'll be fine.
I used the bottle jack once again, this time to push down the control arm to create more space through which to guide the new air spring into position. I wedged wood above/below the jack as follows: 1) under the jack to protect the hub assembly and to create a stable platform for the bottle jack, and 2), above the jack, on the business end, so piston pressure would be directed into the board in the top of the wheel well and not into the wheel well itself (If I had it to do over, I'd put a thick cloth around the upper board to make sure the edges of the wedged wood didn't mar or tear up the wheel well. That didn't happen though -- the board didn't mar or nick the upper wheel well, but a thick cloth would be a very smart precaution.) I cranked on the jack until the control arm moved down a good 4 or 5 inches -- i'm guessing -- the point at which I heard the upper board start to crack , but the jack created just enough space to squirrel the new part into place. Without this hack, it would have been difficult (tried that for about 1min and gave up -- the space was just too small to get the air spring through without tons of grief and overhandling the new part). This 'jack hack' made all the difference.
Test drive
Made sure the air spring was installed as best as I could, the top and bottom properly seated per Arnott's directions, but there's not much you can do other than line it up just right top and bottom because you have zero leverage / working room to seat the air spring -- esp. if you are working in a driveway with jack stands. So, I double checked everything, buttoned everything up, torqued the wheels to spec, started the car, and it gave the familiar 'vehicle rising' message ... as the car began to rise, it paused for moment, then I heard a loud 'pop' which was of course the air spring unit settling down into its control arm molded pocket. Sound was a quick and loud snap, after which the car continued to rise until it leveled. Test drive was successful, no issues. Will let sit overnight to make sure, but all went fine. Will do driver's side per manuf. recommendations another day -- when it's cooler outside.
Follow-up: car driven hundreds since this repair and no issues whatsoever. As stated, I only replaced the right / passenger side, so, I am deciding whether or not to do the driver's side which is not having any (known) problems. Part manuf. says replace both, I say I must do what is best for our situation with careful assessment of overall risk and safety.. Car is my wife's daily driver, long commute, so, I need to pick my battles wisely since I only have the weekends to do the work. That said, like everyone here, I want to do the best thing for the car -- it's a truly awesome well-crafted machine.
Update: Passenger side Arnott rear air spring great no issues some four months later, now however, driver's side original OEM rear air spring now losing air @ ~175k mi. Happy it lasted this long. Same symptoms, losing air over time over shorter and shorter duration ... Unlike passenger side, driver's side air spring was massively stuck to control arm -- could support entire weight of car with air spring sitting only on bottle jack (!)... was about to get all medieval on it, then had the idea of simply upgrading my bottle jack hack rig from a coat hanger to a heavy duty cargo strap ... took some time and care (put largest bolt I could find through 4"x4" base block, secured the strap to bolt, voila). OE air spring eventually came loose after 6 or 7 failed attempts... need to ensure bottle jack was applying max pressure at center of base of air spring (bottle jack business-end kept falling over to the side -- needed to be guided into place carefully to the center of the air spring base, then simply pumped away on jack like hans and franz and the thing finally popped loose). Removal complete, the install of new Arnott air spring was comparatively trivial. Just follow the directions that come with the new unit.
As mentioned in this thread, once finished with the install, lower the car down slowly -- the air spring(s) is(are) completely deflated. You'll have made sure the lower section of the air spring is seated into the control arm properly having guided it into place as best you can before you put the wheel back on. On startup, there will be the expected groans and pops as the new air spring adjusts to its new home and seats itself. All in all, not a difficult project if you have basic wrenching skills and common sense.
Note: if anyone needs my jack hack rig, I'll send it to them. No problem. It worked great. When you're done with it, make it available in the thread for anyone else who may be needing it.
Thanks T101 for starting this thread. I learned from each one of you. I took my time, it took an entire morning, but was very careful -- car is a daily driver. I bought the car, my wife took it over a long time ago. Go figure It's a truly great car, no major issues, 160k+ miles, we are the first and only owners.
Last edited by IloveJesus; 10-20-2022 at 04:14 PM.
Reason: status update
I changed out my two air springs yesterday and thought I'd share my experience. I had a few instances over the past several months of finding the car sagging after sitting a few days and wanted to replace them proactively so I wouldn't have to worry about getting stranded somewhere and have to pay dealer prices to have them replaced. Well before I bought my car as a CPO I was a lurker on this forum researching what potential issues I might face and since then I have been dreading an air suspension leak and the upcoming spark plug replacement (I don't think I'm going to tackle the engine mounts when that day comes). And since I live in New England I thought for sure I was going to be one of the unfortunate to have the air bags seized in the control arm cups.
Fortunately, this job went much more smoothly than I had anticipated. Two tools that I think were a big help: bar wood clamp in spreader mode and long reach bent nose pliers. I bought a clamp with 600 lbs of holding strength after reading the struggles on here, but didn't really have the much issue keeping the suspension from contracting (maybe my shocks are shot LOL) so I think a regular one would work fine. The pliers are super helpful in removing the control arm covers, as one of the clips is difficult to reach, as well as removing the air spring nut (no need to drill holes). I did not remove the brake calipers but admit it would make the job easier.
My air springs came out with about 20 firm hits with a stubby 3 lb hand sledge hammer. I did have to use a socket to reach the spring once it started to move beyond flush of the control arm. After that I cleaned the cups out with a wire wheel, brake cleaner and sprayed them down with some rust primer then fluid film for good measure.
Installation was a matter of squashing the new air spring down, holding my thumb on the valve and trying to get them into place before they could expand again. Annoying but not overly difficult.
Once everything was triple checked, wheels on and battery reconnected I lowered the car down onto the wheels and had my wife start the car while I observed (car still supported by the jack). No message in the dash, no sound of compressor so I lowered the car as far as I felt I could. The compressor then kicked on and ran for maybe a minute and then the car slowly began to rise off the jack. No loud pops or anything.
I hooked up the scanner and everything looked normal (compressor status, height sensors, etc) so I took it for a test drive and all is good. It has sat overnight now and is holding fine.
Thanks to all those who have contributed to this thread, it was super helpful for me.
Thanks for adding to the thread, it'll be helpful for me someday as I'm also in the northeast and will no doubt experience the same complications with rust.
I'm curious how your issue presented itself and how you narrowed it down to the air springs. I had two occasions in the past few months where the rear was sagging (but not bottomed out), but came back up once I started the car and held. I monitored the heights and the "compressor run minutes" for several weeks and it hasn't returned. I'm wondering if this started out similarly with you and and gradually got worse or if it was all or nothing. I'd rather address it proactively and not get stranded somewhere, but trying to diagnose an intermittent issue is frustrating at the least.
On another topic, I notice your rear brake hard lines look like mine. I'm wondering how much time we have before these need to be replaced.
Jumping in on your question...my 2011 S212 started showing the obligatory messages around the 100k mark. At first it was the "Please wait..car rising" message and the compressor would inflate the sagging left rear air spring and once the message cleared off the dash, I'd start driving . Recently the "malfunction" light came on while driving @60 mph on a parkway near my home and noticed that the left rear wasn't dampening road irregularities and that it had dropped to near the top of the tires. I was able to get the car home safely and replaced the left rear air spring the following weekend. I went with the Arnotts and replaced the right rear air spring today. I live in the North east and removing the air spring on the left rear was a bear. I was able to eventually able to hammer it out. Do yourself a favor and spray WD-40 on the bottom where the air springs sit into the control arm with WD40 or rust penetrant a day or two before you decide to change yours. The right side came out very easily with a few love taps with a hammer as opposed to the left side that I didn't use WD40 on. All in all a very straightforward job if you're used to working on your car. Plenty of advise on here as well as on YouTube if you decide to undertake this.
Yeah, hi Specifically, it is the frequency of the sag that will tell you what's up: in our case, car was 'drooping in the rear' about 1x per week, and I noticed it was worse on one side that the other (just eyeballing the clearance above each of the rear tires to the top of the wheel well). Previously, it had only done this 1x or 2x that I can remember and the entire business of 'Vehicle Rising' on startup was rare and strange which later on became commonplace (~1x / week) once the air spring was no longer viable. Rather than even bother with a more detailed diagnosis, this told me plenty -- that the lowest side air spring was not holding air properly. On this basis, I ordered the Arnott 3rd party replacement air spring -- they are excellent OEM-level quality -- and used this forum and the notes herein to replace the air spring. I read through everyone's experience and added my own take on it based on time and tools at hand and was able to replace the air spring without too much bother -- just an afternoon in the driveway grunting and groaning. Hope this helps. Regards
I am experiencing the same issues as many others have in this thread so I went ahead and ordered the Arnott air springs for my 2014 E350 wagon..
The instructions here are excellent, one question though.
Nobody seems to be mentioning replacing the air-spring to body mounting clip, PN A0019911171.
It is the part that guides the air spring into the mounting on the top.
According to the WIS it breaks during removal of the old air spring so it needs to be replaced.
Should I bother picking two up from the dealer or the bellows install just fine without replacing them?
Thanks.
Yes, that clip does automatically break upon the Rear AirSprings removal, so it is important to install it and have back-up replacements because you will inevitably break one unless you happen to have a �seemless� install.
When I installed both of my rears after getting them both rebuilt by RMT, I had the whole rear subframe lowered as I had replaced every bushing and everything else for that matter, so I made sure to connect to each AirSpring to those Air Hoses which connect to the expansion reservoirs attached to the front crossmember of the Subframe thereby allowing the AirSprings to hang in place. I had a Tranny Jack under the Differential and once I got it raised just so I installed the AirSpring Arms with new bolts all around started by connecting the Carrier End 1st as its bushing needs to definitely be Hammered into its center and then the bolt goes thru! Then I ended up raising the Arm enough to fit the lower end of the AirSpring to its mount, but then before you raise the Arm to its inward mount bushing in the Subframe, its crucial that Clip on top of the AirSpring is lined up perfectly before you push the Arm up and drive home that inner Arm Bolt!
I am experiencing the same issues as many others have in this thread so I went ahead and ordered the Arnott air springs for my 2014 E350 wagon..
The instructions here are excellent, one question though.
Nobody seems to be mentioning replacing the air-spring to body mounting clip, PN A0019911171.
It is the part that guides the air spring into the mounting on the top.
According to the WIS it breaks during removal of the old air spring so it needs to be replaced.
Should I bother picking two up from the dealer or the bellows install just fine without replacing them?
Thanks.
The Arnotts should have the clip in the plastic bag that contains the instructions. I chose not to replace mine because the originals weren't damaged when I removed the original air springs.
Well I've regrettably joined into this fray. Began this project couple days ago on my 2012 CLS550. Precisely as several have described here my old air bags are literally fused into the lower control arms (so far I've only attempted the drivers side). After wacking it for nearly an hour I have tried a couple methods like the one with a piece of 2x4 wedged beside the bag and using a bottle jack. I literally began lifting the entire vehicle from that point and the bag did not budge a mm! I have tried some PEN oil around the base, heat, etc nothing.
So now I've decided to just drop the entire lower control arm (which I believe someone above has done and had a hell of a time getting the bag out of it) but of the 4 bolts holding it up, the one nearest the tire and the 'six square' bolt on the opposite end of the arm are seized. I am using a compact air impact wrench and they won't loosen.
This, what should've been a simple repair, is ruining my week. Any tips here would be greatly appreciated. Due to the damage the bottom of the bag has taken from my attempts to wack it out it no longer holds air so reconnecting the lines and driving it to my local shop is no longer an option.
Man... I feel your pain. If it were me at that point... I'd start going after the strut with drill (bore a hole straight through from the bottom), hammer & chisel, etc. There's no need to try saving any of the bag assembly... just destroy it and get it out. Try a large flat head screwdriver, driven from the top side of the control arm and down into the plastic of the strut, and try prying up a bit... work your way around at whatever angles you can reach... just need to get it started it. Be conscious & careful of electrical connectors, wires, hydraulic lines, etc.
* I'll just add... from the pics, I wouldn't be surprised if rust on that lower control arm has "swollen" the inside of the cup, and maybe that's why it seems particularly stubborn; crazy that the bottle jack didn't work... that was a good idea. Once you get all the plastic of the strut chiseled out, be prepared to clean up that control arm (wire brush, etc), including a coat of rust inhibiting paint.
Man... I feel your pain. If it were me at that point... I'd start going after the strut with drill (bore a hole straight through from the bottom), hammer & chisel, etc. There's no need to try saving any of the bag assembly... just destroy it and get it out. Try a large flat head screwdriver, driven from the top side of the control arm and down into the plastic of the strut, and try prying up a bit... work your way around at whatever angles you can reach... just need to get it started it. Be conscious & careful of electrical connectors, wires, hydraulic lines, etc.
Ya this is what I was thinking I had to do but figured it'd be way easier to do it with the whole thing removed from out under the vehicle. May not have a choice at all if I can't get the control arm bolts out. I'm using a very capable 1/2 compact impact wrench, (specs say about 450 ft/lbs) but that six square bolt I showed above is a 3/8" socket in my tool set and I think I lose a considerable amount of torque when I use an adapter on my impact wrench.
Originally Posted by fitzbenz
Once you get all the plastic of the strut chiseled out, be prepared to clean up that control arm (wire brush, etc), including a coat of rust inhibiting paint.
Ya this is what I was thinking I had to do but figured it'd be way easier to do it with the whole thing removed from out under the vehicle. May not have a choice at all if I can't get the control arm bolts out. I'm using a very capable 1/2 compact impact wrench, (specs say about 450 ft/lbs) but that six square bolt I showed above is a 3/8" socket in my tool set and I think I lose a considerable amount of torque when I use an adapter on my impact wrench.
I was planning on this too.
Being as that you are having a hard time getting the original air springs out, my advice would be to take a sharp razor blade and cut the protective boot around the air spring. Removing the protective boot will expose the actual air spring. Using the razor blade again cut through the exposed air spring in half and remove the top half. The bottom half you'll have to chisel and pry out as stated previously. Hopefully this will make it easier to work on the seized half stuck in the control arm. Keep us posted and good luck.
Thanks for the tips everyone, I managed to get those seized bolts extracted and dropped the whole control arm. Bag is cut in half and now I just got to work on getting the base plastic out of this damn arm!
I had the same, used the jack technique, no good, sds chisel, no good, ended up slicing the bag in situ for access and then cut the lower plastic like a birthday cake with a multitool. That did the job and once a section is out the inner plastic unscrewed and the cup could be extracted.
Shame its not as easy as some of the Merc mech videos make it look, fairly easy reinstall, I didn't rely on the compressor expanding the bag, possibly mislocating at the top, so I used the blower gun on my compressor to the line at the valve block end, expanding the bag in a more controlled way.
hope you get it sorted, I only did one side as the will to live ebbed away, however the rhs clearly needs doing as well now so will be biting the bullet when I get some decent weather
I didn't rely on the compressor expanding the bag, possibly mislocating at the top, so I used the blower gun on my compressor to the line at the valve block end, expanding the bag in a more controlled way.
Excellent idea, I had the same thought (whenever I get to that step!) to use my compressor as well to reinflate it into position.
.....once it's out, did any of you sand and re-coat the inner part of that arm? Wire brush head on a drill too harsh to clean it out?
I cleaned as much as possible with a wire brush and coated the inside with a light coating of grease to help keep rust at bay and help seat the air spring when reinstalling.
I cleaned as much as possible with a wire brush and coated the inside with a light coating of grease to help keep rust at bay and help seat the air spring when reinstalling.
Thanks, I got a can of this stuff laying around, I'll likely coat it with a layer once I'm done wire brushing. What kind of grease would be good to lay in there?
Thanks, I got a can of this stuff laying around, I'll likely coat it with a layer once I'm done wire brushing. What kind of grease would be good to lay in there?
I just used some Mobil 1 synthetic grease that I had laying around in my garage. When you reinstall the new spring just remember it won't fully seat in the control arm due to the previous rust. Line up the top of the air spring with the black plastic clip in the center. Make sure the air line is positioned within the cut out on the top mount and BEHIND THE BRAKE LINE(very important)!
I just used some Mobil 1 synthetic grease that I had laying around in my garage. When you reinstall the new spring just remember it won't fully seat in the control arm due to the previous rust. Line up the top of the air spring with the black plastic clip in the center. Make sure the air line is positioned within the cut out on the top mount and BEHIND THE BRAKE LINE(very important)!
**NVM, yes there are clips in the top part of my vehicle where the bags sit. My OEM one I took out didn't appear to have any plastic clip on the top part although my Arnott's came with the clip (slightly different model here CLS550 W218 but identical setup and parts). I did consider that it might not seat correctly due to the rust/deformity's so I was going to use my air compressor and force some air into the bag while it was in place (while up on jacks still and tire off) to ensure it aligns correctly and then connect the air line (yes behind the brake line).
My OEM one I took out didn't appear to have any plastic clip on the top part although my Arnott's came with the clip (slightly different model here CLS550 W218 but identical setup and parts). I did consider that it might not seat correctly due to the rust/deformity's so I was going to use my air compressor and force some air into the bag while it was in place (while up on jacks still and tire off) to ensure it aligns correctly and then connect the air line (yes behind the brake line).
When I installed my air springs, it didn't fully seat till I had put the vehicle on the ground, attached the main battery terminal back and started the car. I heard the familiar popping sound when both air springs had inflated and fully seated into the cut out in the control arm. The popping sound was victory on performing the replacement successfully...lol.
When I installed my air springs, it didn't fully seat till I had put the vehicle on the ground, attached the main battery terminal back and started the car. I heard the familiar popping sound when both air springs had inflated and fully seated into the cut out in the control arm. The popping sound was victory on performing the replacement successfully...lol.
Ok good to know. For the record, I never disconnected my battery (not a fan with resetting all calibrations, ECU tuning, etc), instead I just removed the fuse for Airmatic and also kept the hood and trunk popped (I believe these actions also disable the adjustments that happen when vehicle is static).
Finally success. In the end my PEN oil made the difference (applied copious amounts around the base of the bag and let it seep in for 24hrs) then a hammer and large masonry chisel and just took time working around the lip of the bag where it sits in the control arm (remember, I removed the entire control arm from my vehicle and worked in the open). Once out, I cleaned it up real good with wire brush bits on my drill and then gave it a couple coats with "Rust Converter" then "Rust-oleum", everything reinstalled now. Since I couldn't physically push the bag fully into it's seat on the control arm and it was slightly at an angle, I had to be very careful that the top of the new airbag was aligned properly with the clip (others have mentioned if this is off and you put weight/pressure on it you could destroy the new bag) so prior to reconnecting the air line I used my air compressor to blow into the bag and inflate it into place until it was grabbing that center clip. Replaced the wheels, lowered it, fired it up, heard that nice "POP" as the new bag was forced into it's seat and finally done.. Now.......the other side! Thank you all for the great info in this thread.

 06-26-2022, 05:36 PM


 , but the jack created just enough space to squirrel the new part into place. Without this hack, it would have been difficult (tried that for about 1min and gave up -- the space was just too small to get the air spring through without tons of grief and overhandling the new part). This 'jack hack' made all the difference.

 It's a truly great car, no major issues, 160k+ miles, we are the first and only owners.


 Thank you all for the great info in this thread.