When you click on links to various merchants on this site and make a purchase, this can result in this site earning a commission. Affiliate programs and affiliations include, but are not limited to, the eBay Partner Network.
P064515: Output for the magnetic clutch of the AC has conditioning has a malfunction.
Unfortunately, my W212 AC was not cooling yesterday during a 3-hour trip in Florida, just when the weather started to warm up and not when it was coooold, .
Diagnosed it with XEntry once back last night, and it came up with "P064515: The output for the magnetic clutch of the air conditioning has a malfunction. There is a short circuit to positive or an open circuit.". Summary: - I was able to actuate the AC control valve (@1A), but it cannot access the magnetic clutch.
- Disconnected the cable from the magnetic clutch, and tried to measure resistance: Nothing, open circuit.
Next step: measure incoming voltage from the "control valve to the magnetic clutch":
- if nothing --> I expect a bad control valve
- if @12V --> I expect a bad magnet clutch
Either of them implies, by MB's book, a new AC compressor (MB sourced $900 + Refrigerant Out/In + Installation labor = @$1300). After some searching, it seems the magnet clutch is the same as in the 2011 Toyota Avalon (found one @$60), and I guess the control valve is the same as well (have not found one yet)
It seems I will have a New Year's w/o AC, and my next weekend is already booked.
Happy New Year 2023 to all MB World members.. Enjoy in the company of friends and family.
My variable displacement compressor is by Denso, is yours a Denso too ?
If I may suggest, when you do need to remove the compressor or replace it with a new one, do be very careful of the way compessor oil quantity is to be calculated and the refrigerant quantity.
Super deep vacuuming and proper machine you must use to make your HVAC system as good and lasting as it can be.
I like this guy channel, https://www.youtube.com/@coldfinger459sub0Tom Lech / LECH AIR CONDITIONING he is OCD and a true knowledgeable HVAC engineer with commercial unit experience , where most HVAC for automotive dudes are like kinder garden level
compared to the PhD level of commercial HVAC crowd.
I have a friend whose business is explosion proof HVAC units for oil rigs. Tough niche market but very good money.
He is very impressed on the level of detail explanation and knowledge Tom Lech has.
Enjoy Tom Lech videos and all the links to other good channels he provided.
When you absorb enough knowledge from his video, it will freak you out to the level of cleanliness and dryness and "proper" way an HVAC system has to be prepared to.
I actually enjoy his videos, reminds me of my dive compressor air purification system I once had in Bali , where a copper is considered a wet metal ...OUCH !!!
If you want a simpler but very visual understanding of "vacuum", the video below is awesome
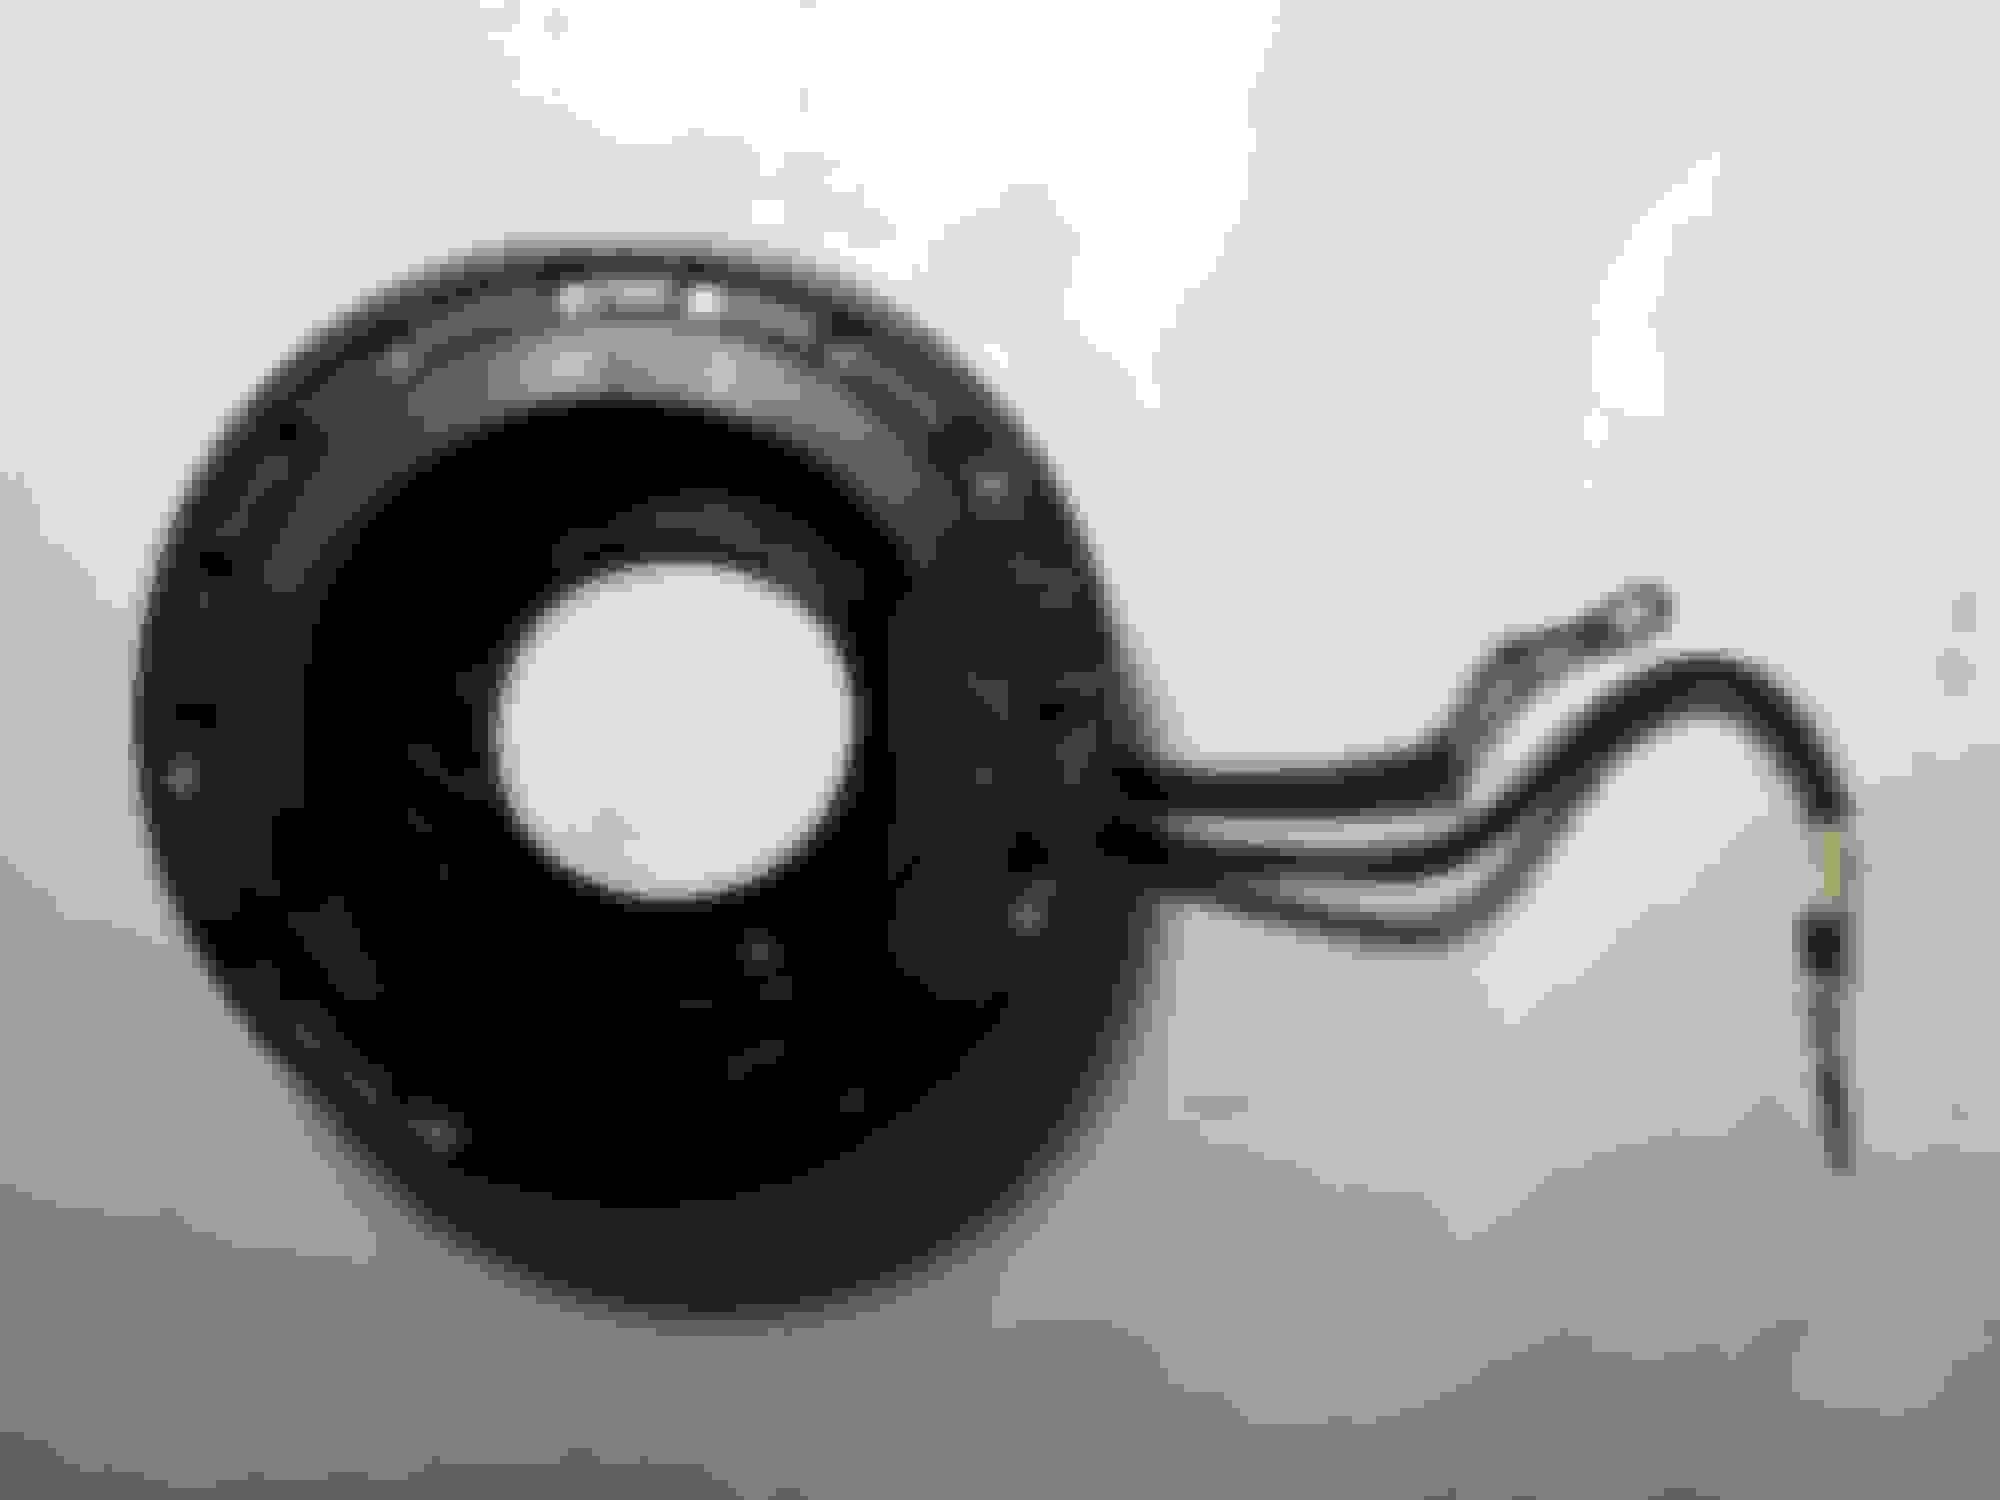
It has the connector for the Toyota harness, but I was able to pull out the terminal from the socket on both and reuse the MB socket; therefore, no wire cutting/soldering.
A bit of PITA doing it in place (without removing the compressor out of the vehicle). First, to remove the pressure plate because I did not know if there is a special tool to hold it while unscrewing the 10 mm center bolt (see pressure plate-pulley)
I decided to hold it with a locking chain plier on the 3" diameter surface (marked in yellow), and after some back and forth it locked, and took the bolt out.
Once the center bolt was removed, I could have removed the pressure plate by screwing back a 12 mm bolt. The 12 mm bolt works like an extractor; however, mine came out by just wobbling it side to side.
Then, with a snap ring plier, I remove the first ring and removed the pulley by wobbling it side to side as well. No need for an extractor pulley (lucky me). Finally, down to the last ring which keeps the stator magnet fixed to the compressor casing.
Once the damaged magnet was out, I replaced the Toyota connector with the MB connector using a tiny lens screwdriver, and started the process in reverse.
Once all was properly back in place, I connected XEntry and scanned the car for errors. No errors were reported. Apply actuations from the FrontSam/Air Conditioning section and I was able to activate the clutch directly w/o starting the vehicle or activating the AC panel. I could hear the clutch "click", I then torqued the bolt to 20 ft-lb and stated the vehicle.
Perfect cooling is back.
Summary:
1 - Clutch from Ebay: $54 (including taxes)
2 - Locking chain plier : $18 (including taxes) + 30 min drive
3 - 3 1/2 hours (including driving to buy the tool)
Total = $72 vs $1200+ (new MB/Denso compressor)
On a side note:
I need to buy something to fix the boroscope camera in place when doing work around the engine. Holding it with one hand while managing a tool with another is a recipe for "$%^&*" words, and failed attempts, At least the lamp had a magnetic base, so I fixed to the frame a few times.
Surya, here are a few pictures I took this morning for the OLD magnet part, and the compressor+clutch pair (from the front view you can guess the compressor type)
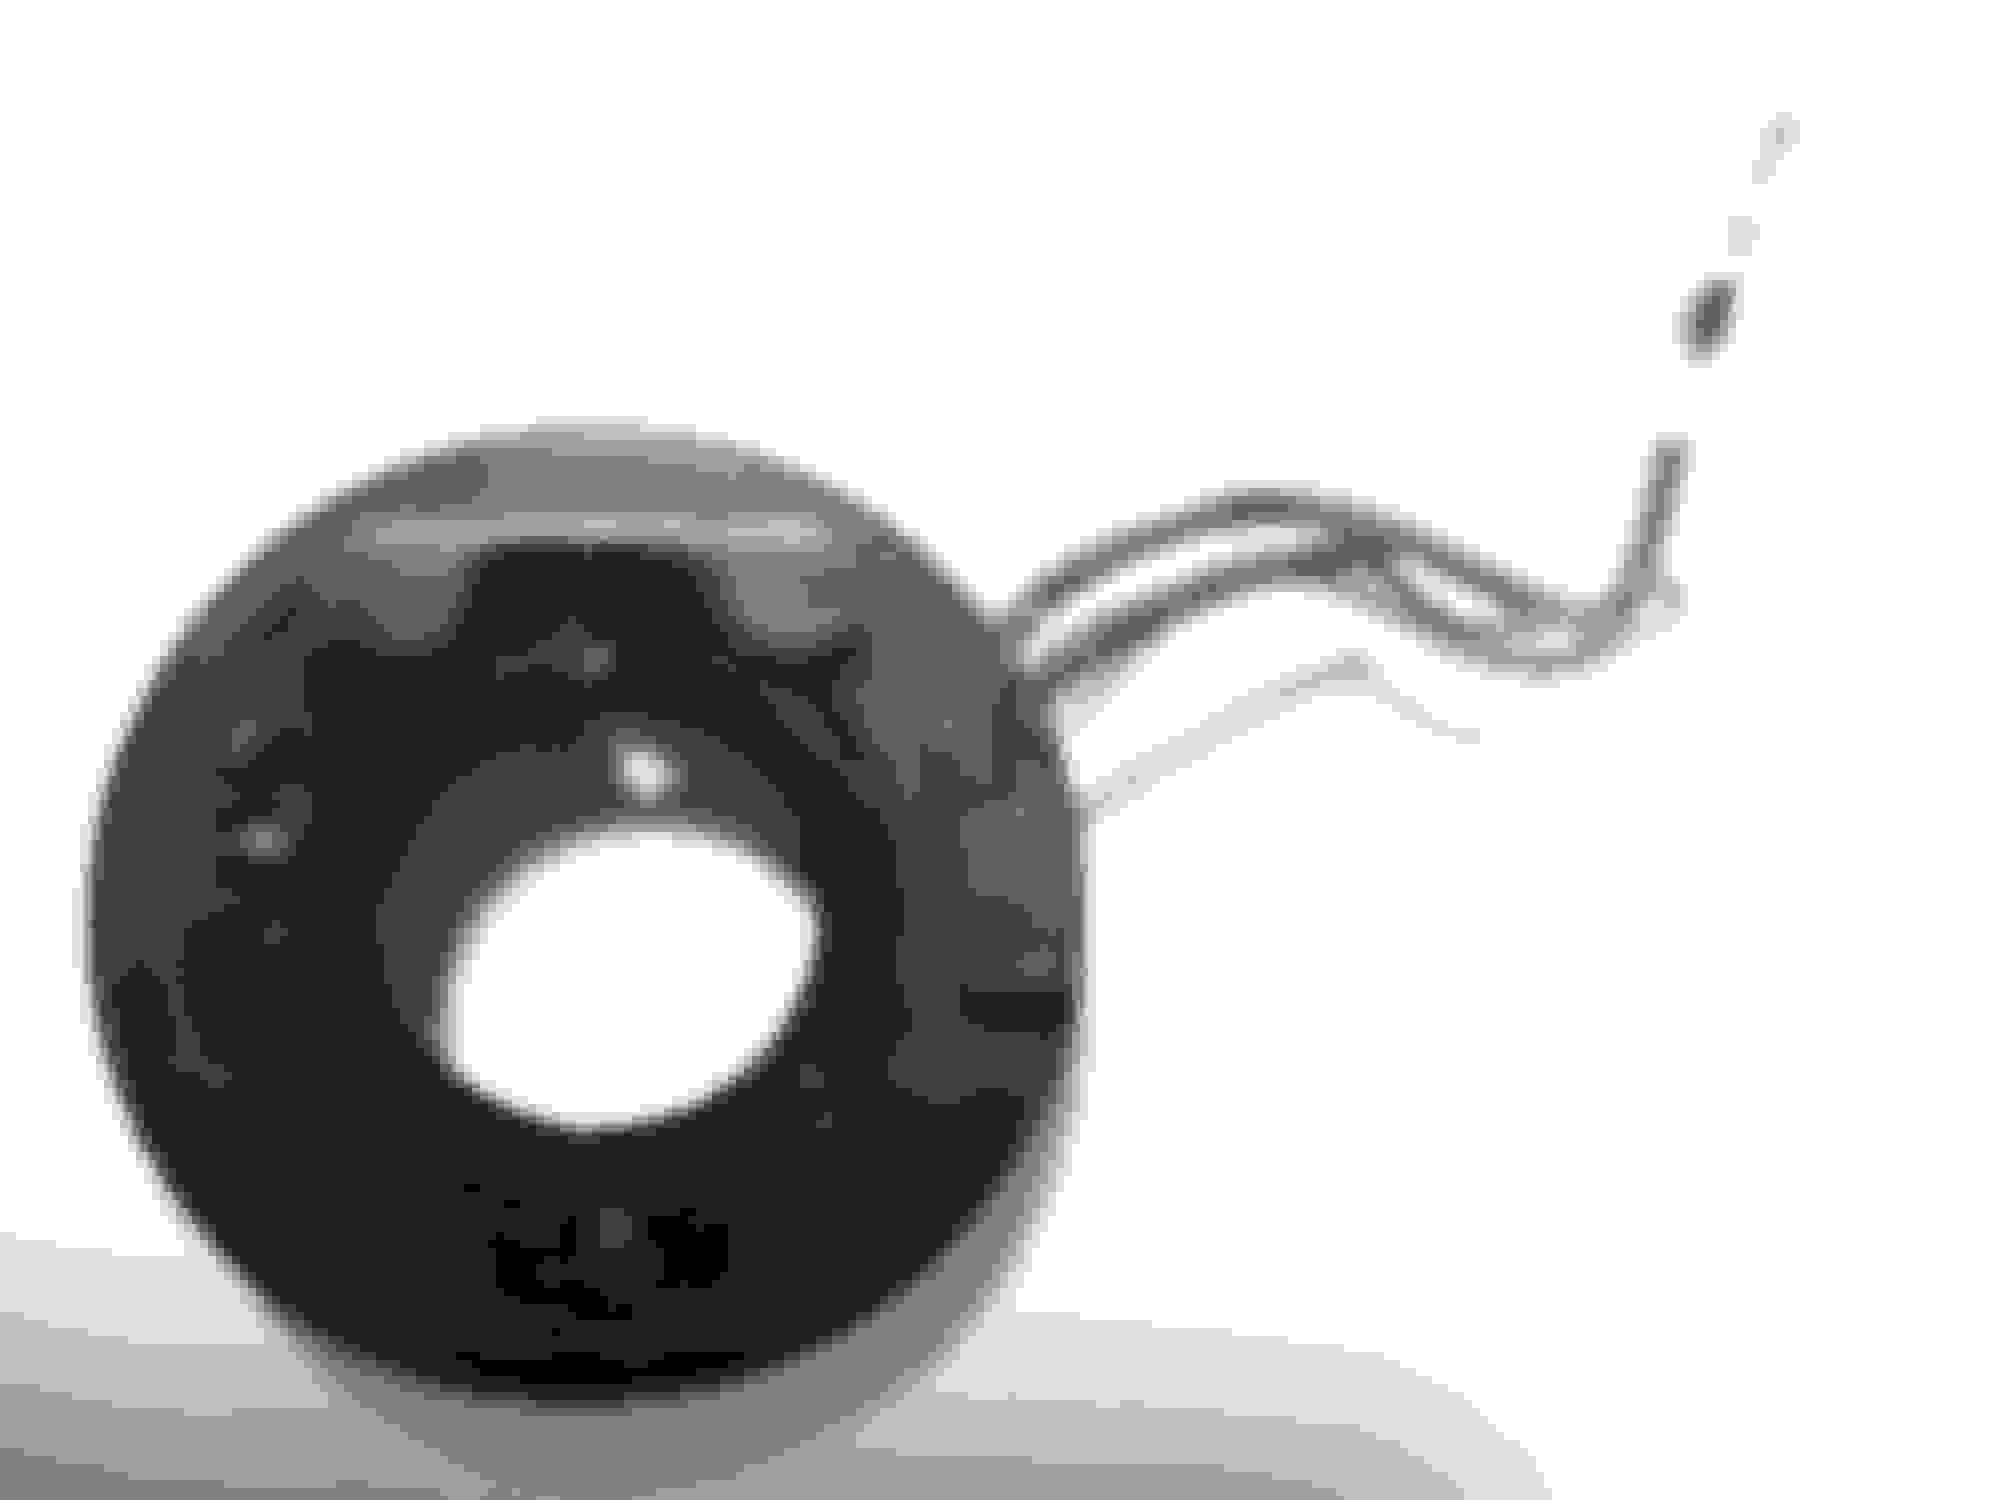
I forgot to mention I verified the magnet resistance following the instructions from the attached document for another AC compressor manufacturer. The new part measured 3.8 Ohms, well in the middle of >2 and <5 Ohms.
I have not done the voltage drop between the battery, and the positive to the magnet as suggested. Pending Front side clutch magnet Back side clutch magnet, notice ground and positive wire are different colors Top view compressor and clutch installed Front view clutch-pulley arrangement
I just realized my AC compressor is clutch-less model.
Some variable displacement comp do have clutch too , I researched it.
DAMN, if my oil valve which is the one controlling the angle of the comp swash plate for the variable displacement actuation goes bad,
refrigerant must be evacuated and oil too. That is a nightmare for me.
However, I have been doing some preparation , keeping in mind my car is now 8 years old.
I bought this tester a few months ago, but I have not used it yet as I feel I am still refrigerant handling stupid
I wanted to see how clean/dirty is my refrigerant+oil as a way to track parts wear and tear before total failure.
Since I have to deep vacuum this test tool air chamber and also the Mercedes approved HVAC Recovery/Recharging system the Texa 760R which I have tracked down
exist in my city ( only 1 unit so far per Aug 2022 ) does not read vacuum to micron level and only down to 1 millibar, I ended up buying a micron gauge. DUGGHHH !!!
1 millibar is still 750 microns.
I am still not happy with the shop's Texa 760R as it does not come with the refrigerant contamination / identification sensors. Nope I will not use any machine without those sensors. https://bads.lt/en/produktas/texa-re...er-kit-s07550/ approx US$2K
If without this refrigerant sensor, it takes only 1 bad luck for the next car ( mine ) which uses this Texa machine, if and when the previous car using the same machine has
his contaminated refrigerant evacuated. Machine like Texa is a one stop machine and the built-in refrigerant recovery bottle is shared.
======
So I bought this one https://www.fieldpiece.com/product/m...-vacuum-gauge/
..... to assist micron reading at car evacuation port, while the Texa will read at its machine and after the "wet" hose the system uses, which will be wetter and also because of extra hose length.
I want to see super dry below 500 microns at the car evacuation port if possible. A used HVAC system like mine wont be as dry as a new HVAC components out of the box.
I have a 3/4 HP Robin air vacuum pump, like 10 years old today, still USA made. I have overhauled it with proper Robin Air repair kit yada yada,
because I accidentally suck-into this pump my engine coolant...LOL .... during air bubble removal from cooling system.
Hold and behold, I can't get under 1,000 microns after the overhaul from my vacuum pump. That means I did not clean enough traces of the coolant.
These micron gauge is so sensitive, it can detect "wet" compressor oil or hose. I will need to again replace the oil.
These micron thingy made me smile. Some flashback of 2012,
I recalled the day I went deep into wanting to read how dry is the air from a dive compressor set up with superb air purification system.
This analogy is similar to vacuum gauge vs micron gauge but at 20 times more money than a micron gauge.
I never expected humidity sensor capable of reading 0.0X% humidity or down to -80C dewpoint can be as much as US$4,500 at that time.
Later upon installation, again I learnt on how difficult it was to set up the sensor to read air that dry. A forum friend from USA who is a Doctor and diver helped me set up
the humidity test system. Youtube doesn't have videos on such thing back then.
The learning I got from this experienced really opened up my eyes and I respect any HVAC engineer working hard to clean/dry HVAC system to under 400 microns.
A sloppy HVAC dryness evacuation wont show up till a few years later, depending on how sloppy though.
The prospect of having to de-contaminate or replace an EVAP alone, is a total dashboard removal requirement... a nightmare I want to avoid at all cost.
The cleaner/drier the HVAC system was prepared when installed, the longer its useful life would be from contamination stand point nad max cooling too.
I have not troubleshoot further my vacuum pump poor performance, as my Banks Gauge toys and the high beam LED light bar came soon after and diverted my attention
Knowing more about stuff of interest, often gets my OCD level higher
Surya, wonder if you already source the ECV (electronic control valve) for your compressor?
On the model of the compressor for the E400, based on the Denso catalog of compressors, here is the list of applications, and photos for those compressors.
Update:
---------
The Denso site for US/Canada is very poor with technical information. It is better to use the European site, https://www.denso-am.eu/, with better "find your parts" database and where you can also find something like
Summary: MB AC systems with VariableDisplacement require a diode (let you read the why), but the diode can be installed in different places, i.e. fixed after the fact. So, there is quite a confusion in the aftermarket of ECV about MB requiring a diode since it is MODEL dependent. That is, if MB installed the diode in the ECU, it does not need a diode downstream. I guess once a platform with ECU that is designed w/o the diode, it must be added elsewhere. New generations and facelift redesign cost controls rely on the reusability of previous designs and only incremental modifications. If adding a diode requires major changes in the manufacturing stream (providers, or stocking new inventories, i.e. $$$, I am certain they will let it go until a new ECU major upgrade.
I have always thought 44710-4324 is Denso P/N. Great database find Juan and the diode info is worth in GOLD.
I sure hope MB workshop and spare part department get this Denso Diode Bulletin, otherwise a wrong unit given to a customer who may have
specialist Indie HVAC shop installing the compressor and not MB Dealership, till 30th February exist, only then the techie may find out the root cause.
Since this is tech know how and not TSB material, MB may keep it quiet and for themselves.
.
DAMN, such downplay explanation from Denso too
====== What causes refrigerant to accumulate inside the compressor?
The compressor has a large heat capacity. Therefore, when the vehicle is left parked for a long time, gas refrigerant within the refrigeration cycle is cooled by a compressor where it becomes liquid refrigerant and accumulates. When the ambient temperature rises, the compressor is harder to warm than other cycle components. As a result, there are cases where liquid refrigerant does not become gas refrigerant and accumulates in the compressor.This is why a CS valve is used.
======
Wow, the compressor may experience liquid hammer and kaboom !!, like car engine water hammering.... when lots of water enter combustion chamber and highly compressed = bye bye engine.
The HVAC compressor is only for pumping refrigerant in gas state and not liquid state , liquid can not be compressed....that much I know. https://greehvacr.com/the-common-pro...liquid-hammer/
@S-Prihadi You are welcome. Glad you find it useful
I just noticed the photo for the DCP17165 has a typo (Denso's fault ). The compressor model type should have been 6SEU16C, not 6SBU16C, since it uses a DL-Pulley. DL-Pulley compressors have EU in their designation. I took the snapshots out of a 2020 PDF file I downloaded a few weeks ago, and I guess it is out of date by now.
At least the live website is correct now, and it also cross-references the MB Part No, so it is your compressor.
On the ECV for your compressor, I will guess it is the non-diode type unless the ECU for some W212 has diodes, and others do not . Please keep us posted on it
Update:
======
while looking for the ECV for DCP17181, I came across the following ECV by UAC
and checked for fitment ( https://newparts.com/product/uac/EX10452C ). Though the 2014 E400 is not explicitly on the list, the 2012-2015 C63 AMG that also uses DCP17165 is there along with many other MB.
========================== On the ECV for your compressor, I will guess it is the non-diode type unless the ECU for some W212 has diodes, and others do not . Please keep us posted on it
Sure, will do
==========================
I cant access some US website, like the one you linked https://newparts.com/product/uac/EX10452C i get 403 forbidden hahahaah
Its normal for me. Some website blocks non US IP I guess.
It seems Denso does NOT sell ECV valve stand alone
Closest one I find is this
It seems Denso does NOT sell ECV valve stand alone
Very unfortunate, and that is the reason it mandates a full compressor replacement, , when it fails. It is not an MB issue, it is Denso not providing a replacement for wearable parts. For example, from a Hyundai technical note
Denso's engineering team for the variable displacement compressor blundered the clutchless decision big time, so I would not bet my hands on them. Notice that MB has gone from clutchless -> magnetic clutch in nearly all non-AMG engines. It seems only the turbo ones still come with clutchless compressors.
From an engineering point of view, the clutchless decision was monstrous. A clutch is a coupling device, and the safe position is decoupled. Coupling should only be active when the slave device is activated. A decision to move the coupling to the electronic valve violates that. If the slave device seizes for whatever the reason, the system will break apart, or the "fuse" will trigger. They spent man hours designing a new clutch, with a fuse, that is being slowly put away.
I agree with cutchless/DL comp I get now is a scary prospect.
I do not get the breakaway ( LIMITER) pulley type which Denso seems to have for when Uncle Murphy decided to whack me azz. https://assets.denso-am.eu/productio...y-bulletin.pdf
I hate seeing it having to spin all the time with the engine and seeing its 110mm diameter vs my crankshaft pulley which I think its like 35% bigger, which means by RPM
at every WOT, the comp spin faster than the engine.
How loud is the Denso clutch engagement on your comp ?
I do enjoy the absence of no loud clutch engagement sound from a clutchless compressor.
My cheapo Toyota 1.2L in Bali , the blooedy clutch engagement is just as loud as my older cars.
Hi Juan,
1. Did you have to remove the A/C compressor from the car to remove the clutch assembly?
2. How did you remove the pressure plate and pulley from the compressor assembly while the compressor still mounted on the car? From what I know beside the center bolt at the front, we need to remove 2 snap rings but not sure how since they are sitting deep inside the clutch assembly.
I have the same issue and thinking of repair it following your method. I got the magnetic coil following your link but not sure what it takes to remove the cluth's components from the compressor assembly. I would really appreciate if you could give me some guidance.
My car is the same as yours, MBZ E350 2014.
I already had an inexpensive 4 in 1 set from Autozone which did the job, but I was close to my patience limits with it. The first ring (for the pulley) opens up, and the 2nd ring closes in; therefore, you need a different type of pliers (the reason they sell in 4). Because it is deep, the plies cannot be too big since there is limited space between the compressor and the radiator. You definitely need a camera to see deep into the 2nd ring if the compressor is in place. I did it that way and I cursed a bit but got it done. I am not new to mechanics, but I am not a professional either.
Here is a video of 2 ladies doing it for another vehicle, but a similar compressor. They only take the first ring, but you will get the idea
Really appreciate your respond and the videos are great!
One more question, how did you remove the 2 coils' wire connector crimps from their housing so you could reuse the Mercedes connector?
Thanks!
Really appreciate your respond and the videos are great!
One more question, how did you remove the 2 coils' wire connector crimps from their housing so you could reuse the Mercedes connector?
Thanks!
There are two ways to do things here:
1 - Cut wires on the new and old magnet and solder the MB connector to the new magnet --> Crude and not an elegant solution prone solder problems.
2 - The correct way: use something like a small screwdriver (like for lenses, or for jewelry) and remove the lock from the connecting side. Look down the connector with a good light and you will see the locking pin/tab, push a bit to release it from the external connector. Once that is out, the terminal inside should slide back. Do not loose the rubber seal (prevent water/liquid to come into the connector). Recall you must do the same on both magnets, i.e. remove the non-MB connector from the new, remove the MB connector from the old, swap and re-insert the terminal within the MB connector, check it locks in, put the plastic lock back on the connecting side.
Hope that helps
Thanks again Juan!
Progress on my task. I have removed the clutch, and pulley from the compressor. Now I am stuck at removing the snap ring that holds the magnetic coil in place. The snap ring is inside a little deep and the 2 holes on the snap ring are facing down, and the space is a little tight for the plyers. I can't get to the snap ring. One of the solutions for this is to remove the 3 bolts that hold the compressor so I can move the compressor around to get more room and accessibility (This is to be done without disconnecting the pressure lines). I am trying to avoid doing this way If I can, do you have any other suggestion to remove the snap ring?
As I mentioned before, there was some cursing during the repair, likely the second ring step (both ways). In the link above you can see what the ring looks like and what you are aiming for. Like the video I may have used the straight tip pliers.
If you are now skilled with these pliers, and working w/o a straight view is painful; however, the goal is to expand/open the ring not to be elegant about putting the tips exactly in the ring holes (that will be ONLY required when mounting it back). If you can the pliers tips between the ends of the ring and open them the ring will EXTRA open and likely come out in one go, or partially out and a bit on one side. Use a flat screwdriver then and gently open it near the bite.
I used a camera and good lighting since I could not see anything from the top.
Hello Juan, Thanks again for your help!
I finally got the snap ring that holds the magnetic coil in place. I might have damaged the snap ring. The challenge now is how to put it back without a direct view to the compressor's shaft. Trying to avoid to unbolt the compressor, I have ordered a borescope but it won't arrive until this coming Friday.
While I was trying to remove the snap ring, the brown O-ring fell out. I will be trying to put it back but not sure where this O-ring goes to. Do you know where this O-ring goes? Did you notice something like that while working on your car's compressor? Thanks in advance.
I do not recall any ring falling out; however, from the picture and diameter comparison, it must be from the shaft area. I think it is just a separator than O-ring. If it came from the compressor, I bet it fits the area where the shaft comes out. Compare to see if it fits snuggly, do not force it. Likely, you grab it with the pliers during the attempt to grasp on the snap ring.
Keep in mind the magnet sits flush against the compressor casing, with nothing in between. So it did not come out when you got the magnet out. If it goes there is between the clutch plate and the magnet. Either around the casing for the shaft, or inside. Measure it against both diameters.
I do not have a Denso compressor parts manual to see where it goes, but perhaps a Google search?
===========
When putting the magnet back, clean well the surface where it sits; otherwise, it the snap ring will not reach its groove. If you can keep the snap ring all the way open until you reach at the back, great; otherwise, you can leave it sitting as close as you can, then, softly tap it/push it towards the back with a flat screwdriver and soft hammer. It will slide to the end if the magnet is sitting correctly, it will fall into its groove.. Man, it is difficult to explain w/o pictures. Hope you get the idea.
Unfortunately, my W212 AC was not cooling yesterday during a 3-hour trip in Florida, just when the weather started to warm up and not when it was coooold, .
Diagnosed it with XEntry once back last night, and it came up with "P064515: The output for the magnetic clutch of the air conditioning has a malfunction. There is a short circuit to positive or an open circuit.". Summary: - I was able to actuate the AC control valve (@1A), but it cannot access the magnetic clutch.
- Disconnected the cable from the magnetic clutch, and tried to measure resistance: Nothing, open circuit.
Next step: measure incoming voltage from the "control valve to the magnetic clutch":
- if nothing --> I expect a bad control valve
- if @12V --> I expect a bad magnet clutch
Either of them implies, by MB's book, a new AC compressor (MB sourced $900 + Refrigerant Out/In + Installation labor = @$1300). After some searching, it seems the magnet clutch is the same as in the 2011 Toyota Avalon (found one @$60), and I guess the control valve is the same as well (have not found one yet)
It seems I will have a New Year's w/o AC, and my next weekend is already booked.
Happy New Year 2023 to all MB World members.. Enjoy in the company of friends and family.
Hi Juan - many thanks for your post, it is much appreciated as you saved me circa $1300 less approx $150 in parts and some tools. And concur with you that it requires a lot patience and when that runs out, needs a sh?t load of cussing and swearing to release the tension! Them slip rings are truly a bugger to remove - and when i thought the worst was over when i'd got them them out- jeez was i wrong, putting them back was even worse!!!!
This job is not for the faint of heart - with very limited space between the radiator and clutch, getting the slip rings out with a flash light, two burly hands and a mirror to see what the hell one is doing - it was a very overcrowded little space! I went through - broke, two pairs of small slip ring pliers and ended up buying a heavy duty set and sawing half the handles off to fit the space, Takeaway for others, look into removing the radiator fan box (if, like the BMWs, they disconnect easily and slip out) it will save hours, literally hours of fighting in the limited space!
 12-30-2022, 12:16 PM

 .
. (MB sourced $900 + Refrigerant Out/In + Installation labor = @$1300). After some searching, it seems the magnet clutch is the same as in the 2011 Toyota Avalon (found one @$60), and I guess the control valve is the same as well (have not found one yet)


 ). The compressor model type should have been 6SEU16C, not 6SBU16C, since it uses a DL-Pulley. DL-Pulley compressors have EU in their designation. I took the snapshots out of a 2020 PDF file I downloaded a few weeks ago, and I guess it is out of date by now.