When you click on links to various merchants on this site and make a purchase, this can result in this site earning a commission. Affiliate programs and affiliations include, but are not limited to, the eBay Partner Network.
For the XENTRY portion, could you find the menu where you can adjust the tire diameters? There's a menu somewhere for that which lists some equivalent diameters and is super helpful when going up and down tire diameters so that shift points stay the same.
Yup. Have that already. The tire sizing options are very limited (almost all smaller), but you can change the axle ratios for the same affect. I wonder if that plays badly with ABS or TC computers, but anything to make the computers more accurate to real life should be helpful. I do wonder if the tire size options and axle ratio options differ by model/year.
Yup. Have that already. The tire sizing options are very limited (almost all smaller), but you can change the axle ratios for the same affect. I wonder if that plays badly with ABS or TC computers, but anything to make the computers more accurate to real life should be helpful. I do wonder if the tire size options and axle ratio options differ by model/year.
Pretty please could you tell me where this option is and what the sizes offered are? Last time I saw it it was mostly 15" and 16" wheels, with beefy sidewall tires and you had to find the equivalent to whatever 18, 19, 20" you were running....
@shiann how difficult was it installing the climatronic unit?
Super simple. My 2005 center cluster is super easy to remove. 2007+ is a little different to remove, but basically the same. Take the trim bezel out, and the CCU will pop out when you release 4 clips. Pop the new one in, plug in, and you're ready to go.
If this is the first time you've removed the center console surround trim, it may take some getting used to.
Interior 3D scan with my Einstar came out really clean. Dimensions checked out also which is pretty awesome. I'll be working on options for actual cup holders over the winter holiday.
Interior 3D scan with my Einstar came out really clean. Dimensions checked out also which is pretty awesome. I'll be working on options for actual cup holders over the winter holiday.
I am excited to see what you come up with for cup holders. I have two of the vent mounted cup holders and love them. But they are not enough on long journeys. I was thinking of this mounted on the corner of the windshield, but its not a great solution: Universal 1-Cup Holder � SeaSucker
If you come up with a nice integrated cup-holder I would love to see it.
Test fitting the speaker ring into the routed hole, as well as showing how I wired the DVC sub in series. I'll be doubling up on the factory wiring (using both pairs of subwoofer speaker leads) in a parallel configuration to make sure that wiring will not be the limiting factor in driving the kicker sub (shouldn't be an issue, but the wires are there and I might as well use it) !
Yes you're correct. The above connection shows the 2ohm DVC coils in series, which makes it an equivalent 4-ohm load. The 2 channels/connectors does make it more wrong also.
I rewired this after thinking about it for a minute but didn't think to take a picture. Each channel was directly connected to each 2ohm coil without the green bridge wire since I'm running each coil independently on a dedicated 2-ohm channels. My amp couldn't bridge the 2 channels down to 1 channel, 1ohm, so that's how I had to do it.
You're the first one to notice this!
cool. i'm looking for a decent solution that doesn't require a new amp since my 2010 uses MOST. i found a memphis audio sub that's 1 ohm dvc, which i assume i can wire in series to get back to the oem 2 ohm but it's lower sensitivity than the kicker.
Yes you're correct. The above connection shows the 2ohm DVC coils in series, which makes it an equivalent 4-ohm load. The 2 channels/connectors does make it more wrong also.
I rewired this after thinking about it for a minute but didn't think to take a picture. Each channel was directly connected to each 2ohm coil without the green bridge wire since I'm running each coil independently on a dedicated 2-ohm channels. My amp couldn't bridge the 2 channels down to 1 channel, 1ohm, so that's how I had to do it.
You're the first one to notice this!
i just noticed you said 2 channels, and then noticed the dual connectors. is the oem driver actually a 2 ohm dvc just like the kicker?
I thought I had everything figured out and correctly 'learned' with my transfer case motor replacement, but that turned out to not be the case. Not sure what happened, but the "Transfer case in Neutral" error popped up once again. I used MB STAR/Xentry and tried to relearn the shift motor distance, but got a new set of errors that I haven't been able to find much about on the internet. I'll have to experiment a lot more on how to relearn the transfer case, but just leaving this here for now. I did get a new Transfer Case Motor from FCPEuro to see if something just went wrong with the last one I purchased from them, but there was no difference in the TC Motor calibration process.
P2213 - The signal from component Direction sensor is implausible
P2214 - Control module N15/7 (VGS Control Module) is not correctly learned
Took our annual trip down to FL for the holidays. The G did great overall except 1 hiccup, where the TC went into Neutral on its own while at a stop light, somewhere in the middle of South Carolina. It was stressful and nerve wracking for sure. Good thing was we were on an overpass heading onto the highway, so slope downhill. Was able to coast to the next light and got out and pushed right into a gas station whlie the wife was steering. Yikes. Took 2 tries of restarting the G, but the TC went back into 'high' and we were able to continue, but I did contemplate just disconnecting the TC motor so it wouldn't shift into Neutral on its own again (It didn't the rest of the way home).
So now I really need to experiment some with the 2 TC error codes listed above. Just in time for super cold weather and snow, so that will have to wait until its warmer outside or I can find a spot inside a garage to do some work.
Anyway, the G did great otherwise on the trip. Just shy of 3000 miles total, averaging 12mpg.
When we got home to NJ in early January, there were a few warm days and I had a few hours free one afternoon, so did some maintenance on the G.
Oil Change (FCPEuro Kit) - 6,864 miles - Slightly longer than the 5k I aim for, but the long trip extended that timeline slightly.
Cabin Air Filter (FCPEuro) - ~40k miles on this one. Pretty dirty so I'll probably stick to a 25k change interval
Engine Air Filters (FCPEuro) ~40k miles on this one. These were really dirty so I'll definitely be sticking to a 25k change interval from now on.
Next up was to address water leaking on to the driver's floor (caught nicely by my ORC trays). It was bad enough that when there was a large amount of rain, the water would pool up to a point of almost spilling over the slips of the mats. I know of the windshield wiper arm/linkage leaks, so I ordered the recommended replacement parts from MB to replace them.
First, ordering the parts was easy overall, but shipping for the parts was insane. I ordered online from MB of Stevens Creek the following:
000-824-22-82-64: Positioning Disk - $2.03 x2 = $4.06
002-990-30-51-64: Nut - $1.52 x2 = $3.04
000-824-35-72: Capsule - $2.54 x2 = $5.08
000-824-17-98-64: Window - $0.51 x4 = $2.04 (sealing washer)
They were by far the cheapest shipping price out of all of the online retailers. The order took 2-3 weeks to deliver as the "capsule" had to be shipped from Germany.
Started taking things off and found that my driver's side wiper arm was competely loose and would easily move around. After taking the nut off, I found that the wiper to linkage connection was solid, but not the linkage to the body.
Of course my wiper arms were seized to the linkage arms, so I got out the puller and positioned it with 2 jaws. worked perfectly.
Here, the nut that holds the wiper linkage spindle down to the body was completely loose and SEIZED. No way to loosen or tighten this nut at all from the outside.
I was hoping that maybe there would be some access from behind the cluster, so I made this simple tool out of 1/8" welding wire to take the cluster out. Saw it on a youtube video and this tool is perfect and super easy to toggle the clips that hold in the cluster.
Of course the windshield defrost vent is right behind the cluster and blocking direct access to the wiper linkage.
This will be a problem to dig into another day when it is warmer outside. A fellow G owner just took out his whole dash to address this (and other things) so that could be an option, but I REALLY don't want to have to take out the dash just to counter hold this bushing on the back side. I'm thinking the best way to do this will be just to cut holes in the windshield defroster ducts, larger one in front, smaller in the back. Then I can easily 3d print up some plugs and glue them in to re-seal the ducts. Project for another day.
For now, I filled up the joint with some Silicone RTV and so far, with the rain we have gotten, it is doing its job much bettter than before of keeping the water out. I may also 3D print a funnel so that the water can drip directly down to the floor mats and not soak the panels above the pedals.
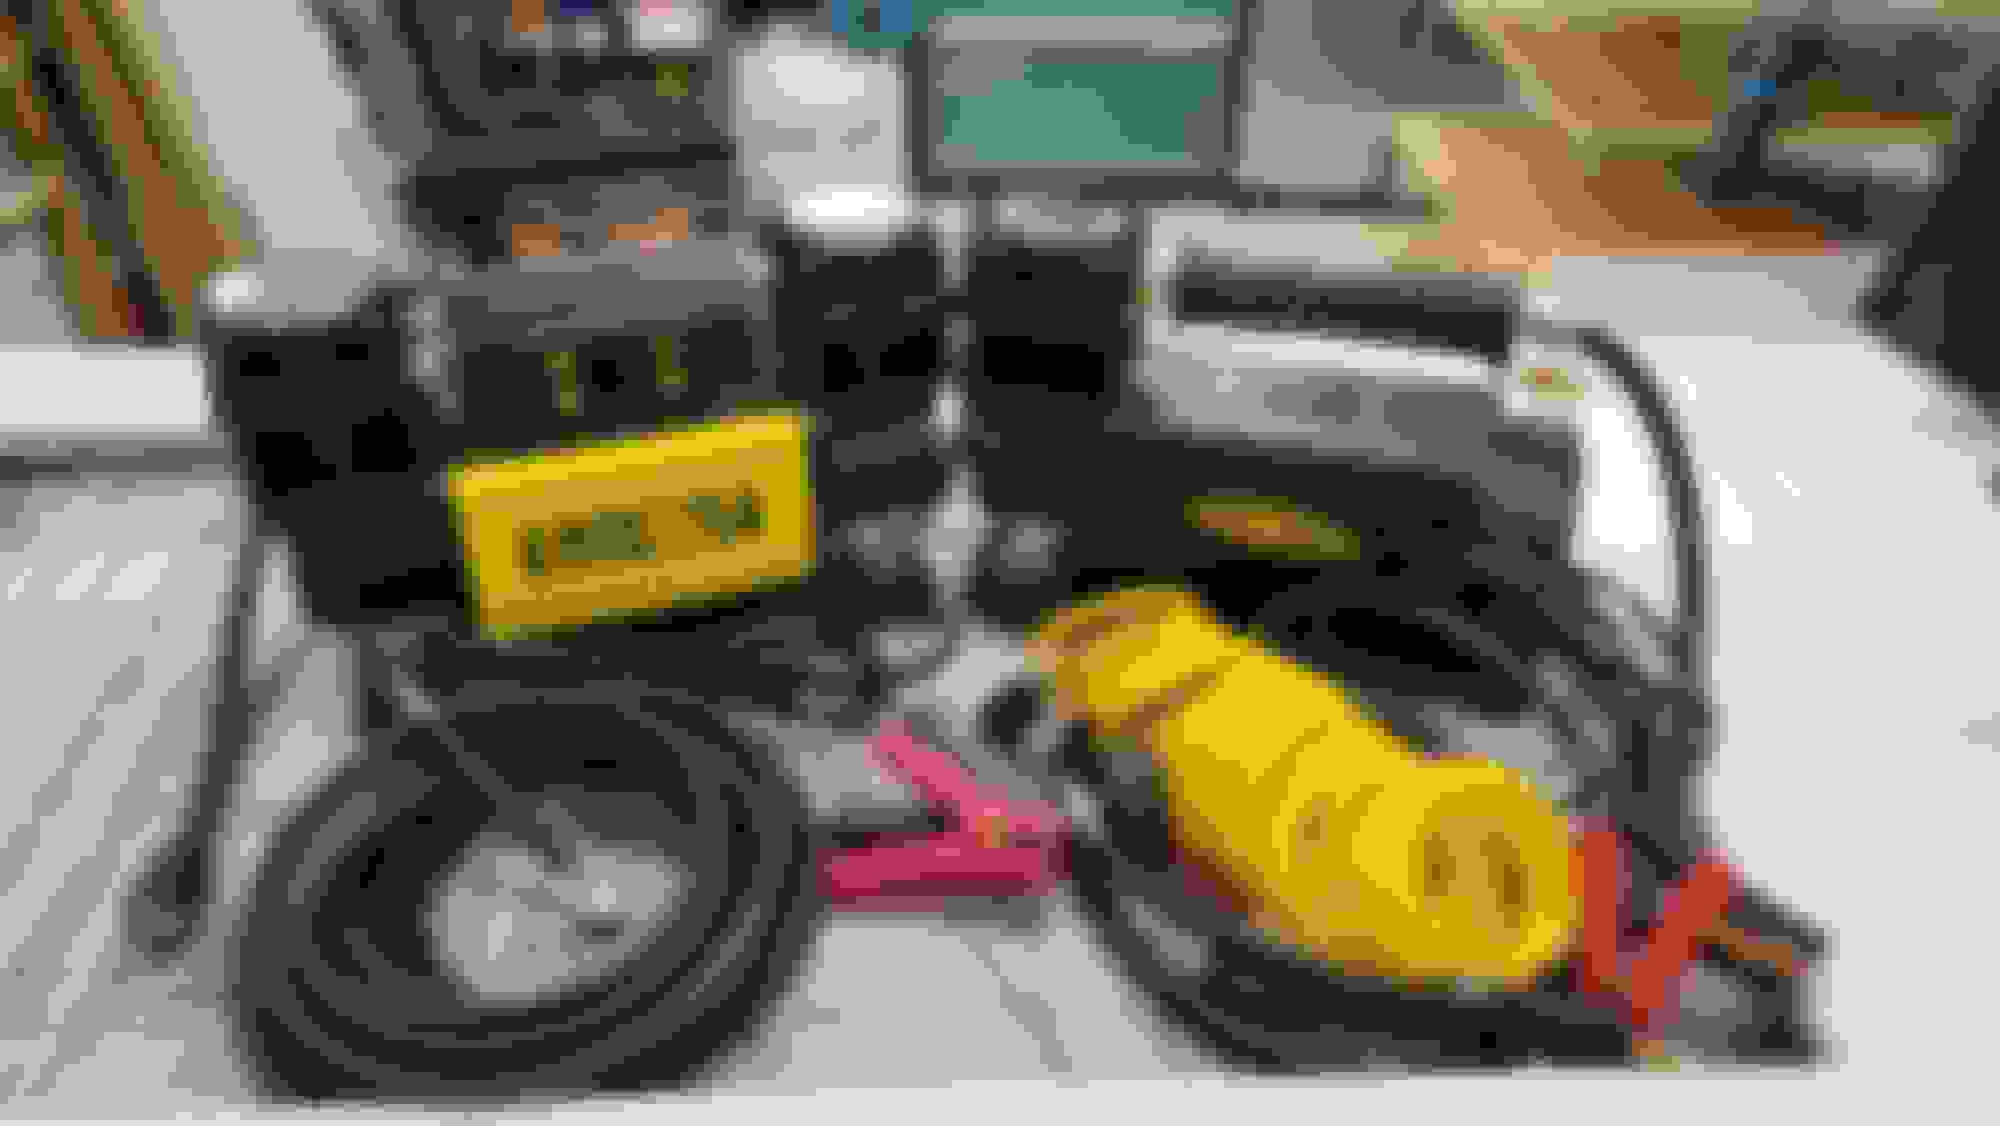
Before heading on our annual roadtrip, and while were were down there, I had to inflate my tires slightly to even things out (transitioning from freezing temps to mid 80's) so had to use the Smittybilt. I really hate how this compressor works, although it does work well overall. Having to go back to the compressor to turn it off in order to get an accurate gauge reading next to the tire gets annoying fast. I know I can modify it with a pressure switch and use a normal air chuck, but I didn't want to do that as I do plan to mount a compressor into my cargo drawer system.
I saw this Amazon-special brand with a digital pressure readout that allows you to set the target pressure and hit 'go', and was intreagued. It's a double piston pump vs the single piston of the Smittybilt, so I had to run a test.
Tire: BFG KO2 in 285/60R18
Start Pressure: 20 psi
End Pressure:37 psi
I still hate the non-standard fittings, so I may change that out after building a box for it and permanently mounting it in the G, but that is also a project for another day. Overall this is a pretty nice compressor, looks identical to tons of other ones out there on Amazon, and was considerably cheaper than the equivalent options from Viair or ARB.
And last but not least, the weather in the Northeast has been pretty chilly and messy the past few weeks, and the G has once again proved to be the perfect winter vehicle. Looks great when clean, looks great when dirty.
For TC motor try clearing the codes in the actual section under Engineering section. I had similar issue with mine. I had to clear them a few times and kept relearning and it finally caught. Knock on wood no issues again.
if that doesn�t work check with BenzNinja he can help. Good luck with continued build.
Awesome updates. Have you considered mounting the compressor in the engine bay? Not that we have any room there though....
Under the hood or under the G between the frame rails in a waterproof box would probably be the best locations. Not sure how I will continue to use the G in the future, so leaving options open for now.
Originally Posted by AMG_55_cruiser
For TC motor try clearing the codes in the actual section under Engineering section. I had similar issue with mine. I had to clear them a few times and kept relearning and it finally caught. Knock on wood no issues again.
if that doesn�t work check with BenzNinja he can help. Good luck with continued build.
Thanks for the tips. I'll try it out in the next few days. One possible other thing is my battery was getting a little low when I was trying the relearn procedure, in the 11.5V range, so that may have something to do with it. I'll pick up a battery charger/tender to make sure that's not an issue.
I've had a few conversations with BenzNinja about getting a STAR system from him and him remotely setting up Xentry on a spare laptop I have. Probably a good time to do that.
We need to see more pictures and updates with your G! One of my favorites.
Just wanted to share that while I had a fresh battery ( in theory -according to the stealership) 18 months ago , when I ran into mis-fires and codes/ SRS light and others in early Jan once it got cold in VA, a new battery made everything right again in the world.... minus the SRS light. but that'll be solved for hopefully when I do the new non-wood wheel in a few weeks...
Just wanted to share that while I had a fresh battery ( in theory -according to the stealership) 18 months ago , when I ran into mis-fires and codes/ SRS light and others in early Jan once it got cold in VA, a new battery made everything right again in the world.... minus the SRS light. but that'll be solved for hopefully when I do the new non-wood wheel in a few weeks...
E
This very well could be my issue.
I'm going to order a battery charger/tender and new Odyssey Group 49/H8 from FCPEuro, along with a few other things, just to make sure that isn't a factor in all of this. I've also never changed the battery, nor did the previous owner. Date on the battry is 2017 which is 7 years which is about right, although it's still working great.
yup - mine tested great- and worked perfectly right up until it didn't - first night under 30.... hope that solves ya' Shiann. There are bigger things to sort out... like stereo amps and storage designs etc..
Also ticked over 145k miles! That would mark over 50k miles that we have put on the G since getting it just about 4 years ago now.
We've had plenty of large storm warnings this winter, with many of the predictions calling for 6-8" of snow, but sadly we were always disappointed with only 1-2" of slush.
Flash forward to a "small" passing storm a few weeks back and woke up to this in the morning.
Also finally relocated my phone charger after removing the vent-mounted charger (same one) when installing the new infotainment screen. This cubby in front of the shifter really is pointless for anyting, so this location works pretty well actually for a home for my phone (android) while driving. I designed and 3D printed a panel to friction fit into the opening, and added a dedicated slot for chapstick. This may all change in the future, but for now it works pretty well. I ran a USB charging wire up behind the glove box where I have sevearl USB power plugs for all the other added electronics. (Nav/Infotainment screen, Rear View Camera/Dashcam, Phone Charger, etc)
I've been having an intermittent P2003/P0410 code for secondary air injection malfunction recently.
After testing everything in the chain, I discovered that the pump wasn't turning on when activated - I replaced it in the not too distant past, so went looking elsewhere for the culprit.
Turns out the fuse blew again. No idea why this only happend after roughly a year with the new pump installed. But made a mental note and ordered a few more spare maxi-fuses for the future.
Also took the opportunity to pick up a set of Diode Dynamics SS3 Pro's in the Fog pattern to also retrofit into the foglight position. Plan is to design an adapter to have a pair of SS3's on each side. I'm also working on an adapter for the DD Elite Series Fog Light F2, for a more OEM look compared to the SSC2 Pro's I currently ahve on my G. Stay tuned if this is something you'd be interested in.
Next up was arm rest console storage organization. I took out this insert with the MB tele-aid buttons to see if I could get rid of it and gain more storage in the upper compartment.
Pretty easy to see the coiled cord was just an extention from the lower connector, and could be completely removed, along with entire upper insert.
Info/Setting buttons for the tele-aid system plugs right into the lower plug. If you remove this switch pack completely, you'll get a dash warning which I didn't want to deal with.
When you remove the small cover on the rear of the armrest lower box, you'll see these 3 wires. Bottom one is for the tele-aid buttons after removing the coiled extension cord. The large plug has an ethernet connector, so I would guess this is for the OE phone option. Not sure what the coax-like connector is for, but maybe a phone antenna.
All of the wires tuck really neatly into the void behind the armrest compartment. There aren't any moving components back there, so I don't have any concerns here to gain more storage space. I added a custom insert to devide all of the things I store in this compartment, as well as a panel to house 4 more USB power ports, since we all use a ton of those. I added a switch to turn them off, but may remove it as I plan to connect this to the front fuse box for switched power, rather than connecting it to the 12V outlet on the back side of the armrest console since that is constant 12V.. Lots more organized in both compartments now, and I may print more organizers for the top compartment also.
The wife noticed that the exhaust was sounding significantly louder while on the highway and driving in general. Also the overall exhuast note seemed to change, being a lot more choppy. I did also notice more exhaust smell, so I got under the G to take a look and found exhaust clamps holding on with the last fibers of their life. ~20 years and ~150k miles proved too much for these clamps and they gave in to the rust gremlins. This joint below was completely gone and only took a flick of a screwdriver to break apart.
The other side seems to be holding on slightlly better, but really on any better as the joint is leaking pretty badly also.
Purchased a set of this type of split exhuast flange clamp which will work fine, but I wanted to test if a V-Band clamp would also work. For this type of split clamp, you'll need the 3" size to fit around the pipe diameter.
With a new exhuast seal gasket/adapter in between the 2 flanged pipes, the geometry and width of the joint is very very close to the flanges that come with a V-Band clamp.
The correct size V-band clamp to hold this joint together is 2.75". I purchased a generic stainless steel clamp off Amazon and it fit very well. I shook the joint with a good amount of force and it was solid, so I'm pretty confident it will hold. Also, being stainless, I have less concern about rusting in the future.
So waiting on a second clamp to finish up the other side, and that will bring us to present day.
Lots left to do on the G, and now with the weather taking a turn for the better, time to dig back into the Transfer Case motor communication issues.
The second 2.75" V-Band arrived so it was time to tackle the driver's side flange.
After using a cold chisel to punch through the remaining 1/2 a rusty bolt, the flanges separated pretty easily. I didn't even have to do any cutting as the top sides were already completely rusted through and just waiting to come apart, just like the passenger's side.
I acutally ended up taking both mufflers off completely to remove the exhuast gasket/seals, then clean up the entire flared flange using a bristle disk and a chisel to get off any of the left-over rusted on old flanges.
And while both mufflers were off, how about a "cold" start, idle, and some baby revs to 3k?
The rest of the proess was a breeze. I picked up some Permatex Copper based exhaust sealant to better seal the joint and applied liberally onto the exhaust gasket/seal.
Fit everything back together and cleaned off any excess squeeze out, which there was plenty.
And all done. The 2.75in size V-Band fits perfectly, and when tightening down to the recommended 60-75 in-lbs, the coverage of the clamp is very good. The second clamp I got strangely had a nylon locking nut instead of metal, so I'll pick up some 1/4-28 nuts to use as secondary lock nuts for added security.
What was left of my exhaust gasket/seals and flanges after ~20 years and ~150k miles of east coast driving.
Also got a few minutes to hardmount the air compressor inside the cargo storage box. All the related hoses and air chucks are located in the FrontRunner Wolfpack recovery supply box, and the battery connections are plenty long enough to reach the battery. The entire pump is easily accessed by just folding down the 1/3 rear seat back, so access really isn't an issue. It is currently rare that I use the compressor as my off-roading is very limited, but I do have plenty of improvements I want to make to the system for better integration.
1. Rewire the battery clamps and use an Anderson plug, directly fused to the battery.
2. Change out the air fitting output to a standard air chuck, and make my own 4-way tire inflator lines.
3. Potentially make a custom manifold/distribution block that I can air down the tires all at once when the lines are connected. Also remove the digitial control panel and remote mount it with the manifold.
4. Enclose the air compressor on all sides with an air inlet on the back (drawer) side to cut down on in cabin noise.
Lastly, I've made solid progress on retrofitting the Diode Dynamics Elite Series Fog Lights F2 style into my fog light mount design. I have a few more tweaks and prints to finalize the design, and then will test fit them on the G and see how different they look and perform vs the SSC2 Pro's I currently have. These are definitely a lot more OEM looking, which I think many other G owners (myself included) would be looking for in a fog light upgrade. I already know the light output is going to be at least on-par with the SSC2 Pro's, so am excited to see what they look like installed.
Looking forward to seeing the lights in place ....amazed how rusted that exhaust clamp was - yikes !
you still headed South at some point ?
If they hold another G-Wagon Rally East this year I hope to make it out. Otherwise most likely just the annual trip down to FL over the holidays.
Good thing for the wife's sharp hearing the changed exhaust note as I was just enjoying the additional volume and increased amount of burbles. Muffler falling off on the road would be carnage for the underside of the G given there are no middle supports at all. I will be looking to add a bolt-on middle exhaust bracket somehow as it seems like a pretty disastorous hazard in the event of a failure.
Hi @shiann - Thanks for a rather amazing documentation of your G55. I found your thread searching for how to do something, and decided to join to maybe I could help with a problem you mentioned earlier.
For your rear door pull, I had the same issue and thought that the cable was stretched, too. When I dove in to see if I could figure out the issue I decided to check if the cable was routed correctly. That is when I discovered that the cable pull has the same sort of insert point behind the door skin as is on the pull. So one end fits into the clip on the door pull, the other fits into a similar one where the cable routes into the door.
Also, you can adjust the tension of the pull. There is an adjustment on the end that fits onto the door pull. It works in reverse - loosening it produces more tension, tightening it produces less. When looking at the entire setup it makes more sense seeing it than writing about it.
As for your TC woes, you may have an issue with the control module. Not only are they stupid expensive, they are also stupid silly to access. You effectively need to rip out the entire center console and remove the SAM hidden under there to arrive at it. I am by far not an expert here, but given my experience with my own TC it seems the next likely culprit.
Last edited by dkonopacki; 03-25-2024 at 10:39 PM.
Hi @shiann - Thanks for a rather amazing documentation of your G55. I found your thread searching for how to do something, and decided to join to maybe I could help with a problem you mentioned earlier.
For your rear door pull, I had the same issue and thought that the cable was stretched, too. When I dove in to see if I could figure out the issue I decided to check if the cable was routed correctly. That is when I discovered that the cable pull has the same sort of insert point behind the door skin as is on the pull. So one end fits into the clip on the door pull, the other fits into a similar one where the cable routes into the door.
Also, you can adjust the tension of the pull. There is an adjustment on the end that fits onto the door pull. It works in reverse - loosening it produces more tension, tightening it produces less. When looking at the entire setup it makes more sense seeing it than writing about it.
As for your TC woes, you may have an issue with the control module. Not only are they stupid expensive, they are also stupid silly to access. You effectively need to rip out the entire center console and remove the SAM hidden under there to arrive at it. I am by far not an expert here, but given my experience with my own TC it seems the next likely culprit.
Thanks for the tip! I saw the cable holder on the latch side but didn't see a tension adjustment - will have to take it all apart and look closer. Good chance the cable came loose on the latch side at some point and someone (maybe me) just tried to adjust the cable tension to fix it.
I am dreading taking apart the center console to get to the TC Module. I hope that's not the case as mine is a 2005 and the early issues should have been fixed, but alas old MB electronics aren't the best. I've just been living with the "TC in Neutral" error lately but now that the weather is warmer, I don't really have an excuse to not try and fix it.
 11-27-2023, 02:39 PM