When you click on links to various merchants on this site and make a purchase, this can result in this site earning a commission. Affiliate programs and affiliations include, but are not limited to, the eBay Partner Network.
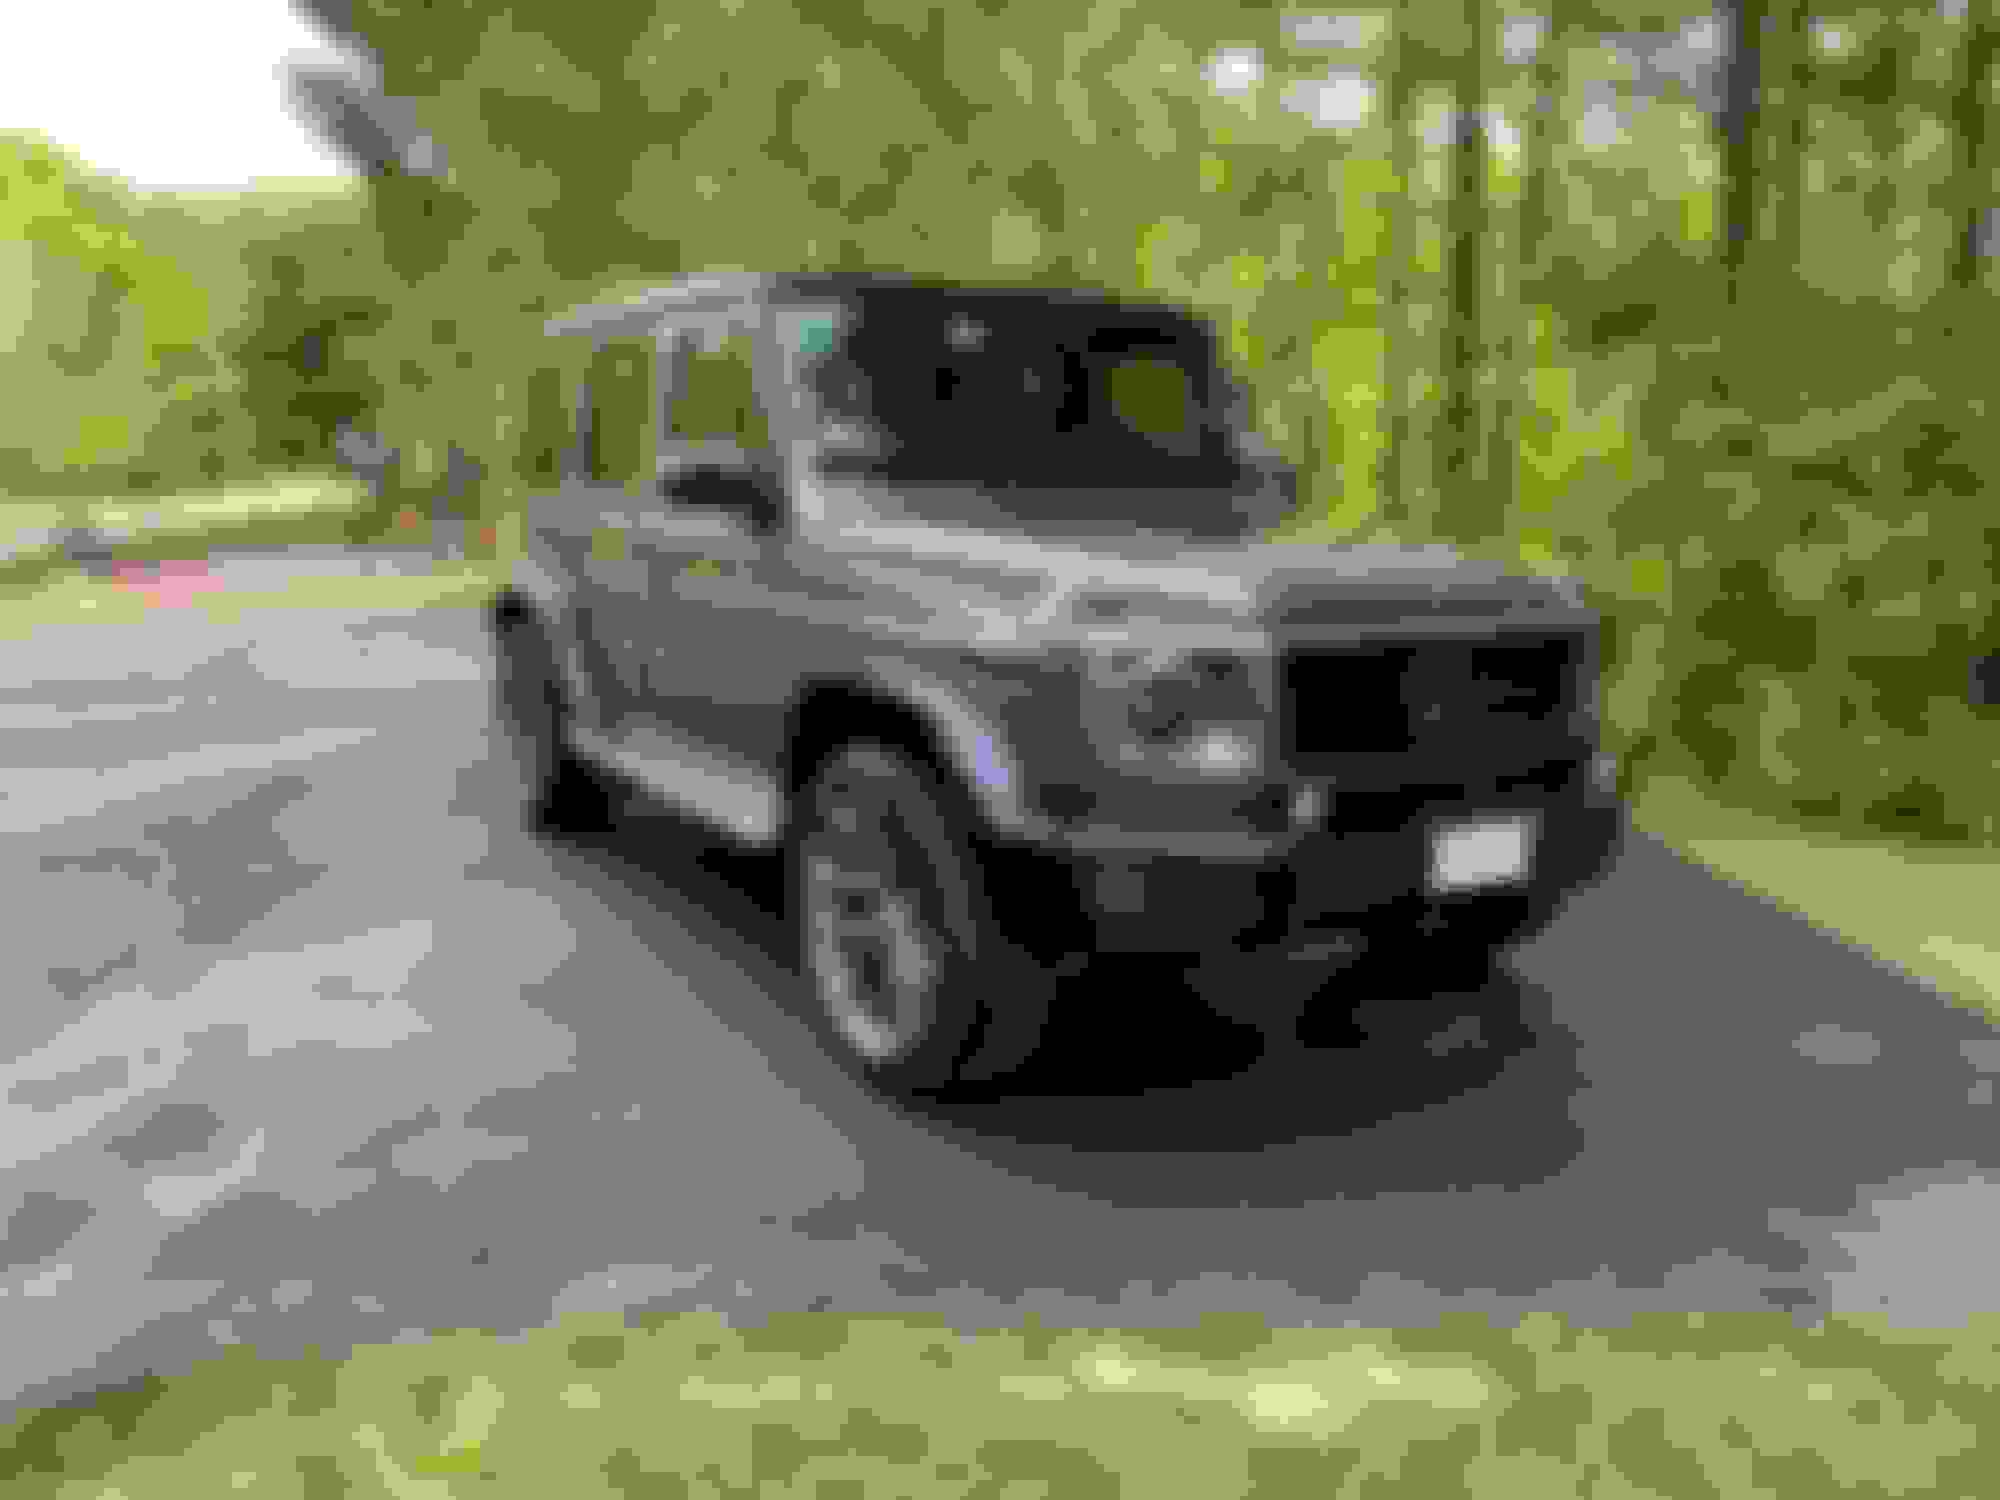
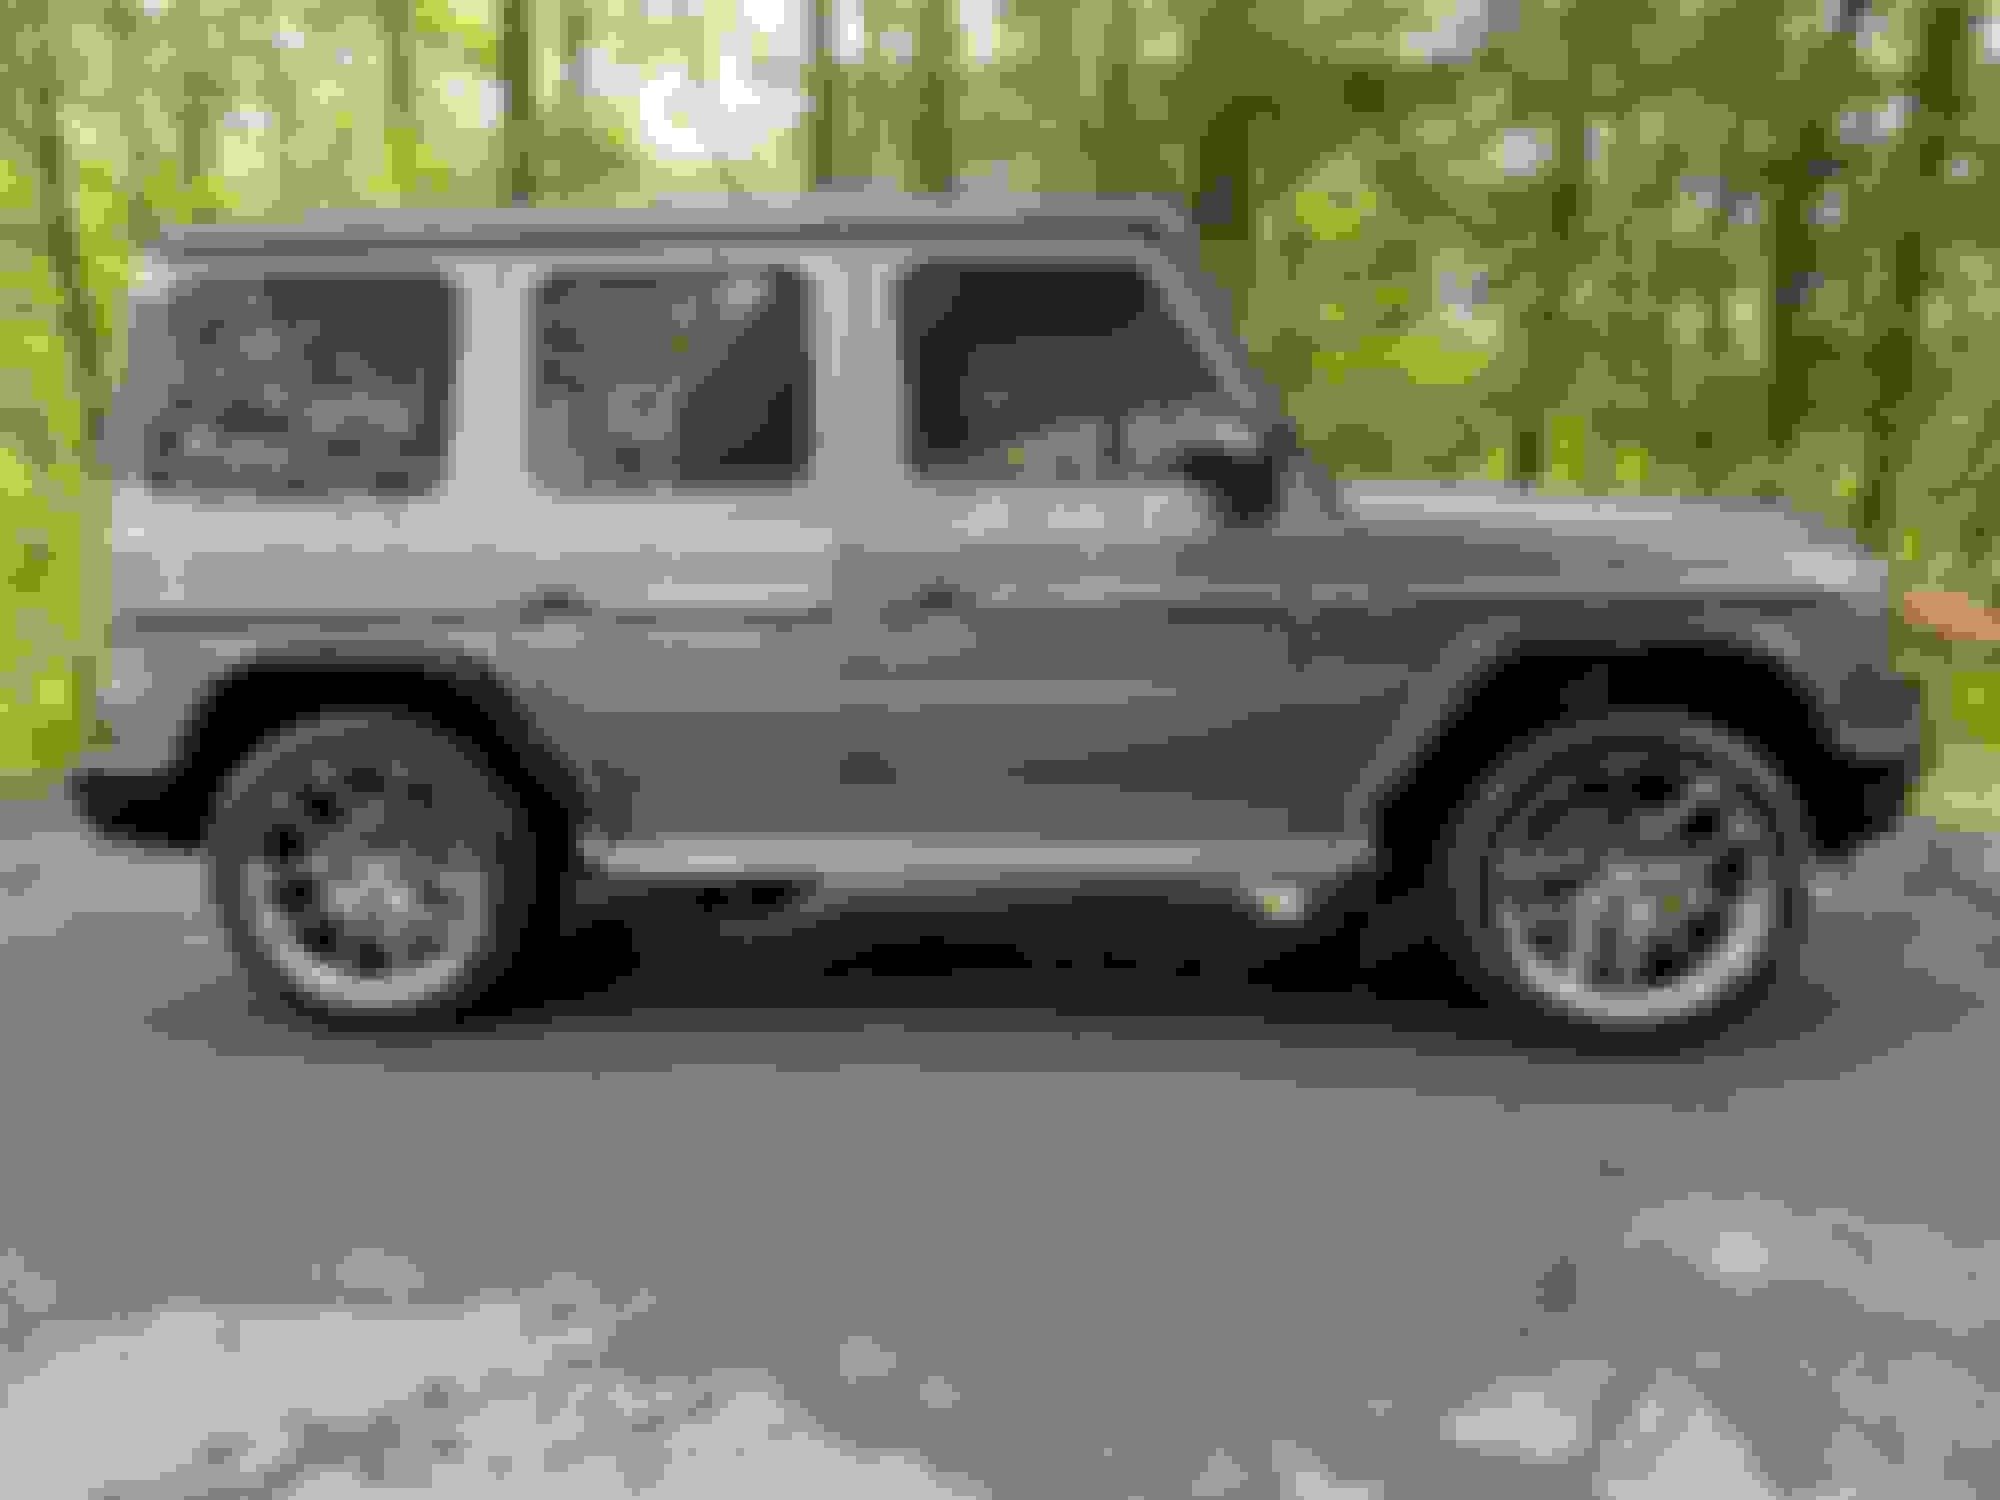
I traded in my 2017 G63 for a new design G550. What a difference in both the interior and the driveability of the car. Still trying to sort out some random rattles, but here's some pics of what I've done so far...
1) My 22" HRE wheels fit perfectly onto the new design. Had to swap out TPMS sensors but the fitment is spot on
2) Took off the bullbar and read all the issues of filling that hole in the bumper. I had some Baja Design lights that I took off my G63 and made some mounts to put the cube lights where the holes in the bumper are. Mounted to where the bullbar would mount. Had a Skene light controller that I still need to hook up. Need to get access to the headlights to tap into the low/high beams - but the headlight covers arent the same as the old W463 style. Anyone know how the headlight surround comes off? Looks like i just clips in?
3) Added the G63 mufflers the the G550 - already had the AMG switch so pretty much plug and play. Surprise how cheap OEM G63 mufflers were brand new with the electronics already built in
4) Added the Renntech tune which brings it up pretty close to the same acceleration as my W463 G63. Straight forward, plus they can code out the start/stop thing as well
5) Blacked out the yellow/red side things...quick easy job using semi transparent wrap.
Still working on getting my V1 hardwired in. Use the Savvy OBDII port for power normally, but that Mercedes Me app keeps giving me errors with that plugged in. Tried to find power in the module behind the rearview mirror. Found 12V+ but it seems like it never turns off!! Saw a post about the fuse box in the rear, but hoping to not have to run wires to the windshield. Anyone figure out what wire turns off when the car is off??
Found 12V+ but it seems like it never turns off!! Saw a post about the fuse box in the rear, but hoping to not have to run wires to the windshield. Anyone figure out what wire turns off when the car is off??
The switched power in the rear fuse box is awkward to wire into -- I couldn't figure out how to get wires under the carpet so that they'd be completely concealed. And the fuse box on the passenger side footwell is entirely non-switched. I picked up switched power at the cig-lighter in the rear center console, and was able to push the power cable up under the bottom edge of the console, under the dash and up the door frame and along the windshield edge to the rear view mirror area. Everything's concealed except directly behind the mirror and when you open the rear ash tray. Too bad vehicles don't come with lighter sockets under the dash, switched and non-switched.
Nice truck!
Last edited by streborx; 05-23-2021 at 03:09 PM.
Reason: more info
Looks great and I like the customizations you did.
For hard-wiring dash cam/V1 pretty much everybody on this forum has run them to the fuses under the rear passenger seat. I found that the wires are easy to conceal both running them under the floor mats and using black felt tape to cover them wherever they are exposed--much easier than trying to go crazy hiding every single inch.
Nice work. What do you mean in 3. when you say, "already had the AMG switch..."? I have a 2020 G550 and put the AMG mufflers on as well but I do not have a switch, unless you are referring to something else?
Nice work. What do you mean in 3. when you say, "already had the AMG switch..."? I have a 2020 G550 and put the AMG mufflers on as well but I do not have a switch, unless you are referring to something else?
I just meant that the g550 mufflers already had the solenoid that opened and shut the exhaust valve. Same as yours as I used your post as the reference to install mine.
I feel like the g63 exhaust doesn�t have much sound difference when open and shut. The g550 had a more noticeable difference - but the g63 muffler looks better and is overall a bit louder!
Understand and I agree. I had ordered mine with the AMG Line option package and it included what they called a Sport Exhaust but it did not sound all the sporty to me! But it did include the actuators that needed to be moved over to the AMG mufflers so it was worthwhile.
I traded in my 2017 G63 for a new design G550. What a difference in both the interior and the driveability of the car. Still trying to sort out some random rattles, but here's some pics of what I've done so far...
1) My 22" HRE wheels fit perfectly onto the new design. Had to swap out TPMS sensors but the fitment is spot on
2) Took off the bullbar and read all the issues of filling that hole in the bumper. I had some Baja Design lights that I took off my G63 and made some mounts to put the cube lights where the holes in the bumper are. Mounted to where the bullbar would mount. Had a Skene light controller that I still need to hook up. Need to get access to the headlights to tap into the low/high beams - but the headlight covers arent the same as the old W463 style. Anyone know how the headlight surround comes off? Looks like i just clips in?
3) Added the G63 mufflers the the G550 - already had the AMG switch so pretty much plug and play. Surprise how cheap OEM G63 mufflers were brand new with the electronics already built in
4) Added the Renntech tune which brings it up pretty close to the same acceleration as my W463 G63. Straight forward, plus they can code out the start/stop thing as well
5) Blacked out the yellow/red side things...quick easy job using semi transparent wrap.
Still working on getting my V1 hardwired in. Use the Savvy OBDII port for power normally, but that Mercedes Me app keeps giving me errors with that plugged in. Tried to find power in the module behind the rearview mirror. Found 12V+ but it seems like it never turns off!! Saw a post about the fuse box in the rear, but hoping to not have to run wires to the windshield. Anyone figure out what wire turns off when the car is off??
Turned out awesome! Love the HREs. They make the 550 look as good as any 63. Show some close up pics of how you mounted the BD lights if you don't mind. That's pretty slick!
Turned out awesome! Love the HREs. They make the 550 look as good as any 63. Show some close up pics of how you mounted the BD lights if you don't mind. That's pretty slick!
The mount for the light pretty much takes up most of the space where the hole is left in the bumper. I just have a bracket that attaches to the OEM bullbar mount....runs up into the hole, and then bent at 90 degrees and then the BD light mounts to the part that is bent
and flush to the bumper.
The mount for the light pretty much takes up most of the space where the hole is left in the bumper. I just have a bracket that attaches to the OEM bullbar mount....runs up into the hole, and then bent at 90 degrees and then the BD light mounts to the part that is bent
and flush to the bumper.
Very cool. Is that something you had made or is it a readily available part? Definitely a good way to mount some auxiliary lights!
Looks great! I’m really starting to like the no b-bar look after seeing yours. I am also interested in more info on the light brackets you are using if you don’t mind sharing?
Very cool. Is that something you had made or is it a readily available part? Definitely a good way to mount some auxiliary lights!
Its a McGuyver thing..but these are the two things I bought off Amazon...
With the first thing, I just used the rectangular mounting block (tossed the ring, and tossed the L bracket) - that mounting block is the same width as the hole in the bumper
On the second kit, I just used the longer L bracket...drilled the lower hole big enough for the factory bullbar bolt to go thru it....then mount the rectangular block (curve side down) on the shorter L portion of the bracket.
With the length of the longer L bracket (mounted on the upper most bullbar hole in the bumper), plus the height of the rectangular block, the top of the block should pretty much be sitting pretty close to flush with the top surface of the bumper....then you can pick whatever lights you want to mount...or even put a light bar in the front!!!
Looks amazing Will! Thank you for sending me these photos over the weekend. I'm subscribed to this thread now so I can keep an eye out for new photos to add to your album and hopefully have enough to upload to our website
Welcome to the forum. Great looking ride. Love the wheels and the color as well as your mods. The G is still relatively rare in this part of the country so be ready for many comments and questions. Many miles of safe and happy motoring.
Its a McGuyver thing..but these are the two things I bought off Amazon...
With the first thing, I just used the rectangular mounting block (tossed the ring, and tossed the L bracket) - that mounting block is the same width as the hole in the bumper
On the second kit, I just used the longer L bracket...drilled the lower hole big enough for the factory bullbar bolt to go thru it....then mount the rectangular block (curve side down) on the shorter L portion of the bracket.
With the length of the longer L bracket (mounted on the upper most bullbar hole in the bumper), plus the height of the rectangular block, the top of the block should pretty much be sitting pretty close to flush with the top surface of the bumper....then you can pick whatever lights you want to mount...or even put a light bar in the front!!!
That's awesome. Turned out great, and it's nice that you can piece it together fairly easy. I assume the mounting bolt on the light is what goes through the block and attaches to the shorter part of the L-bracket, thus holding all of it together?
That's awesome. Turned out great, and it's nice that you can piece it together fairly easy. I assume the mounting bolt on the light is what goes through the block and attaches to the shorter part of the L-bracket, thus holding all of it together?
Yes, the bolt goes through all 3 pieces..the block is actually threaded, so I just bought new bolts at the hardware store as you can first tighten down the block to the L bracket...then you want just enough sticking out beyond the block to get a nut over the actual light bracket. At least on the BD lights, if the bolt sticks out too far then you can't adjust the light down as the bolt hit the body of the light....

 05-23-2021 | 12:41 PM