
Oil change and new brake pads
 03-22-2009 | 10:25 PM
#1

Thread Starter
Member
Joined: Sep 2008
Posts: 222
Likes: 5
'13 CLS550, '17 Q7, '11 G550
Oil change and new brake pads
This weekend I did my first oil change (bought car with 18K miles) on the GL450. The change was a breeze - used by Griots garage oil pump the extract the oil from the dipstick - all 9 quarts came out...and even better, the oil filter cap is the same size as the one on my 911, so the cap fit perfectly on top to change out the filter also.
Since that went so smooth, I also changed out the brake pads to the Posi-quiet pads which I've heard give less dust. I know I'm probably giving up so bite to get less dust, but I can't tell the difference after bedding the pads. Seems to be just as good cold and hot as the stock pads - another plus is no squeeking like my OEM ones did when braking lightly. We'll see how the dust goes in the future!! While the wheels were off, I also flushed the brake fluid...I had read that there was alot of air in the factory fluid, and mine was the same...lots of air as I was purging (I use a Motive bleeder).
One thing is that the wheels weight a freakin ton!!! Really hard to get them back on and lined up correctly....I'll need to get some of the wheels stud alignment things to help the next time!!
All in all, very straight forward work and hopefully worth the pain of the brake dust!!!
03-23-2009 | 09:16 PM
#3
Super Member
Joined: Dec 2007
Posts: 898
Likes: 8
From: Woodstock, IL
His 2019 RAM Cummins Turbo Diesel Laramie; Her's 2007 ML320 CDI P3; Mine BMW R1200R
Would you mind expanding a little more on the brake fluid change. I have always used the dealer, because of fear of the ABS.
Any special issues or tricks? How long?
Thanks.
Any special issues or tricks? How long?
Thanks.
03-23-2009 | 10:11 PM
#4
Thread Starter
Member
Joined: Sep 2008
Posts: 222
Likes: 5
'13 CLS550, '17 Q7, '11 G550
With the motive bleeder, you fill up the brake fluid (used ATE Super Gold) in the bleeder - attach it to the brake fluid reservoir and then pump it up to create pressure to push the fluid into the resevoir... then startin with the caliper furthest from the reservoir (rear passenger side) you just open up the nut that lets the fluid out on the caliper. With the pressure of the motive bleeder trying to push the fluid in, the fluid flows out without having to "pump" the brakes...so you end up with no air in the system and you just let out the fluid till it looks clean and has no air bubbles. Repeat each wheel ending with the one closest (front drivers side).
You can do the whole thing very quickly once the wheels are off...about a couple minutes a wheel of bleeding. One thing I do on my 911 is switch between blue and gold colored fluid on each change...that way its easy to tell when the fluid has been flushed.
Hope this helps...if you go to http://www.motiveproducts.com you'll see the bleeder and they have instructions....very easy to do....
03-24-2009 | 09:10 AM
#5
Member
Joined: Oct 2007
Posts: 158
Likes: 2
From: Elk Grove, CA
2013 Land Cruiser, 2007 GL450 [SOLD], 2007 Toyota Tundra Double Cab 4x4 Limited, 2009 Corolla LE
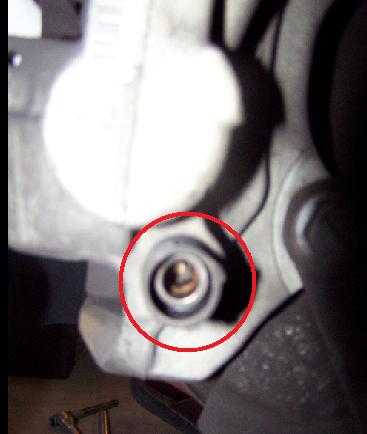
Can someone tell me that what kind of tool is used to loosen the bolt to remove the pads? I took this shot few weeks back while I was doing underbody inspection. Earlier model of Benz only needed a 1/4" extension or wrench for this purpose. Now it has changed.
03-25-2009 | 09:33 AM
#7
Member
Joined: Oct 2007
Posts: 158
Likes: 2
From: Elk Grove, CA
2013 Land Cruiser, 2007 GL450 [SOLD], 2007 Toyota Tundra Double Cab 4x4 Limited, 2009 Corolla LE
Trending Topics
12-05-2009 | 10:13 PM
#8

Junior Member
Joined: Dec 2007
Posts: 71
Likes: 0
From: Honolulu, Hawaii
1995 E320 Cab; 2007 E350 Sport
I just did a pad change in our 2007 GL 450. The diy thread for the ML350 with pics is very helpful as was the info here. The GL brakes looks identical to the new ML brakes, even the springs look the same. The front and rear springs need to pried off, the reverse is very easy.
The 9mm hex socket for the front is not something you will find at Sears (or at least not here). I ended up buying it from a Snap On truck, $20.00. If you plan ahead you may find one on the web cheaper.
The rear is a 7mm hex, easy to find but the bottom caliper pin does not allow for a socket wrench, unless you have a really low profile one, I used an allen key it was fine just tedious.
The sensors plug into the inboard pads. The rear sensor plugs horizontal into the caliper, the front plugs in vertical although they are the same part. The sensors go into a groove at the top of the pad, easy to see.
I jacked the car at hard suspension points and put my jack stands at the factory jack points. One downside is I had to then raise the car again to put the wheels back on but not a big issue.
It helps to have a shoplight or a flashlight when you are reinserting the caliper pins since you need to wiggle the caliper to line them up. It really helps for the bottom pin.
The calipers are heavy, especially the fronts. If you are a contortionist like me you can balance it on your knee, remove the pads, retract the 2 pistons (the rear is only one) get then new pads in and slide the caliper back on.
Anyone who has taken a wheel off knows how heavy they are. After the last one I needed some Tylenol. If you can have a helper for the wheels get one.
Our car has only 17K miles, I think the rear sensor had tripped since after I did the rear pads we moved the car a little and the brake wear icon did not illuminate. The fronts were very worn also and you can't tell which sensor has tripped.
I got the parts from a local store that specializes in import parts. The cost was a little more than 50% of what the dealer quoted me. I did not change the rotors and saw no need to do so.
Thanks to everyone who had done this before, I knew what tools I needed and was able to get it done efficiently.
12-06-2009 | 03:18 AM
#9
Member
Joined: Oct 2007
Posts: 158
Likes: 2
From: Elk Grove, CA
2013 Land Cruiser, 2007 GL450 [SOLD], 2007 Toyota Tundra Double Cab 4x4 Limited, 2009 Corolla LE
[QUOTE=vexed;3839208]The 9mm hex socket for the front is not something you will find at Sears (or at least not here). I ended up buying it from a Snap On truck, $20.00. If you plan ahead you may find one on the web cheaper. /QUOTE]
I got mine from Home Depot and it was reasonably priced. I think it was less than 20$
I got mine from Home Depot and it was reasonably priced. I think it was less than 20$
12-16-2009 | 06:32 PM
#10

Member
Joined: Jun 2009
Posts: 121
Likes: 4
09 GL450
Could you please elaborate a bit? Where exactly did you put the jack front/rear? What are hard suspension points? Can you snap pictures by any chance? This is VERY useful to know!
12-18-2009 | 03:09 PM
#11
Junior Member
Joined: Dec 2007
Posts: 71
Likes: 0
From: Honolulu, Hawaii
1995 E320 Cab; 2007 E350 Sport
I'll try to take some pics. From memory the rear has a large piece inboard of the wheel that was perfect. It was part of the rear suspension or subframe. The front was I believe the lower control arm. If you look around you will see large stampings that clearly can support one side of the truck. I did not use the differential, it is finned and even with a block of wood under it I was not comfortable with it.
12-18-2009 | 10:36 PM
#12
Member
Joined: Jun 2009
Posts: 121
Likes: 4
09 GL450
Upfront, did you use the side of the control arm attached to the wheel, or, the side that attaches to the body. In the first case suspension is loaded when you lift the truck, in the second it is not. Pictures would be great! I've asked around multiple forums how to lift this truck not using stock lift points (reserved for jack stands) and no one knew. As far as I know, you are the first one with an alternative solution. Thanks!
12-19-2009 | 07:40 PM
#13
Junior Member
Joined: Dec 2007
Posts: 71
Likes: 0
From: Honolulu, Hawaii
1995 E320 Cab; 2007 E350 Sport
Upfront, did you use the side of the control arm attached to the wheel, or, the side that attaches to the body. In the first case suspension is loaded when you lift the truck, in the second it is not. Pictures would be great! I've asked around multiple forums how to lift this truck not using stock lift points (reserved for jack stands) and no one knew. As far as I know, you are the first one with an alternative solution. Thanks!
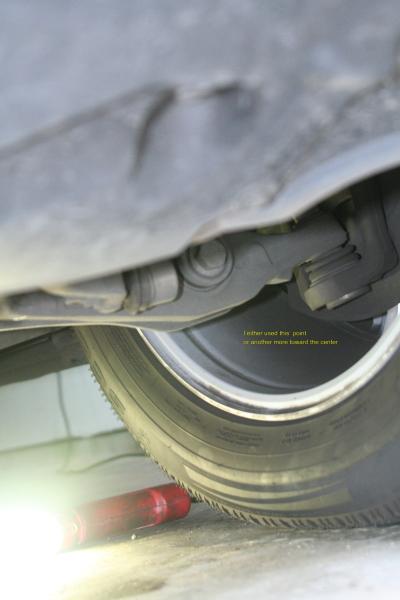
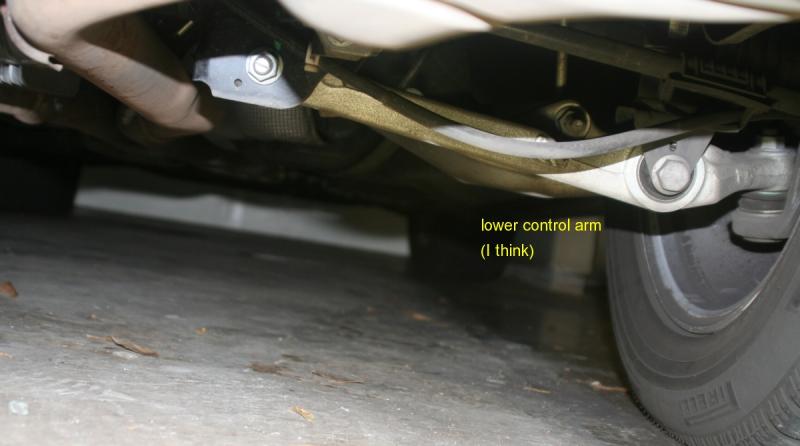
The pics aren't great but may be of some help. I used the point where the control arm attaches to the body (frame). The rear pic shows it, the front is the arm at the wheel. I could not get a good pic of the front but it sounds like you have looked under there and have a good idea.
Hope this helps--the first pic is the front, the next two the rear.

Last edited by vexed; 12-19-2009 at 07:42 PM.
12-19-2009 | 10:38 PM
#14
Member
Joined: Jun 2009
Posts: 121
Likes: 4
09 GL450
The pics aren't great but may be of some help. I used the point where the control arm attaches to the body (frame). The rear pic shows it, the front is the arm at the wheel. I could not get a good pic of the front but it sounds like you have looked under there and have a good idea.
Hope this helps--the first pic is the front, the next two the rear.
Hope this helps--the first pic is the front, the next two the rear.
 That would keep the front suspension compressed when lifting. You probably could have done the same thing in the rear as well.
Thanks!
Last edited by GLguy; 12-19-2009 at 10:40 PM.
12-20-2009 | 02:30 AM
#15
Junior Member
Joined: Dec 2007
Posts: 71
Likes: 0
From: Honolulu, Hawaii
1995 E320 Cab; 2007 E350 Sport
The text did not come out in the first picture but if you follow the control arm towards the center of the car there is a similar bolt or mounting point as the rear. The point I wanted to make about the front is the arm appears to be split where it meets the wheel which is why I did not place the jack there. The front has more places that looked sturdy enough than the rear.
12-21-2009 | 07:30 PM
#17
Junior Member
Joined: Dec 2005
Posts: 23
Likes: 0
From: Staten Island, New York
2010 GL350 Steel Gray
I have a mighty vac brake fluid extractor that sucks brake fluid through the system via a hose attached to the bleeder. Is there any reason not to use this type of bleeder to flush your brake fluid? I have a Facom pressure bleeder that is difficult to use in comparison and takes a lot of fluid to fill to working level.
12-21-2009 | 07:53 PM
#18

MBWorld Fanatic!
Joined: Dec 2004
Posts: 4,268
Likes: 248
all mercedes oil pans are baffled. this means that you are not draining all the oil with the extractor leaving the dirtiest oil not drained.
extractors promote engine oil sludge which is exactly what all newer mb motors do not need as their extended service intervals make them sludge-prone especially at higher mileage to begin with.
do not use oil extractors. they are for boats..
if you are doing your own oil- get ramps, slide underneath and do it the right way. while waiting for the hot oil to drain (about 10 minutes) use the opportunity to look around for leaks, check your swaybar ends and main bushings (they go often)... check rubber boots on steering rack, etc.. a warranty work will not be performed if problem is undetected.
Last edited by alx; 12-21-2009 at 07:55 PM.
The following users liked this post:
StradaRedlands (03-02-2017)
12-21-2009 | 09:37 PM
#19

Senior Member
Joined: Sep 2009
Posts: 361
Likes: 3
From: Chicagoland
2008 ML350 4matic
Cheers alx,
I thought I was also one of the few who got underneath and did it all the way. Pulling the plug is not only quicker, but definitely ensures you're getting to the bottom of the pan to eliminate sludge. I also love to give it a full underside exam while down below. Call us old fashoined, but pulling the plug is the only way to go for me. If MB was so confident on the suction method, then why even offer a drain plug?
I thought I was also one of the few who got underneath and did it all the way. Pulling the plug is not only quicker, but definitely ensures you're getting to the bottom of the pan to eliminate sludge. I also love to give it a full underside exam while down below. Call us old fashoined, but pulling the plug is the only way to go for me. If MB was so confident on the suction method, then why even offer a drain plug?
12-22-2009 | 12:41 AM
#20
Member
Joined: Oct 2007
Posts: 158
Likes: 2
From: Elk Grove, CA
2013 Land Cruiser, 2007 GL450 [SOLD], 2007 Toyota Tundra Double Cab 4x4 Limited, 2009 Corolla LE
I have done oil changes both ways i.e.; suction method and draining method. I also discovered that my suction pumps does better job than draining because I first sucked it all with mytvac evacuator and then open the drain plug to verify the results. I discovered that not even a single drop came out which mean sucker is doing its job. In my opinion, pros to suction method is that it is simple method and other reasons as follows
1) It eliminates getting under the car
2) don't have to remove the guard shield, and
3) don't have to replace the drain plug gasket every time.
Cons to suction method is that it take little long and you have to keep pumping till nothing come out. Draining method is just vica-versa of suction method. I would say that keep doing what you feel comfortable and have confidence in. I just prefer suction method. You decide for yourself.
Cheers and peace out.
The following users liked this post:
StradaRedlands (03-02-2017)
12-22-2009 | 10:25 PM
#21
Junior Member
Joined: Dec 2005
Posts: 23
Likes: 0
From: Staten Island, New York
2010 GL350 Steel Gray
Guys,
You misread my question. I am talking about flushing the brake fluid, not changing the engine oil. I have used the vacuum method for flushing my other cars with ABS so I figured this system to be no different. I only asked the question because my Bentley BMW motorcycle manual recommends the dealer do it with a special pressure bleeder they have. I have a pressure bleeder as well from FACOM but it is messy to use and if you can't see the level of the reservoir easily you can run it dry and drive air into the system. This is a no-no with ABS pumps. Very difficult to get the air out. Unless there is some special reason not to, I would prefer my Mity-Vac extractor with its brake bleeder attachment. I am waiting for the Service DVD to come so I can see what MB recommends.
You misread my question. I am talking about flushing the brake fluid, not changing the engine oil. I have used the vacuum method for flushing my other cars with ABS so I figured this system to be no different. I only asked the question because my Bentley BMW motorcycle manual recommends the dealer do it with a special pressure bleeder they have. I have a pressure bleeder as well from FACOM but it is messy to use and if you can't see the level of the reservoir easily you can run it dry and drive air into the system. This is a no-no with ABS pumps. Very difficult to get the air out. Unless there is some special reason not to, I would prefer my Mity-Vac extractor with its brake bleeder attachment. I am waiting for the Service DVD to come so I can see what MB recommends.
07-29-2010 | 06:34 PM
#22

Newbie
Joined: May 2009
Posts: 1
Likes: 1
GL450
Brake fluid change (bleeding) GL450 2007
No special tricks. The procedure takes about an hour.
To do the fluid change you do not even have to take the wheels off - you just can pump the suspension up and get under the car. The brakes are easily accessible.
You need:
- the Motive bleeder European version (or any other bleeder that fits the European type cap), you can get this on Amazon,
- a brake bleeder wrench (any auto parts shop),
- I also got a Genesis Bleeder Magnet bottle (amazon again, simple and useful).
http://www.amazon.com/Brake-Fluids-G...438465&sr=8-11
- one or 2 liters of the DOT4+ fluid (1-2 quarts), I flushed the brakes with one, but you may want to do that more throughfully.
( http://www.carpartsdiscount.com/auto...tml?3593=53402)
- a syringe
- paper towels
- empty container for used fluid
So:
- open the hood and drain the reservoir with the syringe and top off with the new fluid.
- put the bleeder cup and pump it to a little below 2 bar
- go to the furthest wheel (back right wheel) and begin there
- put the bleeder wrench on the bleeder and attach the hose of the bottle that you are going to use to collect the liquid to
- open the bleeder and watch the color of the fluid until it is light
- close the bleeder. you should use a torque wrench to do that, but I did not use one
- have someone looking at the reservoir so it doesn't dry out while you are doing the bleeding, if it dries you are going to push air into the brake pump (you dont want to do this)
- when you are done with the first wheel, go to the second rear wheel, etc.
General comments
- be careful with the brake fluid as it is highly corrosive, so protect the car paint with some clothes or protective foil.
- watch the pressure on the bleeder and the level of the liquid in the reservoir
- DON'T pump the brake pedal - if you do that, you are going to ruin your brake pump and have to spend $2000 on a new one.
Otherwise - it is an easy procedure, you don't need any special skills or expensive/specialized tools to perform it.
Last edited by ninja250; 07-31-2010 at 11:57 AM. Reason: posting pics
The following users liked this post:
StradaRedlands (03-02-2017)


