When you click on links to various merchants on this site and make a purchase, this can result in this site earning a commission. Affiliate programs and affiliations include, but are not limited to, the eBay Partner Network.
Solved my ABS/ESP problem - Maybe this will help others
I have had several issues with my 2007 GL450. It has taken a while to sort them out, as a weak battery and faulty alternator created more error codes than really existed. Once those were sorted out, I had one issue left to investigate… the ABS/ESP warning lights, which were accompanied by some strange vehicle behavior, such as the brake applying itself for a few seconds, but only when just starting out. Background: The ABS and ESP lights have been problematic since I purchased the vehicle about 8 months ago. At first, they would come on once in a great while. Maybe once a week… just flash on for a few seconds and then off. Over time, this worsened. It came on longer… then longer, until one day, it was off when the car started, and then came on within a few feet of travel, and stayed on.
After reading multiple posts about the ABS speed sensor, I changed the sensor. No difference.
I then purchased a code reader (SD Connect C4) that included the Xentry software, considering I have both the GL450 and an E320 to maintain. I believe it has already paid for itself.
Spent a little time driving with the code reader diagnostic system running. We set it up to monitor the outputs of the wheel sensors directly. After a few miles, it was clear that the left rear sensor output was intermittent. I changed the sensor again by swapping the left and right rear sensors. Same result… an intermittent signal.
On the way home from testing, we took a rough, unpaved road. After one particular bump, the sensor output stopped entirely! Now I had something to sink my teeth into.
Getting probes into the sensor was difficult. I even tried scraping the wires on the vehicle side of the speed sensor connector (as opposed to the sensor side), but it was not reliable. So, I chose to sacrifice one of my sensors to make a test jig. I used a pair of cutters to remove the shroud off the extra sensor connector (on the sensor side, not the vehicle side). Then, I soldered some wires I took from an old resistor to the pins so that I could get a reliable connection to the sensor wires. It looks like this:
Next, using the proper safety precautions, I jacked up the rear of the vehicle using a 3 ton floor jack on each side, backed up with jack stands. The rear wheels were removed.
Now, a mistake.
Having worked with speed sensors in years past, I disconnected the speed sensor and clipped my DMM (digital multimeter) probes to the sensor output and set for AC volts. I spun the tire. Nothing. As a check, I did the same with the right rear sensor, which is known working. Also nothing. Ugg.
A bit of research was in order, so I did some reading, only to discover that this model uses a hall effect sensor, which will not output a signal like the old style sensors. This means I had to power it in order to determine if the issue was the ESP control module, the wiring, the sensor, or the ring in the hub. My first thought was to use a car battery and resistor to limit the current in a make shift test fixture, but I could not find the current spec for the sensor. Therefore, I decided to test it in the actual vehicle with the ignition on, which would yield more information.
In other words, I had to turn on the ignition to get power to the sensor.
Now, that research I mentioned also showed me that I should expect one of the wires to be 12V and the other to be the return. At this point I decided to get a little more serious and opted for a digital oscilloscope instead of a DMM so I could get a visual look at what was going on.
My scope is a Hantek DSO5072P Digital Oscilloscope, 70 MHz Bandwidth, 1 GSa/s, 7.0" Display. It’s just under $250 on Amazon. Very good for the money and works very well.
Starting with the known good right rear sensor, I plugged in my little modified sensor (i.e. test jig) into the right rear wheel and connected a scope probe across the test wires I extended. I spun the tire. After setting the scope for 500mV/division amplitude and centered on 12.5V, I started seeing distinct negative going pulses of about a volt when the wheel was spun. The faster the spin, the closer together the pulses. I did not think to snap a pic, but they look a lot like this:
Perfect! Now I knew what to expect. I changed sides and put the test jig into the left rear wheel hub. The very first thing I noticed was that there was no 12.5V signal. I spun the wheel and there was no sensor output, which makes perfect sense as the sensor was not powered.
Of course my first thought was “ESP module” and a sense of dread surfaced. But, I had to be sure.
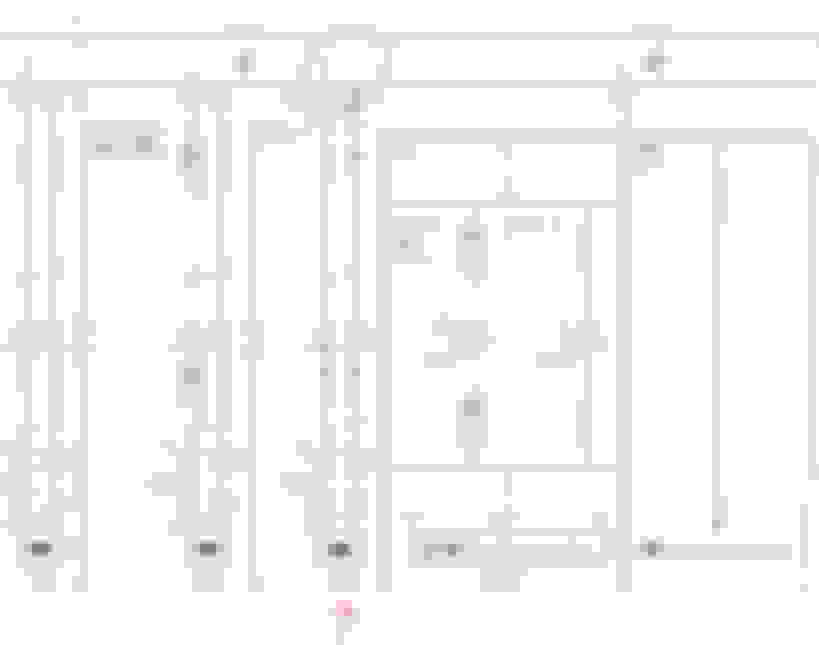
Next, I found a schematic.
The two wires, red/blk and violet/blk, run from the left rear wheel to the ESP module.
I unplugged the big connector on the back of the N47-5 ESP Module. It was nice of them to put it in an easily accessible place like the front left side of the engine compartment, right there on top! (though, I would be happy to sacrifice this ease of access for headlights, parking lights, and side marker lights that were easier to access!) I digress.
Now a hurdle to overcome. The connector looks like this:
Notice that there are no pin numbers to be found. Ugg again. This was starting to be a chore.
I could not find this connector pinout in the Mercedes service manual.
The internet comes to the rescue.
I went to google and searched for keywords such as "Mercedes N47-5 connector pinout". Lots of pinouts, but none looking exactly like this particular connector. Then I found this: (wish I knew who did this to give him credit. Whoever you are, thank you!)
As it turned out, his guesses are correct, at least for the row that starts with N47-32, red. I needed to identify the pins, so I went to the right rear wheel and shorted the wires with a jumper. Counting from pin 32 as shown, I found what should be pins 42 and 43 for the right rear wheel. An ohm meter showed close to 0 ohms. I removed the jumper… now >500K ohms, essentially open. I now had the proper pinout.
I moved my shorting jumper to the problematic left side. I checked pins 36 and 37. No continuity. I had a bad wire! I probably didn’t have to buy a new ESP control module! Things were looking up!
I then used a pair of jumper cables (well, one side of the cables) to run to the right rear wiring harness from the engine compartment and checked the red/blk wire, essentially substituting for the violet/blk wire. The red wire was good!
It had to be the violet/blk wire, but I had to make sure. I checked it with the same method of using a jumper cable. Indeed, the violet/blk wire had an open circuit. I was overjoyed (for a few minutes). Note that this could have used any wire that reaches from the back wheel to the engine compartment. I simply had jumper cables handy right next to me, so I used them.
My jubilation was short lived. I realized several things.
1) I had no idea where in the line it was broken.
2) A wiring harness would be expensive.
3) A wiring harness would be a pain in the posterior to replace.
4) I could repair the harness.
5) I could literally run a new wire from end to end and bypass the open circuit.
Realizations 1-3 were frightening. Number 5 was sloppy. I decided on option 4.
But.... where was the break? This is where it got tricky.
The only way I could think to do this was with a TDR (time domain reflectometer). Luckily, I am an electronics professional, so I had a very fancy communications analyzer (Tektronics CSA803) with a TDR module installed. Now, this is really overkill. One can get a very basic TDR box for use with a simple oscilloscope (or build one) for very little money. But I used what I had.
For those unfamiliar with TDR, it basically sends a pulse down the wire and looks for a reflection to come back. Any discontinuity along the way will cause a little indication on the screen… including opens. The position of the indication shows where on the line it occurred. Anyone who does a lot of electrical troubleshooting should really get one.
TDR sets measure all sorts of things. Discontinuities, the propagation speed of the signals, impedance, etc. I didn’t need all the fancy stuff, and I didn’t care what the impedance of this loosely twisted pair was. I just needed to find the end of the wire. For that, I needed a frame of reference as to the wire length.
A TDR trace looks something like this, depending upon your tester.
Luckily, the red/blk wire was good. First, I cut the connector off so I could get good connections after stripping a quarter inch off the wires. I connected one trace (TDR output) to the red/blk wire at the left rear wheel harness (the problem side) and set the TDR to show the length of this wire across the screen.
Next, I connected the second output to the violet/blk wire at the harness. Voila! I could compare the two scope traces and see exactly where the open circuit was on the scope screen. Wish I had thought to take a pic at the time.
The problem is that I didn’t have a reference for the distance from the connector. I did not know the overall length of the wire to use the propagation speed to calculate the distance to the break. All I could tell was that the break was not far from the wheel connector. It was about 1/10 of the way in, by my estimate from the screen.
Experience with a TDR was invaluable. On circuit boards, we do TDR mapping. We inject the signal, look at the trace, and then touch different places with fingers or tweezers to get a little blip on the screen which lets us see where we are on the line. I used the same technique.
I started at the sensor connector position, and ran my hand along the cable. The blip was small, but it was there. I followed it along until I matched the location of the break, within a few inches.
About 18 inches in, the cable is attached to the frame in 3 places using zip ties and is rather harshly routed with very sharp bends.
The loosely twisted pair cable was routed to and attached to these two circles with zip ties and to another point directly behind this member. All of them were cinched so hard that Hercules must work at Mercedes Benz.
I cut the zip ties. I straightened out the wire. I went a few inches farther along the cable and cut the protective cover so that I could slide it off.
Here is what I found: the broken violet wire.
It appears that Mercedes was too zealous when cinching the zip ties and damaged the wire. Over time, vibrations made it worse and worse until one final bump literally cut the wire. You can’t see it here, but the “good” red wire was cut about halfway through. Working, but damaged.
I cut both wires. Stripped, twisted, soldered, cleaned, and covered with heat shrink tubing. After that, a larger heat shrink tubing to cover the entire length of protective cover I removed and then a little more so that the new cover went over a few inches of the old remaining cover that was left farther in. Just to be sure, I placed a split wire loom over that and reattached at the zip tie points with a sane amount of force on the zip ties. I also repaired the connection to the connector I had cut off with the same method. Without cutting that connector, I could not have removed the original protective cover or slid the new heat shrink over the whole mess.
Plugged it all in. Sensor now working according to the scope. Reassembled everything. All codes now gone. I didn’t even have to clear the codes. They just disappeared.
Problem solved. Money saved. Lessons learned. I’m satisfied. I hope this helps others.
Excellent step by step diagnostic investigation.
PLEASE READ: My 2012 C-250 just now (yes, today) suddenly lit up the ABS, ETS AND the engine light. I keep my Mercedes up to date with every and ALL scheduled services. I have complained earlier on this forum about how "fragile" this car is. I even offered my Authorized Mercedes Benz mechanic to buy it from me and he responded, and I quote, "why on earth would you sell it now that you have spent thousands of dollars fixing everything that goes wrong with this car over the last 5 years that I've known you? Your buyer is going to get a dream car, with no problems for the next 30 years. You already fixed them. Now is the time to keep the car" ... well, that was before another $3,000 worth of repairs later that same month, and now, with the same ESP/ABS/ETS/Engine Light fiasco described in this posting...
Dear fellow Forum members: ACCEPT THE TRUTH: This car is a piece of ****. Who would like my 2012 C-250 for $100 bucks? ... do I hear $200, ... do I hear $20,000 ? Do I hear $20,000? Full AMG package, hello? All service and maintenance records (plenty of them) ... Do I hear $25,000 with full new factory tire package ? ... going once, going twice ... ...
Sold ! to the ******* on the row that said these cars were reliable ...
I will probably be murdered on this forum, when I repeat, these modern (2012, etc.) C-250s are a piece of garbage. AND no, I do not need to buy thousands of dollars worth of electronic diagnostic tools, mechanical tools and all kinds of "try-to-fix-it-yourself" tools for a car I bought PRECISELY for its reliability reputation.
I have owned racing cars, vintage cars, and French, British, Italian,and American cars, from all ages, from muscle cars to round-about boulevardiers ... and I did all the mechanics on them.
The Mercedes C-250, from 2012 IS A PIECE OF ****. PERIOD.
Like Henny Youngman used to say ... Take My Car, Please !
That’s a lot of words to say you’re frustrated you likely have a disconnected or broken wheel speed sensor. But I agree I never thought the modern C classes were very great. Reminded me of a cheaper Asian import car
Excellent step by step diagnostic investigation.
PLEASE READ: My 2012 C-250 just now (yes, today) suddenly lit up the ABS, ETS AND the engine light. I keep my Mercedes up to date with every and ALL scheduled services. I have complained earlier on this forum about how "fragile" this car is. I even offered my Authorized Mercedes Benz mechanic to buy it from me and he responded, and I quote, "why on earth would you sell it now that you have spent thousands of dollars fixing everything that goes wrong with this car over the last 5 years that I've known you? Your buyer is going to get a dream car, with no problems for the next 30 years. You already fixed them. Now is the time to keep the car" ... well, that was before another $3,000 worth of repairs later that same month, and now, with the same ESP/ABS/ETS/Engine Light fiasco described in this posting...
Dear fellow Forum members: ACCEPT THE TRUTH: This car is a piece of ****. Who would like my 2012 C-250 for $100 bucks? ... do I hear $200, ... do I hear $20,000 ? Do I hear $20,000? Full AMG package, hello? All service and maintenance records (plenty of them) ... Do I hear $25,000 with full new factory tire package ? ... going once, going twice ... ...
Sold ! to the ******* on the row that said these cars were reliable ...
I will probably be murdered on this forum, when I repeat, these modern (2012, etc.) C-250s are a piece of garbage. AND no, I do not need to buy thousands of dollars worth of electronic diagnostic tools, mechanical tools and all kinds of "try-to-fix-it-yourself" tools for a car I bought PRECISELY for its reliability reputation.
I have owned racing cars, vintage cars, and French, British, Italian,and American cars, from all ages, from muscle cars to round-about boulevardiers ... and I did all the mechanics on them.
The Mercedes C-250, from 2012 IS A PIECE OF ****. PERIOD.
Like Henny Youngman used to say ... Take My Car, Please !
 03-29-2018, 12:55 AM