When you click on links to various merchants on this site and make a purchase, this can result in this site earning a commission. Affiliate programs and affiliations include, but are not limited to, the eBay Partner Network.
Fix: P9006 short circuit error when replacing AC compressor
Hello everyone - long time reader, first time poster.
I picked up a 2009 GL320 two months ago and the AC compressor failed after 3 days of ownership. Being cheap I set out to fix it myself. Diagnosis showed that the AC compressor was actually locked up and thus, at a minimum I needed to replace the compressor in order to pressurize the system to find other potential leaks etc. I bought an aftermarket (but new) compressor from Rock Auto. Install went fine but once hooked up I kept getting an error (P9006 AC compressor short circuit). The cabin fans would sort of cycle up and down as the ACC repeatedly tried to start the compressor but to no avail - the AC simply wouldn't work. I hot wired the "refrigeration/AC control valve" with an external 12 V power supply and the AC system worked like a champ (super cold). So off to the forums I went. I read a bunch but the most common story was that aftermarket compressors simply don't work and I would need to buy the Denso branded version. I also read that I needed to complete and "AC compressor adaptation" via SDS which I don't have. I wasn't satisfied with these answers as I really didn't want to empty all the R134a out of my system again and I had a hard time believing that AC compressors were really different enough to need "adaptation." Luckily, I finally considered replacing the AC control valve with the control valve in the cratered compressor I removed. In doing so I pretty much destroyed the old control valve. Here is what it looked like after removal and non-reversible disassembly:
AC control value disassembled.
What I found out via disassembly is that there is a diode in parallel with the solenoid winding. This diode effectively clamps the reverse polarity voltage present when the coil is discharging (i.e. turned off). This made me wonder if, for some odd reason, the compressor I bought didn't have a diode in the same location. A quick visit to Polar Bearings excellent "RCV" website showed that there are two visually identical parts but one has a diode and one doesn't. Why Audi, BMW, etc. don't use a diode whereas MB does is beyond me (thanks for making these cars hard to work on!) but I was sure this was my problem. I dug out the diode from the disassembled control valve:
Note: I used this crappy diode because I didn't have a better replacement handy (with Radio Shack going out of business and all electronic parts are always a few days shipping away). I am quite sure that any schottkey diode (e.g. 1N5817) should suffice.
I then soldered in the diode to the spare wiring harness I had on my cratered compressor:
And here is the final form before installation:
Final form with heat shrink
Note - the big round crimp terminal is to provide the necessary ground - the stock ground connection is inaccessible without removing the compressor which I didn't want to do.
I installed the modified wiring harness, zip tied the old wiring harness out of the way and fired it up. It has worked perfectly for the last week, no more errors, no need for "adaption", no requirement to buy a "Denso" branded compressor.
Obviously, the "right way" to fix this issue would be to install the correct "with diode" control valve - but again this requires removing all R134a and somehow getting the control valve out (I had a very hard time with my "scrap" compressor).
All this trouble is caused by the lack of a 5 cent part. It took me quite a while to figure this out so I'm hoping that this post helps some struggling with the same or similar issue. I assume this fix would apply to all GLs (the early ones at least).
Hi Barium,
Thanks for your post. I have the exact same situation as you were experiencing. Few questions:
Where exactly did you solder the salvaged diode?
Did you end up using your wiring harness from your old compressor and not end up using the wiring harness from new compressor?
Is the "AC compressor adaptation" something that can only be done at the dealership?
Thanks for the info Barium, will give this fix a try. Can you please provide a part number for the "with diode" control valve or any keywords to search with? The descriptions of parts on aftermarket websites don't offer this info.
Last edited by entersandman; Sep 4, 2018 at 06:21 PM.
Reason: added info
update:
so the shop that installed the aftermarket compressor couldn't get the aftermarket compressor to function normally with pushing the AC button. The compressor would operate if manually operated using the Snap-on computer connected to the OBD2 port. After reading this thread and other threads and talking with Mercedes Benz service at the dealership, we came to the conclusion that aftermarket AC Compressors simply don't function properly (reprogramming or an "AC adaptation" does not solve the problem). The only solution was to purchase the OEM denso 7seu17c compressor. The shop removed the aftermarket compressor and installed the OEM compressor, and voila it worked...after several tries to 'initialize' the compressor.
I should add that Mercedes-Benz service at the dealership has never heard of the AC control valve on the compressor being serviceable. They have never serviced that part before and don't believe it is serviceable, hence my desire to not salvage the control valve from my old seized OEM compressor.
Last edited by mrbacardi; Sep 6, 2018 at 09:11 PM.
Hello mrbacardi - sorry you had to replace the whole thing - this is exactly what my post was trying to avoid. I am quite sure that the only operational difference between the aftermarket and OEM models is the tiny diode in the AC control valve. I agree that changing the AC control valve is probably really hard as I had a very hard time getting the one out of my locked up compressor to see if it indeed had a diode in it. This is why I suggested a soldered in retro-fit. I soldered it in using the old wiring harness as I had already installed the new wiring harness with the new aftermarket AC compressor and didn't have access to take it out. When soldering in the diode it is attached between the two wires that run to the compressor (not in series but in parallel). If you salvage the old diode like I did (not recommended but fun if you like destroying things) you will need to figure out which lead is the anode and cathode (otherwise you will simply short out your AC control signal with the diode). The cathode connects to the positive wire and the anode connects to ground.
Hello mrbacardi - sorry you had to replace the whole thing - this is exactly what my post was trying to avoid. I am quite sure that the only operational difference between the aftermarket and OEM models is the tiny diode in the AC control valve. I agree that changing the AC control valve is probably really hard as I had a very hard time getting the one out of my locked up compressor to see if it indeed had a diode in it. This is why I suggested a soldered in retro-fit. I soldered it in using the old wiring harness as I had already installed the new wiring harness with the new aftermarket AC compressor and didn't have access to take it out. When soldering in the diode it is attached between the two wires that run to the compressor (not in series but in parallel). If you salvage the old diode like I did (not recommended but fun if you like destroying things) you will need to figure out which lead is the anode and cathode (otherwise you will simply short out your AC control signal with the diode). The cathode connects to the positive wire and the anode connects to ground.
Barium
Wow ! I am really impressed by your knowledge and how you figured out what most mechanics and dealership couldn't
Of course Mercedes dealership guys have not heard about it, they like replacing the whole thing. If allowed, they will ask customers to replace the whole truck ha ha
Given the headache involved, it seems that best is to buy the right replacement compressor with diod in it.
Totally right I just use a diode 1N5819 cathode to positive and the anode to negative welding good works like brand new my old solenoid was original MB just blow and throw code A9 short circuit but really this fix the problem 1👍🏻🙏
Totally right I just use a diode 1N5819 cathode to positive and the anode to negative welding good works like brand new my old solenoid was original MB just blow and throw code A9 short circuit but really this fix the problem 1👍🏻🙏
Thanks for letting me know you had success Chifoman! I'm glad my picture taking and posting paid off.
Hello niL - I used the GPD6512810 from RA but I'm not sure that I would recommend it. For my GL320 anyway the clutch pulley wasn't right (8 vs 7 ribs if I remember right) but it completely depends on your exact model etc. I just reused my old clutch as it was still okay after fixing the "spin free" function that allows the pulley to spin when the compressor fails. Be careful to drain and then refill the compressor with the right amount of compressor oil (correct amount is likely written on a sticker on the front clip). I failed to drain my compressor and thus it has too much oil in it significantly reducing it's performance when its hot out. So I have some work to do pretty soon.
Hello everyone - long time reader, first time poster.
I picked up a 2009 GL320 two months ago and the AC compressor failed after 3 days of ownership. Being cheap I set out to fix it myself. Diagnosis showed that the AC compressor was actually locked up and thus, at a minimum I needed to replace the compressor in order to pressurize the system to find other potential leaks etc. I bought an aftermarket (but new) compressor from Rock Auto. Install went fine but once hooked up I kept getting an error (P9006 AC compressor short circuit). The cabin fans would sort of cycle up and down as the ACC repeatedly tried to start the compressor but to no avail - the AC simply wouldn't work. I hot wired the "refrigeration/AC control valve" with an external 12 V power supply and the AC system worked like a champ (super cold). So off to the forums I went. I read a bunch but the most common story was that aftermarket compressors simply don't work and I would need to buy the Denso branded version. I also read that I needed to complete and "AC compressor adaptation" via SDS which I don't have. I wasn't satisfied with these answers as I really didn't want to empty all the R134a out of my system again and I had a hard time believing that AC compressors were really different enough to need "adaptation." Luckily, I finally considered replacing the AC control valve with the control valve in the cratered compressor I removed. In doing so I pretty much destroyed the old control valve. Here is what it looked like after removal and non-reversible disassembly:
AC control value disassembled.
What I found out via disassembly is that there is a diode in parallel with the solenoid winding. This diode effectively clamps the reverse polarity voltage present when the coil is discharging (i.e. turned off). This made me wonder if, for some odd reason, the compressor I bought didn't have a diode in the same location. A quick visit to Polar Bearings excellent "RCV" website showed that there are two visually identical parts but one has a diode and one doesn't. Why Audi, BMW, etc. don't use a diode whereas MB does is beyond me (thanks for making these cars hard to work on!) but I was sure this was my problem. I dug out the diode from the disassembled control valve:
Note: I used this crappy diode because I didn't have a better replacement handy (with Radio Shack going out of business and all electronic parts are always a few days shipping away). I am quite sure that any schottkey diode (e.g. 1N5817) should suffice.
I then soldered in the diode to the spare wiring harness I had on my cratered compressor:
And here is the final form before installation:
Final form with heat shrink
Note - the big round crimp terminal is to provide the necessary ground - the stock ground connection is inaccessible without removing the compressor which I didn't want to do.
I installed the modified wiring harness, zip tied the old wiring harness out of the way and fired it up. It has worked perfectly for the last week, no more errors, no need for "adaption", no requirement to buy a "Denso" branded compressor.
Obviously, the "right way" to fix this issue would be to install the correct "with diode" control valve - but again this requires removing all R134a and somehow getting the control valve out (I had a very hard time with my "scrap" compressor).
All this trouble is caused by the lack of a 5 cent part. It took me quite a while to figure this out so I'm hoping that this post helps some struggling with the same or similar issue. I assume this fix would apply to all GLs (the early ones at least).
Best
your post is life saver I have the exact issue with my gl450 . I bought so many control valves evacuated replaced same crap till I found ur post and indeed went on the link you provided and bought the cv with diode just finished replacing it and worked like champ thank you very much your life saver !!
I have been having this same issue on ML for the longest time. I have changed the solenoid valve a couple times and nothing fixed the problem. There is apparently a TSB that involves updating the AAC firmware to a certain revision and also connecting the ground wire that is terminated on the compressor mounting bolt to the Chassis.
This makes me wonder if in the software update they changed to not detect the diode and for added safety add a more solid ground.
I was going to just run a ground wire and see if it solved my problem but Now I will also add a diode and see if that fixes it.
ji...2001 - I haven't heard of a service bulletin on this issue but I wouldn't be surprised. One thing I have been meaning to provide an update on is that, on some aftermarket compressors, there actually is a diode included in the wiring harness (think of the manufacturered version of what I did with my modified harness). I found this out looking at a harness I had laying on my bench (I was cleaning my bench off). I felt a little lump in under the wiring harness protective cover and, cutting it open, sure enough there is a diode in there. This diode was a 1N400X series diode which is for rectification purposes. So, I can only guess that this is actually the wrong type of diode for the application since running a schottky diode resolves all AC errors (P9006). So, to provide an update, it appears that it isn't strictly the absence of a diode but that some of the aftermarket compressors don't have the right type of diode. For those that think all diodes are the same I'm sure this is confusing but a schottky diode can switch on and off much faster than a plain jane 1N400X series diode (meant for rectifying 60Hz for power supplies etc.) I don't remember what frequency the PWM of the compressor control is but it is probably about 1kHz thus the need for the faster diode.
I must commend your intelligence!!!Thank You for this informative post coz I have been trying to figure how to fix this problem without having to go to the dealership!!I have had several local mechanics change the compressor all to no avail!!At the point of seeking mine which I indeed love the driving aside this AC problem.
To your solution,do you mind making a sketch of the whole process coz I am not a Physicts but a technical person!!!O mean drawings on where the Diode is attached to with label!!!
ji...2001 - I haven't heard of a service bulletin on this issue but I wouldn't be surprised. One thing I have been meaning to provide an update on is that, on some aftermarket compressors, there actually is a diode included in the wiring harness (think of the manufacturered version of what I did with my modified harness). I found this out looking at a harness I had laying on my bench (I was cleaning my bench off). I felt a little lump in under the wiring harness protective cover and, cutting it open, sure enough there is a diode in there. This diode was a 1N400X series diode which is for rectification purposes. So, I can only guess that this is actually the wrong type of diode for the application since running a schottky diode resolves all AC errors (P9006). So, to provide an update, it appears that it isn't strictly the absence of a diode but that some of the aftermarket compressors don't have the right type of diode. For those that think all diodes are the same I'm sure this is confusing but a schottky diode can switch on and off much faster than a plain jane 1N400X series diode (meant for rectifying 60Hz for power supplies etc.) I don't remember what frequency the PWM of the compressor control is but it is probably about 1kHz thus the need for the faster diode.
I guess then I first need to check if my valve came with any type of diode. If it did, then I guess, I will either have to change the valve out with the one that has the correct diode, or get one without the diode and add a diode like you did.
I have found that the aftermarket compressor does not come with the correct pressure valve that Has a built-in diode .
The way to find out if this is the problem is very simple make sure your AC is completely charged find a way to access the connector for your AC compressor while your engine is running disconnect AC compressor for about 20 seconds as soon as your Fan comes on plug the AC compressor back up. If your AC comes on and it works fine your problem is the compressor. (once the vehicle is turned off and started back up the compressor is not gonna work anymore)
There's another thread on the same topic here: https://mbworld.org/forums/gl-class-...de-9006-a.html with a fix that involves adding a diode to a more accessible spot than at the compressor. My A/C works 100% of the time after adding the diode.
I have a replacement compressor, although it was done by a MB dealer, so it appears to apply to MB compressor as well as aftermarket units.
I had same problem after installing a new non Denso compressor. It would work if I use my Obd computer to turn on compressor but otherwise due to detected �short� would not turn on normally. I had a 1N4001 diode from some other project. I soldered it as described but at top of the engine. The single wire signal to compressor runs near the power steering fluid. I took a bit of the shielding off and soldered the diode there. Note you need a very good Clean contact or it won�t work.
i then used the obd computer to initialize the compressor. That I believe allowed it to vary the voltage in response to cooling demand. Before that it would stay 100% on.
Well, I followed the directions after buying a diode at Radio Shack (I can provide part numbers and photo of install if anyone would like) and instantly my compressor came to life. This is after Mercedes quoted $1800 to repair and could not find the problem with a scan. Second local mechanic (really good guy) could find the same 9006 code with his SnapOn scanner and was wondering if there were differences between the aftermarket compressor and the Mercedes...he was on the right track.
So, the $.54 diode was installed "up top" and allowed me to add the freon and get the AC back to spec. Saved me $1800. I think my wife should write me a check. I owe the original poster a really good beer.
Saved me $1800. I think my wife should write me a check. I owe the original poster a really good beer.
I agree with that. I'm constantly saving money from all the great contributions shared here and I just reward myself by buying more tools. She never questions that expense when she knows a few bucks spent at HFT have helped me save a ton.
2009 GL450 Had codes for compressor has a short circuit. Installed aftermarket compressor, no good. Replaced with DENSO unit, BAM, works 100%. Also, the a/c compressor break in option isn't necessary to see if the A/C works after replacing DENSO unit. It will work regardless. But I have a Snap-On Zeus and took 2 tries to get it going. Had to erase codes first, then make sure car is on and A/C is on blast Cold. Thanks to everyone!
Hi , I get code 9007 open circuit to ac compressor so I don�t suppose the diode will help my problem but can someone please tell me where the power comes from ? control module?can I get a wiring diagram I have searched but haven�t found anything legible. Thanks
Hi, folks. I performed this repair today on my 2009 GL320. I purchased it in the heat of the summer from a typical, sketchy used car lot outside Denver. The A/C blew ice cold on my test drive. When I came back a couple days later to pick up the car, it didn't start quite right, but then after cycling the A/C, it worked, and so I did not protest and drove away with my new problem child. As summer wore on in to August and September, I noticed the A/C would occasionally kick on and off but would generally work after a few cycles. By October, however, it was mostly not working and would not kick on.
At this point, I scanned the car with my new iCarSoft MB 3.0 tool. It came back with the 9006 error code. I checked the ground points, and those seemed fine. I then took into the local chain store to have the refrigerant checked. They told me I needed a new compressor (and condenser / drier) for $2,000. I was not persuaded, as I had read this thread, but planned on replacing at least the compressor. October wasn't that hot in Denver this year, so it sort of went on the back burner because the GL also developed a power steering around the same time as I took into this less than helpful shop. $750 later that was resolved, and I returned my attention to this issue.
I purchased the 1N4007 diodes from Amazon for $4. From Home Depot, I purchased some nice green wire for $6. As I did not want to make a permanent modification, I purchased a box of "tap splices" for $9 from the electrical section in Home Depot. The way these work is that you strip the insulation from the wire you want to tap into, then slide another wire, the green wire in my case, next to it, and then a little bit of metal bridges the two together with a plastic clip down. These were a bit of a pain to install but eventually I found the size that fit, and it seems to be snugly there. I should probably solder this joint together, but there's not a lot of room there in that wire bundle, and I don't want to drip solder into that area for fear of making a bigger problem.
I wrapped the two ends of the diode around two short lengths of green wire. The wire is flexible enough that you can intertwine the metal wire into the copper wire. I then soldered that together with my 18V Ryobi cordless soldering iron, which is a very convenient tool for me because there's always something like this broken on my cars or my pinball machines.
The last step was to use a terminal connector kit to make a ring connector to the other end of the wire.
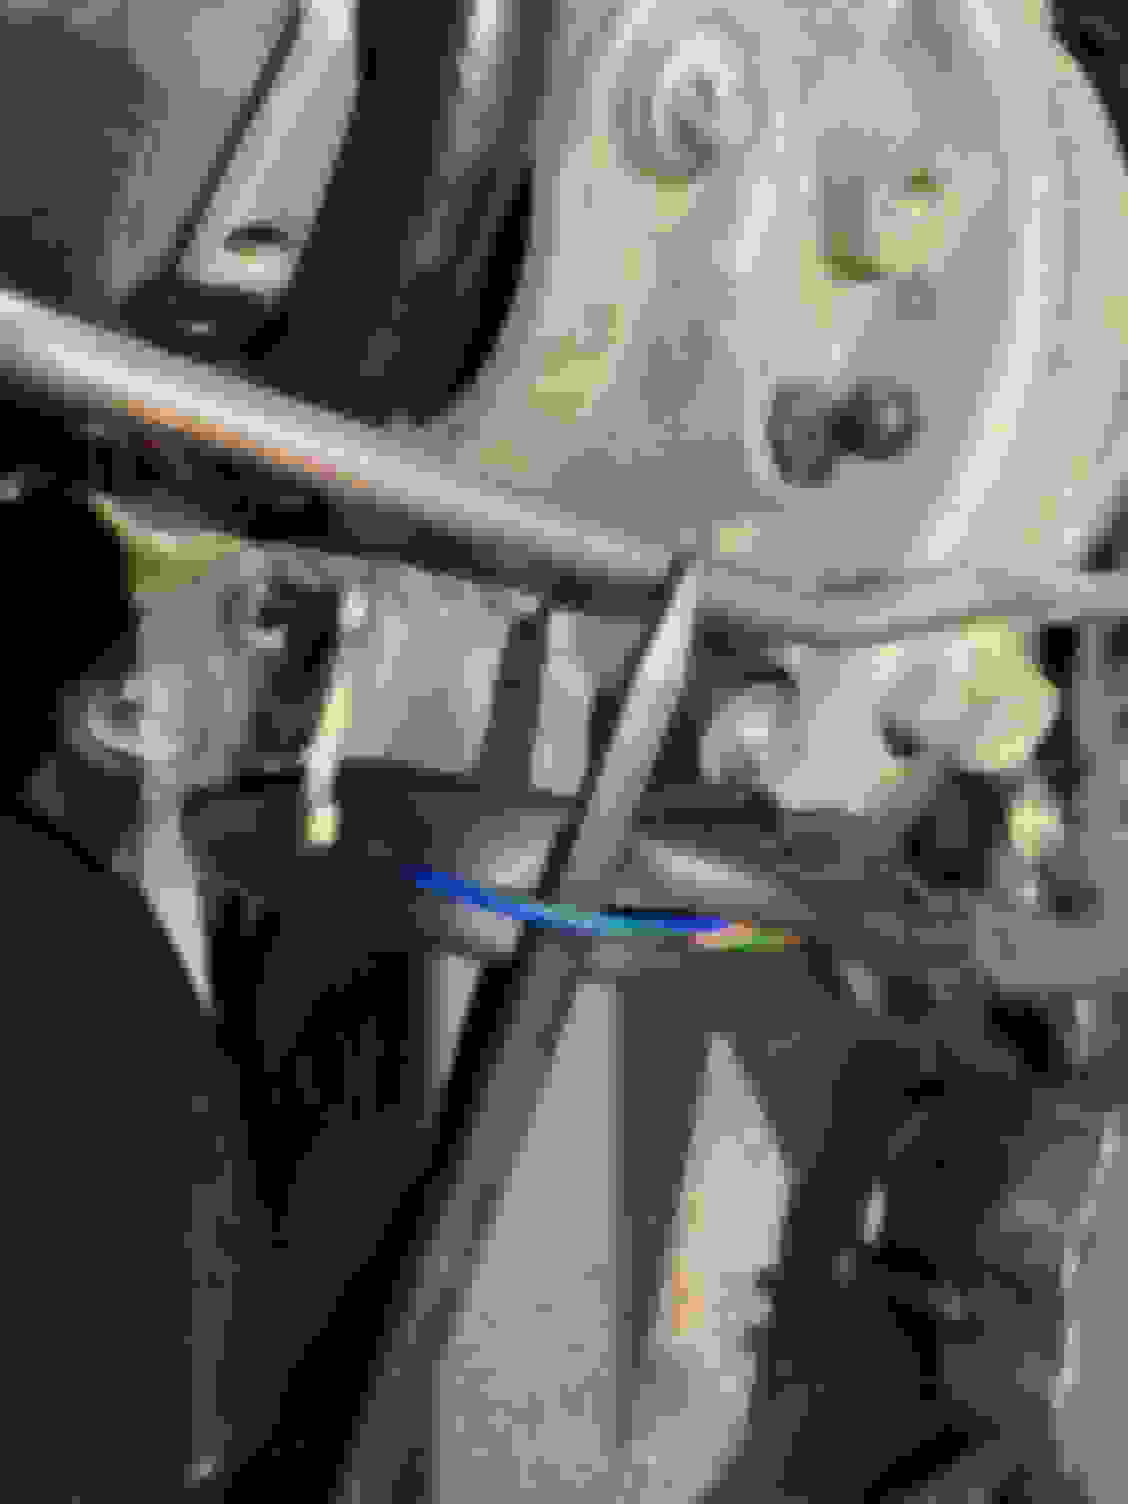
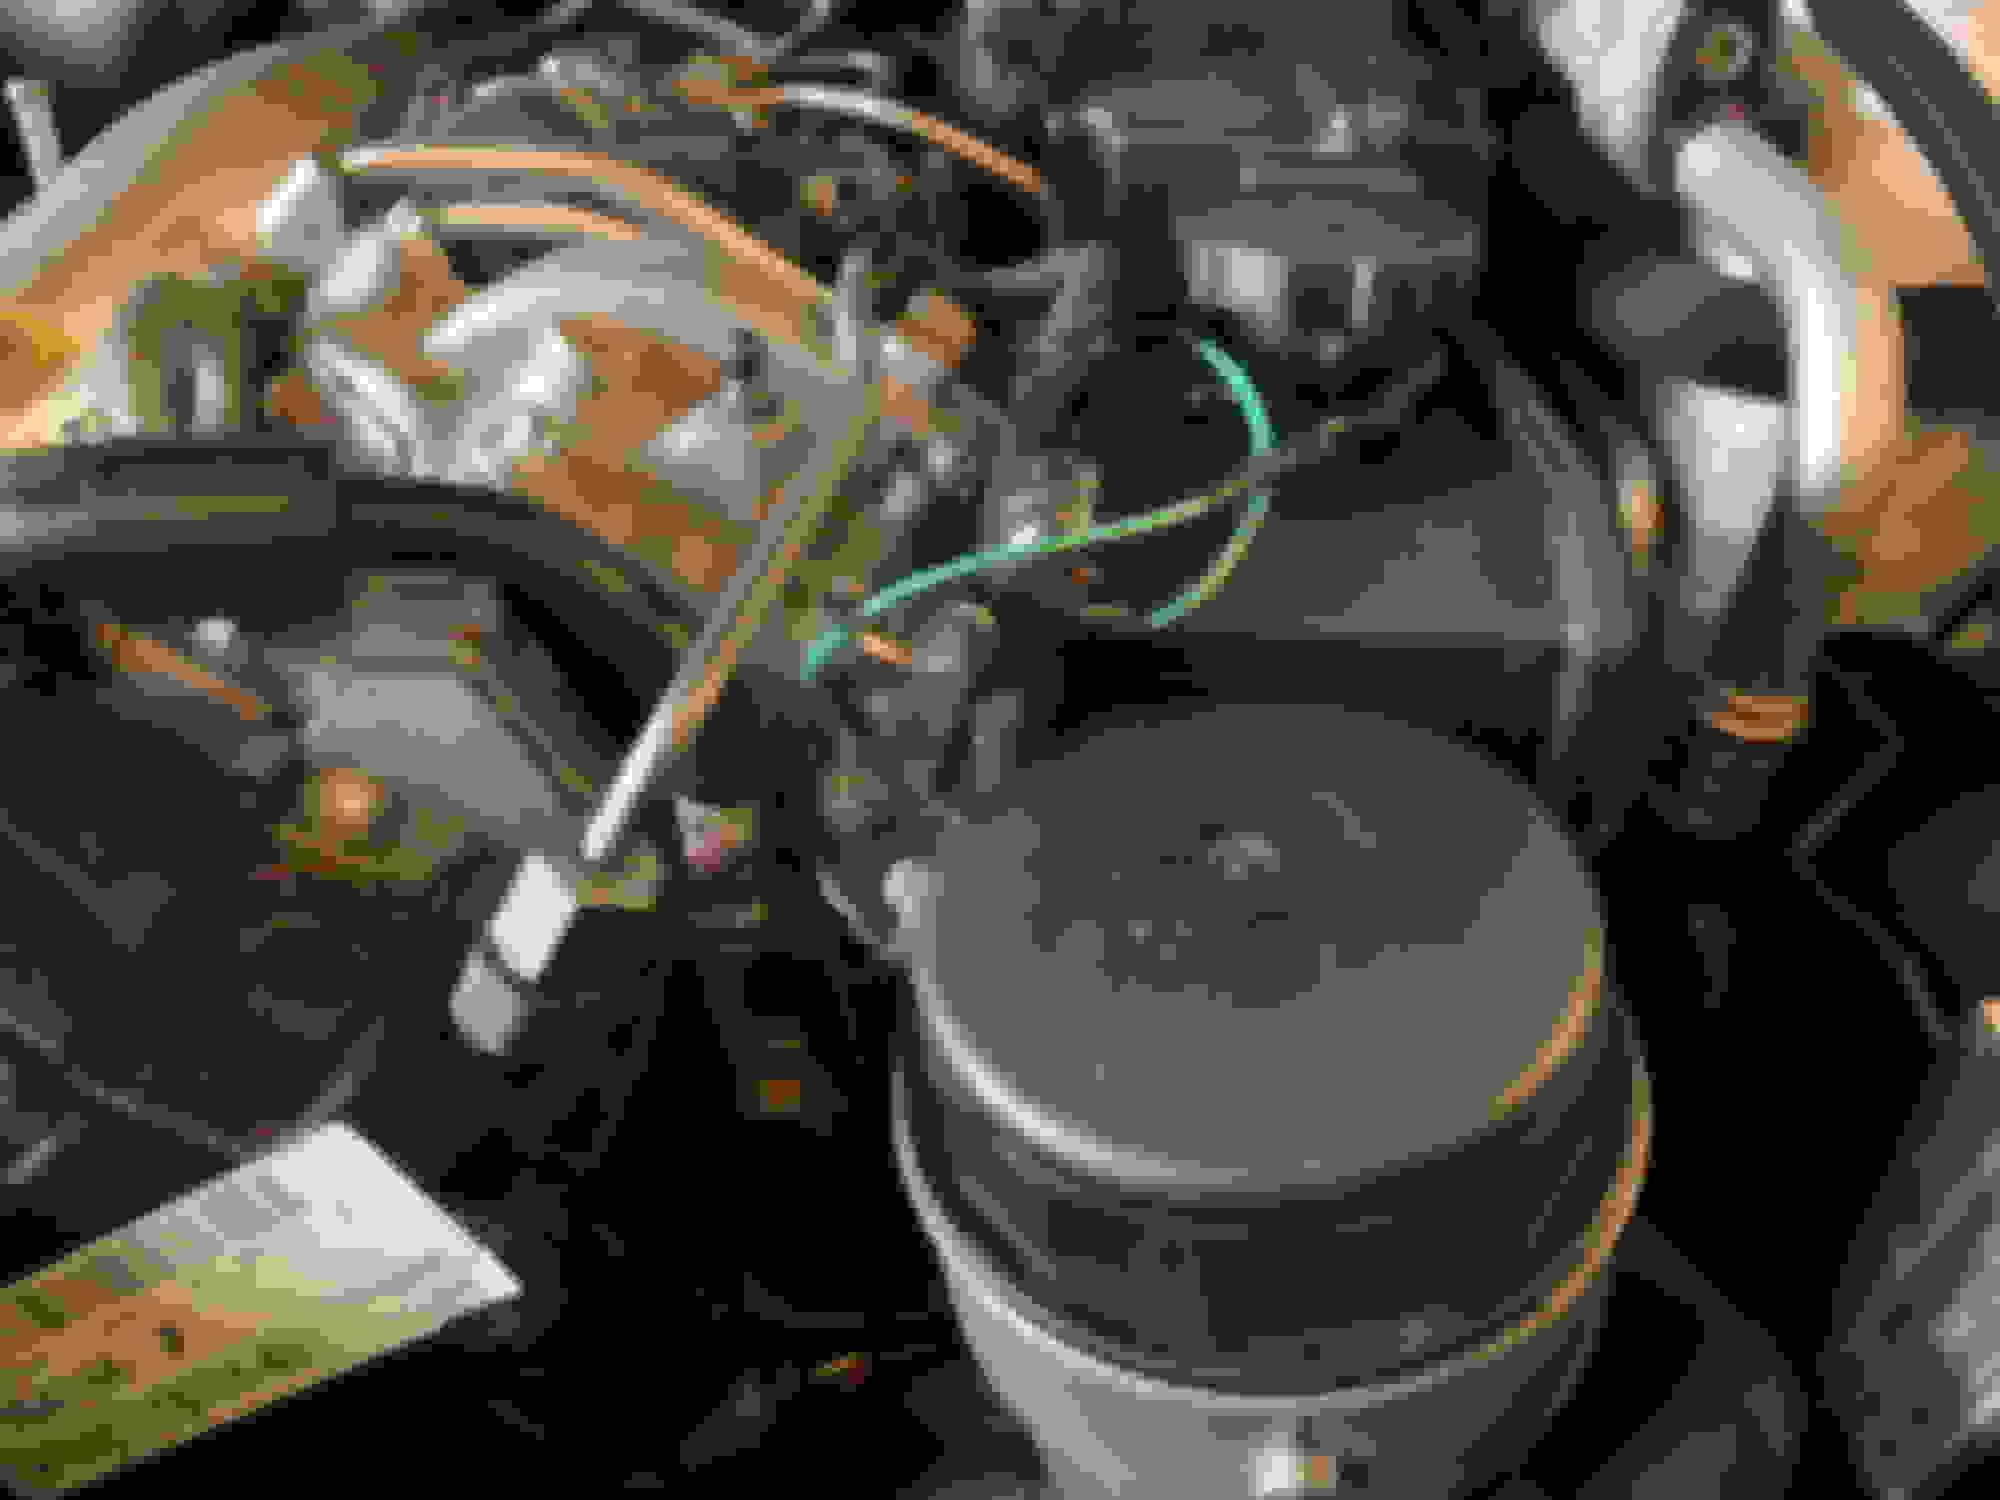
Here are some pictures that may be helpful to others in the future.
The wire bundle is located above the oil filter and on the left side of the power steering reservoir. You can see the black wire bundle on the left side of the power steering reservoir cap. Here it is cut open. You can see the blue / green wire. This is a 2009 GL320 Bluetec. I used a plastic pick tool to isolate the blue/green wire, so I could scrape off its insulation. This is a picture of the 1N4007 diode intertwined with the green wire. You can see the little ring connector that will fit over the E10 bolt. I decided to ground against this particular bolt because it is easily accessible. I don't know if it matters what bolt you choose, but I did not want to cause any leaks. My wire is sufficiently long that it can be looped around the power steering reservoir cap to keep it from getting too hot or tangled with something (hopefully). Here are pictures of the diodes, the tap splices and wire from Home Depot. This is the Terminal kit that had the ring connector. If you took the bolt with you to HD, you wouldn't need to buy so many and could save a few bucks.
Mercedes SLR McLaren 722 S Is Extremely Rare Example Modified by McLaren
Slideshow: A one-of-one U.S.-spec Mercedes-Benz SLR McLaren Roadster became even rarer after a factory-backed transformation at McLaren's headquarters.


 I agree with that. I'm constantly saving money from all the great contributions shared here and I just reward myself by buying more tools. She never questions that expense when she knows a few bucks spent at HFT have helped me save a ton.