When you click on links to various merchants on this site and make a purchase, this can result in this site earning a commission. Affiliate programs and affiliations include, but are not limited to, the eBay Partner Network.
In 2016, at 50,000 miles, the dealer replaced the timing chain which had stretched and was making a loud rattling noise at startup.
Now at 103,000 miles, the timing chain rattle at startup has come back. It happens only on cold startup after the truck sits for a while - at least overnight.
I did some research on the Internet, and found that it's possible that the new timing chain is stretched again already, or that it also could be that the timing chain tensioner has failed, or both. The failure mode is that the tensioner is supposed to retain oil pressure internally and thus keep the chain tensioned for the next startup. If the internal mechanism fails, the tensioner leaks out oil internally and relaxes after sitting for a while, so the chain loses tension at startup.
Since it only costs about $100, I decided to install a new tensioner prior to diagnosing or replacing the chain and see if the problem resolves.
When I removed the timing chain tensioner, it had obviously failed. I was also disappointed to see that it was still the original part date stamped 2011 - when the dealer replaced the timing chain back in 2016, they did not also replace the timing chain tensioner or the guides. Pretty dumb, especially since by 2016 Mercedes had already developed a new and improved tensioner much less likely to fail.
The whole procedure took less than 30 minutes.
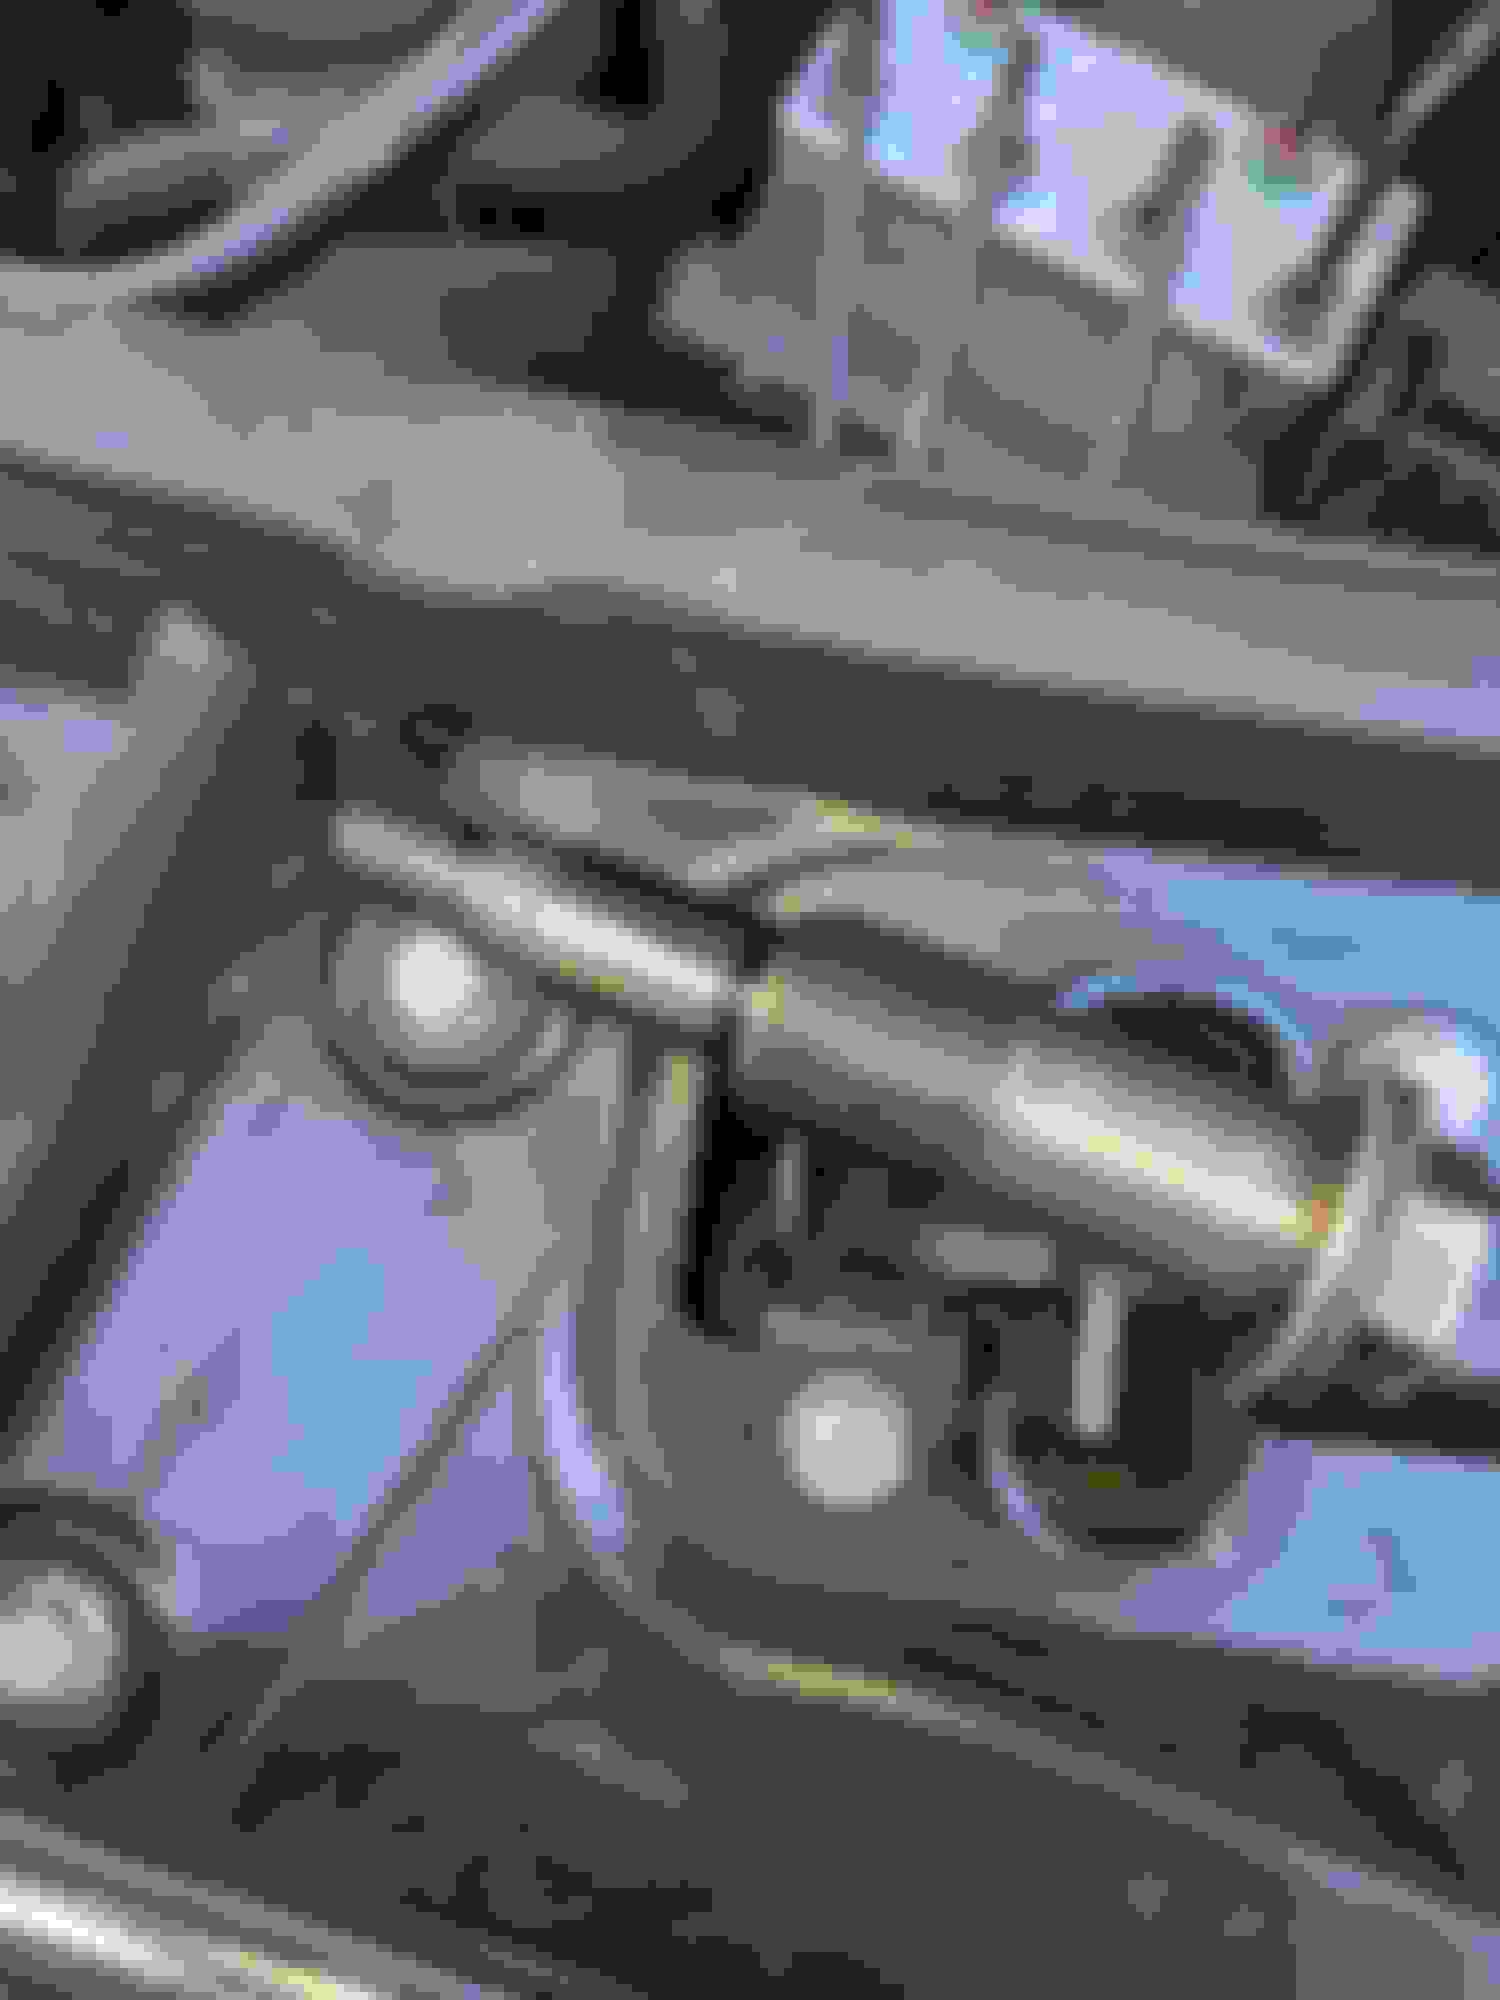
The tensioner is on the passenger side of the engine, underneath the oil filler cap. In the first photo, I left it unscrewed so you can locate it easily - it looks like a large silver bolt about six inches below the oil filler cap. To get to it, remove the engine cover, remove the passenger side black plastic air conduit from the engine air filter and loosen the wiring harness just below the oil filler cap.
Use a 22mm socket with a short extension to unscrew the tensioner from the head. Note that the tensioner tips downward from the head at about 30 degrees toward the passenger wheel well, so your socket must be slanted up and to the right.
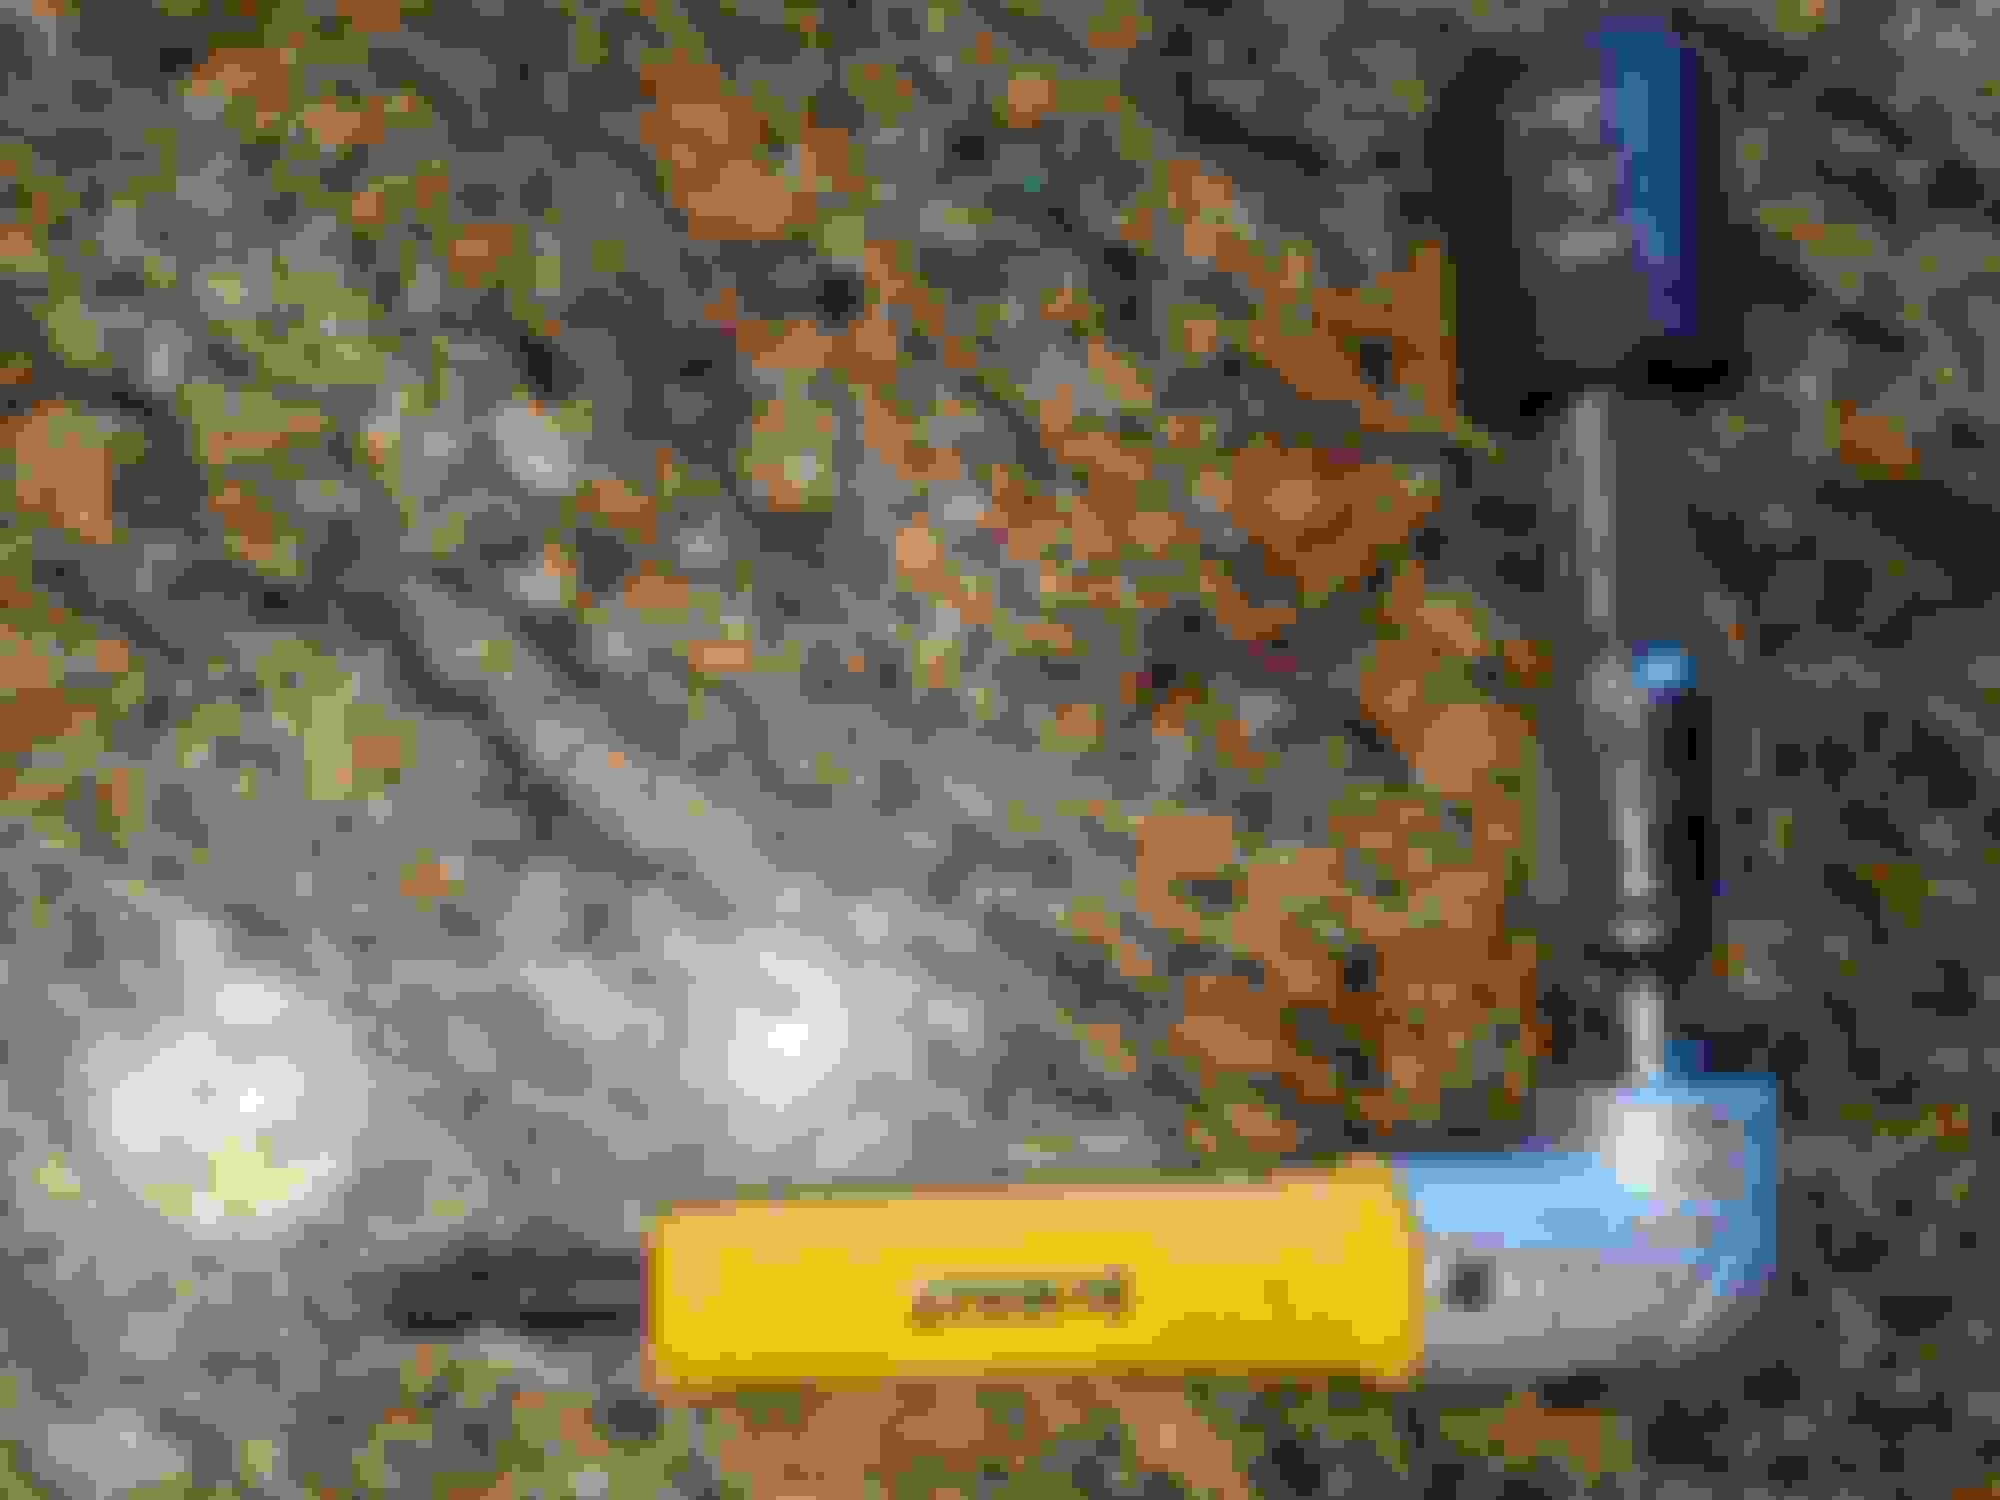
Here is the trick. The hardest part of the procedure is getting the replacement tensioner to start to thread - it has a strong spring and you need to stick it up diagonally into the hole and simultaneously push it in pretty hard while screwing it in as you need to compress the spring inside the tensioner before the threads on the tensioner will reach the threads in your head. I ended up using a right-angle drill adapter, a socket adapter and a short extension bar so I could use the palm of my left hand against the right angle adapter to push the new tensioner into the hole, and at the same time use my right hand to spin it into the threads. Once it seats and you get the threads started, it's easy to turn by hand until you need to do the final tightening with your socket wrench.
I will report back in a few days / weeks if a new tensioner solved the rattling problem.
In this photo, the tensioner is unscrewed so you can see it more easily. It is underneath the oil filler cap, and to the left of the dipstick. Look for the big silver bolt with a white gasket.
.
Here is the new tensioner going in...
Here you can see a closer up view of the old tensioner, before removal. It is stamped 642, for the OM642 engine, and has a date code. Mine was the original from 2011.
Here is the old failed tensioner. It fell apart after I removed it.
2011. So not cool.
Leaky seal means the old tensioner will collapse after it sits for a while...
This is what I Macguyvered up to make it easy to put pressure on the new tensioner to compress it up into the hole while also screwing it in. Note - do this by hand so you don't risk stripping the threads on your heads.
Good Job! I just did this while changing my chain. You actually worry me. I do not remember a gasket/washer on the new tensioner I put in... I like your idea with 90degree tool. I got lucky and after just a couple brute force attempts it caught. I will use your idea if (when) I have to do it again!
About the stamp, do you have notes from the timing chain replacement? it should say whether or not they replaced the tensioner. I thought that it is part of procedure even in WIS. Maybe it was manufactured in 2011, and sat in their parts department for 5 years?
On a separate note, the loctite of your valve cover gives me hope. I thought I had a lot of it poking out after sealing it back up! I but if that is how dealership techs buttoned her up and that is up to standard then I am golden lol.
Hi Misha - yes I have the paperwork from the dealer and they did NOT replace the tensioner or the guides back in 2015. Only the stretched chain. Lesson to me is to pay more attention on warranty work - I should have demanded they replace the guides while they had the valve cover off.
I've seen so much sloppy work at the dealer - I think they have a hard time retaining good techs. At one point I had 5 go-backs for a warranty repair with multiple failures to fix / new things they broke that they didn't notice.
Ah I see! Yea don't even get me started on that lol! I have a weird experience... I have mediocre experience at best with getting service at local dealership done. But in rebuilding my top end I went to their parts department quite a bit for obscure and quick access items, and I have found the guys to be very knowledgeable and helpful. Like the parts guys would know exactly the thing I was talking bout before they looked it up, so clearly they have experience digging in the engine... maybe when mechanics get too good they put em into parts department? =)
By the way, to the best of my knowledge, you cannot change guides without removing timing cover. And that involves dropping oil pan, which itself requires engine to be raised. The guides are held in with slide pins. I had to remove 3 on left and 1 on right to get the heads off. With the heads off I contemplated changing the guides - they looked fine but I figured since I removed some of the pins holding them I might as well. Well WIS shows the remaining pins where the timing cover is. I could not find them there so I assume they are underneath it.
Hi Misha, that is correct - but I still would have preferred the dealer to have done the complete job - chain, tensioner and guides. I think you are right that it depends what WIS says the correct repair is.
Thanks Blown - A week after the repair, I haven't heard any rattle at startup, but I've been driving the truck every day. As soon as it sits for a day or two if we still have no rattle on a cold morning startup I will declare victory and update here.
Thanks Blown - A week after the repair, I haven't heard any rattle at startup, but I've been driving the truck every day. As soon as it sits for a day or two if we still have no rattle on a cold morning startup I will declare victory and update here.
If it works, I would recommend that everyone with an OM642 engine proactively upgrade their tensioner. Could be faulty tensioners that are causing the failures and short lived timing chains after the first replacement. MB and their suppliers are very consistent. If yours is faulty, all the others are likely faulty too.
Two months in, I can report that this fix has successfully stopped my chain rattle noise at startup.
Most recently the truck sat for 10 days, and even then no rattle upon startup.
Reminder, in my case I have a 2011 GL350 with 110,000 miles on it, with the timing chain already replaced once at around 55,000 miles. The dealer did not replace the tensioner when they replaced the chain. Recently the timing chain rattle at startup came back. I replaced the original tensioner which clearly had failed. The new tensioner stopped the rattling noise immediately, and it has not come back since, in 2 months...
Thanks for the information regarding chain tensioner, very helpful.
If I could pick your brain just a little, the installation procedure of the new tensioner, was it just screw it in?
Or did you have to start the harmonic balancer at 40 degress, then after fitment, rotate the engine backwards via the balancer bolt with a torque wrench set to 80 Nm, while at the same time holding the RH side cam shaft, (at the rear of the engine with a t-55, t-60 torx). Then rotating the engine by hand a few revolutions forward? This apparently, unlocks the tensioner which then applys pressure to the chain guide for first start.
Sorry for the long winded post.
I have seen videos of other MB tensioner installs with this procedure.
I�d like to know the answer to this also , will the new tensioner not just screw in and maybe lever it to it�s lengh through the oil filler cap? Or would that be a bit harsh ?
I�d like to know the answer to this also , will the new tensioner not just screw in and maybe lever it to it�s lengh through the oil filler cap? Or would that be a bit harsh ?
My uber-sophisticated German procedure was:
A) unscrew the old one
B) screw the new one in
It rattled for about two seconds on first startup while it pumped up, and hasn't made a noise since.
A) unscrew the old one
B) screw the new one in
It rattled for about two seconds on first startup while it pumped up, and hasn't made a noise since.
I was hoping for something simple like that 😀 so you didn�t prime or extend your new one first before installing ? I�ve got a 2 second rattle on start up so thought I�d try a tensioner first before going down the chain route , so if I install the tensioner and start the engine it will push the tensioner to its full lenght under its own steam ?
Ive seen some post where they want you to crank the engine anti clockwise to engage the tensioner which seems a bit of a fart on 😂
thanks for getting back to me , much appreciated 👍
If you wish, you can insert the tensioner in a cup of oil and manually pump it up before you install it, that may make it harder to screw in as it will be longer.
In any case, once it is installed, oil pressure within your engine pumps the tensioner out.
If your chain is severely stretched, it's probably better to pump it up before installing. In my case I had already replaced the chain and I just had a failed tensioner...
I suspect the official German procedure is to protect you from something catastrophic like skipping a tooth when the new tensioner is installed but not yet extended, which could destroy your engine.
Yes I was thinking of extending it first as I�m sure it will go in , it�s on an s class so I�m hoping i will be able to get to it by taking a few bits off and getting it in through the wheel arch , I�m just hoping the start up rattle stops when I�ve done is as I really don�t fancy doing the chain 🥴 the last time I did one was on a c200 komp that had slipped and bent the valves , and that was bad enough 😂
thanks for your info bud , been a big help 👍

 12-21-2020 | 05:59 PM