This is crosspost from the W164 forum. While there are some posts here about retrofitting projectors, I couldn't find a how to with pictures when I did mine, so I figured it was of value to post in this forum as well. The procedure is the same for a X164, although I don't remember the issue with the locating pins on my GL. Not sure if that is a GL/ML thing or a year thing (2011 vs. 2008). In any case, otherwise, this will significantly improve your lighting in a X164. Both of my cars had factory bi-xenons, but I believe factory halogens can be done in a similar fashion (maybe even without opening the lights?) and doing so is highly encouraged over slapping a HID or LED bulb in the stock halogen projectors and calling it a day. You'll have better lighting and produce less glare for oncoming traffic. I forgot to mention it in the post, but getting the headlights off the car requires removing or at least partially removing the front bumper cover.
I'm a long time X164 owner that picked up an 11 ML550, and decided to retrofit the same projectors into my headlights that I have in my 08 GL550. The stock bi-xenon projectors were replaced with EVOX-R projectors and the high beams were replaced with Morimoto HB projectors. It is a pretty easy retrofit. The lights are sealed with butyl and open easily after baking at 240F for 12 minutes, the EVOX-R projectors mostly bolt in and the HB projectors drop right in. it is a great headlight to retrofit - the lights open and reseal easily and the projectors are entirely inside the sealed stock headlight housing, so sealing the projectors isn't an issue. The headlights opened up with the stock projector and high beam bowl (previous owner added the LED parking bulb):
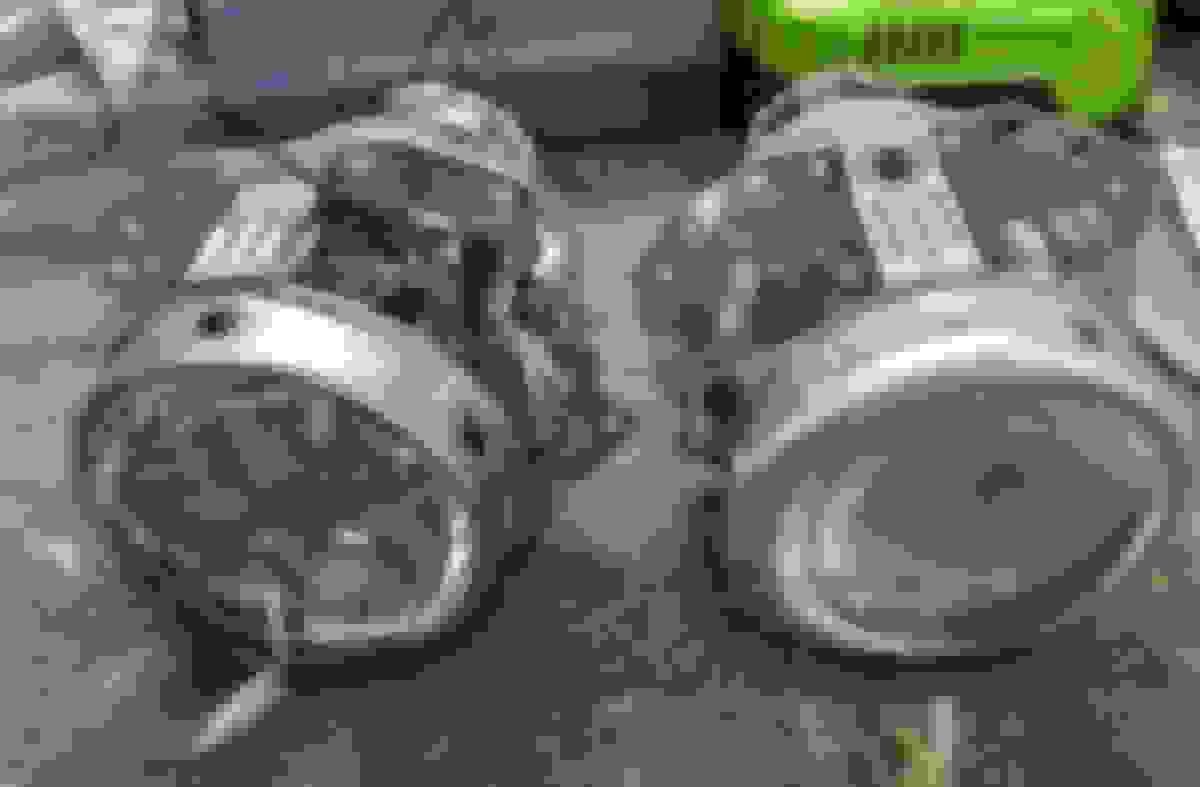
Stock projector on the right, EVOX-R on the left. The EVO comes with a clear lens, the stock lens has fresnel, which diffuses the light output somewhat and makes the cutoff less sharp. Also notice how much shinier the bowl is on the new projector, which is the main reason they have much better light output. The Hella projectors MB uses are known for losing their reflectivity over time. These weren't as bad as the ones in my GL which had output comparable to an old sealed beam headlight by the time I replaced them. The stock projector is deeper front to back, which requires a little extra work if you want to keep the stock surround trim ring (you do for appearance reasons). The stock projectors are attached with four of the torx head screws MB uses everywhere. Undo them, unplug the bi-xenon shutter cable from the housing and remove the projectors from the housings:
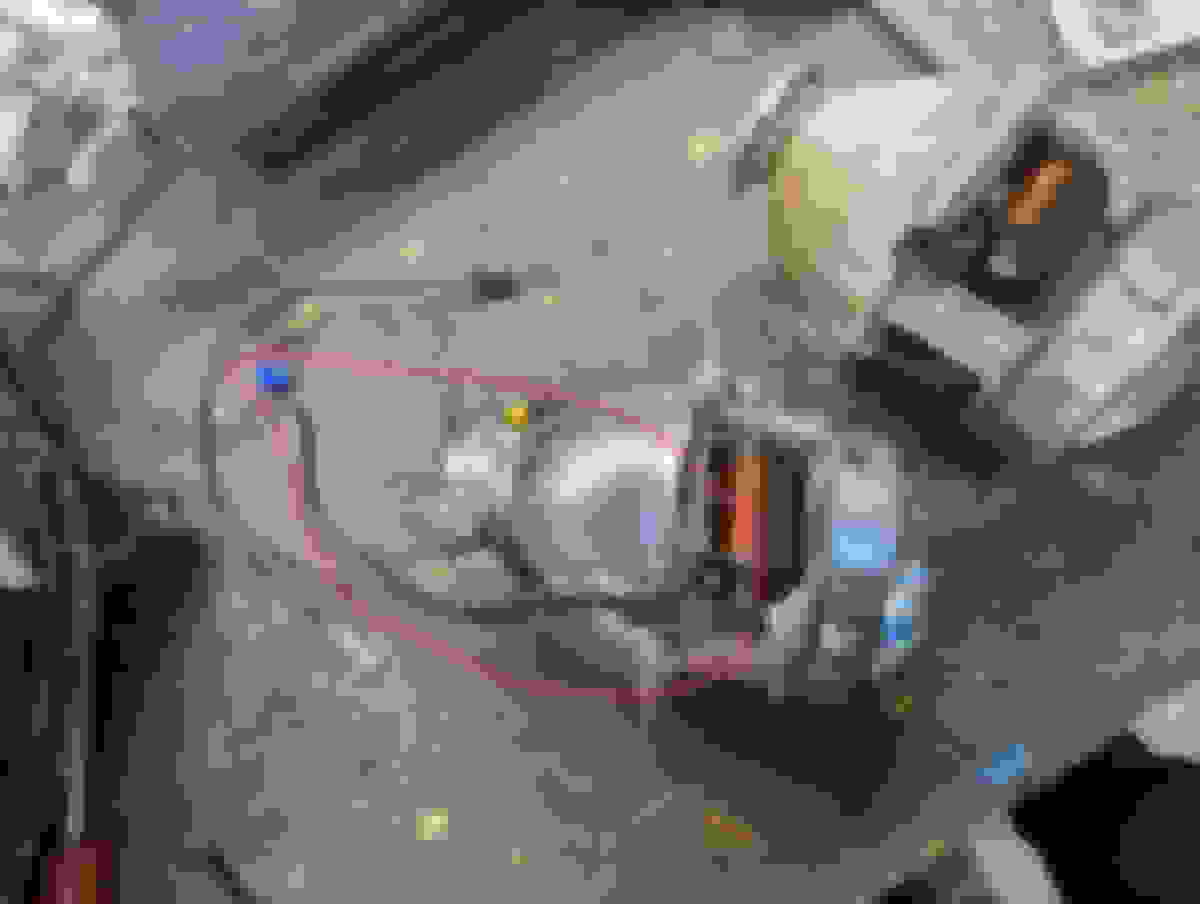
On the stock projector, there is a cable that attaches to the base of the projector and connects inside the housing with a blue connector just inside the opening at the back of the headlight housing to open and close the shutter on the projector that switches between low and high beam. Disconnect that cable from the stock projector, connect it to the new projector and plug it into the headlight housing once the new projector is installed or your bi-xenon projectors will just be xenon projectors:
The EVOX-R mostly bolts in, but requires a couple of minor modifications. First, the connector for the bi-xenon cable referenced above interferes with the mount it fastens to and requires some grinding at the bottom of the projector mount. I meant to take a picture without the projector in place but evidentially forgot. The location is circled in the picture below. It will be obvious when you try to put the new projector in place. I just used a dremel and it took all of 20 seconds. Be careful with the dremel though because there are electronics in the base you don't want to dig into. Second, there are some locating pins at the top of the mount that fit into holes on the frame of the stock projector and there are not corresponding holes in the frame of the EVOX-R to accommodate them. Again, the dremel provided a quick fix. I only ground down the pin section and left the "base" because of the third issue that left the projectors not sitting flush against the projector mount.
Third, while the upper part of the EVOX-R projector has holes in a location that matches the mounting holes on the projector frame (red circle) , the lower mounting holes line up with holes on the EVOX-R that are already filled with a small machine screw that is used to attach the projector lens to the projector (blue circle). Remove the stock machine screw and pass the mounting screws through the frame into the mount. However, the part of the frame that the stock machine screws fasten into has a "bump" that projects enough on the backside of the projector frame that keeps the projector from sitting flush against the mounting frame. To keep the projector aligned properly (parallel) relative to the mounting frame, put two thin washers between the projector and the frame at the upper mounting screws. Upper mounting screws circled in red with two washers and lower with the bump circled in blue. (the headlight housing is upside down in the picture):
Finally, because the EVOX-R projectors aren't as deep as the stock projectors, the trim rings no longer sit in the proper location (they sit ~.5" beyond the end of the projector). I broke off the mounting "legs" and used RTV to glue the rings directly to the projectors. They are a perfect fit for the o.d. of the frame that holds the lens and have stayed in place for 4 years on my GL. Visible in the next picture.
The Morimoto HB projectors bolt-in. To install, remove the stock bulb, insert the projector shaft through the hole (I used the supplied funnel shaped rubber gasket on the inside of the light) and tighten the nut on the threaded shaft. The only issue is that the projector comes with wires terminated with pins designed to be put into the supplied 9005 male connector (don't install until the lights are mounted because the mounting nut won't pass over the connector). The stock high beam is an H7, so you either need a female 9005 to male H7 adapter (
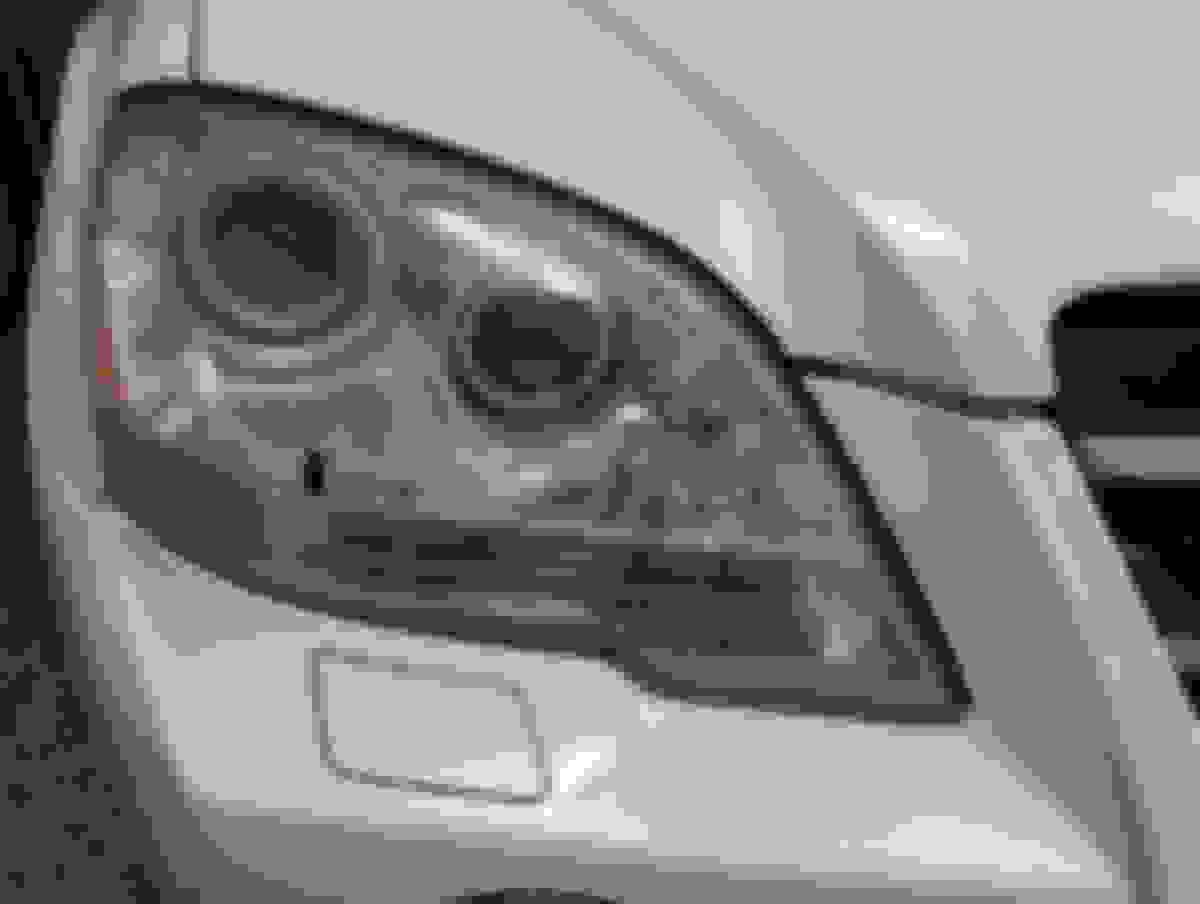
) or just replace the stock pins with spade connectors and plug them into the H7 connector. I used Mini Gatling shrouds on them to hide the projector in the stock opening. The projectors are polarity sensitive, so if they don't work, reverse the connectors. I was 0 for 2 with mine on the first attempt. The final product with the headlight cover off:
And with the covers: (yes I need to polish the headlight lens. Looked perfect at purchase - already starting to show a little cloudiness)
Low beam output. The EVO projectors have a brighter hotspot than most projectors. Some don't like it, but i do since it puts more light in front you:
And high beam:
If you've never opened up headlights before, a good how to summary:
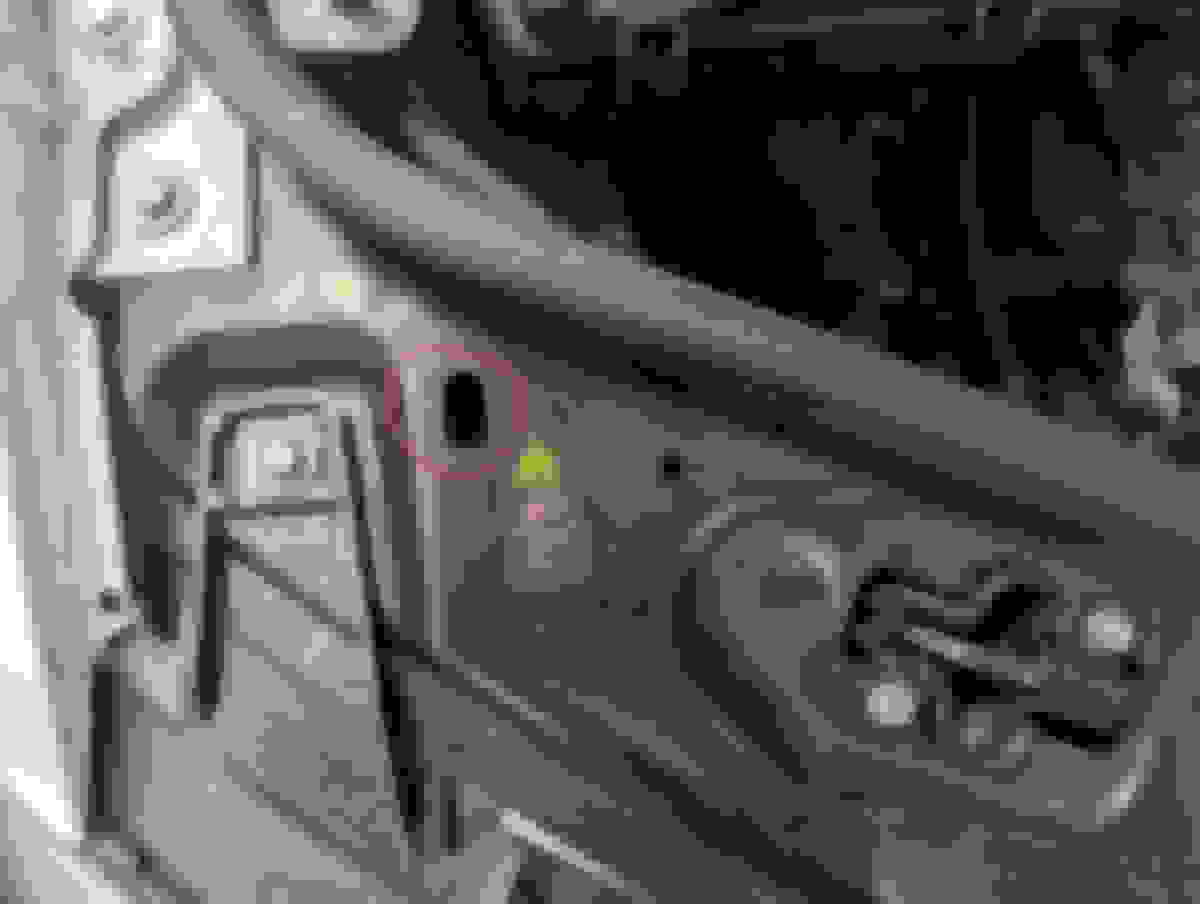
I didn't know the trick of flattening both the old and new butyl down. Results in much less residual butyl on the outside of the light after resealing. Also, once you have them installed, the projectors will probably need at least a small amount of adjustment. A 6 mm Allen through the hole up and to the left of the high voltage logo will adjust the projectors up and down:
Overall, it is a great modification. The new projectors have much better output than the old ones and have a sharper cutoff. I used a new set of Osram CBN bulbs which are a little whiter than the stock bulbs. 98% of the improvement in lighting is due to the new projectors. Putting the new bulbs in the old projectors was only marginally better - the bowls lose their finish over time and the lights lose quite a bit of output. The improvement from the HB high beam projectors isn't huge, but they provide a better match in light temperature to the bi-xenons, and they're not that expensive.
Parts needed are:
EVOX-R projectors (available elsewhere but LightWerkz is a great vendor): https://lightwerkz.net/collections/h...oto-evox-r-2-0 Morimoto HB projectors: https://lightwerkz.net/collections/l...to-mini-hb-led Mini Gatling Gun shrouds: https://lightwerkz.net/collections/p...ni-gatling-gun A set of D1S HID bulbs. You can reuse your current bulbs, but they lose output over time too and are probably due for replacement if you have a W164 (use Osram or Philips - you get what you pay for with HID bulbs) Morimoto retro rubber to reseal the light The 9005/H7 converter cable referenced above unless you want adapt the stock leads on the HB projector
Thank you so much @EWT for posting your process and including all the parts. I ordered everything from above from Lightwerks and after watching a few videos on baking the headlights in a cardboard box, I took the plunge and followed your update in my 2008 GL320. The results are DRAMATIC! So dramatic that I realized I have dynamic curve lighting within 3mins of the first test drive (had this truck for 45K miles and 4yrs).
1. These Morimoto HID lights are SAFE. I've been upgrading headlights in my cars (halogen European code for years) and these units are fully contained units with sharp and safe cutoffs.
2. Hardest part of this project is removing / loosening the bumper cover and reinstalling. If I were to do it over, I'd remove both front wheels, totally remove the fender liners, and totally remove the bumper cover.
3. Scariest part of this project? committing to baking the headlights in a cardboard box to remove the lens. I'm already planning to upgrade the lights in the W209 CLK320 and my MazdaSpeed Protege.
4. I made an error in assuming I could swap in LED running lights and they would work. They do not. Crap.
5. doing it next time, I'd take a little more care with mounting the hi-beam LED. I think they are a little off center.
So, for anyone on the fence, I 100% recommend doing this update.
Glad you like them. I had the same realization about the dynamic curve feature when I did my GL headlights - I didn't realize I had it until the new projectors were in. My stock ML projectors were in better shape, but there was still a big improvement with the new projectors. I couldn't get the high beam projectors centered well on my GL either even with quite a bit of fiddling. For some reason, the ML projectors centered pretty well on the first attempt. The front bumper is the hardest part - that piece that clamps the top edge of the cover to the front of the fender isn't easy to reinstall.
Glad you like them. I had the same realization about the dynamic curve feature when I did my GL headlights - I didn't realize I had it until the new projectors were in. My stock ML projectors were in better shape, but there was still a big improvement with the new projectors. I couldn't get the high beam projectors centered well on my GL either even with quite a bit of fiddling. For some reason, the ML projectors centered pretty well on the first attempt. The front bumper is the hardest part - that piece that clamps the top edge of the cover to the front of the fender isn't easy to reinstall.
looking at doing this on my 09 R320 but my only concern is how long will this retrofit last?
my model uses the HID as daytime running light which means they are on all the time
looking at doing this on my 09 R320 but my only concern is how long will this retrofit last?
my model uses the HID as daytime running light which means they are on all the time
Please advise thanks
The bulb life isn't affected by the retrofit. If you use the DRL feature, the bulbs will need replacement faster because they're on 100% of the time. You're probably losing lumens after a couple of years. Hard to say if the aftermarket projector bowls will last longer than the originals. I retrofitted my GL 5+ years ago, and the projectors still seemed to be fine when I sold it a couple of weeks ago so they have pretty good life at least.
I actually put the stock bulbs back in my GL before selling because the manual A4 I picked up cheap also uses D1S bulbs. It has a seperate incandescent bulb for the DRL feature, which is a better way to do it than running expensive HID bubs full-time.
looking at doing this on my 09 R320 but my only concern is how long will this retrofit last?
my model uses the HID as daytime running light which means they are on all the time
sorry, I question this statement. The cost for a light duty DRL is so low and to use an HID + ballast would be exorbitant- even for Mercedes. Something else must be causing the fault. I run my HID headlights every moment the car is driving and I have just replaced the bulbs after 50K miles - but only because of the Morimoto Retrofit.
the upgrade lasts forever because you are upgrading the ellipsoid projector lens.
looking at doing this on my 09 R320 but my only concern is how long will this retrofit last?
my model uses the HID as daytime running light which means they are on all the time
Please advise thanks
It will last the same amount of time because it uses the same type of bulbs. This retrofit improves light output over the stock crappy/burned out projectors but doesn't change the bulb itself. You could theoretically swap to LED projectors and they might outlive your car.
Quote:
Originally Posted by Yemiii
That option is not available on Canada model but I will double check it again
You will probably need to change the coding of your car to a US model using STAR or Xentry. Keep in mind Canada by law requires some form of DRL on all cars.
[QUOTE=Tsumi;8892228]It will last the same amount of time because it uses the same type of bulbs. This retrofit improves light output over the stock crappy/burned out projectors but doesn't change the bulb itself. You could theoretically swap to LED projectors and they might outlive your car.�
I though about the LED too but will it generate enough heat to keep ice off the headlights in winter driving?
I though about the LED too but will it generate enough heat to keep ice off the headlights in winter driving?
Depends on how heavy the snow is. For sure it won't do as well as halogen or HID. Halogen and HID lights throw out a lot of infrared light which directly heats the lens, snow, and ice, similar to how a microwave functions.
LED projectors and bulbs emit little infrared light and instead produce heat within the projector or bulb and use a cooling fan to whisk the heat away. This means the whole housing has to be warmed up in order to melt the snow. So on top of producing less waste heat due to being more efficient, LEDs spread that heat over the entire housing rather than focusing it on the lens.
For your use case, it might be better to stay with HIDs. Alternatively, you can mount a set of good amber LED fog lights for those really snowy nights. Diode Dynamics has amber LED pods with street legal fog light beam pattern that can also be backlit for DRL function. The SS3 Pro and Max power levels are capable of melting snow, but also quite expensive.
has anybody done this with halogens? I have halogens and I know you said it theoretically should work but has anybody actually done it?
I assume you mean, can you start with a halogen eqjuipped headlight and do the priojector upgrade. Yes*
need the HID ballasts and need to splice them into the regular wiring, but the headlight housing doesn't have a provision for mounting that ballast, so you need to solve that as well. If you do it this way, you also lose the "active curve" illumination controllers from the OEM bi-xenon kit, which is an extremely nice feature. Were it me, with halogens, I'd seriously look at picking up a set of bi-xenon lights and then sell my halogens after the project. You'd come out almost even and then you could take your time on the headlight project.
FYI - I am still suffering from all the warning messages and inoperative LED bulbs I used for the parking and running lights (4 total). I was leery at first because I knew this was a potential downside. So, I'd stick with a fresh set of (4) standard bulbs so you never need to touch them again.
if I went and got some bi-Xenon light housings how would I make that work with my halogen wired vehicle?
Replaced CANBUS 'parking' bulbs with Resister kits & regular LED bulbs
Quote:
Originally Posted by Diamond Dave
FYI - I am still suffering from all the warning messages and inoperative LED bulbs I used for the parking and running lights (4 total). I was leery at first because I knew this was a potential downside. So, I'd stick with a fresh set of (4) standard bulbs so you never need to touch them again.
While trying different models from SuperBrightLEDs.com and getting warranty replacements, I gave up on CANBUS bulbs for my GL450's & E55's City Light bulbs. Many actually fell apart and dropped parts inside the housings when the internal resisters melted the solder connections in the bulbs.
Nearly 3 yrs ago, I installed 194-NWCOBTW 135 Lumen COB bulbs, and installed a RL-2525K LED Marker Lamp Load Resister Kit for each CityLight bulb, and they've been working great! Nice Bright White and reliable!
if I went and got some bi-Xenon light housings how would I make that work with my halogen wired vehicle?
Not sure if you ever got the answer to this, but if X164 is anything like W251, the plugs are the same on the pre-facelift models, not sure about post facelift. There is most likely extra plug for the adaptive curve part but you can ignore that.
That said, I would recommend retrofitting your halogen headlights with HID or LED projectors rather than replacing the entire assembly with an OEM HID one. You'll get better light output and it'll cost less.
Quote:
Originally Posted by Kropf
While trying different models from SuperBrightLEDs.com and getting warranty replacements, I gave up on CANBUS bulbs for my GL450's & E55's City Light bulbs. Many actually fell apart and dropped parts inside the housings when the internal resisters melted the solder connections in the bulbs.
Nearly 3 yrs ago, I installed 194-NWCOBTW 135 Lumen COB bulbs, and installed a RL-2525K LED Marker Lamp Load Resister Kit for each CityLight bulb, and they've been working great! Nice Bright White and reliable!
I use Auxito 24-SMD 3014 chipset 194 bulbs in all my front running lights on my W251 and they've worked mostly flawlessly for years, only throwing errors about once a year or so.