


2008 ML320 CDI - Oil Cooler Seals Replacement

Junior Member

Joined: Mar 2010
Posts: 20
Likes: 1
E350, E320 Wagon, E320 CDI ML320CDI Sold, SLK350 Sold, 300D For Sale.
Startek may have some more comprehensive info as there are some numbered procedures on alldata that are either difficult to find or simply not there. Makes it time consuming to some degree, but with enough research and studying, you can fill mentally fill in the blanks as to what you can't find.
I have not used startek, $20 bucks for a days use... if you use it, get all you need in one day and you should be okay.
And correction to the above; it is the right aft and center shield and insulation that needs to be removed as opposed to the left side.
MIke
Newbie
Joined: Nov 2013
Posts: 3
Likes: 0
ml320 cdi
Newbie
Joined: Jan 2014
Posts: 10
Likes: 0
2008 GL320 CDI
Same condition at 60K
Hi. I'm new to the forum and just got a quote from the dealer for this service @ $2,200. The truck only has 60k on it and a good service history. No participation from MB corporate though the dealer did offer to participate slightly. Is this uncommon at 60K? I also just had to replace a rear air shock which was previously replaced by MB 20k ago.
This is my first MB is this what I am to expect from a build quality perspective?
This is my first MB is this what I am to expect from a build quality perspective?

Out Of Control!!


Joined: Aug 2010
Posts: 12,516
Likes: 628
From: Charlotte NC area
2019 WS222 S450 4-Matic / 2007 W211 E350 4Matic (Sold) / 2008 X164 GL320 CDI
Hi. I'm new to the forum and just got a quote from the dealer for this service @ $2,200. The truck only has 60k on it and a good service history. No participation from MB corporate though the dealer did offer to participate slightly. Is this uncommon at 60K? I also just had to replace a rear air shock which was previously replaced by MB 20k ago.
This is my first MB is this what I am to expect from a build quality perspective?
This is my first MB is this what I am to expect from a build quality perspective?
From what I can tell, it is not a build quality issue and much as an unanticipated (but maybe should have been) poor selection of seal material.
(combined with a hard to get to repair) If the cooler was not located under the manifold, it would be a 1 to 2 hour repair.
Given the nature of the failure it seems it could be as much if not more time related than mile related.

Member
Joined: Jul 2009
Posts: 122
Likes: 0
From: Mercer Island, WA
09 GL320 BTC; 07 BMW 335i
Out Of Control!!
Joined: Aug 2010
Posts: 12,516
Likes: 628
From: Charlotte NC area
2019 WS222 S450 4-Matic / 2007 W211 E350 4Matic (Sold) / 2008 X164 GL320 CDI
Newbie
Joined: Feb 2014
Posts: 1
Likes: 0
ML320cdi
Brandon you did a great job which inculde turbo clean.I changed one on my ml320 cdi in 2011 it was hard to find any information.Removing turbo exahust bolt was the hardest part. have to grind of one the bolt.it will be vary hard to get the same quailty job from some one.Ordering parts was not easy either.I instaled provent valve to catch oil from breather.I wish mercedes installed beter oil trap (Hockey puck)
MB World Stories
The Best of Mercedes & AMG

Manual Mercedes? 6 Times Sindelfingen Let Drivers Have All The Fun
Verdad Gallardo
Mercedes SLR McLaren 722 S Is Extremely Rare Example Modified by McLaren
Verdad Gallardo
8 Classic Boxy Mercedes Designs That Have Aged Like Fine Wine
Verdad Gallardo
Flawlessly Restored Mercedes 190E Evo II Heads to Auction
Verdad Gallardo
Electric Mercedes C-Class Unveiled: 11 Things You Need to Know
Verdad Gallardo
Mercedes EQS Gets A Major Update: Everything You Need to Know
Verdad Gallardo
5 Underrated Mercedes-Benz Models That Don't Get the Love They Deserve
Verdad Gallardo
Mercedes 300D Has Pushed Well Past 1 Million Miles and It Ain't Stopping
Verdad Gallardo
10 Most Reliable Mercedes-Benz Models You Can Buy Used
Verdad Gallardo
Thread Starter
Newbie
Joined: Feb 2013
Posts: 8
Likes: 8
From: Portland, OR
08 ML320CDI
Here is a list of the parts that I did that job with.
This DOES NOT include the newer seals (purple ones) mentioned in this thread. Make sure you check for the latest part number.
1 SEAL RING. 0269974348 $5.00
1 SEALING RING. 0139970045 $4.50
1 O-RING. 0209974745 $2.20
1 O-RING. 0149976445 $5.00
1 INTAKE PIPE SOCKET. 6420980037 $9.25
1 GASKET. 6421421180 $7.00
1 GASKET. 6421420681 $2.70
2 GASKET. 6421410580 $6.25
1 GASKET. 6421420580 $2.70
2 GASKET. 6421880180 $4.50
1 METAL SEAL. 6421420781 $2.90
Thread Starter
Newbie
Joined: Feb 2013
Posts: 8
Likes: 8
From: Portland, OR
08 ML320CDI
The ML hasn't leaked a drop of oil since I did this job. The swirl motor survived and I've put over 25K miles on the engine since then.
The VNT vanes continue to stick randomly (maybe once or twice a month) or when driving long, flat, low-engine-load type roads. I am keeping my eyes peeled for a good exhaust side to replace this one.
Here is a video of some of the work:
Unfortunately the go-pro died mid-job so that's all I have.
Not terrible for the first time I've ever worked on an OM642. Not as easy as my older diesels but it's do-able. The plastic pieces are annoying (brittle) and the dealer where this car lived in California had broken a bunch of wire loom pieces when they replaced the head gaskets long before I got it.
Not for the faint of of heart!

Newbie
Joined: Oct 2009
Posts: 2
Likes: 0
GL320CDI
I have an '08 GL320 with 142k miles and has started dripping puddles of oil in the driveway. Local high end indy shop quoted me $2700. Doesn't sound like they do much in the way of cleaning or change the swirl motor. I think I'm going to tackle it myself. I appears that Brandon didn't remove the fuel rails in his job, but masc243 did. Is that the case Brandon? It looks like you just pulled the fuel filter forward and removed the fuel lines? Also any tips on the bolts to the turbocharger. Definitely don't want to break any bolts.
Member
Joined: Jul 2009
Posts: 122
Likes: 0
From: Mercer Island, WA
09 GL320 BTC; 07 BMW 335i
No need to remove fuel lines. Coolant will be drained.
$2700 sounds about right. Parts along are ~$800. I was planning to DIY as well (I've done brakes, fuel filter, door lock, door handle, mirror turn signal as well as front air struts on the GL..) but at the end I still decided to leave it for dealer. Glad I made that decision. The truck has stayed at shop for 2 weeks! They also found coolant leak and a broken DEF tank heater. For the oil cooler fix, they had to redo everything after a gasket leak being found during testing on the initial job.
$2700 sounds about right. Parts along are ~$800. I was planning to DIY as well (I've done brakes, fuel filter, door lock, door handle, mirror turn signal as well as front air struts on the GL..) but at the end I still decided to leave it for dealer. Glad I made that decision. The truck has stayed at shop for 2 weeks! They also found coolant leak and a broken DEF tank heater. For the oil cooler fix, they had to redo everything after a gasket leak being found during testing on the initial job.
Last edited by rayleiwu; May 14, 2014 at 11:45 AM.
Out Of Control!!
Joined: Aug 2010
Posts: 12,516
Likes: 628
From: Charlotte NC area
2019 WS222 S450 4-Matic / 2007 W211 E350 4Matic (Sold) / 2008 X164 GL320 CDI
No need to remove fuel lines. Coolant will be drained.
$2700 sounds about right. Parts along are ~$800. I was planning to DIY as well (I've done brakes, fuel filter, door lock, door handle, mirror turn signal as well as front air struts on the GL..) but at the end I still decided to leave it for dealer. Glad I made that decision. The truck has stayed at shop for 2 weeks! They also found coolant leak and a broken DEF tank heater. For the oil cooler fix, they had to redo everything after a gasket leak being found during testing on the initial job.
$2700 sounds about right. Parts along are ~$800. I was planning to DIY as well (I've done brakes, fuel filter, door lock, door handle, mirror turn signal as well as front air struts on the GL..) but at the end I still decided to leave it for dealer. Glad I made that decision. The truck has stayed at shop for 2 weeks! They also found coolant leak and a broken DEF tank heater. For the oil cooler fix, they had to redo everything after a gasket leak being found during testing on the initial job.
What parts added up to $800?
Member
Joined: Jul 2009
Posts: 122
Likes: 0
From: Mercer Island, WA
09 GL320 BTC; 07 BMW 335i

Junior Member
Joined: Nov 2007
Posts: 57
Likes: 0
124128
Absolutely Sold/Convinced
MB V-6 Turbo-Diesels are to be avoided AT ALL COSTS (Pardon, the Bad Pun)
Sorry for Y'all's Tribulations !
BUT,This is an INsane unnecessary repair that should be picked up By the Factory !!! FOREVER MORE [As in as Long as you own the Chassis!!!]
Cheap ,Cheap,Cheap...Bean counting,Non-Engineer,carbon based life forms!!!
Sorry for Y'all's Tribulations !
BUT,This is an INsane unnecessary repair that should be picked up By the Factory !!! FOREVER MORE [As in as Long as you own the Chassis!!!]
Cheap ,Cheap,Cheap...Bean counting,Non-Engineer,carbon based life forms!!!

Junior Member
Joined: Sep 2010
Posts: 38
Likes: 1
2006 Golf TDI 2007 E-320 Bluetec
Thanks for posting the detailed instructions. I am in the process of tearing my 2007 E-320 apart to get at the oil cooler. A couple of questions.
1. Did you disconnect the coolant line at the thermostat?
2. If so, did you drain the coolant first?
3. Did you do anything special to bleed the air from the fuel lines that were disconnected?
4. Any problems getting the parts? Did you get them at your local dealer or order them online?
5. There is a black plastic tube/line that runs from the left front, across the engine to the right side then back to the back of the engine. Any idea what this is and does anything come out if it is disconnected.
I hate not having a Chilton's guide to follow, but I do appreciate folks like yourselves who share what they have learned.
It seems like I have oil leaking in through the EGR as well as a possible oil leak from the front seal at the harmonic balancer. I'll replace all. I love this car when it is running, but it has been the worst car I have ever owned, and at 54, I have owned a lot of cars. This one only has 90,000 miles on it and I have put more money into it (parts only as I do my own labor) than all the other cars I have owned combined - not including collision repair and customizing...
Thanks, Rob
Junior Member
Joined: Sep 2010
Posts: 38
Likes: 1
2006 Golf TDI 2007 E-320 Bluetec
More questions.
1. How do you disconnect the Swirl motor?
2. any tricks to getting the wire loom and fuel line on the right front side out of the way. It looks like I will have to disconnect 3 or 4 of the rubber hoses that connect to the steel fuel lines.
The intake is loose and ready to pull out except for the swirl motor. With the wire loom and fuel lines in the way, I can't take both intake halves out at the same time. So far the only casualties were two of the six bolts that hold the turbo to the exhaust manifolds. I have taken a bunch of pictures and will take more as I reassemble everything. There are quite a few hidden bolts that took a while to find that I'll point out for the next brave soul.
I did drain the coolant as it was apparent the radiator hose would have to be disconnected. The drain for the coolant is located on the right side just above a bracket for the under body trim. Get a 6 inch piece of hose to direct the coolant into your bucket, otherwise it sprays on the bracket and sprays everywhere. I am guessing a 3/16 or 1/4 ID hose would work. By the time I realized I would need it, I wasn't going to stop to look for one. I got about 6 quarts of coolant. Not much fuel when I drained the lines.


Junior Member
Joined: Sep 2010
Posts: 38
Likes: 1
2006 Golf TDI 2007 E-320 Bluetec
Thanks. I already know my oil cooler is leaking, I have everything apart except I don't know how to disconnect the swirl motor so I can take the intake manifold halves out independent of each other. Anyone? Anyone? Someone has to know the trick.
Thanks,
Rob
Thanks,
Rob
Junior Member
Joined: Mar 2010
Posts: 20
Likes: 1
E350, E320 Wagon, E320 CDI ML320CDI Sold, SLK350 Sold, 300D For Sale.
At this point you should have the fuel line that goes from the right side to the left side (looking at the motor from the front) disconnected as well as the fuel filter and the plastic housing covered wire bundle out of the way.
I'll assume the turbo is removed, EGR Valve and the intercooler silver pipe at the front of the engine.
Remove all of the bolts on the intake manifold; There are lots of them and of varying lengths. (Might want to label which size goes where, I didn't and had to take some extra time reinstalling figuring which was right).
Once you are confident all of the intake bolts are removed, you will then work the intake out by some slight prying action to brake it free from the cylinder heads Slide it aft and raise it straight up in one piece. The swirl motor will remain attached to the intake manifold when you remove it. Once the intake is removed, pay particular attention to how the levers are attached to the intake flaps; take pictures prior to removing anything. It will basically be hanging on the manifold by the levers and the plastic ball clips. Might want to order some new ball clips as they are basically two halves that press together but don't really snap fit when put together. They are secured when the swirl levers are installed to the swirl motor. Better to have a few on hand in case some of them break off.
Once the swirl motor is disconnected from the intake assembly, you can take the intake halves apart for cleaning. Large o-ring between the halves, might want to get one of those as well. It will be filled with crud from the pcv system as will the cylinder head intake ports. Prepare to get dirty.
I cleaned the intake with solvent and a pressure washer and was quite satisfied with the outcome.
The intakes on the heads were a real pain. I basically sprayed each intake with solvent and scraped what I could with a tiny screwdriver. My biggest concern was leaving chunks in the intake ports that might be sucked through the valve and into the cylinder. To mitigate this, I used my shop vac to continuously vacuum the port while cleaning and scraping. Some valves will be open and if you do this you will get some solvent down that particular cylinder. (Once all was back together, I cautiously bumped the engine a couple of times prior to starting to ensure the engine was free of fluid; this along with lots of suction on each port while cleaning. A little white smoke once started, but all was good. Also did an oil change right after the job.)
BMW Mercedes mechanic friend of mine suggested pentosin oil based on some info regarding pvc induced engine crud. I plan to change over to it this coming oil change. Once you get this apart and see all of the crud, you'll understand.
All of this info is from my recollection of the process back in nov/dec timeframe. I hope you find it of value.
Best to you,
Mike
Last edited by masc243; Jul 17, 2014 at 07:15 AM.
Junior Member
Joined: Sep 2010
Posts: 38
Likes: 1
2006 Golf TDI 2007 E-320 Bluetec
Thanks Mike. I have a diesel Golf and a Diesel F-250 also, so I am familiar with the intake crud accumulation. Actually on the F-250 it is non-existant because they don't pump the crankcase vapors into the intake the same way. I have gotten the wire loom and fuel lines out of the way, but I have run into a problem. There is a coolant valve on the back driver's side that will not come off and the hoses are impossible to remove. It has 2 bolts which have been removed but it seems to have been glued down. I even wedged a utility knife part way between the two parts but I could not get it to pop off. Latter I will attempt heating the part to see if that will soften the sealant. The hoses look like they have a quick release clip at the firewall, but it didn't want to come off either and I was reluctant to force it since it looks like it will be equally difficult to get it back together when I reassemble everything. I really love the way the car performs, but I hate the engineering. There could not have been much consideration to repairing the vehicle, which it seems to need often. Even bolt and nut sizes are oddball. The nuts for the fuel lines must be 18mm. Since I don't have an 18mm wrench, I used the closest SAE that would fit. I ran into the same issue doing the brakes when I had to locate a 16 mm socket... I am taking lots of pictures and will post them when I am done in hopes that I can create a more complete idiots guide to oil cooler seal repair. LOL
Junior Member
Joined: Mar 2010
Posts: 20
Likes: 1
E350, E320 Wagon, E320 CDI ML320CDI Sold, SLK350 Sold, 300D For Sale.
Thanks Mike. I have a diesel Golf and a Diesel F-250 also, so I am familiar with the intake crud accumulation. Actually on the F-250 it is non-existant because they don't pump the crankcase vapors into the intake the same way. I have gotten the wire loom and fuel lines out of the way, but I have run into a problem. There is a coolant valve on the back driver's side that will not come off and the hoses are impossible to remove. It has 2 bolts which have been removed but it seems to have been glued down. I even wedged a utility knife part way between the two parts but I could not get it to pop off. Latter I will attempt heating the part to see if that will soften the sealant. The hoses look like they have a quick release clip at the firewall, but it didn't want to come off either and I was reluctant to force it since it looks like it will be equally difficult to get it back together when I reassemble everything. I really love the way the car performs, but I hate the engineering. There could not have been much consideration to repairing the vehicle, which it seems to need often. Even bolt and nut sizes are oddball. The nuts for the fuel lines must be 18mm. Since I don't have an 18mm wrench, I used the closest SAE that would fit. I ran into the same issue doing the brakes when I had to locate a 16 mm socket... I am taking lots of pictures and will post them when I am done in hopes that I can create a more complete idiots guide to oil cooler seal repair. LOL
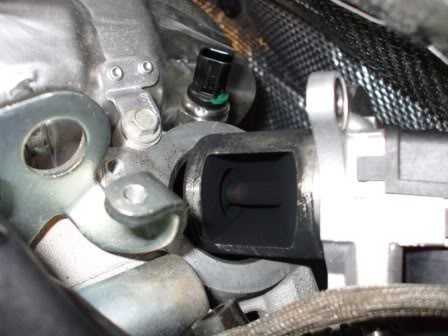
The coolant lines go to the egr system in an attempt to cool the egr gasses. It is a very tight tolerance cylindrical insert. You'll need to see if you can rotate it back and forth to free it up then lift it straight up and out. Best to remove it with as many lines still attached as you can as they are a pain to get back in. They should go to a valve at the firewall, might could get them off there. A set of hose clamp pliers works best and are available at advance auto for 10 or 15 bucks. They will have a swivel type head that can be used to get a clamp into position at weird angles.
Got me wondering if it really needs to be removed from the manifold;
I removed mine, but simply can't recall if it's absolutely necessary as long as the coolant lines and connector are removed,
Once broke free and rotated a few degrees back and forth, it should slide out though.
Hope this helps.
Here is a pic of what it looks like:
Last edited by masc243; Jul 18, 2014 at 01:19 PM. Reason: added picture


