When you click on links to various merchants on this site and make a purchase, this can result in this site earning a commission. Affiliate programs and affiliations include, but are not limited to, the eBay Partner Network.
(Note: Cross-posting this from the X166 forum, as I understand that these parts are common between X166 and W166.)
We broke the hold-down latch for the passenger-side flip-up armrest on the center console. I understand that the repair for breaking this tiny plastic piece is made by replacing the entire armrest/container unit. (Grrr. $$$.) I've seen instructions for the removal of the entire center console assembly (thanks @Plutoe and @JamesFeathers), but I'm only looking to remove the center console armrest and container segment (item #8 in the exploded view drawing of the center console assembly). I suspect that several of the other items in the center console assembly need to be removed in order to access the mounting bolts for item #8, but I've not seen anything resembling a set of step-by-step instructions for removal/replacement of the #8 unit. Can anyone assist?
Maj. Dundee, thanks so much. However, these are the instructions for the Model 164, and the center console on the Model 164 is quite different from that on my Model 166. Would you happen to have the instructions for the 166?
Regards
--Joe
Last edited by joecparrish; Jan 6, 2018 at 12:09 PM.
The part I'm looking remove/replace is the Armrest, item #8 in the attached exploded drawing. Mercedes part number 166-680-41-03-9H15, replacing older part number 166-680-08-19-9H15.
I think the instructions you just posted are for the removal/replacement of part #4, Top Cover, in the exploded drawing. Do you have instructions for R/R of part #8?
Here is the best I can do. Also, a copy of your DATA sheet is included.
Thank you!!! I'm almost sure this is the information that I needed. I will attempt the repair soon and get back to you with any questions, but I think I'm in good shape. Thank you once again.
Thank you!!! I'm almost sure this is the information that I needed. I will attempt the repair soon and get back to you with any questions, but I think I'm in good shape. Thank you once again.
--Joe
I don't own a GL so go easy on the questions. How did this appear on the W164 site?
I don't own a GL so go easy on the questions. How did this appear on the W164 site?
Repair successfully completed! Thanks again! I’m reasonably handy, but there’s no way I would have been able to complete this job without the WIS instructions you provided.
(BTW, I’ve only posted to the X166 and W166 forums. The center console assembly is identical across these lines. Not sure where you got the idea that I was posting to the W164 forum? No worries, though.)
For others attempting this same repair, the only advice I’ll offer beyond that offered in the instructions is that the lower screws on the rear console assembly are quite difficult to reinsert (because they’re going in horizontally in a blind hole) unless you have a way to hold and control the screw upon insertion. I was using a Bondhus.ball-drive hex key and had to switch over to a regular squared-off hex key because the screw kept falling off the ball drive end. Magnetic insert would also be useful here.
Thanks once again, Major. You made this possible and I saved a bundle compared to having it done at the dealership.
Regards
—Joe
Last edited by joecparrish; Jan 6, 2018 at 07:04 PM.
Any instructions available for that? Part #3 on the explosion.
One of the "sidearms" in the left cup holder on my ML 2014 seams to be jammed, doesn�t return, and I need to check it out.
I have the same damn problem with my 2013 ML 350 4MATIC. My wife used black electric tape for now to secure it. Can anyone here help on how to get it fixed rather than replacing the entire armrest console? This is the VIN # 4JGDA5HB7DA212505.
Sir, would this illustration work on a 2013 ML 350 4MATIC? (VIN: 4JGDA5HB7DA212505) Any assistance would be appreciated. I'm trying to fix the same latch issue passenger side.
Hey @joecparrish this is all incredibly helpful. When you fixed the armrest flap, did you replace the entire stowage box, or were you able to fix the latch inside of the box once you got it disassembled?
Hey @joecparrish this is all incredibly helpful. When you fixed the armrest flap, did you replace the entire stowage box, or were you able to fix the latch inside of the box once you got it disassembled?
I ended up replacing the entire box, but the broken part was just a spring. No way of knowing that (perhaps you might if you were an experienced MB tech) without pulling the entire assembly, and at that point I needed to be sure that I could get the car whole and back in service immediately. So I had the new box ready and waiting to go in.
If you can accept some downtime and/or are more price-sensitive, you might pull the box, see what is really wrong, and go from there.
Good luck
—Joe
Last edited by joecparrish; Jun 25, 2019 at 10:43 PM.
Ok, for posterity, here's what all I did to get this fixed. Mucho thanks to @joecparrish and @Maj. Dundee for their contributions above. It's incredibly infuriating when the arm rest stowage compartment lid won't stay down.
The PDFs you'll need are "Remove_install rear center console.pdf" and "Remove_install stowage compartment.pdf" above. In my case, I ordered a full replacement stowage box after reading here and speaking with my local dealer. The part was 166-680-41-03-9H15 but double check that before you order anything. Getting the screws out on the rear center console is a bit of a pain in the ***, but not as much as getting them back in. You will want a very magnetized torx driver (15 and 27 are the sizes you'll need IIRC) to get the screws out of some of the more difficult/blind locations. I lost one in the console, but I'm pretty sure the car is still roadworthy.
The electrical connections on the inside stowage box panel were difficult to remove, so I just left them -- once everything is unscrewed, you can just slide the panel through its opening on the old box and into the new one, there is no need to disconnect those, or the connections on the rear console panel (you might need to if you have the rear AC/entertainment controls). The only electrical I unhooked was the LED light on the rear that runs directly into the stowage box itself. A pair of needlenose pliers gets that unclipped quickly.
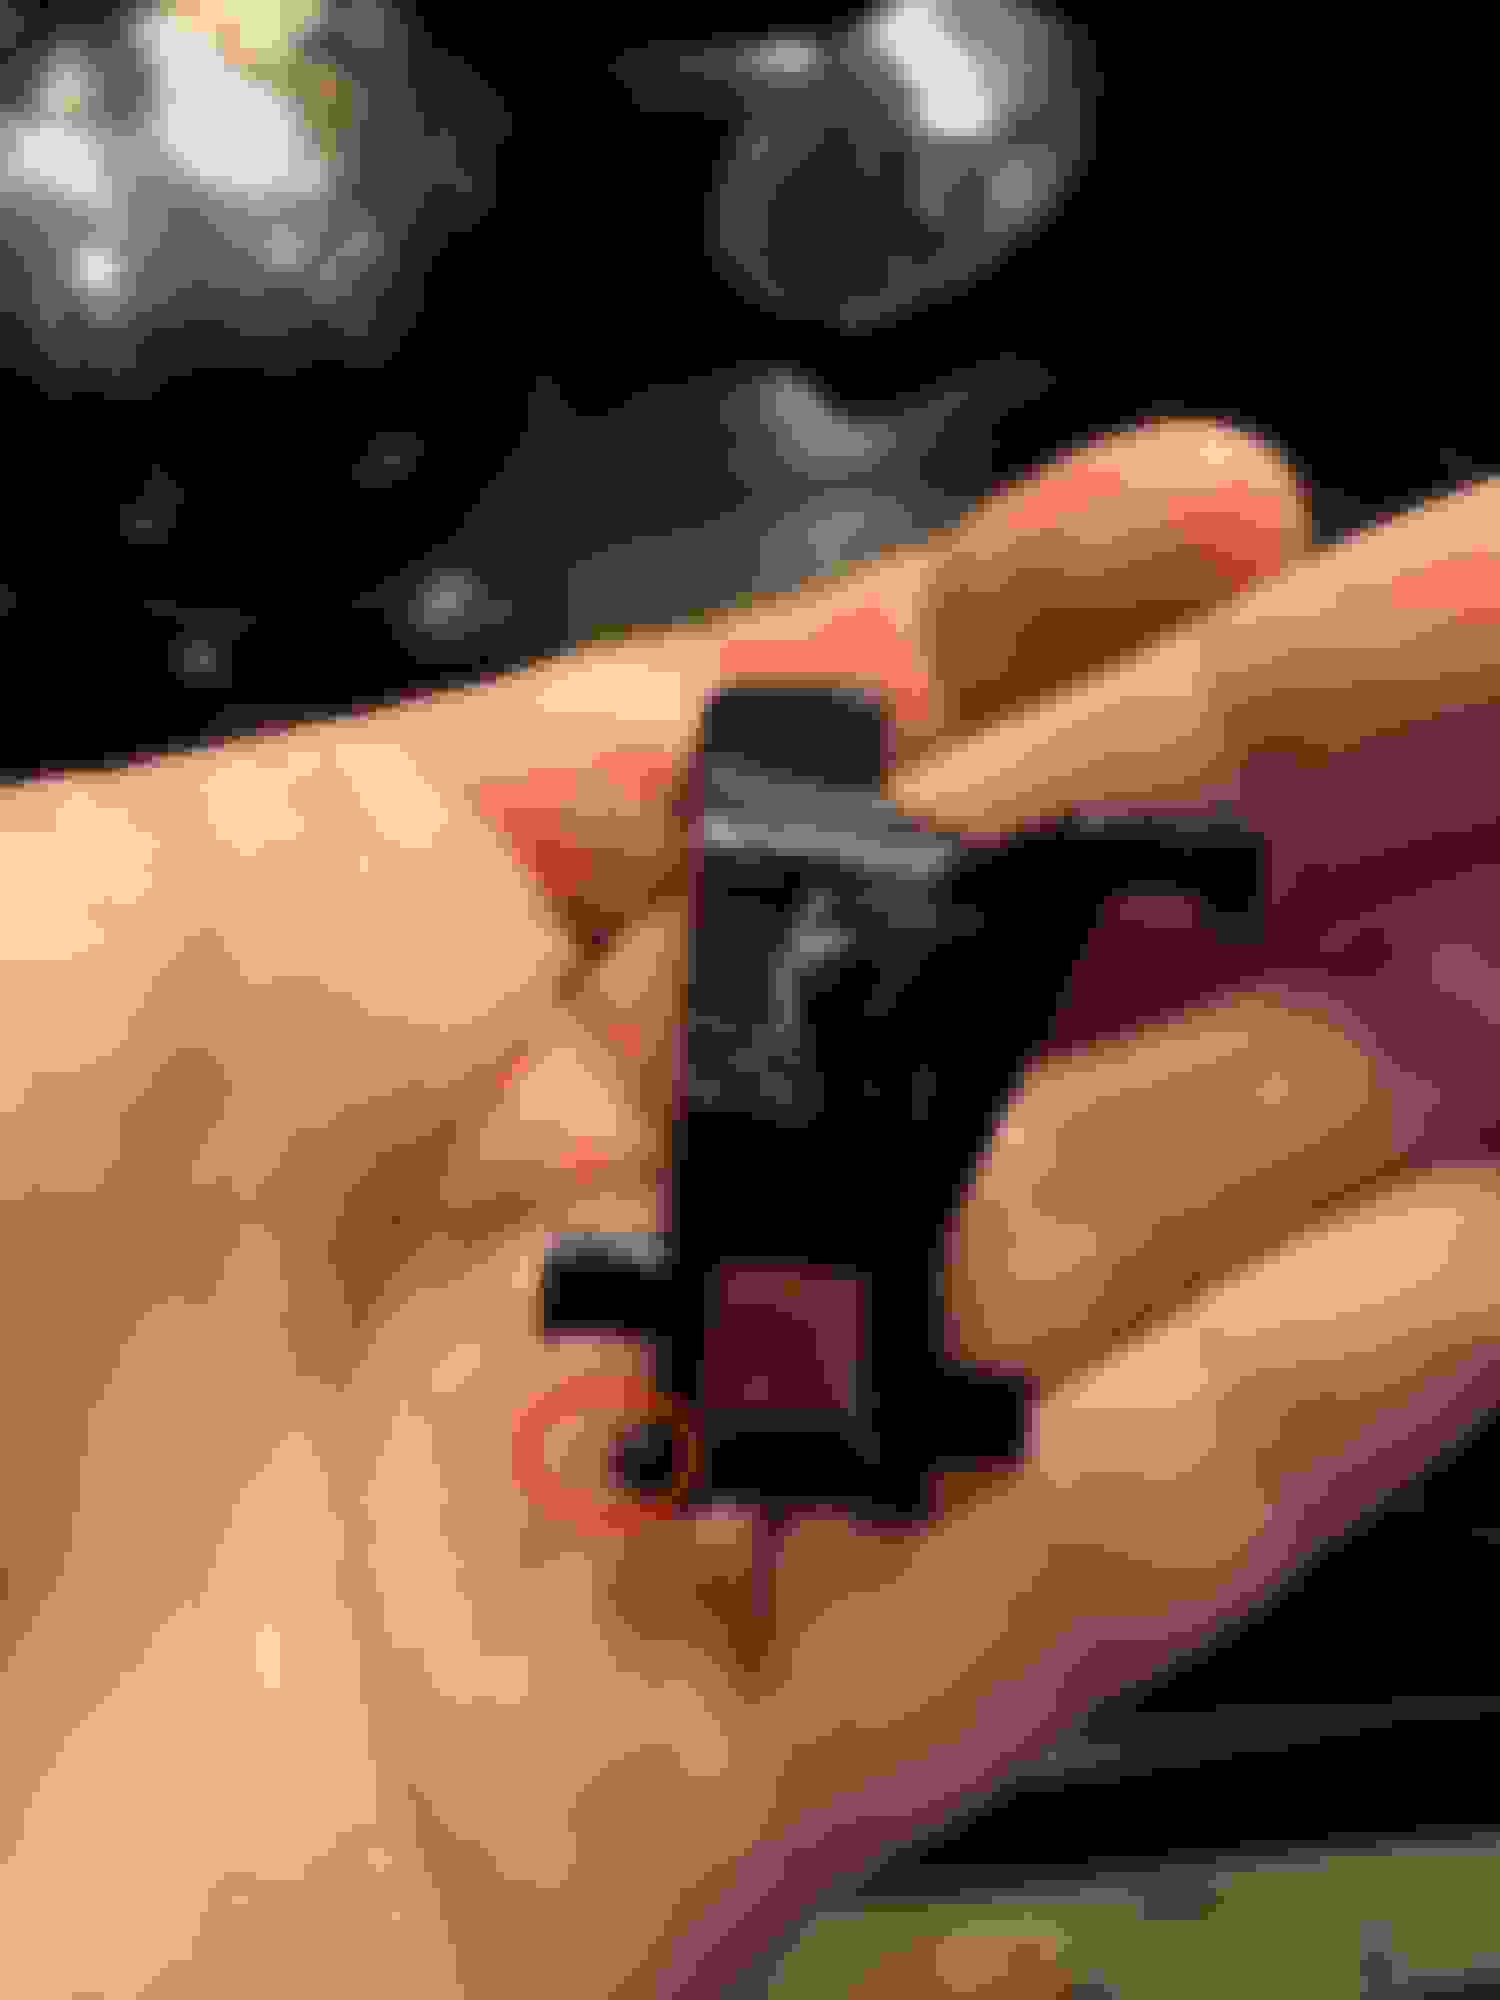
Broken part as it would appear, note missing plastic peg and spring.
The actual thing that broke was a tiny plastic peg that holds a spring in place to return the latch to its locking position. Without it, there is nothing to return the latch to its position to catch the armrest/stowage box flap and hold it down, so the spring on the back of the box holds the flap open.
If I could find the spring, I could possibly have replaced the latch on its own (it has markings A1666800019 16906797 and LHD PS but google doesn't seem to turn up any results for that as a part number). Alternatively, a free workaround would be to remove the opener spring on the back of the box, so at least the flap would rest closed instead of failing open.
As a side note since I haven't been able to find many reviews about them, I ordered from mbpartscenter.com which had the lowest price I could find by $50, and I had it 6 days later, shipped directly from MB. Their rep was very helpful on the phone, I would definitely buy from them again. The part was $329 (including $42 to ship) and took about an hour to install, as opposed to $543 from the local dealership + $172 labor and $48 tax -- total. So quite a substantial savings over a $765 repair bill from the dealer.
Last edited by bigfrigginml550; Jul 6, 2019 at 01:29 PM.
where did you purchase the replacement part to do the repair?
I have the same problem and can’t believe that MB wants to replace the entire unit rather than make the repair!
Gary K.
where did you purchase the replacement part to do the repair?
I have the same problem and can�t believe that MB wants to replace the entire unit rather than make the repair!
Gary K.
I got it from mbpartscenter.com. Pain to install but not too bad. Unfortunately I don�t think they sell the little broken clip, I had to replace the entire console. But $286 from that site was less than half of what the dealer wanted to replace it.
where did you purchase the replacement part to do the repair?
I have the same problem and can�t believe that MB wants to replace the entire unit rather than make the repair!
Gary K.
Gary�
I still have the two latches from the old box. (One is broken exactly as shown in bigfriggin�s photo, but the other one is intact). If you�re lucky, you broke the �other one� and can replace it with my intact one. I also have one spring � I don�t know if they are common across the latches; hopefully they are. Of course, I lost the one that went with the broken latch.)
I no longer have this vehicle and would be happy to mail you the latches and spring � if things work out, you�ve saved yourself the price of a new box. Just DM me your address and I�ll pop them in the mail. Might take a while because of the holidays.
I hope somebody can model it to the 3d printable but, anyway I fixed this with only $22, there is another site that sell the part about $70. of course it is very expensive for the part size but it saves me a lot of money.
I am finally happy with this fix after 2-3 years with right arm always open and taping was not a solid solution.
1. remove the rubber mat from the rear bottom tray
2. unscrew the two bolts revealed with tork #20
3. unlatch the tray with two/three paper method
4. unscrew the two bolts with tork #20 accessible after laying down the tray
5. unlatch the rear plastic console frame from the top hook inside the plastic rear console frame.
6. uncrew #15 tork aside of the cable connector
7. uncrew two screwes #25 or #30(not sure) inside of storage bottom(you would need a impact wrench and long extension), 4 screws #20 as well.
8. raise up the storage and you can access the latch.
probably the spring is gone hard to find, but the item I purchase from ebay also has the spring.
when assemble back, the hard part was to latch back the tray of rear console. I used two or three papers to latch the tray without breaking anything.
I know this thread is quite old but I bet somebody someday looking exact same information will be benefited. not sure if the item would still be on sale at that time though.
Last edited by myanonmbw; Apr 7, 2020 at 05:08 PM.
Hello guys, long time member but do not post oftenly. I am going to install an after market 9" 1920x720 Android screen. I am going to need to run a cable to the AMI port under the arm rest to get the AUX to give me sound. Does anyone has done this or have the schematics on how to take apart the center console??
Hi Could you please help me with instructions for GL500 2013, the hold-down latch for the passenger-side flip-up armrest on the center console is broken i guess. its the tiny plastic piece that holds the flap compartment.
I hope somebody can model it to the 3d printable but, anyway I fixed this with only $22, there is another site that sell the part about $70. of course it is very expensive for the part size but it saves me a lot of money.
I am finally happy with this fix after 2-3 years with right arm always open and taping was not a solid solution.
1. remove the rubber mat from the rear bottom tray
2. unscrew the two bolts revealed with tork #20
3. unlatch the tray with two/three paper method
4. unscrew the two bolts with tork #20 accessible after laying down the tray
5. unlatch the rear plastic console frame from the top hook inside the plastic rear console frame.
6. uncrew #15 tork aside of the cable connector
7. uncrew two screwes #25 or #30(not sure) inside of storage bottom(you would need a impact wrench and long extension), 4 screws #20 as well.
8. raise up the storage and you can access the latch.
probably the spring is gone hard to find, but the item I purchase from ebay also has the spring.
when assemble back, the hard part was to latch back the tray of rear console. I used two or three papers to latch the tray without breaking anything.
I know this thread is quite old but I bet somebody someday looking exact same information will be benefited. not sure if the item would still be on sale at that time though.
very helpful. my latch just broke and i will attempt to take it apart so i can see if it is the same part that broke and then order the ebay one you linked. could you elaborate step 3 "paper method"? and also the "papers" to latch the tray, im not sure what that is/what it means
very helpful thread, thank you everyone for the posted WIS and comments, hopefully it will be a low cost repair
Mercedes SLR McLaren 722 S Is Extremely Rare Example Modified by McLaren
Slideshow: A one-of-one U.S.-spec Mercedes-Benz SLR McLaren Roadster became even rarer after a factory-backed transformation at McLaren's headquarters.