When you click on links to various merchants on this site and make a purchase, this can result in this site earning a commission. Affiliate programs and affiliations include, but are not limited to, the eBay Partner Network.
Seems few of us, specially in North East, are getting Blind Spot Inoperative message as cars are getting older and probably this unit was not design very well to sustain cold/salty weather. This is how I dealt with this issue for around 300 USD.
1. Determine which side blind spot sensor failing.... in my case I was able to drive car on highway, middle lane and when cars where approaching from behind as was able to see which side does not show red indicator on mirror. Another option is go to dealer to get it diagnosed.
2. Buy a correct part (both side sensors are the same), 2012 years model's part A0009050210 only fits 2012 and not interchangeable with 2013+ models, so do your homework
Old part on top. I purchased new sensor from ebay, automaniac24online seller, who is located in Germany as it was new and best price what I was able to find. I was surprised that it took only 8 days to time i clicked buy to get it from Germany to USA North East with free shipping. Purchased 7/10 had it delivered on 7/18! Amazing!
3. I had no plans to take bumper off. I removed 1 bolt from muffler heat shield (aluminum) and bent it so I could fit my hands between bumper and shield.
4. Grab a flashlight and you should be able to see it...
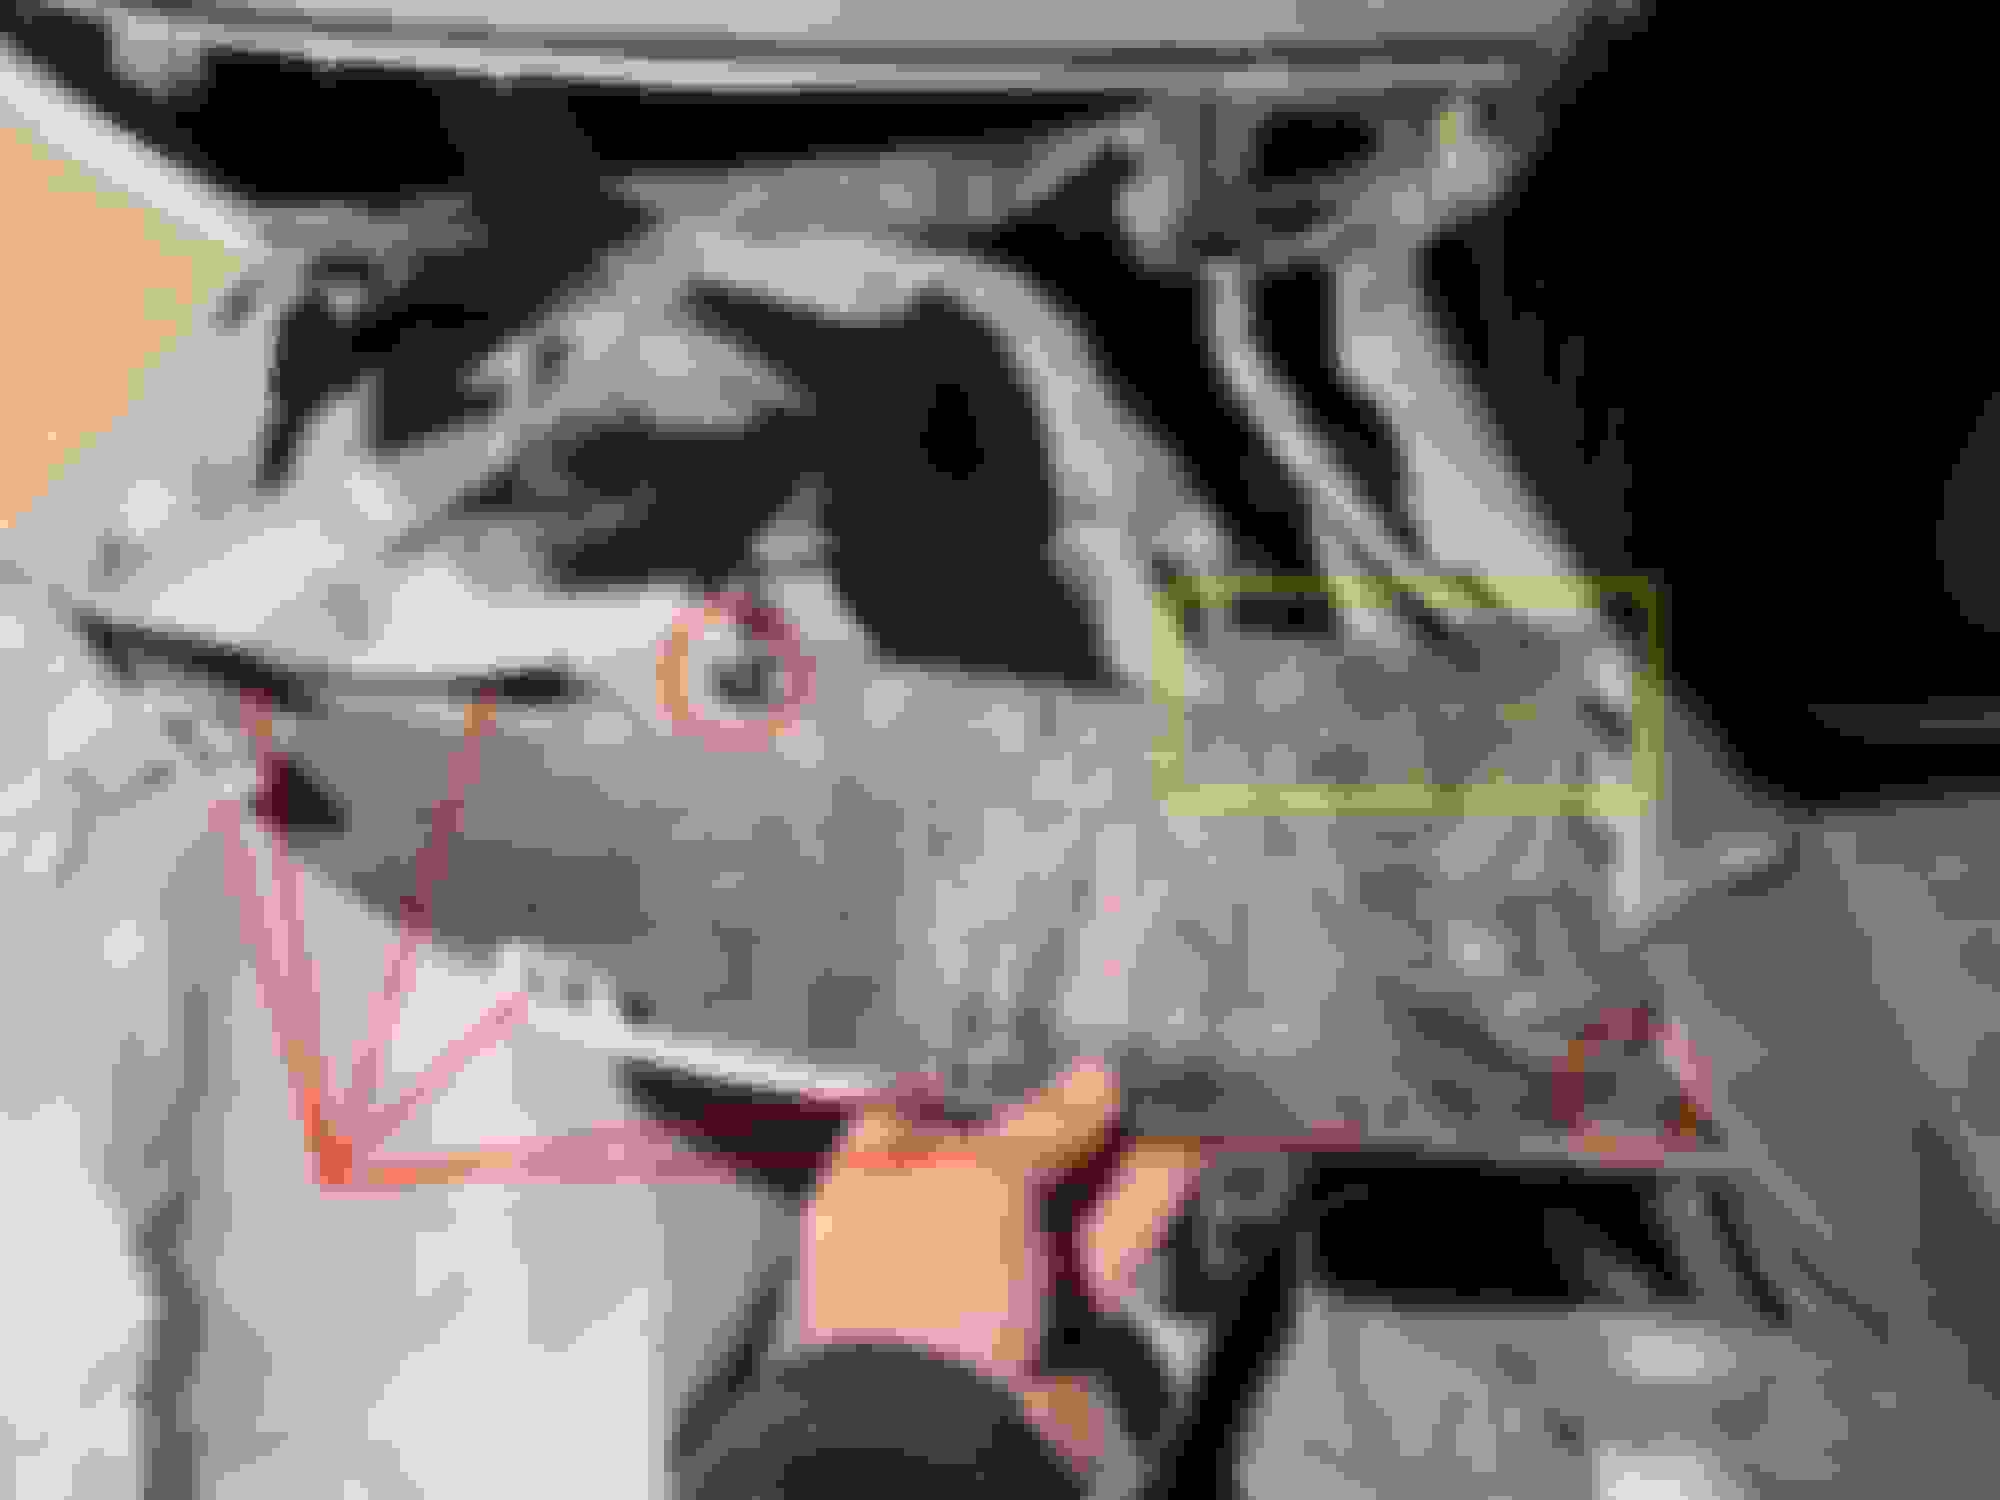
5. Take harness connector off 1 by pressing on the top of it and wiggling it out. It took me some time it was pretty tight and was struggling with it for few minutes... Lift tab 3 and try to push it toward front of the car. If you cannot, disconnect tab 2 and wiggle it out as you will have more room to work... . Mine took sometime to take it out as it was kind of expanded
6. To put it all back do same in reverse order. Mine was just plug and play no additional programming needed.
Last edited by vrmb; 07-18-2018 at 10:17 PM.
Reason: typo
Just got a 2013 ML350 and the drivers side blind spot assist was working inconsistently and coming on without reason or not coming on when it should. I was planning to eventually get the rear bumper out to look but luckily came across your post and took a look today and turns out that the bracket had popped off and so I just had to pop it back on after looking at the other side for reference. Now it is working perfectly. Thanks for sharing!
Just got a 2013 ML350 and the drivers side blind spot assist was working inconsistently and coming on without reason or not coming on when it should. I was planning to eventually get the rear bumper out to look but luckily came across your post and took a look today and turns out that the bracket had popped off and so I just had to pop it back on after looking at the other side for reference. Now it is working perfectly. Thanks for sharing!
yea i got this same issue on my 2011 GL550.. suck thing is your rain sensor wipes stop working and all other crap start happening if you don't replace the unit..
i will be ordering a new unit soon
My other side crapped out .... swapped sensor, but issue still exists.... will try to clean electric connectors on the mirror to see if that helps as it seems it's only happening when it's wet...or issue with wiring as MB tech told me......
My other side crapped out .... swapped sensor, but issue still exists.... will try to clean electric connectors on the mirror to see if that helps as it seems it's only happening when it's wet...or issue with wiring as MB tech told me......
When replace ur sensors, i will also apply some silicon to give extra seal and hopefully the sensors will last longer. I had to replace my wire harness when i replaced my sensors since it rusted so bad and interrupted the wire signal
When replace ur sensors, i will also apply some silicon to give extra seal and hopefully the sensors will last longer. I had to replace my wire harness when i replaced my sensors since it rusted so bad and interrupted the wire signal
Mine connector and harness to sensor looked like new..... at what location your harness was rusted ?
May I know what size of the screw was that? What kind of wrench should I buy? Cause I have the problem on my driver's side BSA, keep turning red and when I turn on the signal will have an alarm.
May I know what size of the screw was that? What kind of wrench should I buy? Cause I have the problem on my driver's side BSA, keep turning red and when I turn on the signal will have an alarm.
I don't think it requires any special tools. Just get a general socket set from Canadian Tire, you should be good to go
May I know what size of the screw was that? What kind of wrench should I buy? Cause I have the problem on my driver's side BSA, keep turning red and when I turn on the signal will have an alarm.
Get a Torx Star Female Bit Socket set and one of them will fit . I dont recall actual size. Your symptom is not like mine, i think it might be something else, not just sensor.
Get a Torx Star Female Bit Socket set and one of them will fit . I dont recall actual size. Your symptom is not like mine, i think it might be something else, not just sensor.
Thanks VRMB for posting your pics. Very helpful! For those who are doing this in the future, I just replaced my blind spot sensor and have a few additional tips:
1. The pics are for the LEFT rear blind spot sensor. I think the right side one is harder, but haven't done it myself. I think the bumper may actually have to be removed for the right side. But the left side is easy as described.
2. Definitely remove that screw from the muffler shield.. makes it a lot easier.
3. My bracket holding in the radar sensor was different.. it looked like two plastic strips over top of the blind spot sensor (instead of holding it more by the corners as in VRMB's pics). It released the same way.. use tab "3" in the pics and slide it out.
4. Was very difficult to remove the connector and the sensor as they had salt residue and dirt holding them in. Pry very gently with a screwdriver while removing the connector, then you can wiggle it out. I pried while pressing the tabs, just to get the connector removed enough that the tabs wouldn't click back into place. Meaning the connector was physically unlatched, but was still stuck on. Then you can wiggle and pull it off. If one of those tabs relatches you'll break it and/or have a hard time. So get the connector removed about 1/16" or more then it's easy.
5. Considering how hard it was to remove the blind spot sensor, I put a very thin layer of dielectric grease on the back (black side) of the new sensor before reinstalling it, just to lube things up and make it easier. Should probably have used dielectric on the connector too but didn't have any.
6. You can reach from the front side of the muffler backwards with your right arm, while you're removing the blind spot sensor with your left. That way you're not only pushing it out with your left hand, you can also grab it and pull hard with your right. You'll see what I mean. I have long arms but it should be doable for anyone.
7. When removing the blind spot sensor, get a flat head screwdriver between the end of the housing and the sensor itself. Twist it 90 degrees which will push the sensor out a tiny bit. Then you can wiggle the screwdriver while pulling the unit out. Much easier than trying to grab and push/pull. The flathead gets it started enough that it's looser coming out.
8. Of course make sure you have the exactly correct part # (from dealer or MB EPC) before starting. You don't want to do this twice! My 2013 GL320 used a sensor ending in 0110 not the 0210 sensor as pictured.
9. Oh yeah, I did this on a 2013 GL and it was exactly the identical steps as a 2012 ML (except part #). I suspect all W166 ML and GL models are replaced exactly the same way, just different part numbers. I think I read they used one sensor for 2012 then another model for everything 2013+ .. but verify this before starting!
10. Can't wear gloves or a watch..your arm won't fit. Prepare to get your forearms scraped up a little bit.
11. Now that I have done it, I could probably do it again in 10-15 mins. That's how easy it is once you know how to do it. The pics helped immensely!!
Seems few of us, specially in North East, are getting Blind Spot Inoperative message as cars are getting older and probably this unit was not design very well to sustain cold/salty weather. This is how I dealt with this issue for around 300 USD.
1. Determine which side blind spot sensor failing.... in my case I was able to drive car on highway, middle lane and when cars where approaching from behind as was able to see which side does not show red indicator on mirror. Another option is go to dealer to get it diagnosed.
2. Buy a correct part (both side sensors are the same), 2012 years model's part A0009050210 only fits 2012 and not interchangeable with 2013+ models, so do your homework
Old part on top. I purchased new sensor from ebay, automaniac24online seller, who is located in Germany as it was new and best price what I was able to find. I was surprised that it took only 8 days to time i clicked buy to get it from Germany to USA North East with free shipping. Purchased 7/10 had it delivered on 7/18! Amazing!
3. I had no plans to take bumper off. I removed 1 bolt from muffler heat shield (aluminum) and bent it so I could fit my hands between bumper and shield.
4. Grab a flashlight and you should be able to see it...
5. Take harness connector off 1 by pressing on the top of it and wiggling it out. It took me some time it was pretty tight and was struggling with it for few minutes... Lift tab 3 and try to push it toward front of the car. If you cannot, disconnect tab 2 and wiggle it out as you will have more room to work... . Mine took sometime to take it out as it was kind of expanded
6. To put it all back do same in reverse order. Mine was just plug and play no additional programming needed.
Just did my Blind spot radar replacement on ML350 w166. The easiest way to get to it is removing lower part of bamper corners. They are attached by 3 popup pins ansld rest just pops off by hand pressure . No need to take tire off . Take 3 clips off from under fender cover and then find clips that holds bamper pc. Firt time takes 20min the second side took less then 5.. as soon as cover is out the sensor is right there
the rest is like showing on picture above. Remove wire from sensors and push it towards front of car. My one sensor had some green oxidation under harness. This where water gets in. Ones new one in just make sure its tight and may wrap connector with isolated tape for future.
Hello,
I have a 2012 GL450 and I had to give up on this project. I ran into a HUGE challenge accessing this area on my truck. I have the tow package and chrome plate that are attached to my bumper that block me from accessing the muffler shield. If anyone knows how to get around these without removing them please let me know.
Hi,
Thank you for sharing this useful information here.
I am having the same problem and I have to remove my rear bumper left corner trim to replace the sensor.
However, I can only remove the yellow box pivot under the bumper. I can't really reach the red corners pivots.
Also, the red arrow clips are very hard for me to access and push out.
Any advice would be helpful, appreciate it!
Can anyone verify how to determine the fitment of modules if buying used / aftermarket? Is the part number for your vin simply enough to make sure it will work?
I just recently got the dreaded Blindspot Inoperative message, my scanner can read my passenger side module but not the driver side. I assume that's the one that has gone out.
Like the OP mentions and from what I've experienced, when you remove your sensor, look at the ZB, SW and HW #'s and ensure the replacement sensor you're buying is the exact same. This will ensure it is compatible.
There are many variations and I have not tried different numbers to know if they would work or not. I can confirm if you get the same numbers, then it will work.
Update on this, I was able to replace one sensor with a used module with the same MB part number according to VIN. The two modules have different HW and SW numbers and work perfectly. In my case, the harness had corroded and created a short, so that was replaced. Both the original modules still work, and the new module + old work together perfectly. Silicone on both modules and dielectric grease on the connectors as preventative measure. Fingers crossed for a long life on these
Update on this, I was able to replace one sensor with a used module with the same MB part number according to VIN. The two modules have different HW and SW numbers and work perfectly. In my case, the harness had corroded and created a short, so that was replaced. Both the original modules still work, and the new module + old work together perfectly. Silicone on both modules and dielectric grease on the connectors as preventative measure. Fingers crossed for a long life on these
i will be picking this up again soon as I think my failure is harness related. What is the part number for the harness that you replaced and how did you go about replacing it?
I don't remember the part number but I had the dealer look it up by VIN, it was about 140$ CAD. The reason I figured out it was the harness was that my scanner was able to read the passenger side module but not the driver side. I plugged the new module into driver's side and was still not able to read it. Did some probing on the harness and realized there was a short on the pins, replaced the harness and all was good.
You will probably need an MB scanner to know what is really going on, but the harness can be replaced without removing the bumper. The parking sensors are also tied into the harness, I made sure to add some dielectric grease to all the connectors when I reinstalled the harness. The only piece I removed was the driver side lower valence of the bumper as pictured in post #18, thats just to get around removing the heatshield/exhaust on the driver side.
 07-18-2018, 10:16 PM


 . I dont recall actual size. Your symptom is not like mine, i think it might be something else, not just sensor.