When you click on links to various merchants on this site and make a purchase, this can result in this site earning a commission. Affiliate programs and affiliations include, but are not limited to, the eBay Partner Network.
Just wanted to share with you a project that I have been working on for the last week. I just finished.
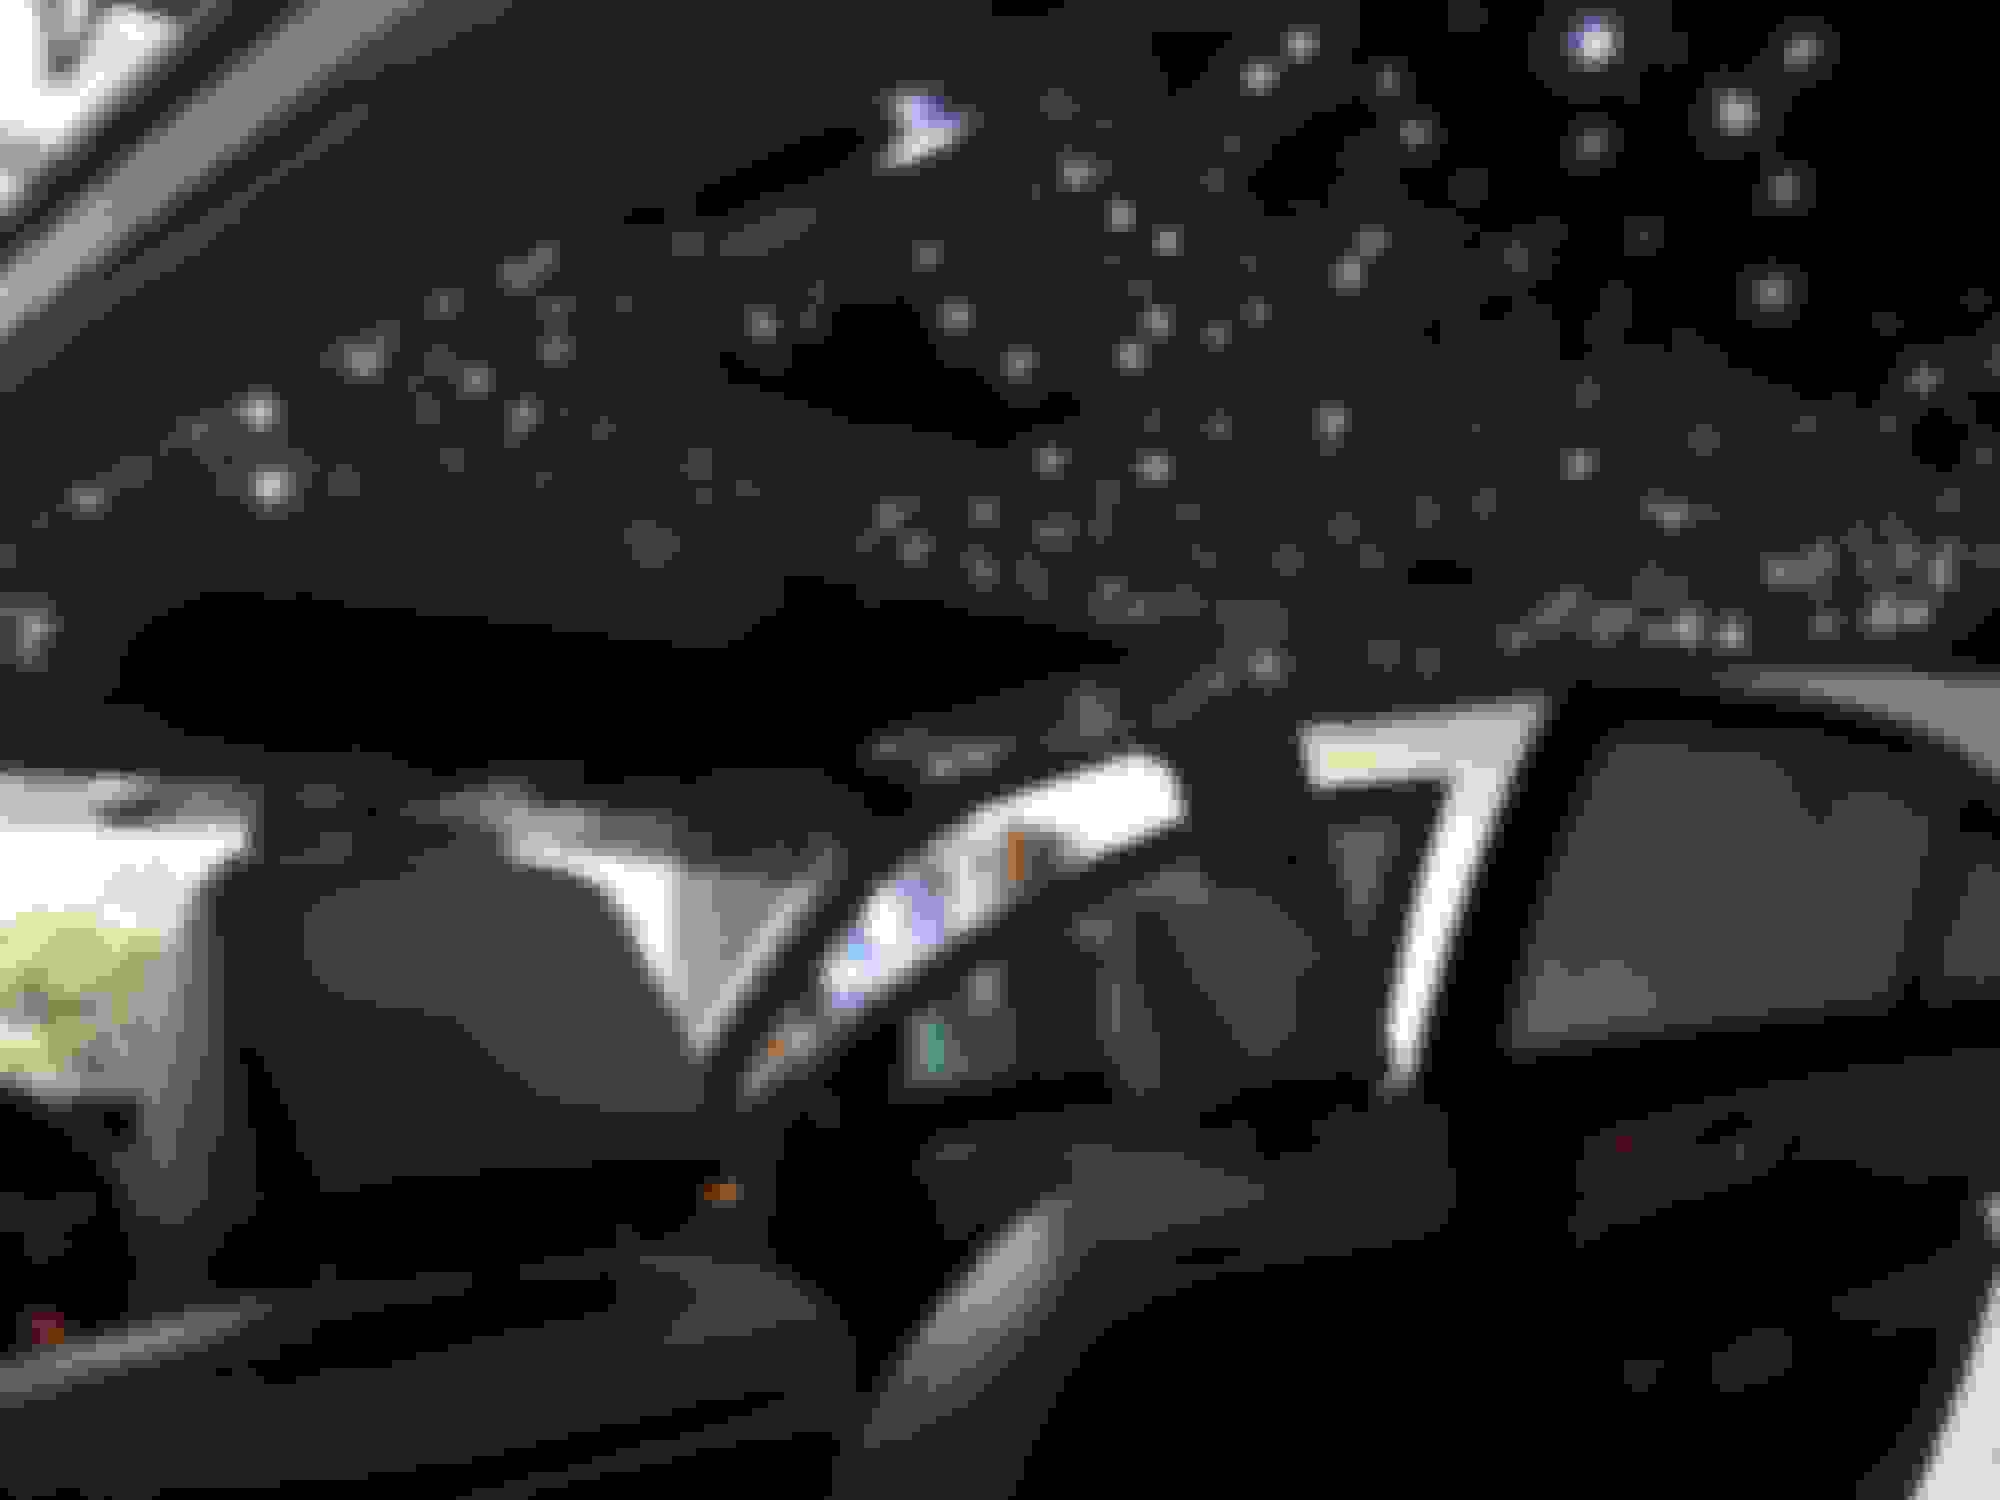
I custom fabricated a starlight roof. My original headliner was gray but I wanted black so I bought a used 07 s65 alcantara suede black headliner from COImports for 490$ free shipping. Bought all the roof accessories (rear view mirror/center roof control center/sun visors) for about 300$. I bought a Chinly 835 strand LED fiber optic kit with twinkle feature for 288$ of AliExpress.
I got a few quotes from shops in AZ and LA (I live in AZ). Nothing less than 4-5K which included wrapping my headliner in suede (not even alcantara).
Anyways I'm gonna go thru the process with pictures that I went through. It took about a week for the parts to get here and then I worked 8-10 hours a day on it for 4 days straight.
First- ordered all the parts, had to pick up the headliner from a freight shipping company. Light came in from Hong Kong via DHL. Pretty quick shipping!
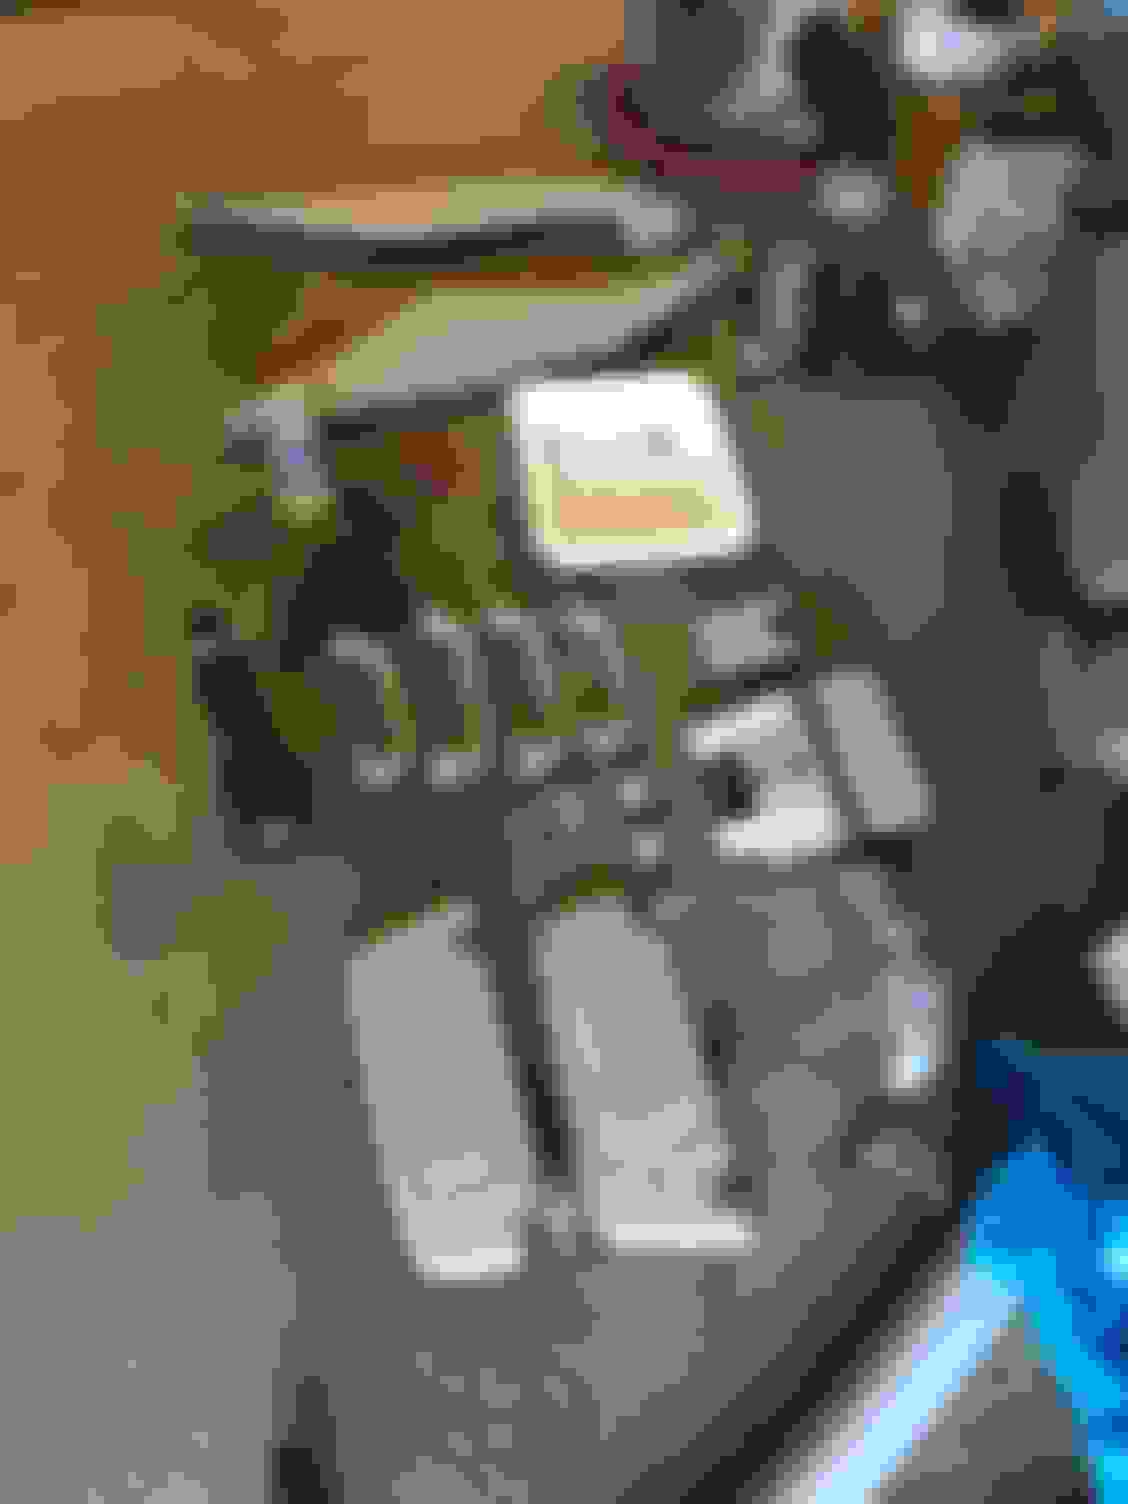
Next- I layed the headliner out a table and begin installing the fiber optic lights. 835 damn holes. Poke a hole, slide the fiber in, hotglue the top, snip the other side. 8-3-5 of them smh. I also got a starmap of what the constellations looked like on my birthdate and somewhat recreated it, so it is slightly personalized too! You can see in the next picture I start putting the fibers in!
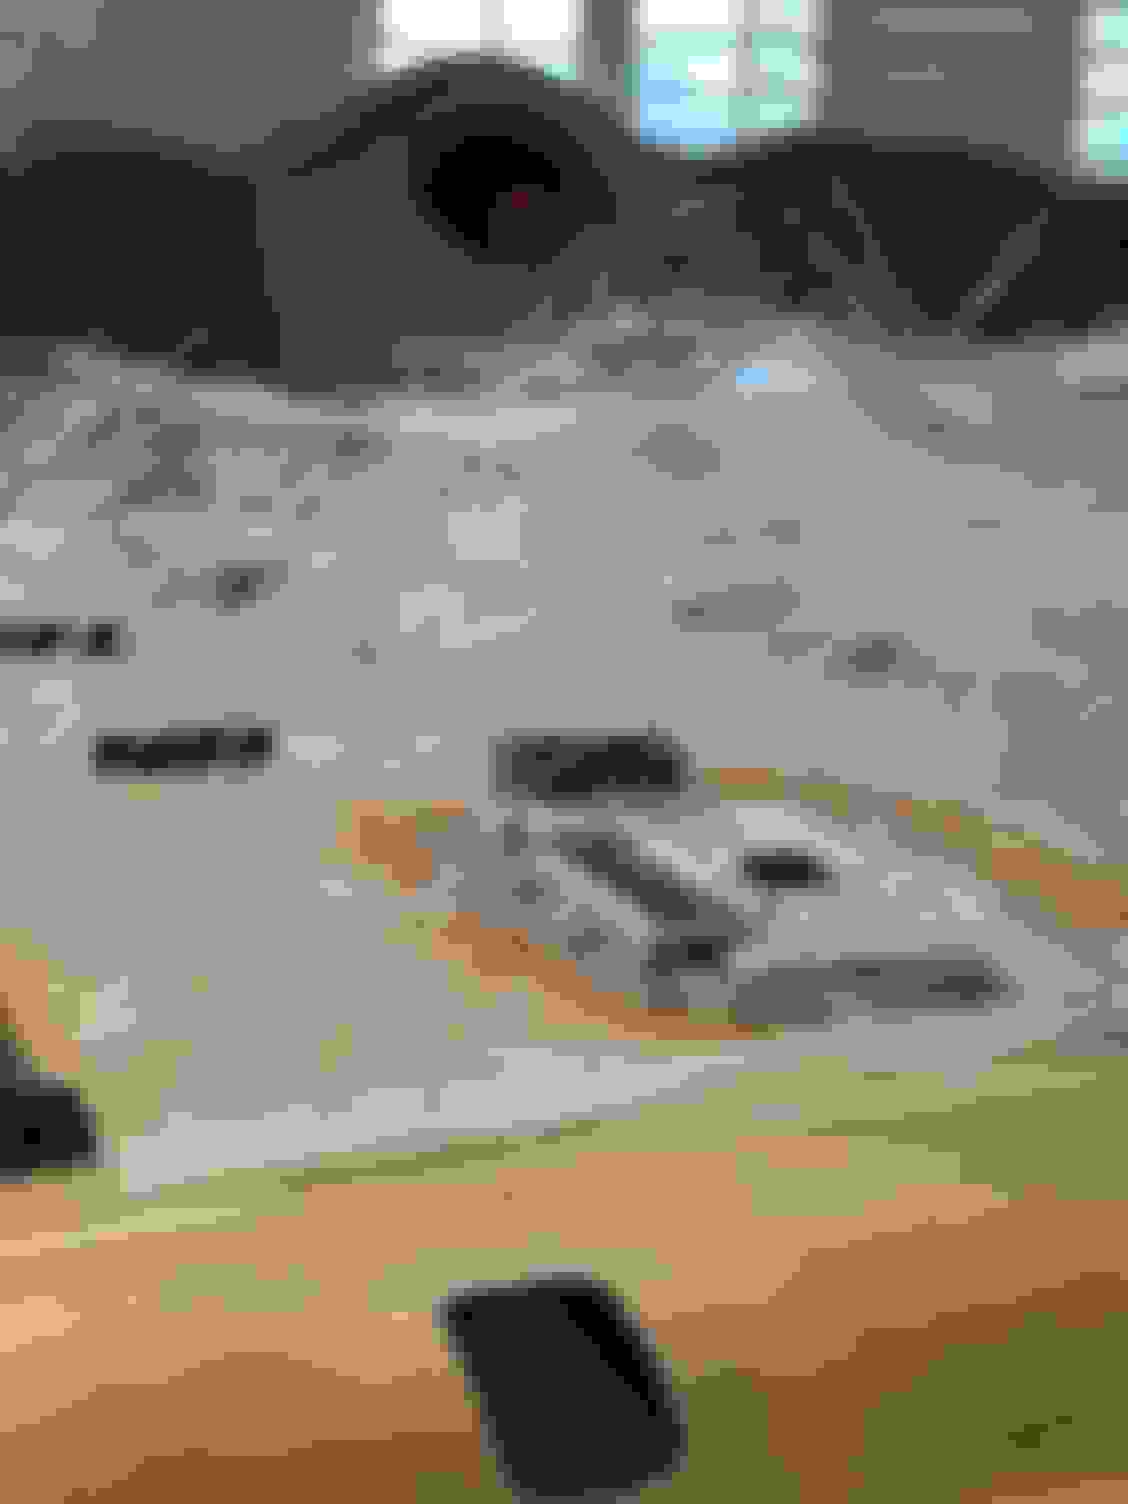
Now **** got real messy real quick. So many wires everywhere it was hard to stay collected.
Now that the headliner was all done. I still had to organize all the wires via tie-wraps and other means (tape). But first I wanted to get the old headliner off. I wasn't planning on doing this but my buddy was too busy so I took care of it myself.
Removed the visor, grab handles, coat hangers, center control panel, rear view mirror, A/B/C pillars, and weather seal around doors. The sunroof had some hard clips that you need to know how to take off or else it will take you all day. Once I got the hang of it, the headliner was down in 15 mins. It was a PITA to make sure it doesn't bend anywhere. To get it out the door you have to recline both seats to the max and push them all the way back. Then you slide it out through the rear left door. You have to slightly bend it but it doesnt damage it. Thank god its somewhat flexible.
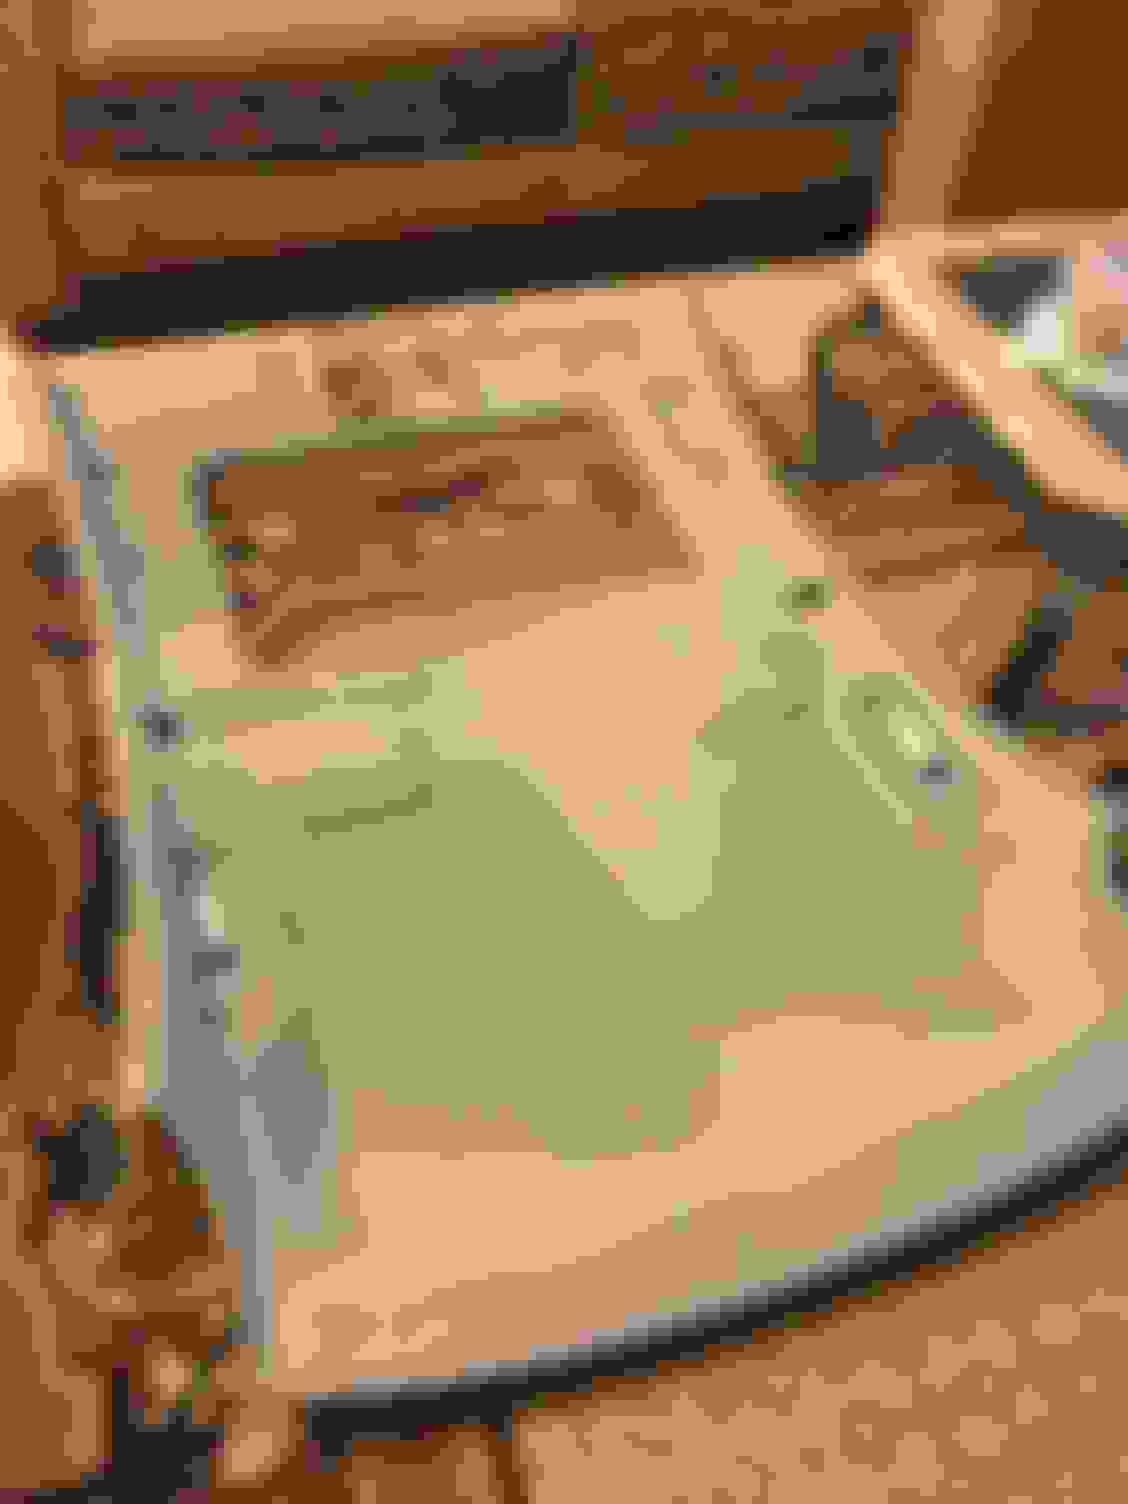
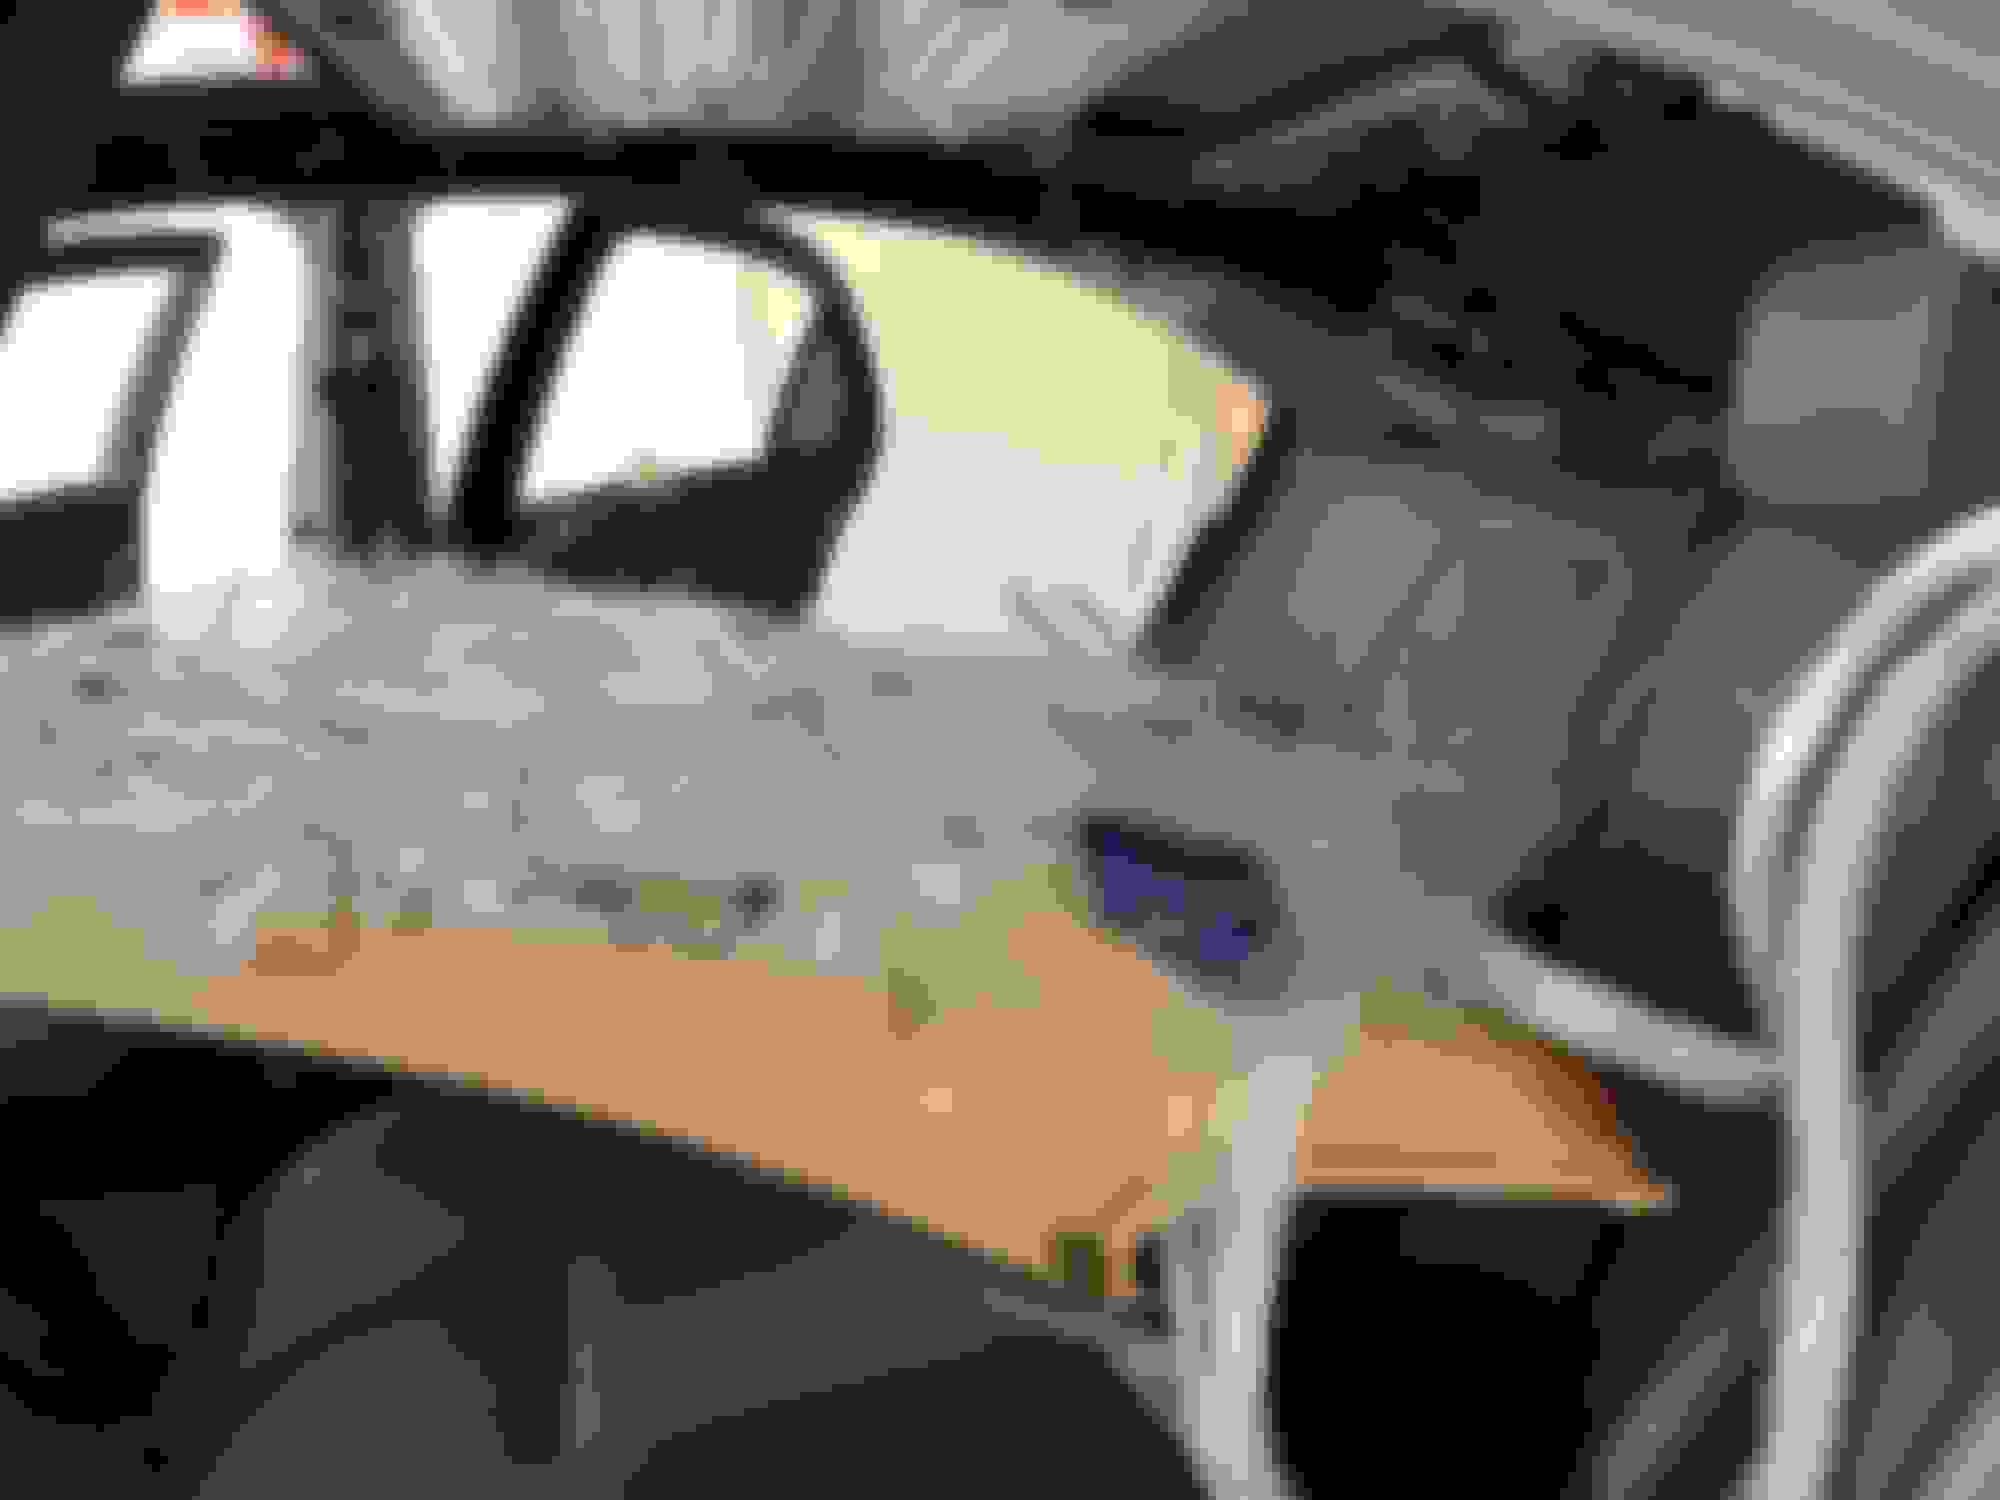
With the headliner out, I went ahead and organized all the fiber optic cables on the new headliner. Carefully put it back in the car and snapped it back into
You need someone at all times to help you with this. Shout out to moms for helping me haha.
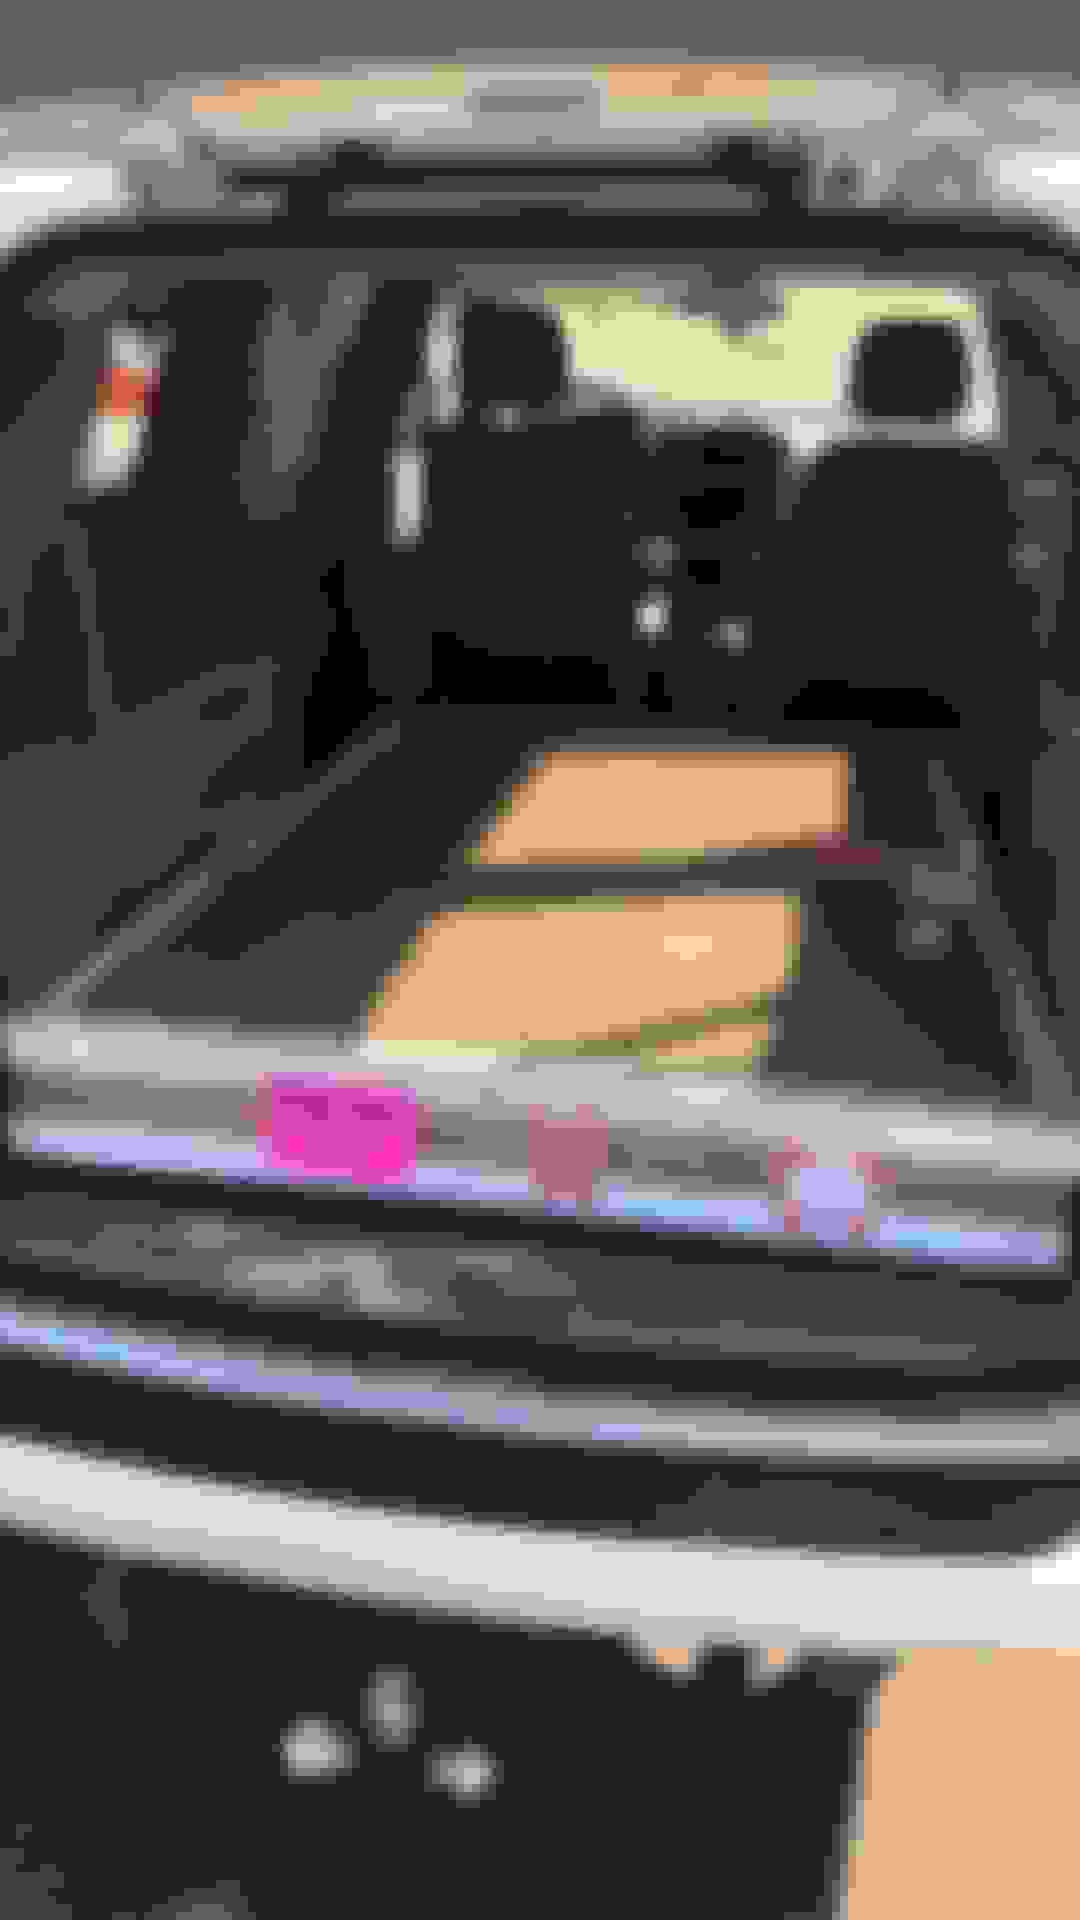
Anyways. I carefully put the new headliner in and had to run custom wiring. Ran it through the rear c pillar to the trunk. The trunk has a battery behind the wall that separates the rear seats. I connected a invertor to the battery and plugged in the fiber optic starlight ceiling kit to it. Very clean installation and I am so glad it worked out.
Here are some pictures of the final products. Note that the sunroof cover/door grab handles are still grey. The sunroof cover would of been way to hard to remove and I didn't want to screw up the sunroof at all so I left it, a little two tone doesn't hurt! Handles I can change whenever but they look good for now. Don't want to spend more money to buy new handles haha. Maybe after I see my old gray parts.
Now for the pics you have been waiting for
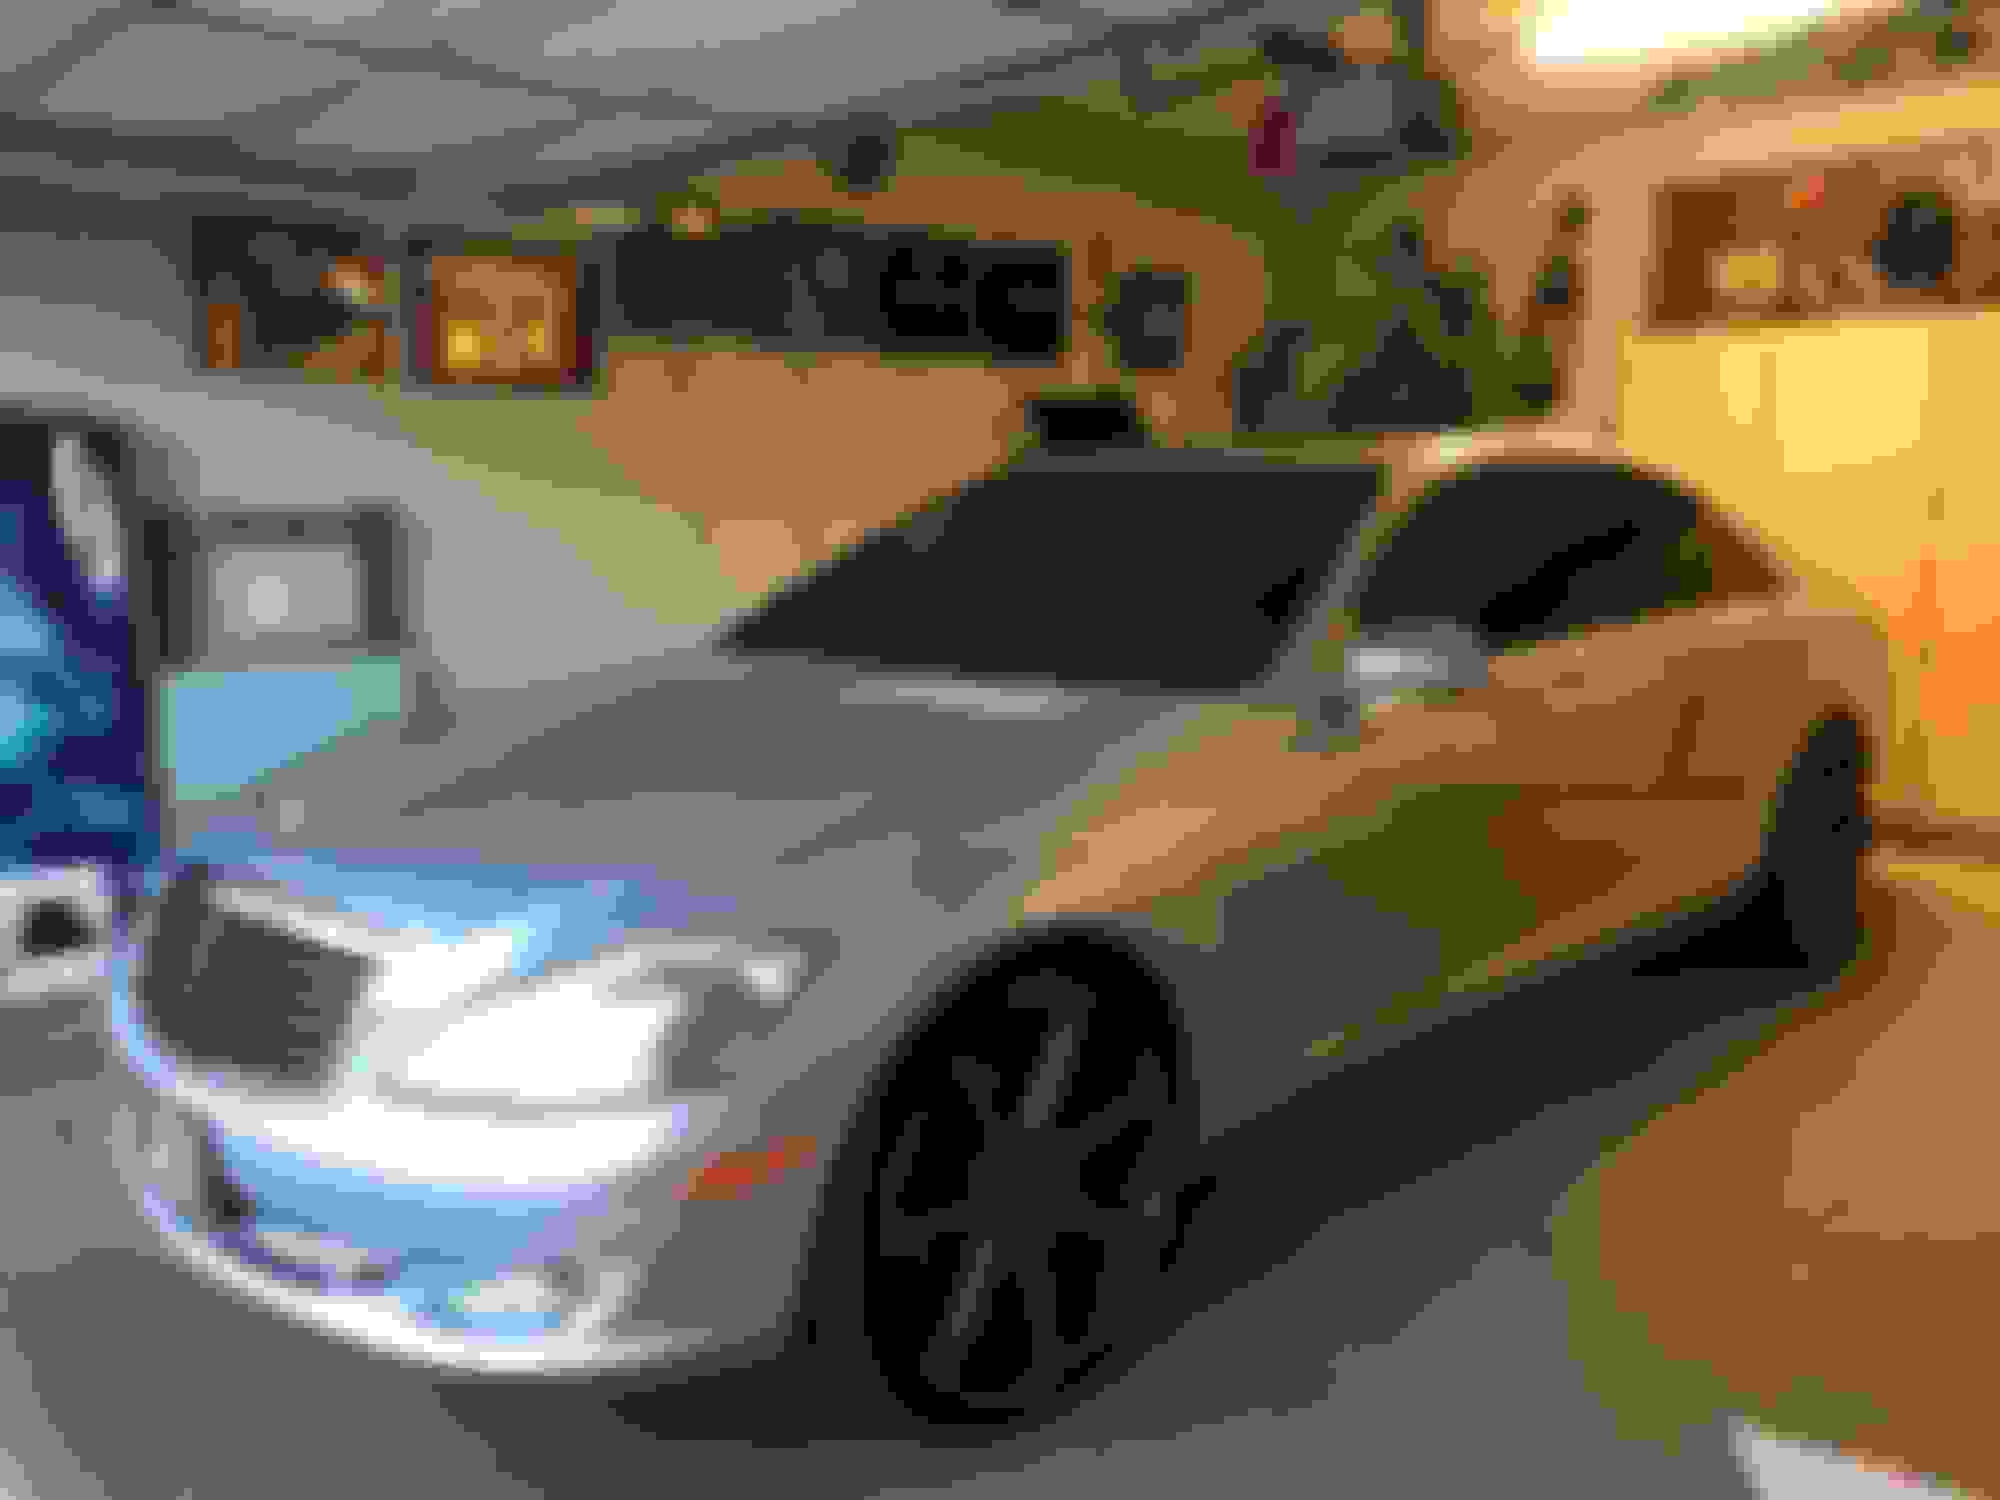
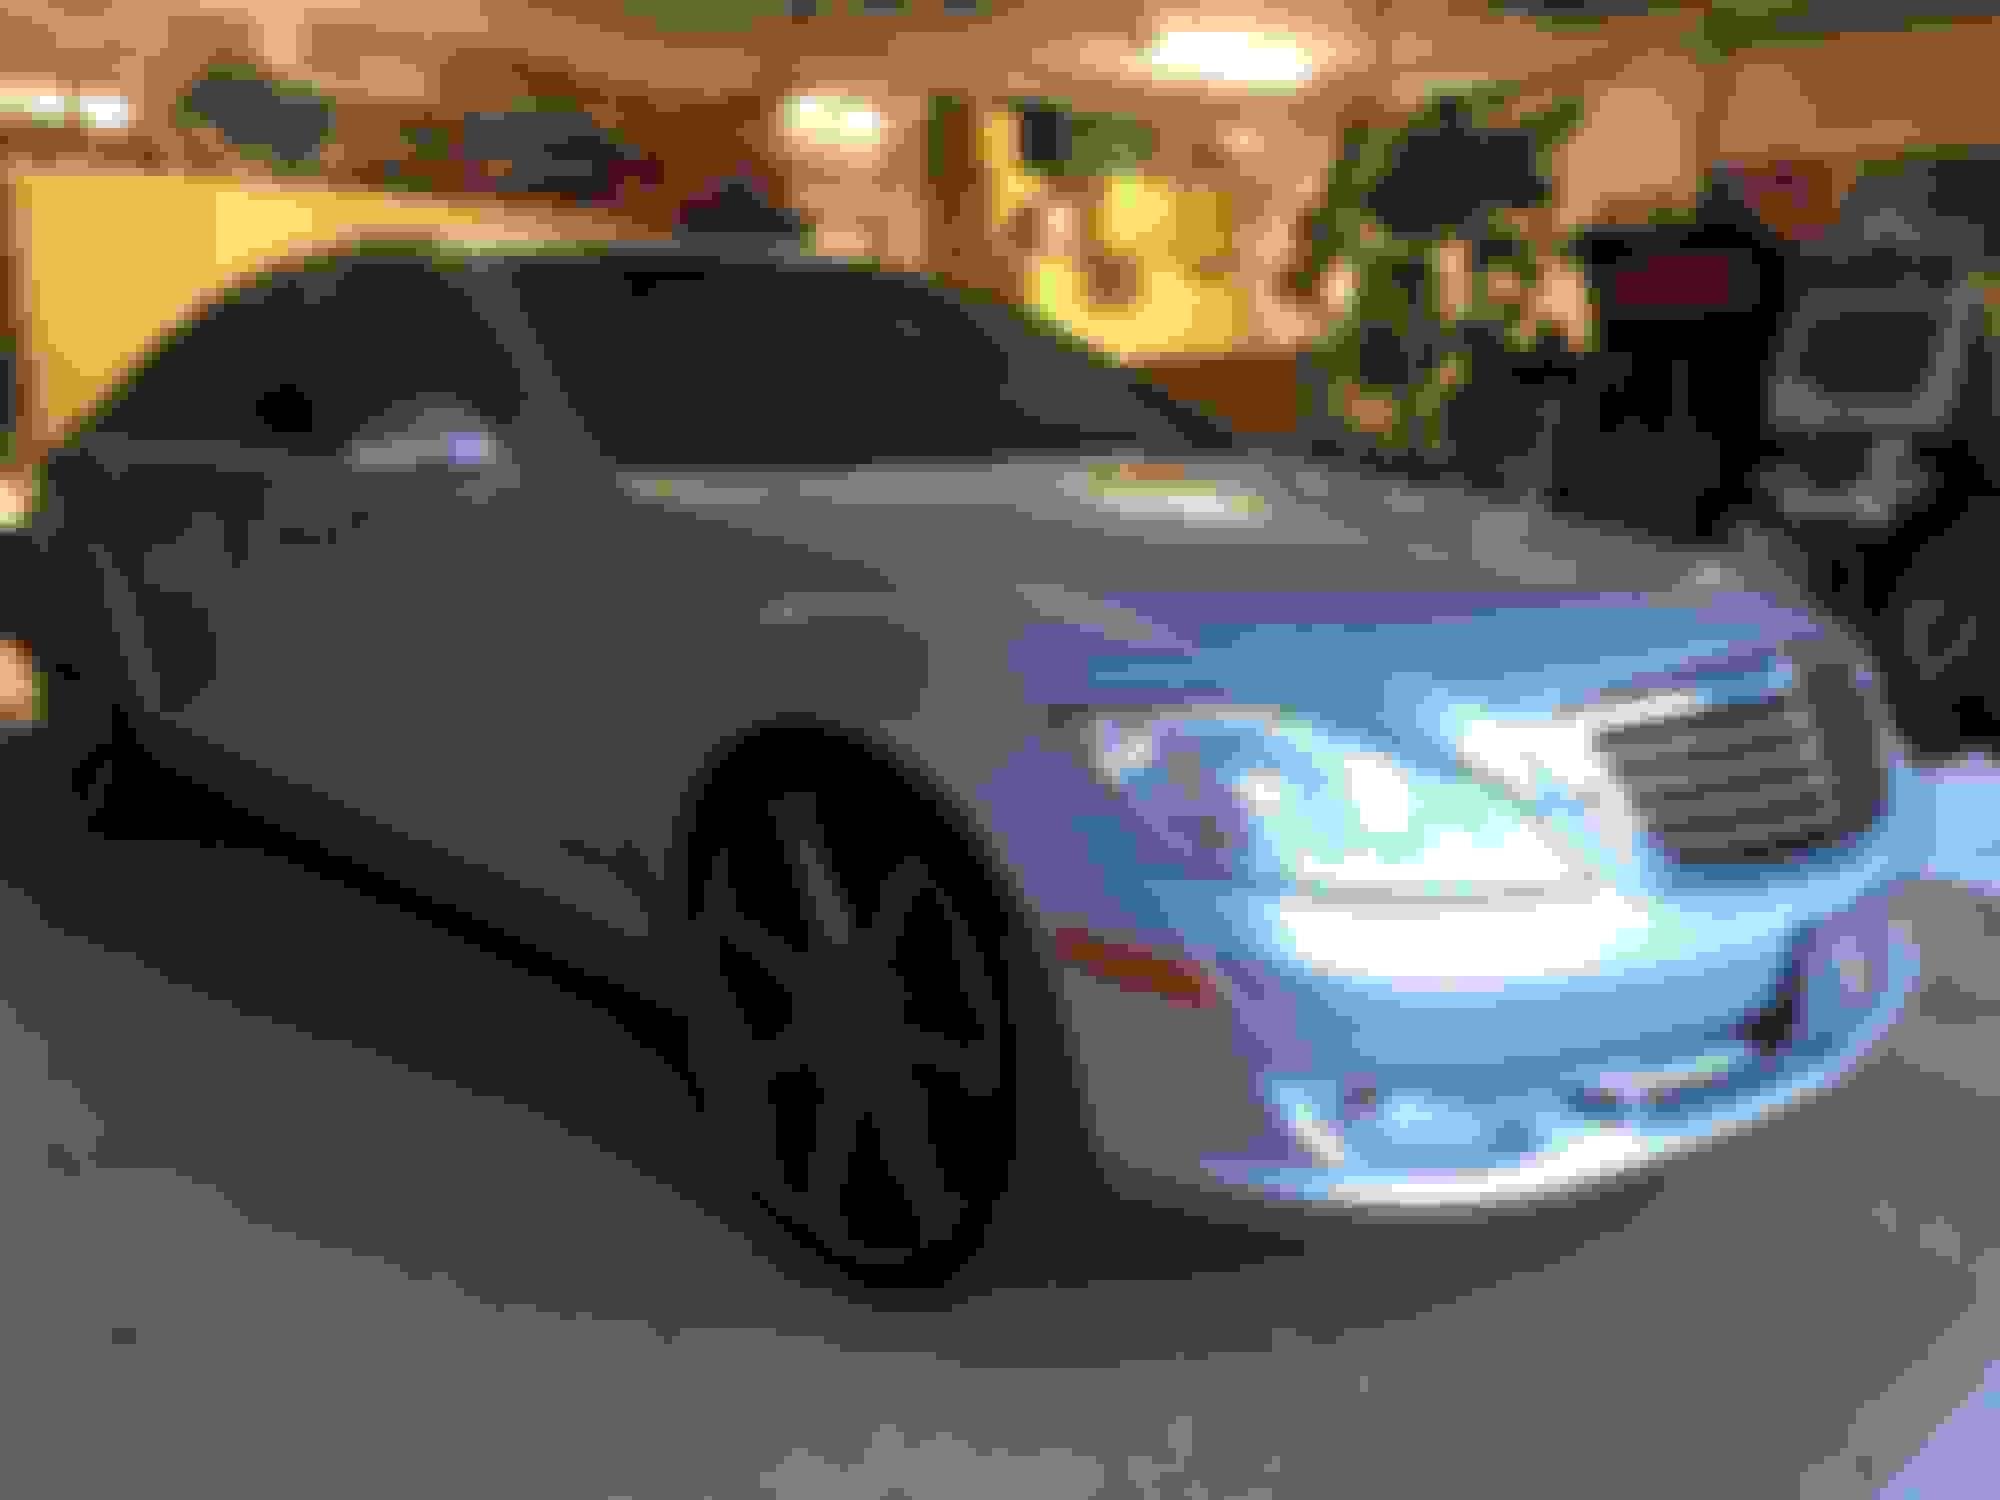
My 2007 S550 with 111K miles. Dealer maintained. Sits on 22" Vossen CV7 Matte Graphite (these rims are amazing).
Anyways. about 1200$ later, I have the most premium upgrade you can get on a s550. All done by myself. Didn't break anything, didn't have to reorder anything. Everything looks like it came off the factory.
Anyone in AZ that's interested, ill hook it up What do you guys think!?
Just wanted to share with you a project that I have been working on for the last week. I just finished.
I custom fabricated a starlight roof. My original headliner was gray but I wanted black so I bought a used 07 s65 alcantara suede black headliner from COImports for 490$ free shipping. Bought all the roof accessories (rear view mirror/center roof control center/sun visors) for about 300$. I bought a Chinly 835 strand LED fiber optic kit with twinkle feature for 288$ of AliExpress.
I got a few quotes from shops in AZ and LA (I live in AZ). Nothing less than 4-5K which included wrapping my headliner in suede (not even alcantara).
Anyways I'm gonna go thru the process with pictures that I went through. It took about a week for the parts to get here and then I worked 8-10 hours a day on it for 4 days straight.
First- ordered all the parts, had to pick up the headliner from a freight shipping company. Light came in from Hong Kong via DHL. Pretty quick shipping!
Next- I layed the headliner out a table and begin installing the fiber optic lights. 835 damn holes. Poke a hole, slide the fiber in, hotglue the top, snip the other side. 8-3-5 of them smh. I also got a starmap of what the constellations looked like on my birthdate and somewhat recreated it, so it is slightly personalized too! You can see in the next picture I start putting the fibers in!
Now **** got real messy real quick. So many wires everywhere it was hard to stay collected.
Now that the headliner was all done. I still had to organize all the wires via tie-wraps and other means (tape). But first I wanted to get the old headliner off. I wasn't planning on doing this but my buddy was too busy so I took care of it myself.
Removed the visor, grab handles, coat hangers, center control panel, rear view mirror, A/B/C pillars, and weather seal around doors. The sunroof had some hard clips that you need to know how to take off or else it will take you all day. Once I got the hang of it, the headliner was down in 15 mins. It was a PITA to make sure it doesn't bend anywhere. To get it out the door you have to recline both seats to the max and push them all the way back. Then you slide it out through the rear left door. You have to slightly bend it but it doesnt damage it. Thank god its somewhat flexible.
With the headliner out, I went ahead and organized all the fiber optic cables on the new headliner. Carefully put it back in the car and snapped it back into
You need someone at all times to help you with this. Shout out to moms for helping me haha.
Anyways. I carefully put the new headliner in and had to run custom wiring. Ran it through the rear c pillar to the trunk. The trunk has a battery behind the wall that separates the rear seats. I connected a invertor to the battery and plugged in the fiber optic starlight ceiling kit to it. Very clean installation and I am so glad it worked out.
Here are some pictures of the final products. Note that the sunroof cover/door grab handles are still grey. The sunroof cover would of been way to hard to remove and I didn't want to screw up the sunroof at all so I left it, a little two tone doesn't hurt! Handles I can change whenever but they look good for now. Don't want to spend more money to buy new handles haha. Maybe after I see my old gray parts.
Now for the pics you have been waiting for
My 2007 S550 with 111K miles. Dealer maintained. Sits on 22" Vossen CV7 Matte Graphite (these rims are amazing).
Anyways. about 1200$ later, I have the most premium upgrade you can get on a s550. All done by myself. Didn't break anything, didn't have to reorder anything. Everything looks like it came off the factory.
Anyone in AZ that's interested, ill hook it up What do you guys think!?
Nice job m8....car looks amazing both on the inside and the outside...love it.
Just had a quick question...
When you drilled the holes...did you drill through the hard plastic of the roof and stop right before it went through the headliners alcantara lining.... or ....... did you drill through the alcantara lining on the roof as well ?...and what size bit did you use ?
did you even drill or just popped holes by using something else ?
what were the inverter specs ? or was it just a convertor like 12V to 220V/110V or what ?
any tools that I need in particular ?
can you control their brightness ?
anything that I should know of before going on with this project ?
as my username says...I got a CL
Cheers
Last edited by TheCLguy; Oct 13, 2017 at 08:31 AM.
Thats alotttt of optic wires, you couldnt trim them? end result does look really cool.
I trimmed some from the other side of the headliner after pulling them through but there was just too much and I wanted to leave some extra just in case. I'm sure I could have done it a little cleaner but since it was my first time, it was hard to judge how much wire to leave :O
Nice job m8....car looks amazing both on the inside and the outside...love it.
Just had a quick question...
When you drilled the holes...did you drill through the hard plastic of the roof and stop right before it went through the headliners alcantara lining.... or ....... did you drill through the alcantara lining on the roof as well ?...and what size bit did you use ?
did you even drill or just popped holes by using something else ?
what were the inverter specs ? or was it just a convertor like 12V to 220V/110V or what ?
any tools that I need in particular ?
can you control their brightness ?
anything that I should know of before going on with this project ?
as my username says...I got a CL
Cheers
Hey! Glad you liked it! I actually didn't drill holes into the headliner, I used a pin (https://images-na.ssl-images-amazon...._AC_SS350_.jpg) to poke holes and kind of twist it around to make the hole slightly bigger. The fibers are very tiny in diameter so it doesn't take much to slip them in.
Then I bolted that circular wire end to the battery in the trunk that had a extra screw for like a battery tender and installed it that way.
Tool wise, I would say have the following: a decent hot glue gun, a few of those needles I pictured earlier, tie wrap cutting tool (to cut the fibers), tools necessary to remove headliner, a extra set of hands to help you with this, tie wraps to keep things organized, and LOTS AND LOTS OF PATIENCE.
Taking the headliner off is straight forward, you will need a friend or someone to help you. I probably couldn't have done it on my own... It gets frustrating and before you even start I'd make sure you have room to slide a thick bunch of fiber optic cables through the c-pillar and into the trunk. I had to remove the subwoofer panel towards the rear and remove some foam to get the fiber optic bunch to the trunk passing through the C pillar.
At the end of the day, it looks amazing and was worth it. message me if you have some questions or need help
Jballer, that's baller! I missed this post somehow. Finished product looks great. I deal with a company that makes these with lights installed in a new headliner and cost is quite a bit up there. Very cool project. I imagine if you have a pano, it would be as cool.
Jballer, that's baller! I missed this post somehow. Finished product looks great. I deal with a company that makes these with lights installed in a new headliner and cost is quite a bit up there. Very cool project. I imagine if you have a pano, it would be as cool.
Where are you from?
Thanks! Yeah this mod can definitely get pricey. From AZ btw!
Hey! Glad you liked it! I actually didn't drill holes into the headliner, I used a pin (https://images-na.ssl-images-amazon...._AC_SS350_.jpg) to poke holes and kind of twist it around to make the hole slightly bigger. The fibers are very tiny in diameter so it doesn't take much to slip them in.
Then I bolted that circular wire end to the battery in the trunk that had a extra screw for like a battery tender and installed it that way.
Tool wise, I would say have the following: a decent hot glue gun, a few of those needles I pictured earlier, tie wrap cutting tool (to cut the fibers), tools necessary to remove headliner, a extra set of hands to help you with this, tie wraps to keep things organized, and LOTS AND LOTS OF PATIENCE.
Taking the headliner off is straight forward, you will need a friend or someone to help you. I probably couldn't have done it on my own... It gets frustrating and before you even start I'd make sure you have room to slide a thick bunch of fiber optic cables through the c-pillar and into the trunk. I had to remove the subwoofer panel towards the rear and remove some foam to get the fiber optic bunch to the trunk passing through the C pillar.
At the end of the day, it looks amazing and was worth it. message me if you have some questions or need help
Thanks so much for the impeccable feedback...honestly appreciate the time and effort you not only put into your work but also the response....and yeah sure...I hope I find the time to get along with this future project...and yeah if I have anything I'll let you know
Just wanted to share with you a project that I have been working on for the last week. I just finished.
I custom fabricated a starlight roof. My original headliner was gray but I wanted black so I bought a used 07 s65 alcantara suede black headliner from COImports for 490$ free shipping. Bought all the roof accessories (rear view mirror/center roof control center/sun visors) for about 300$. I bought a Chinly 835 strand LED fiber optic kit with twinkle feature for 288$ of AliExpress.
I got a few quotes from shops in AZ and LA (I live in AZ). Nothing less than 4-5K which included wrapping my headliner in suede (not even alcantara).
Anyways I'm gonna go thru the process with pictures that I went through. It took about a week for the parts to get here and then I worked 8-10 hours a day on it for 4 days straight.
First- ordered all the parts, had to pick up the headliner from a freight shipping company. Light came in from Hong Kong via DHL. Pretty quick shipping!
Next- I layed the headliner out a table and begin installing the fiber optic lights. 835 damn holes. Poke a hole, slide the fiber in, hotglue the top, snip the other side. 8-3-5 of them smh. I also got a starmap of what the constellations looked like on my birthdate and somewhat recreated it, so it is slightly personalized too! You can see in the next picture I start putting the fibers in!
Now **** got real messy real quick. So many wires everywhere it was hard to stay collected.
Now that the headliner was all done. I still had to organize all the wires via tie-wraps and other means (tape). But first I wanted to get the old headliner off. I wasn't planning on doing this but my buddy was too busy so I took care of it myself.
Removed the visor, grab handles, coat hangers, center control panel, rear view mirror, A/B/C pillars, and weather seal around doors. The sunroof had some hard clips that you need to know how to take off or else it will take you all day. Once I got the hang of it, the headliner was down in 15 mins. It was a PITA to make sure it doesn't bend anywhere. To get it out the door you have to recline both seats to the max and push them all the way back. Then you slide it out through the rear left door. You have to slightly bend it but it doesnt damage it. Thank god its somewhat flexible.
With the headliner out, I went ahead and organized all the fiber optic cables on the new headliner. Carefully put it back in the car and snapped it back into
You need someone at all times to help you with this. Shout out to moms for helping me haha.
Anyways. I carefully put the new headliner in and had to run custom wiring. Ran it through the rear c pillar to the trunk. The trunk has a battery behind the wall that separates the rear seats. I connected a invertor to the battery and plugged in the fiber optic starlight ceiling kit to it. Very clean installation and I am so glad it worked out.
Here are some pictures of the final products. Note that the sunroof cover/door grab handles are still grey. The sunroof cover would of been way to hard to remove and I didn't want to screw up the sunroof at all so I left it, a little two tone doesn't hurt! Handles I can change whenever but they look good for now. Don't want to spend more money to buy new handles haha. Maybe after I see my old gray parts.
Now for the pics you have been waiting for
My 2007 S550 with 111K miles. Dealer maintained. Sits on 22" Vossen CV7 Matte Graphite (these rims are amazing).
Anyways. about 1200$ later, I have the most premium upgrade you can get on a s550. All done by myself. Didn't break anything, didn't have to reorder anything. Everything looks like it came off the factory.
Anyone in AZ that's interested, ill hook it up What do you guys think!?
Who FWIW wrote in 1995 : �Science is more than a body of knowledge; it is a way of thinking. I have a foreboding of an America in my children�s or grandchildren�s time�when the United States is a service and information economy; when nearly all the key manufacturing industries have slipped away to other countries; when awesome technological powers are in the hands of a very few, and no one representing the public interest can even grasp the issues; when the people have lost the ability to set their own agendas or knowledgeably question those in authority; when, clutching our crystals and nervously consulting our horoscopes, our critical faculties in decline, unable to distinguish between what feels good and what�s true, we slide, almost without noticing, back into superstition and darkness.�
Mercedes SLR McLaren 722 S Is Extremely Rare Example Modified by McLaren
Slideshow: A one-of-one U.S.-spec Mercedes-Benz SLR McLaren Roadster became even rarer after a factory-backed transformation at McLaren's headquarters.


 You can see in the next picture I start putting the fibers in!
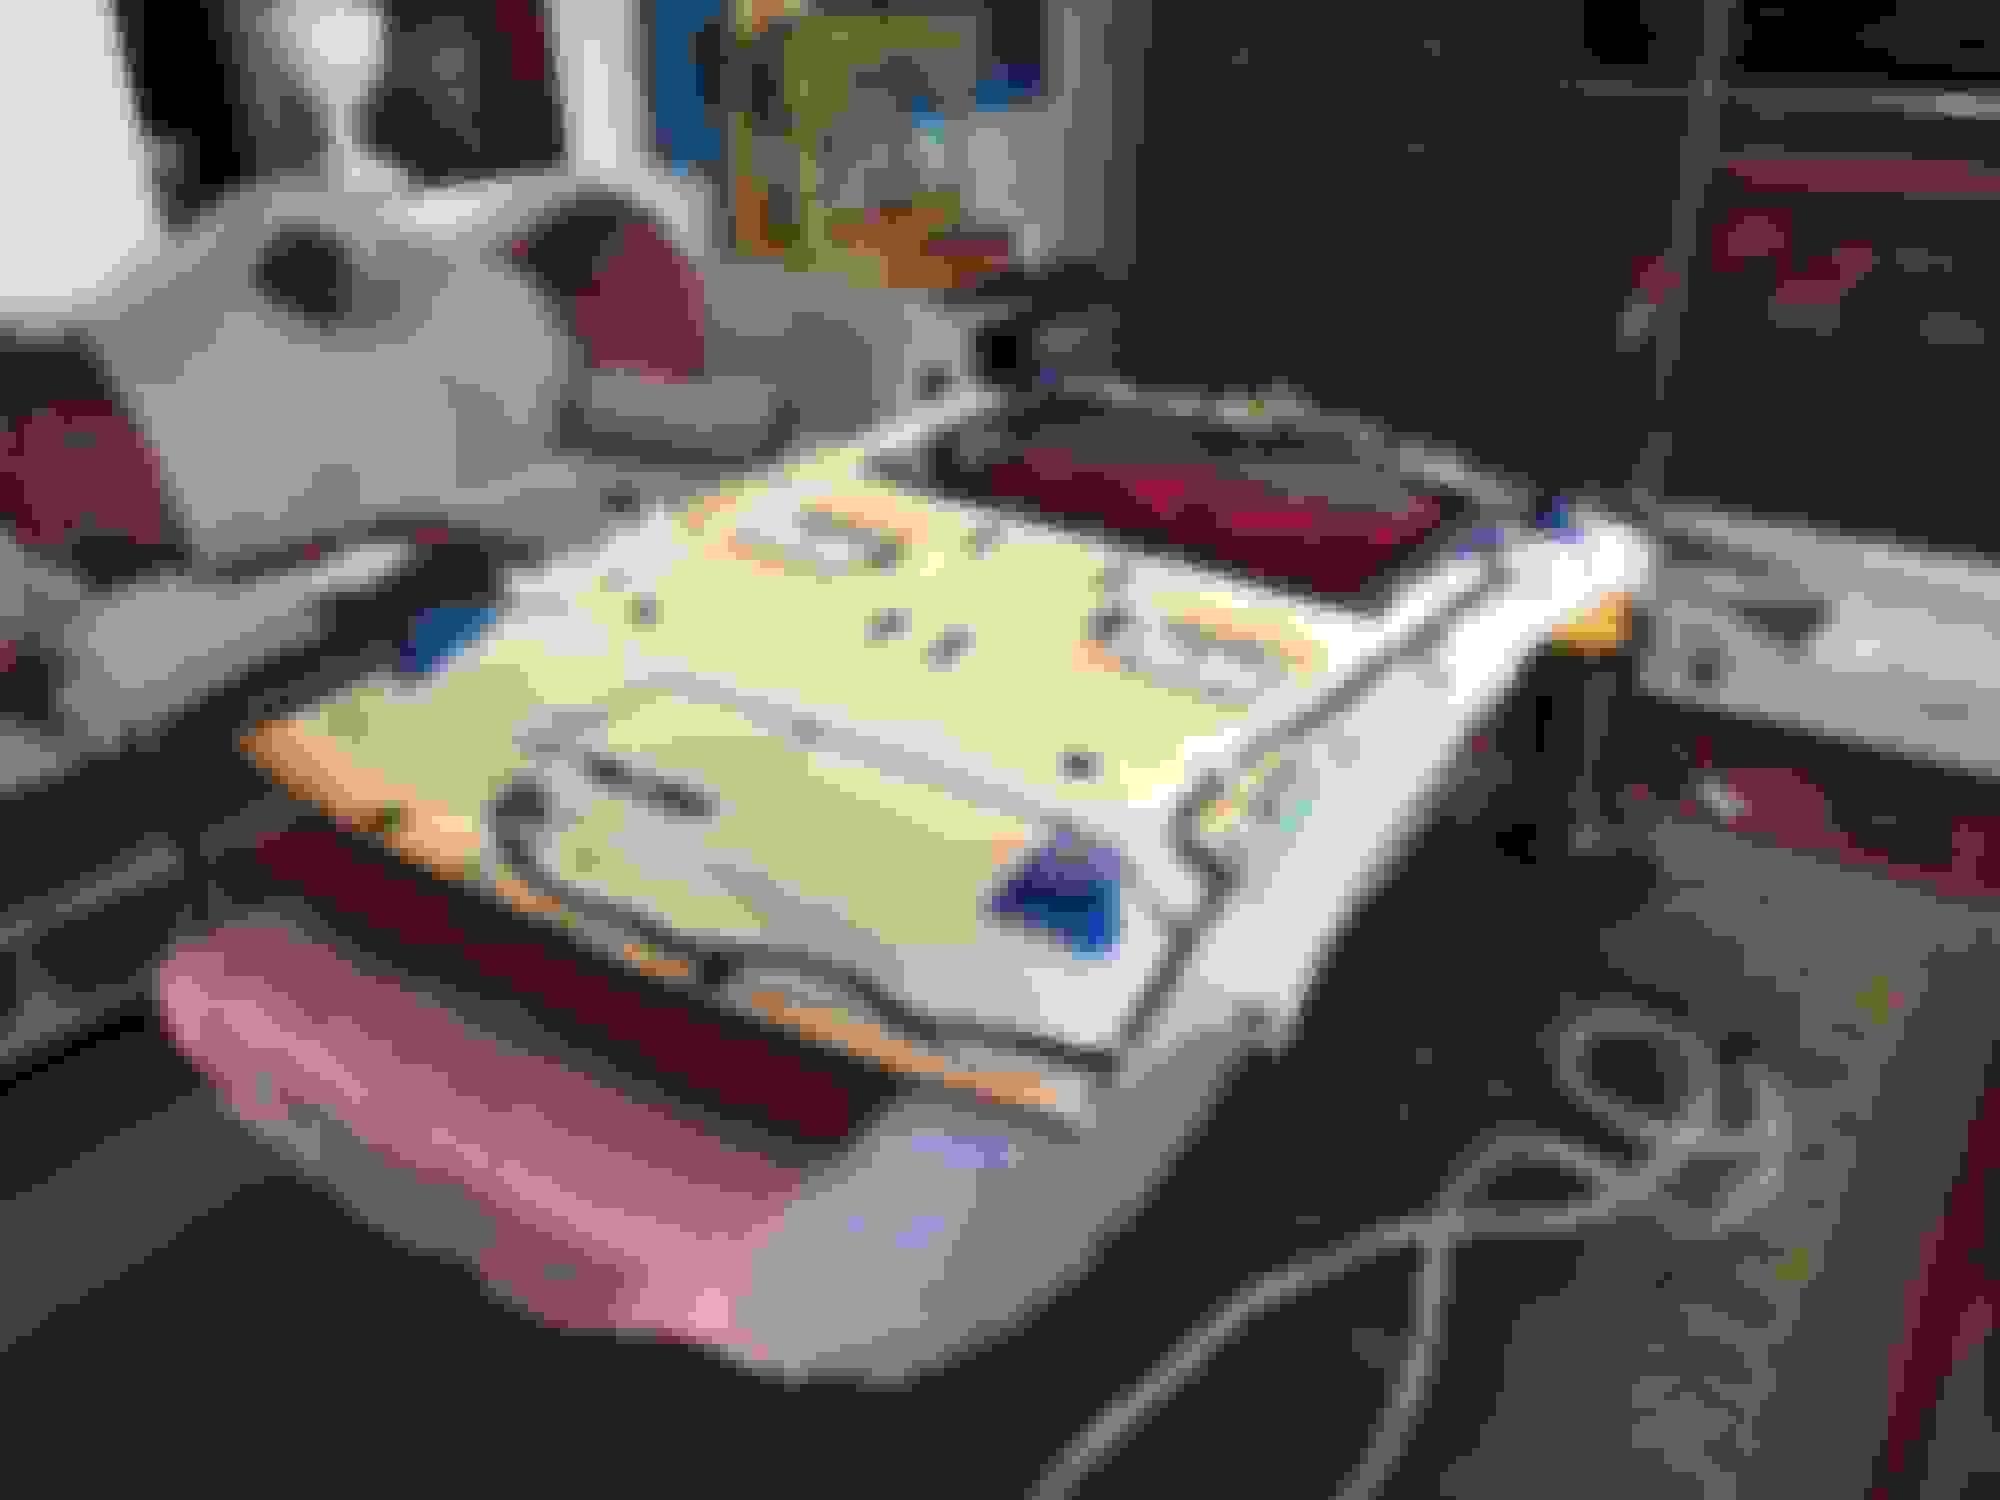


 : �Science is more than a body of knowledge; it is a way of thinking. I have a foreboding of an America in my children�s or grandchildren�s time�when the United States is a service and information economy; when nearly all the key manufacturing industries have slipped away to other countries; when awesome technological powers are in the hands of a very few, and no one representing the public interest can even grasp the issues; when the people have lost the ability to set their own agendas or knowledgeably question those in authority; when, clutching our crystals and nervously consulting our horoscopes, our critical faculties in decline, unable to distinguish between what feels good and what�s true, we slide, almost without noticing, back into superstition and darkness.�


