When you click on links to various merchants on this site and make a purchase, this can result in this site earning a commission. Affiliate programs and affiliations include, but are not limited to, the eBay Partner Network.
It would appear that you will have easier access, and might get away with loosening the bolts on the pump (rather than removing all to move the pump forward enough to get access on SL550). Nonetheless, follow Mr. Rudeny's procedure to ensure this technique has no unintended consequences.
Did you use your VIN when ordering part? It should be good then.
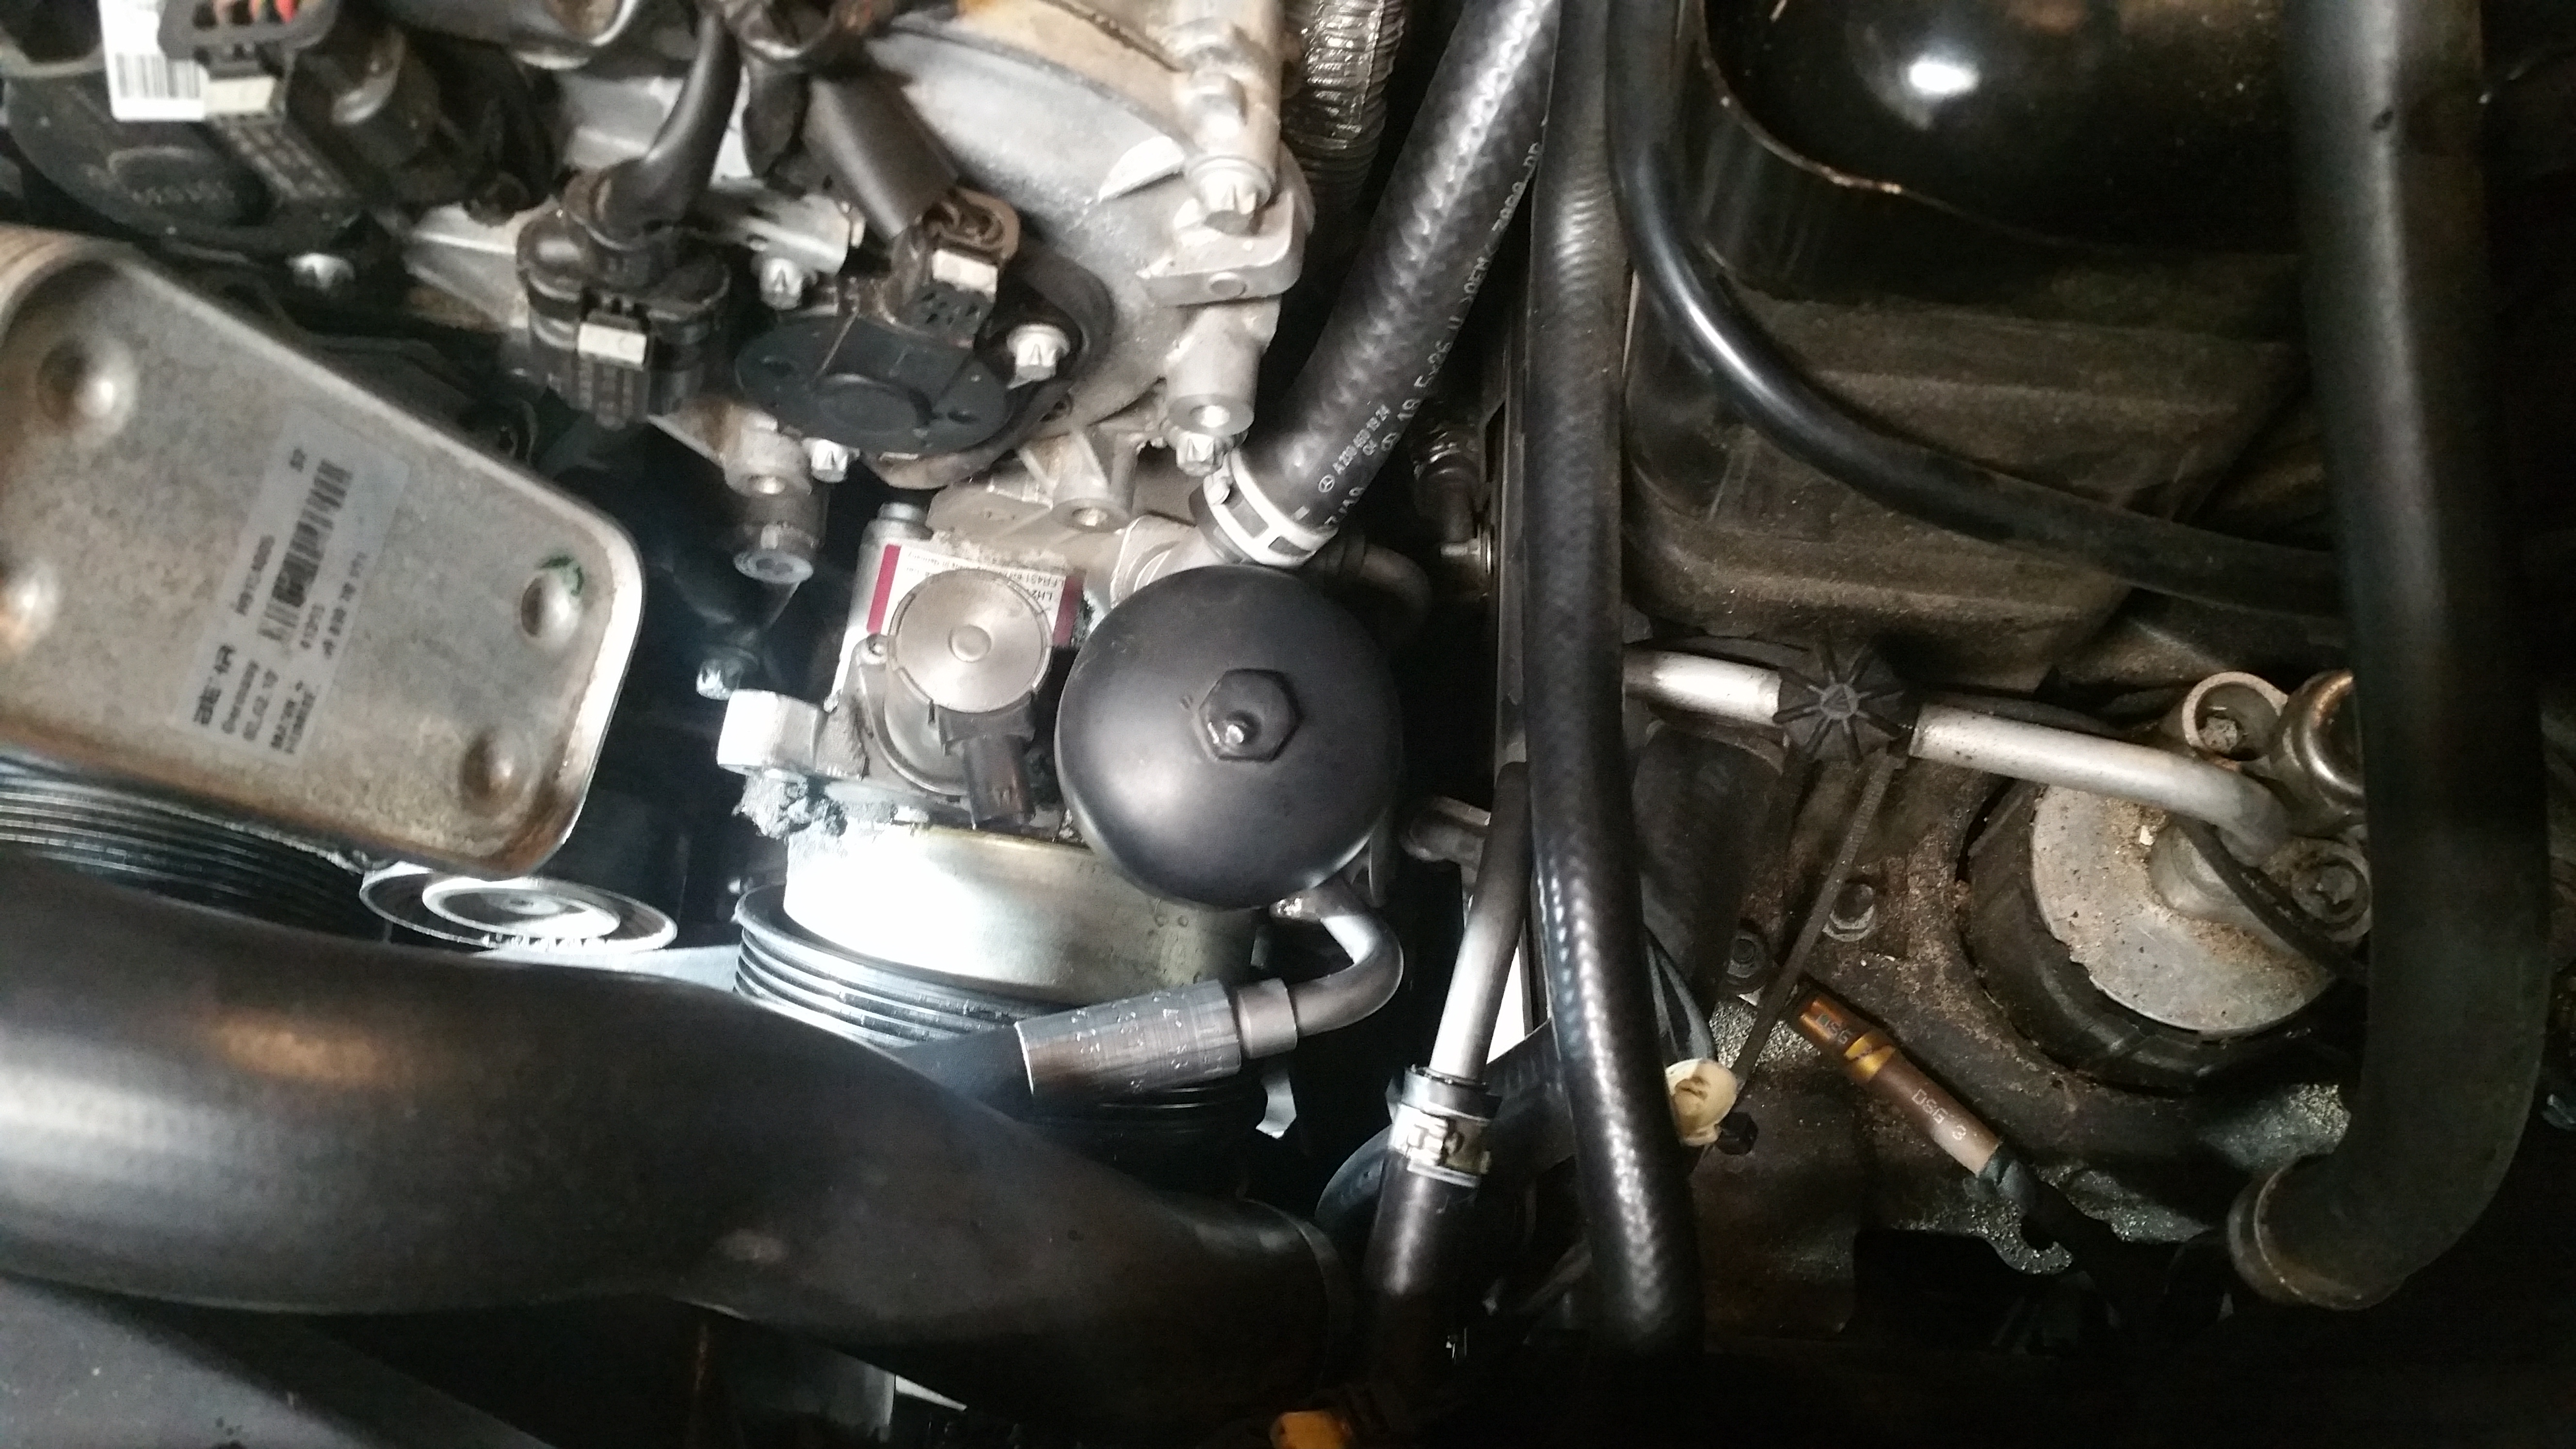
Thanks all! Appreciate the advice. So, for reference, here�s what it looks like in my engine bay. All I think I really have to do is remove the air intake tube and move a couple of lines aside and it�s right there:
Yes, it is easier on the M113 engine. The camshaft adjuster housing on the M273 is in the way and that's why the pump has to be detached and shifted for access on it.
Is anyone able to confirm if this is the right part?
Thanks all, part is waiting at my local dealership and I think I�ll knock it out tonight. I�m hoping I won�t have to move anything and it�ll be essentially changing a light bulb but we will see. I plan to clean the area as Rodney suggested with electrical contact cleaner.
Am I correct in understanding that the dampener is removed & screwed in using a 17mm hex socket on top of the �bulb�?
Alright! So, swapped in the new dampener just now. It was definitely the problem -- I took the car for a quick drive and no noise. Though I can't be sure, I think it also felt a bit smoother on the whole -- I think this part has been failing since before I bought the car and tainting my impression of it!
Some random observations:
-I can follow up on the pictures and speculation above to confirm that this is a comically easy job -- in theory -- on the 2007 and 2008 SL55 AMG. The only thing I needed to actually remove was the air intake tube.
-But the job took me more than an hour! I had the same problem as @MBCO : most of that was me struggling to get the old one loose. It was on there much tighter than anticipated, and my 17mm socket + various extensions and ratchet were going absolutely nowhere -- I could not get enough leverage on it. I found a tire iron and used that to finally get it loose.
-It has a slightly abrupt endpoint when screwing it back on, and I was a little concerned that I had cross-threaded or didn't torque it down correctly. I suppose if I had I'd have discovered as much on my drive.
Thaks for the input, gentlemen.
Just in case anyone's curious, my wife snapped a quick picture during the swap:
Good job! I also think I was getting some vibration from mine before it failed and starting making a loud noise. I came from a CLK550 (same engine/transmission combo) and I always felt more engine vibration through the steering wheel in the SL. Regarding loosening the dampener, I don't recall mine being terribly difficult, but I did break it loose before detaching the pump from the engine block.
I was getting vibration at 1500-2000 RPM (0-50MPH) through steering wheel and footwell. This was after new motor and tranny mounts installed, so I pretty much deduced the Pulsation Dampener as the cause based on Forum posts, etc. Now there is no bad vibration, just good vibes going down the road.
Like i said, I noticed that extra vibration before the dampener failed. It was just sort of a rough feeling in the steering wheel and pedals. I just figured it was due to the ABC pump being so close to the steering column. But when it failed, I was on the freeway and it sounded like the roar of a dump truck with bad tires driving next to me. Since I was the only vehicle on the road, I knew it was my car. I pulled off at a rest stop and checked. At idle, it was not noisy at all, but just a slight increase to even 1,000rpm and it was noticeable. I raised the hood and listened and knew immediately what it was. After replacement, I also noticed much less vibration in the steering column.
A few weeks ago on my way back from Nashville, I began to hear an odd noise from the car. I was running about 90mph and it sounded like the whine you'd expect to hear from the differential in a big dump truck, but there was no dump truck nearby. After varying my speed and engine RPM, I realized it was coming from my car. I made a rest stop and could hear it coming from the engine. It was a sort of a whining/whirring noise, and I could feel some vibration in the steering wheel and pedals. These are pretty much tell-tale symptoms of a failing pulsation dampener. Further testing confirmed it. It won't make any noise until the fluid heats up. A single short drive of 5-10 miles with RPMs kept low would not create any noise, but the moment I revved beyond about 3,000RPM, I'd begin to hear and feel it. Or, after driving a bit and then stopping, I'd then hear the noise on the next drive. My theory is that there is a pinhole in the diaphragm and cold oil is too thick to enter it, but once it heats up, the oil thins and the pinhole expands, and it fills with oil and stops working.
Since my car has the MY2007+ ABC system, the pulsation dampener is mounted directly to the pump. WIS states that the pump must be completely removed for replacement. Part of this is for access, because the dampener is wedged in under the head cover, but also because the dampener is only to be removed with the pump upside down to prevent any contaminates entering the pump. I decided to take my chances and just clean everything thoroughly and remove the dampener after detaching the pump from the engine and sliding it forward. I took one photo (below) of the pump moved forward with easy access to the dampener.
To do this, I had to remove the serpentine belt, the pulley on the pump (to access one of the bolts) and the three bolts holding the pump to the engine. I also unbolted the pressure hose from its bracket to make access easier. The pump was easy to move forward enough for the pulsation damper the be accessed.
Here are the steps I took:
1. Lifted the front end and removed front left wheel (just for easier access for crawling under the car) and the lower engine paneling.
2. Released the belt tensioner from underneath the car and locked it in place with a small screwdriver.
3. Removed the bolt holding the pump bracket to the engine block. I decided to remove the bracket form the block rather then bracket from the pump as access was easier.
4. Back up top, I removed the serpentine belt from the ABC pump and AC compressor.
5. Disconnected the wiring harness from the ABC pump and move it out of the way.
5. Removed the top bolt holding the pump to the engine (actually it bolts onto the timing chain cover).
6. Discovered that even with some of my low-profile tools, I could not get to the lower front bolt without removing the pump pulley.
7. Removed the three bolts holding the pulley to the pump. Note that this would have been easier with the serpentine belt in place to hold the pulley, so do that first!
8. With the pump loose, I could slide it forward just enough so the pulsation dampener was clearly accessible (see photo below).
9. THOROUGHLY cleaned the area on top of the pump and around the dampener. I first hosed it down with a can of electrical contact cleaner. I figured that would be better than engine degreaser as it dries quickly. I used a microfiber cloth wrapped around the dampener and "buffed" it.
10. I replaced the dampener and put everything back together.
11. I found it easier to first install the top front pump bolt without the hose bracket to hold it in place. Then, i was able to get the lower bolt and bracket started, the rear bolt started, and then torque everything down.
12. I was able to hold the pulley with my hand when torquing its bolts.
The torque for the pulley bolts is 30Nm, the pump-to-engine bolts are 20Nm. The pulsation dampener is 45Nm.
Thanks for the excellent write up. In step number 11. You mention you were able to get the Rear bolt started. I noticed you had never mentioned a rear bolt prior in your steps, just a top front and lower front bolt, the latter of which required you to remove the pulley. I recal from a C240 that there was a rear bolt which held in the pump, and I presume there is the same setup. That bolt was a PITA, and had to use very low profile reverse torx socket. Please explain. Thanks
Step 3 is dealing with the rear volt. It attaches to a bracket that then attaches to the block. I found it easier to remove the bracket from the block.
hi, nce write up, strange cant just skrew this ting out is open above it , and it seems like is setup for just unskrew it from top ? did you take and sound clip or video of this wining ?
On the M273 engine, there is not enough clearance to get the dampener around the valve adjuster housing on the front of the valve cover, thus the reason for detaching the pump and sliding it forward. On the M113 of the SL55, you might have clearance. Just keep in mind that the "officially certified MBZ procedure" is to ONLY remove the pulsation dampener when the pump is removed and turned upside down so as to prevent any contaminants from entering the system. When doing it with the opening on the pump facing upwards, you take some risk of getting debris into the system. Personally, I believe it is possible to adequately clean the area and be careful so that it it's a problem.
Sorry I did not take a sounds clip of the noise it made.
Like many of the above contributors my damper is seized. Using a 17mm socket on a 1/2 extension and a breaker bar, the top nut sheared right off the globe. (F#$*!!) Now it looks like I'll have to be removing the entire pump unit in order to get a monkey/pipe wrench on the portion of the globe that is accessible and hope I don't damage any surrounding structures. Not pleased with Mercedes factory torque spec. Kinda reminds me of Honda Crank Bolts. So perhaps someone has a technique for removing 'nutless" globe so I dont have to remove the entire unit from the vehicle. Welding a nut back on there it is not safe could damage pump, cause nitrogen gas to explode, fluid to ignite, etc. Thinking of drilling into top of globe, inserting two rods, and rigging something to torque it off , but worried about contaminants and fragments getting into the pump. I am at a loss.
Hmm, mine was not that tight at all. I think our best bet now is to remove the pump and try various tools with long pull bars to remove the dampener. I'd not drill or weld, but "squeezing" would be acceptable.
And yes, I am familiar with those Honda crank pulley bolts.
Like MBCO, my damper was siezed. The nut on top of the globe sheared off when I attempted to remove it with a brekaer bar. I thought I had to remove the entire pump from the vehicle to monkey wrench it off. I didn't. I Freed up all P/S bolts including bracket to block. Removed the pulley, Rotated it laterally away from midline as much as possible for clearance. Pin the whole unit with a 2x4 block of wood against outer aspect of globe and frame of vehicle. Dremel a 1/8" groove into globe at the front most border. Use 4lb hammer and long chisel or prybar to crack it loose, using the dremeled groove as your point of contact for the chisel. Took a good 12 whacks!! This f'r is on friggin tight. After lose, retighten by hand. Spray area profusely with brake cleaner to clean off all metal shavings and particulates. Remove globe.
Last edited by mobitechaz; 01-28-2020 at 06:22 PM.
Reason: forgot something
Hey Rodney, Just some advice to those who are doing this job for first time. First, remove pulley and mark the pulley alignment if possible, there are numerous holes and the pulley is indexed. Second, the rear attachment bracket is a *****. Its a long metal tube that bolts to the rear lateral aspect of the pump and to the block. The bolt at the pump is near impossible to remove without removing the P/S pressure lines, don't attempt. The bracket/block attachment bolt is your target--but don't think thats easy. Took me an hour to finally figure out how to get it out. Use a 3" extendsion with E12 and from undernearth the vehicle (remove the lower engine cover), reach up with Right hand and insert the E12 with extension onto the Torx bolt and let it rest on the engine mount. With knee pads, I climbed on the engine and with a long flex head 3/8" ratchet with an additional 1" extension, I reached down (at this point my knees are on the plenum and i'm facing toward the left side of vehicle) and reach down in that small space between engine and left frame, and connect the ratchet up to the E12 w/ extension and crank and crank and crank (what a PITA). I could find no other tool or combo of tools because the engine mount shielding is totally obstructing a lower approach. Hope this techique helps those limber DIYers out there. That bolt was the toughest one imho.
Like MBCO, my damper was siezed. The nut on top of the globe sheared off when I attempted to remove it with a brekaer bar. I thought I had to remove the entire pump from the vehicle to monkey wrench it off. I didn't. I Freed up all P/S bolts including bracket to block. Removed the pulley, Rotated it laterally away from midline as much as possible for clearance. Pin the whole unit with a 2x4 block of wood against outer aspect of globe and frame of vehicle. Dremel a 1/8" groove into globe at the front most border. Use 4lb hammer and long chisel or prybar to crack it loose, using the dremeled groove as your point of contact for the chisel. Took a good 12 whacks!! This f'r is on friggin tight. After lose, retighten by hand. Spray area profusely with brake cleaner to clean off all metal shavings and particulates. Remove globe.
I did this job today on 2007 SL550 that belongs to a friend like several other the damper was seized and the regular tools rounded the corners on the Hex.
I replaced the standard 17mm socket for a bolt extractor type (see attached picture) and got it to brake loose with my 20" braker bar.
If you don't have a set of these extractors i recommend to get a set before you get started on this job!
I followed Rodney's write up and apart from finding the damper to be seized it all went smooth.
I recently replaced my 2008 SL550 pulsation damper by removing the top front mount bolt and then just loosening the lower bolt. Removing both front bolts on the ABC pump looks like it gave you much clearer access to the damper, important to keeping ABC fluid uncontaminated. I would use your technique next time.
BTW, my damper was not damaged. Only the o-ring was bad and leaking profusely. I replaced the whole 10-year-old damper anyway. The new damper came with an o-ring. Am i correct in understanding that there is ONLY the single o-ring, and not the o-ring PLUS some sort of hydraulic seal? I read several references to hydraulic seals (i.e, plural) on the damper mount. I never saw evidence of a second seal.
Was your damaged or just srinked/ dryed out little bit ?
Had to register to say thank you Rodney for the write up. Dealer quoted 1100 + parts for the job.
Having just done this on my '12, I would only add:
Definitely loosen the pulley bolts BEFORE removing the belt
Put a mark on the pulley showing the alignment on the pump shaft before it gets shifted around to gain access to the bottom bolt
There are two bolts on the left side of the pump in front, on the back, a bolt into the block on the bracket and a 13 mm nut that need to be removed.
A 3/8" universal attached to the E14 socket and a 16" extension make really short work of the rear bracket bolt on the block
The 13 mm nut is by feel only, its above the AC compressor on the backside of the pump at the bottom of it
Other than that, I cannot believe the difference that part makes. I swear, in the half dozen SLs I test drove before I bought mine, they all had that rumble, and I thought it was normal.
had a lock at my 2007 SL55AMG , looks like its easy get to this damper, seems like 550 is worse

 10-17-2019, 03:29 PM